Docker(Windows)でROS2 Humbleを扱えるようにする
はじめに
ROS2はWindows上に直接構築することもできるが,やはりLinuxで動かしたい.Foxyについて一度だけWindowsに直接構築したが,使いにくい印象を受けた.また,環境構築も大変であった記憶がある.
今回は,ROS2にもLTS(Long-Term Support)が登場したということで,Ubuntu22.04上にROS2 Humbleを構築していきたい.ただ,UbuntuホストにするPCの余りもなく,かといって仮想環境だとGPU使いたいときに困るかもしれないので,今回は,以前の記事を参考にDocker(ホスト:Windows10 Home)上で構築していく.
Docker Hubでベースを探す
GPU使えるようにしたいなという思いから,Nvidiaが提供するUbuntuイメージファイルにUbunut22.04が無いか調べる.
- Docker Hubにアクセス
- nvidia/cudaと検索
- TagsのところでUbuntu22.04と検索
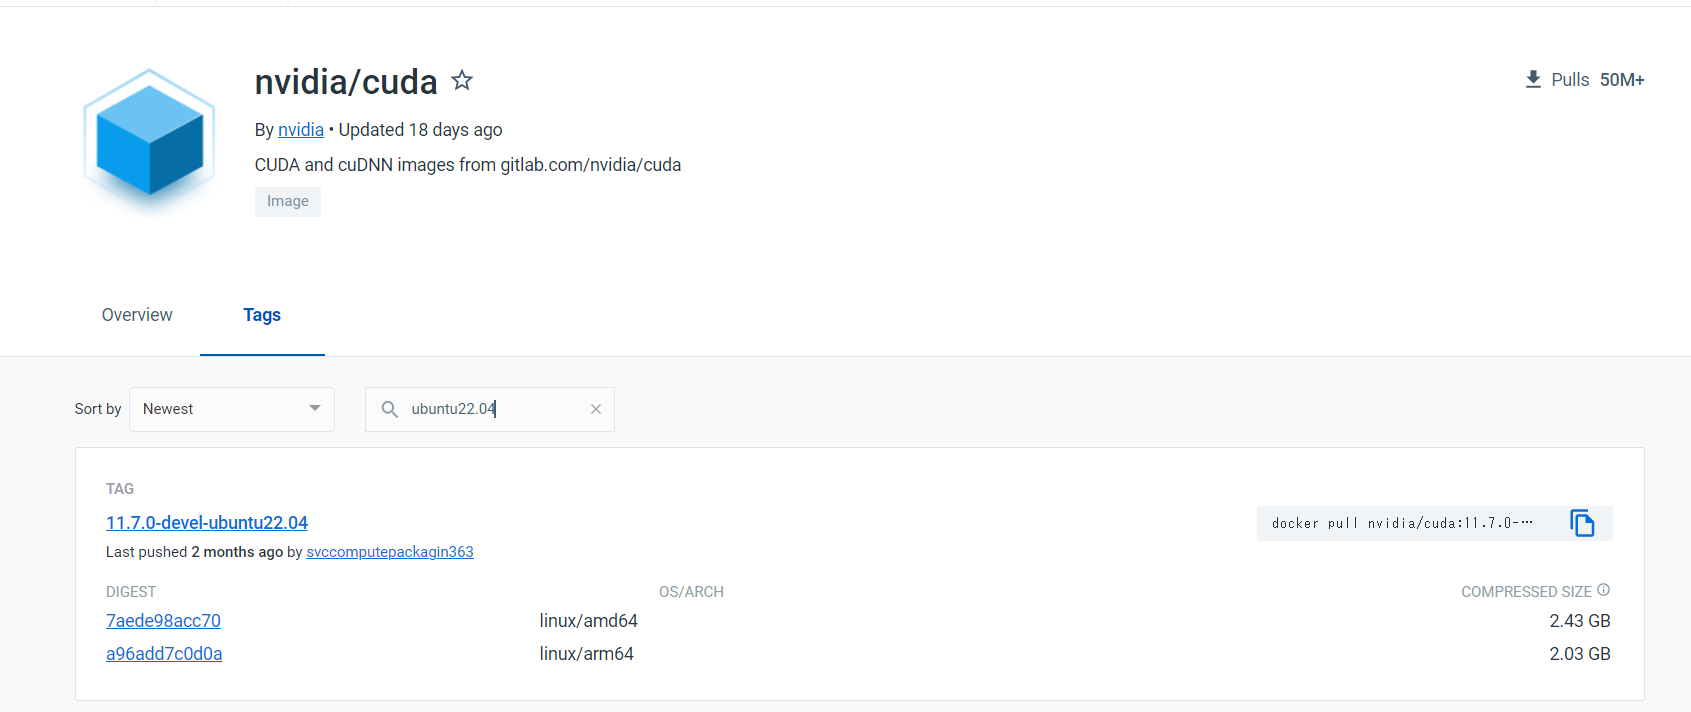
今回はこれを使うこととする.
ROS2 Humbleの構築手順の確認
ROS2 Humbleのインストールについては,@porizou1さんの記事をそのまま引用する形となる.
ただ,Docker imageでエラーも避けながら,簡単にインストールできるように,シェルスクリプトを作成しておく.※Dockerfileと同じディレクトリに置いておく.
#!/bin/bash -e

# ------------ apt-getリポジトリの追加
apt-get install curl gnupg lsb-release -y
curl -sSL https://raw.githubusercontent.com/ros/rosdistro/master/ros.key -o /usr/share/keyrings/ros-archive-keyring.gpg

# ------------ リポジトリをsource listに追加
echo "deb [arch=$(dpkg --print-architecture) signed-by=/usr/share/keyrings/ros-archive-keyring.gpg] http://packages.ros.org/ros2/ubuntu $(source /etc/os-release && echo $UBUNTU_CODENAME) main" | tee /etc/apt/sources.list.d/ros2.list > /dev/null

# ------------ ROS2インストール
apt-get update
apt-get install ros-humble-desktop -y

# ------------ 環境設定
echo "source /opt/ros/humble/setup.bash" >> ~/.bashrc

# ------------ ワークスペースの作成
apt-get install python3-colcon-common-extensions -y
mkdir -p ~/ros2_ws/src
cd ~/ros2_ws/ && colcon build

# ------------ Gazeboのインストール
apt-get install gazebo -y
apt-get install ros-humble-gazebo-* -y

# ------------ 環境設定を反映
source ~/.bashrc
Docker Imageの作成
# ------------ ベースとなるイメージファイル
FROM nvidia/cuda:11.7.0-devel-ubuntu22.04

# ------------ 環境設定
ENV LIBRARY_PATH /usr/local/cuda/lib64/stubs
ENV DISPLAY host.docker.internal:0.0
ENV DEBIAN_FRONTEND=noninteractive

# ------------ タイムゾーンの設定
RUN apt-get update && apt-get install -y tzdata
ENV TZ=Asia/Tokyo

# ------------ ワークディレクトリの設定
WORKDIR /root

# ------------ Ubuntu上での環境構築
RUN apt-get update && apt-get upgrade -y
RUN apt-get install -y python3 python3-pip

# windows上でx-serverに接続するために必要なx11-appsのインストール
RUN apt-get install x11-apps -y

# gitのインストール(20.04以降はデフォルトでインストールされていない)
RUN apt-get install git -y

# matplotlibなどでの描画GUIに必要
RUN apt-get install python3-tk -y

# PyTorchのためのライブラリをインストール
RUN pip3 install torch torchvision

# ------------ ROS2のセットアップ
COPY setup.sh /root/
RUN bash ~/setup.sh
コンテナの立ち上げ
ディレクトリ構成
ここでディレクトリ構成について示しておく.以下にtree /fの結果を示す.
D:.
  Dockerfile
  setup.sh
立ち上げ
今回は,以前の記事を参考にVScode上でremote Containerを使って立ち上げている.
Docker Imageからコンテナを作成して立ち上げていくわけだが,初回は様々なものをインストールする関係から,割と時間がかかることが予想される.(とりあえず放っておくといつか終わるはず)
JSONファイル
一度立ち上げると.devcontainer/devcontainer.jsonが生成される.
それはVScode上でremote containerを使って立ち上げる際の設定を記述するファイルである.
以下に最低限のjsonファイルを示しておく.
devcontainer.json
// For format details, see https://aka.ms/devcontainer.json. For config options, see the README at:
// https://github.com/microsoft/vscode-dev-containers/tree/v0.224.3/containers/docker-existing-dockerfile
{
	"name": "Existing Dockerfile",

	// Sets the run context to one level up instead of the .devcontainer folder.
	"context": "..",

	// Update the 'dockerFile' property if you aren't using the standard 'Dockerfile' filename.
	"dockerFile": "../Dockerfile",

	// Set *default* container specific settings.json values on container create.
	"settings": {},

	// Add the IDs of extensions you want installed when the container is created.
	"extensions": [
		"ms-python.python",
		"ms-python.vscode-pylance"
	],

	"workspaceFolder": "/root/",

	"mounts": [
		"source=${localWorkspaceFolder}/share,target=/root/share,type=bind",
	],
	// Use 'forwardPorts' to make a list of ports inside the container available locally.
	// "forwardPorts": [],

	// Uncomment the next line to run commands after the container is created - for example installing curl.
	// "postCreateCommand": "apt-get update && apt-get install -y curl",

	// Uncomment when using a ptrace-based debugger like C++, Go, and Rust
	"runArgs": ["--gpus=all"],

	// Uncomment to use the Docker CLI from inside the container. See https://aka.ms/vscode-remote/samples/docker-from-docker.
	// "mounts": ["source=../src/,target=/root/src,type=bind"],
	// "mounts": [ "source=../src,target=/root/src,type=bind" ],

	// Uncomment to connect as a non-root user if you've added one. See https://aka.ms/vscode-remote/containers/non-root.
	// "remoteUser": "vscode"
}
jsonファイルのmountsというタグについては設定しなくてもよいが,ローカルとコンテナ間でのファイルのやり取り口となっている.Dockerfileを置いているディレクトリにshareというフォルダを作っておいて,そのshareフォルダとコンテナ内の/root/shareというところを結ぶという設定にしている.
この時のディレクトリ構成について以下に示す.
D:.
│  Dockerfile
│  setup.sh
│
├─.devcontainer
│      devcontainer.json
│
└─share
環境のテスト
talker & listener
コマンド
ros2 run demo_nodes_cpp talker
ros2 run demo_nodes_cpp listener
結果

Rvizの立ち上げ
※GUIを必要とするものを扱うときは,Xserverを立ち上げておく必要がある.
(Windowsだと,Xlaunchが一番簡単だと思う.)
以下の記事にXlaunchのインストールと立ち上げ方について記述している.
コマンド
ros2 run rviz2 rviz2
結果

Gazeboの立ち上げ
コマンド
ros2 launch gazebo_ros gazebo.launch.py
結果

感想
NvidiaがUbuntu22.04のDocker imageを提供してくれていたおかげで,大きくつまづくこともなく,簡単にGPUも使えるROS2 Humble環境をDocker上に構築することができた.GPUの確認はPythonのインタラクティブシェルにて確認できた.
>> import torch
>> torch.cuda.is_available()
True
ROSは勉強してきたが,ROS2は触れる程度しかまだできていないため,この環境構築を機に,少しずつROS2も自在に扱えるようにしていきたい.
参考文献