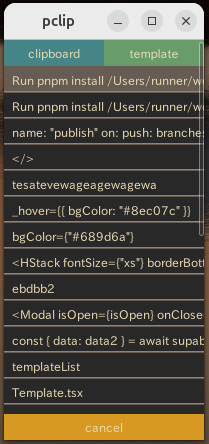
メインのマシンはUbuntuなのですが、仕事上Windowsを使うこともあります。家ではMacbookAirを使うときも。仕事でLinux操作中にWindowsの端末とクリップボードを同期したいな、という思いがありました。
先に書いておくと、つくったソフトは公開しません。簡単につくれるので、皆が遊びでつくってみたいな、と思ったときの手引きとしてこの記事を書いています。
完成したものは以下。
どういう技術スタックでつくるのか
tauri + Reactで作成しました。electronは、どうしてもファイルサイズが嵩むのが嫌でした。あと仕事でelectronは使っているので、tauriで遊ぼうという気持ちでつくっています。ReactかSvelteかは悩みましたが、自分が慣れ親しんでいるReactにしました。ElectronならSvelteでつくったかもしれません(単純にSvelteを学び直しながらtauriも勉強するのが面倒くさかった)。
どういう仕組みでクリップボードを同期するか
1秒ごとに現在のクリップボードを確認し、前回と異なっていた場合にDBへ突っ込みます。今回、DBはsupabaseを使用しました。理由はフロントエンドから非常に簡単にアクセスできるからです。また、1秒ごとに監視する部分はReact内でsetIntervalを使用することによって書かれています。
もともと、OSごとにNativeなAPIにアクセスしてクリップボードが変更されたイベントを検知しようか、と考えていました。しかし、OSごとの処理を考えるのが面倒くさいのでやめました。次にRust側でクリップボードを1秒ごとに監視しようかと思いましたが、そもそも、そこまで重い処理ではないだろうし、結局取得したデータをsupabaseに投げる部分がReact側になるので、最終的にはReact側でクリップボードを監視することにしました。ここでちょっと重いようならRust側で書こうと考えていましたが、いまのところCPU使用率もメモリ使用量も少ないです。
機能について
Ctrl(Macはcommand)+Shift+Vでソフトがマウスの位置に表示されます。そこで選択したテキストが現在のクリップボードに入ります。あとはtemplateという、いわゆる定型文の機能もあります。一般的なクリップボード拡張ツールですが、インストールしている全端末でクリップボードが共有できるのが特徴です。おそらく探せば世の中にはあると思いますが、自前のDBに保存されているので非常にセキュアだと言えます。あとはデザインでしょうか。自分好みのデザインでつくれるので、そこが気に入ってます。
作り方
それでは実際に作り方を簡単に説明していきます。
Polling
クリップボードを監視して、変更があるかどうかを検知します。
import { useInterval } from "@chakra-ui/react";
import { readText } from "@tauri-apps/api/clipboard";
import { useAtomValue } from "jotai";
import { useState } from "react";
import { supabase } from "../../utils/supabase";
import { clipboardListAtom } from "../Clipboard/stores/clipboardStore";

export const Polling = () => {
	const [prev, setPrev] = useState("");
	const clipboardList = useAtomValue(clipboardListAtom);
	useInterval(() => {
		const polling = async () => {
			const clipboard = await readText();
			const clipboardListTextList = clipboardList.map((c) => c.text);
			if (
				clipboard !== prev &&
				clipboard !== null &&
				clipboardListTextList.includes(clipboard) === false
			) {
				await supabase.from("clipboard_histroy").insert({
					text: clipboard,
					user_id: "test-user-id",
				});
				setPrev(clipboard);
			}
		};
		polling();
	}, 1000);

	useInterval(
		() => {
			// 10分に1回、clipboardの件数が100件を超えたら古いデータを削除する
			const del = async () => {
				const { data, error } = await supabase
					.from("clipboard_histroy")
					.select("id")
					.order("created_at", { ascending: true })
					.range(100, 1000);
				if (error) {
					console.error(error);
					return;
				}
				if (data) {
					const ids = data.map((d) => d.id);
					await supabase.from("clipboard_histroy").delete().in("id", ids);
				}
			};
			del();
		},
		1000 * 60 * 10,
	);

	return null;
};
useIntervalで1秒毎にtauriのclipboard, readText関数を呼び出しています。そして前回と異なる場合にsupabaseへ入れています。もう少し複雑なプログラムになりそうであればTanstack Queryなどを使用したかと思いますが、どうせクリップボードと定型文だけなのでjotaiで管理することにしました。
GlobalShortcut
次はGlobalShortcut、つまりどのキーを押したらソフトがマウスの位置に表示されるのか、という部分です。
import { invoke } from "@tauri-apps/api";
import { isRegistered, register } from "@tauri-apps/api/globalShortcut";
import { LogicalPosition, appWindow } from "@tauri-apps/api/window";
import { useSetAtom } from "jotai";
import { useEffect } from "react";
import { supabase } from "../../utils/supabase";
import { clipboardListAtom } from "../Clipboard/stores/clipboardStore";
import { templateAtom } from "../Template/stores/templateStore";

export const GlobalShortcut = () => {
	const setClipboard = useSetAtom(clipboardListAtom);
	const setTemplate = useSetAtom(templateAtom);
	useEffect(() => {
		const init = async () => {
			const { data } = await supabase
				.from("clipboard_histroy")
				.select("*")
				.order("created_at", { ascending: false })
				.limit(30);
			if (data) {
				setClipboard(data);
			}
			const { data: data2 } = await supabase
				.from("template")
				.select("*")
				.order("created_at", { ascending: false })
				.limit(30);
			if (data2) {
				setTemplate(data2);
			}
		};
		const asfn = async () => {
			const isRegist = await isRegistered("CommandOrControl+Shift+v");
			if (isRegist) return;
			await register("CommandOrControl+Shift+v", async () => {
				const cursorPosition = (await invoke("get_cursor_position")) as {
					x: number;
					y: number;
				};
				await appWindow.show();
				await appWindow.setFocus();
				await appWindow.setAlwaysOnTop(true);
				await appWindow.setPosition(
					new LogicalPosition(cursorPosition.x, cursorPosition.y),
				);
				const { data } = await supabase
					.from("clipboard_histroy")
					.select("*")
					.order("created_at", { ascending: false })
					.limit(30);
				if (data) {
					setClipboard(data);
				}

				const { data: data2 } = await supabase
					.from("template")
					.select("*")
					.order("created_at", { ascending: false })
					.limit(30);
				if (data2) {
					setTemplate(data2);
				}
			});
		};
		asfn();
		init();
	}, [setClipboard, setTemplate]);
	return null;
};
仕事で使うソフトではないので、data2とか変数名横着していますが……。簡単に解説すると、tauriのregisterという関数で、あるキーの組み合わせが押されたときに処理が開始されます。そこで現在のカーソル位置を取得し、隠されていたappWindowが表示されるという処理になっています。ついでにその瞬間にsupabaseから最新のクリップボードを取得します。Tanstack Queryなどを使用するときは、focus時にrefetcとしてあげたら楽だと思います。invokeで呼んでいるrust側のプログラムは以下。
use mouse_position::mouse_position::Mouse;
use serde::{Deserialize, Serialize};

#[derive(Serialize, Deserialize)]
struct CursorPosition {
    x: i32,
    y: i32,
}

#[tauri::command]
fn get_cursor_position() -> CursorPosition {
    let m = Mouse::get_mouse_position();
    match m {
        Mouse::Position { x, y } => CursorPosition { x, y },
        Mouse::Error => CursorPosition { x: 0, y: 0 },
    }
}
mouse_positionというcrateがあったので、それをそのまま使っています。今回のソフトでrustを書いたのはこの箇所だけです。globalShortcutやwindowを使用するときはtauri.conf.jsonを編集する必要があるところは注意です。
クリップボードに入れる処理
さっきのreadTextと同じようにwriteTextという関数があるので、button click時に呼んであげるだけです。
const onClickHandler = async (text: string) => {
	await writeText(text);
	await appWindow.hide();
};
クロスプラットフォームビルド
全OSのマシーンを持っているので各端末でビルドしてもいいのですが、便利なGithubActionがあるのでそれを使います。
name: "publish"

on:
  push:
    branches:
      - release

# This workflow will trigger on each push to the `release` branch to create or update a GitHub release, build your app, and upload the artifacts to the release.

jobs:
  publish-tauri:
    permissions:
      contents: write
    strategy:
      fail-fast: false
      matrix:
        include:
          - platform: "macos-latest" # for Arm based macs (M1 and above).
            args: "--target aarch64-apple-darwin"
          - platform: "macos-latest" # for Intel based macs.
            args: "--target x86_64-apple-darwin"
          - platform: "ubuntu-22.04" # for Tauri v1 you could replace this with ubuntu-20.04.
            args: ""
          - platform: "windows-latest"
            args: ""

    runs-on: ${{ matrix.platform }}
    steps:
      - uses: actions/checkout@v4

      - name: setup node
        uses: actions/setup-node@v4
        with:
          node-version: lts/*

      - name: install Rust stable
        uses: dtolnay/rust-toolchain@stable
        with:
          # Those targets are only used on macos runners so it's in an `if` to slightly speed up windows and linux builds.
          targets: ${{ matrix.platform == 'macos-latest' && 'aarch64-apple-darwin,x86_64-apple-darwin' || '' }}

      - name: install dependencies (ubuntu only)
        if: matrix.platform == 'ubuntu-22.04' # This must match the platform value defined above.
        run: |
          sudo apt-get update
          sudo apt-get install -y libwebkit2gtk-4.0-dev libwebkit2gtk-4.1-dev libappindicator3-dev librsvg2-dev patchelf
        # webkitgtk 4.0 is for Tauri v1 - webkitgtk 4.1 is for Tauri v2.
        # You can remove the one that doesn't apply to your app to speed up the workflow a bit.

      - name: install pnpm
        run: npm install -g pnpm

      - name: install frontend dependencies
        run: pnpm install # change this to npm, pnpm or bun depending on which one you use.

      - uses: tauri-apps/tauri-action@v0
        env:
          GITHUB_TOKEN: ${{ secrets.GITHUB_TOKEN }}
        with:
          tagName: app-v__VERSION__ # the action automatically replaces \_\_VERSION\_\_ with the app version.
          releaseName: "App v__VERSION__"
          releaseBody: "See the assets to download this version and install."
          releaseDraft: true
          prerelease: false
          args: ${{ matrix.args }}
これでreleaseブランチにpushする度、自動的にWindows, Linux, Macでアプリをビルドしてくれます。便利。
作成にかかった時間は、tauriのdocumentを全部ざっと読むのを含めて、およそ5時間くらいでしょうか。これくらいの規模のソフトなら、週末の趣味のプログラミングとしては最適だと思います。新人研修とかにも良いかも。

