Amazon SageMakerとは
ノートブックに書いた機械学習モデルをそのままデプロイしてホスティングできるサービスです。
トレーニングとホスティングは、分ごとの使用量で課金されます。最低料金や前払いの義務はありません。
SageMakerを使用するメリットしては、環境構築の手間が省けるのと作成したモデルをエンドポイントとして簡単に利用できることがあげられます。
事前に提供される環境としては、tensorflowやxgboost勾配木をはじめ各種アルゴリズムが用意されています。
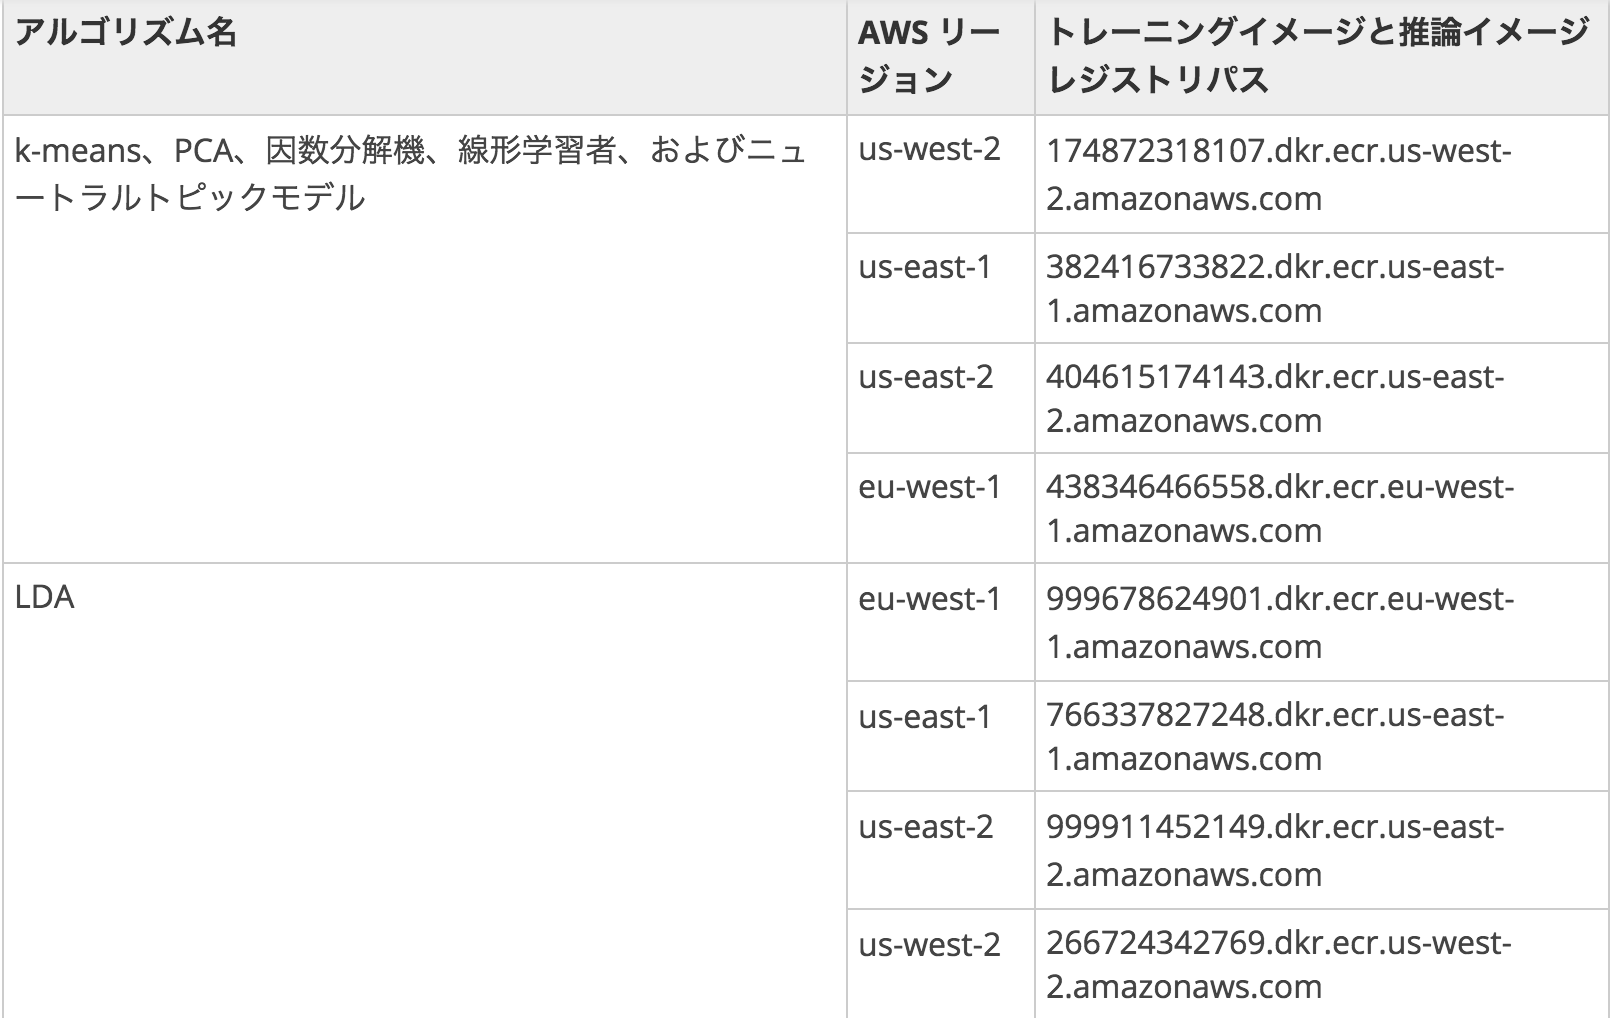
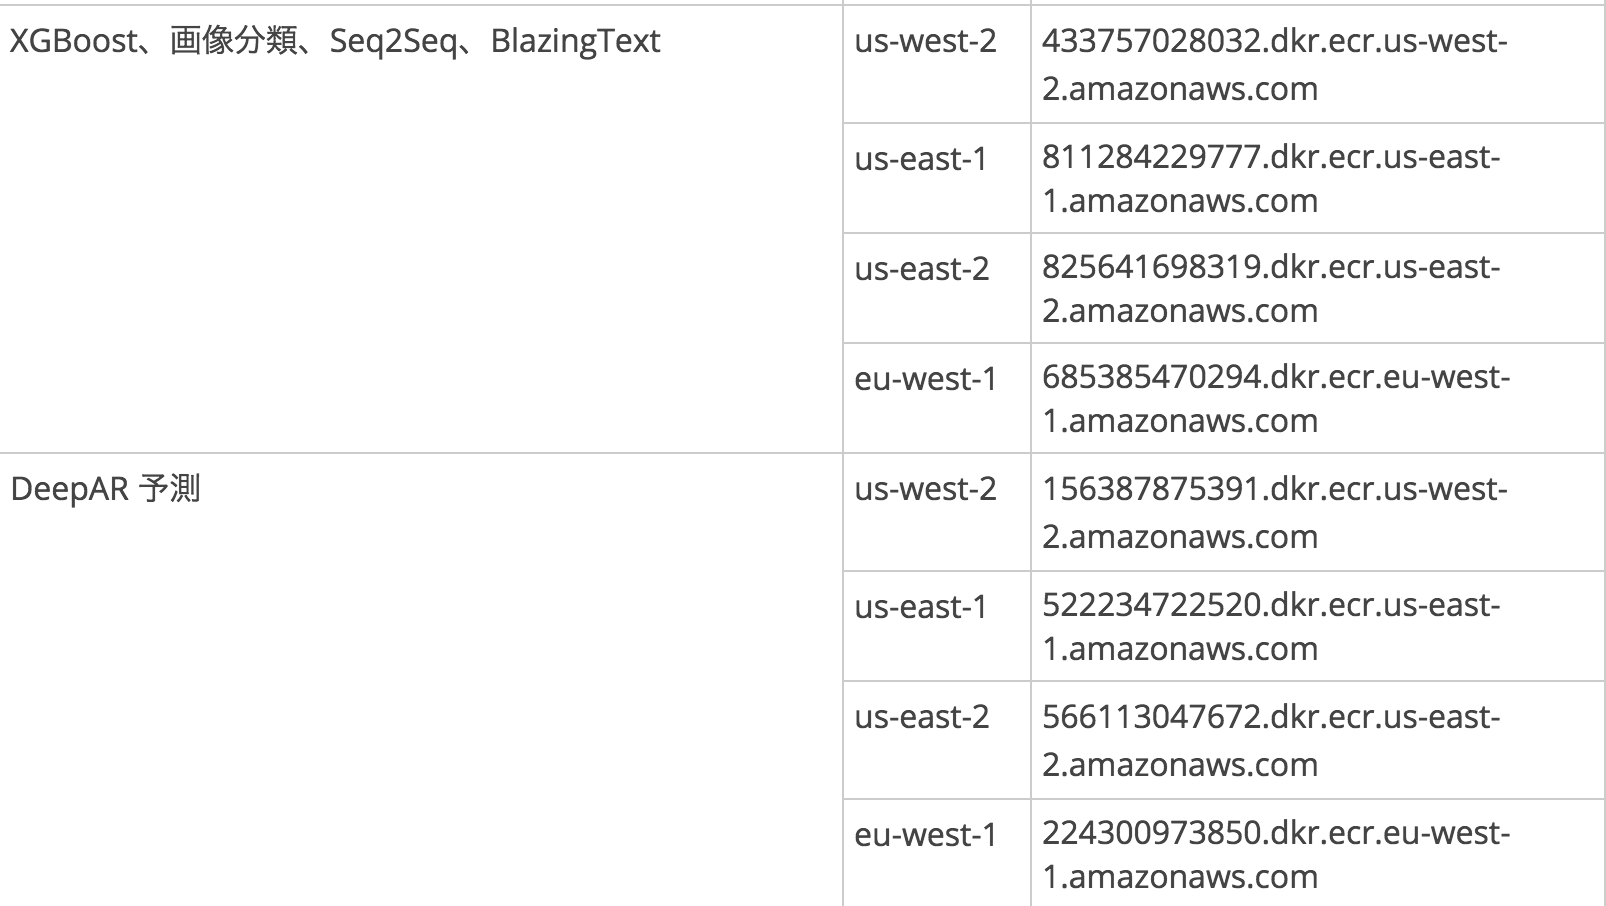
(参考) https://docs.aws.amazon.com/ja_jp/sagemaker/latest/dg/sagemaker-algo-docker-registry-paths.html
料金体制について
SageMakerにはノートブック, モデル学習, デプロイの3つの別々のインスタンスが存在する。
一般的によく使用するインスタンスの料金体制は以下のようになります。
ノートブックのインスタンス: t2.medium 0.0464 USD
モデル学習のインスタンス: m4.xlarge 0.28 USD
デプロイのインスタンス:m4.xlarge 0.28 USD
組み込みアルゴリズムについて
SageMakerでは以下の組み込みアルゴリズムが環境構築不要で使うことができます。


今のところトレーニングイメージのリージョンで東京を指定することができないので、リージョンを全てusかeuにあわせて利用するか、自分でDockerのイメージ構築し独自アルゴリズムを使用する2つの方法があります。最初は後者でやろうとしましたが挫折してしまったので、とりあえず今は前者の手順を説明したいと思います。
利用する手順
今回は、taitanicデータを用いてモデルを構築、デプロイまでを説明します。
Amazon S3にバケットを作る。
学習データや結果を格納するためのバケットを作ります。作成する際にバケットが存在するリージョンが選択できます。今回はSageMakerの組み込みアルゴリズムを使いたいので、上述の通りus-west-2にリージョンを指定します。
バケットができたら、testというフォルダを作成しその下にtrain.csvというデータセットを置きます。
ノートブックインスタンスの作成
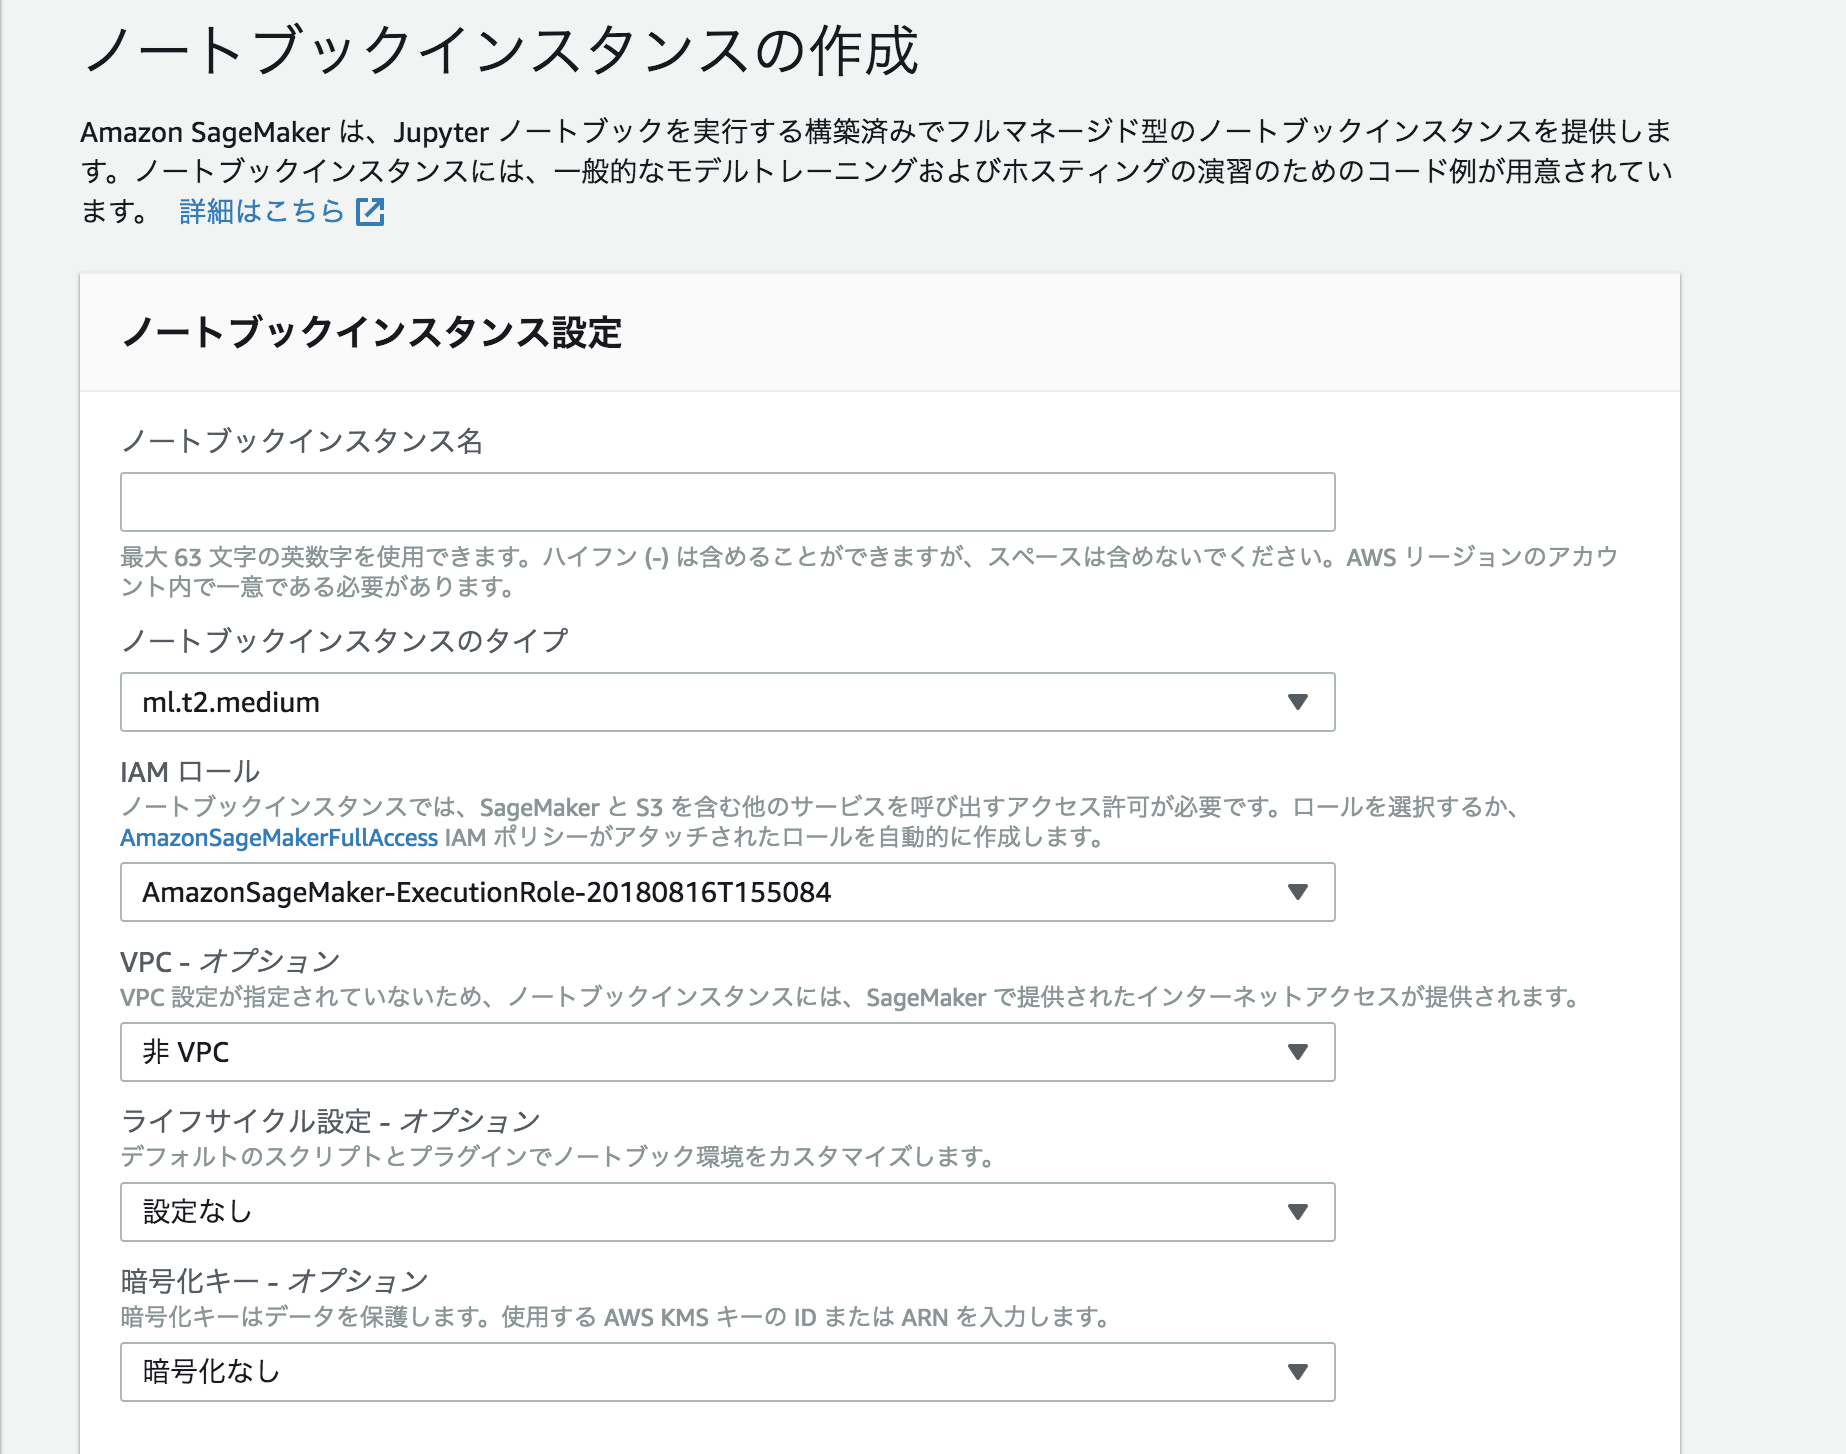
Amazon SageMakerコンソールから作成します。ノートブックインスタンス名は任意の名前で良いですが、IAMロールの選択で、AmazonSageMaker-ExecutionPolicy, AmazonSageMakerFullAccess, AmazonEC2ContainerRegistryFullAccessの3つの権限がロールに付与されていることを確認してください。

しばらくしたら、自動でノートブックインスタンスが立ち上がります、今回はconda_python3を選択しipynb形式のファイルを作成します。
モデルの学習
必要なライブラリ等をimportします。
bucketは先ほど作成したバケットの名前を
prefixは、学習したファイルをアップロードする場所を指定します。
import os
import boto3
import time
import re
from sagemaker import get_execution_role
import numpy as np                                # For matrix operations and numerical processing
import pandas as pd                               # For munging tabular data
import sklearn as sk                              # For access to a variety of machine learning models
from time import gmtime, strftime                 # For labeling SageMaker models, endpoints, etc.
import sys                                        # For writing outputs to notebook
import math                                       # For ceiling function
import json                                       # For parsing hosting output
import io                                         # For working with stream data
import sagemaker.amazon.common as smac            # For protobuf data format

role = get_execution_role()

# Now let's define the S3 bucket we'll used for the remainder of this example.

bucket ='#######'#  enter your s3 bucket where you will copy data and model artificats
prefix = 'sagemaker/taitanic'  # place to upload training files within the bucket
データの読み込みと前処理を行います。
keyは、学習データがあるs3上でのパスを書きます。
入力データを学習で利用する際に必要な形式に変換するための仕組みは, SageMakerには用意されていないので
notebookに直接書いていきます
s3 = boto3.client("s3")

key='test/train.csv'
# bucketとkeyを指定する
response = s3.get_object(Bucket=bucket, Key=key)
data = pd.read_csv(io.StringIO(response['Body'].read().decode('utf-8')))

dummies_port = pd.get_dummies(data['Embarked'])
data = pd.concat([data, dummies_port], axis=1)
data = data.drop('Embarked', axis=1)
data = data.drop(['Cabin','Name','Ticket','PassengerId'], axis=1)
dummies_sex = pd.get_dummies(data['Sex'])
data = pd.concat([data, dummies_sex], axis=1)
data = data.drop('Sex', axis=1)
data = data.fillna(data.median())
data = data.dropna()
data.head()
トレーニングデータ, 検証データ, テストデータに分割してそれぞれS3のバケットにアップロードします
train_data, validation_data, test_data = np.split(data.sample(frac=1, random_state=1729), [int(0.7 * len(data)), int(0.9 * len(data))])
# CSVにしてS3へアップロード
buf = io.BytesIO()
smac.write_numpy_to_dense_tensor(buf, np.array(train_data.drop(['Survived'], axis=1).values()) \
                                 .astype('float32'), np.array(train_data['Survived'].values()).astype('float32'))
buf.seek(0)
boto3.resource('s3').Bucket(bucket).Object(os.path.join(prefix, 'train', 'train.csv')).upload_fileobj(buf)
s3_train_data = 's3://{}/{}/train/{}'.format(bucket, prefix, 'train.csv')
buf = io.BytesIO()
smac.write_numpy_to_dense_tensor(buf, np.array(validation_data.drop(['Survived'], axis=1).values()) \
                                 .astype('float32'), np.array(validation_data['Survived'].values()).astype('float32'))
buf.seek(0)
boto3.resource('s3').Bucket(bucket).Object(os.path.join(prefix, 'validation', 'validation.csv')).upload_fileobj(buf)
s3_validation_data = 's3://{}/{}/validation/{}'.format(bucket, prefix, 'validation.csv')
今回はlinear-learnerを使うことにするので、そのイメージがあるコンテナを指定し
SageMakerのEstimatorに関する設定やハイパーパラメータの設定を行います。
# SageMakerのセッション
sess = sagemaker.Session()
# sagemakerのestimatorへ必要項目を指定
linear = sagemaker.estimator.Estimator(container,
                                       role,
                                       train_instance_count=1,
                                       train_instance_type='ml.m4.xlarge',
                                       output_path='s3://{}/{}/output'.format(bucket, prefix),
                                       sagemaker_session=sess)
# ハイパーパラメーターの指定
linear.set_hyperparameters(feature_dim=10,
                           mini_batch_size=10,
                           predictor_type='binary_classifier',
                           epochs=10,
                           num_models=32,
                           loss='absolute_loss')
# モデルフィッティングと出力先の指定(S3)
linear.fit({'train': s3_train_data, 'validation': s3_validation_data})
estimatorのパラメータは、
使用するコンテナのイメージ
IAMロール
学習に使うインスタンス数
学習に使うインスタンスタイプ
モデル出力先
SageMakerのセッション
を順番に指定してあげます。
ハイパーパラメータには、
特徴量の数
ミニバッチサイズ
予測するタイプ
エポック数
並列でトレーニングを行うモデルの数
適用する損失関数
を順番に指定します。
デプロイ
モデルからエンドポイントに生成するインスタンスの個数とその種類を指定してあげてdeployメソッドを用います。
デプロイが終わると作成されたモデルとエンドポイント名が表示されます。
linear_predictor = linear.deploy(initial_instance_count=1, instance_type='ml.t2.medium')
エンドポイントからモデルを利用する
from boto3 import Session
from sagemaker.predictor import csv_serializer

endpoint="linear-learner-#####"
profile = 'default'
session = Session(profile_name=profile)
sm_session = sagemaker.Session(boto_session=session)

# 予測に用いるクラスの初期化
predictor = sagemaker.predictor.RealTimePredictor(
    sagemaker_session=sm_session,
    endpoint=endpoint,
    serializer=csv_serializer)

test_data = np.array(data.drop('Survived', axis=1))
for test in test_data:
    print(predictor.predict(test))
このようにして、予測されたラベルが見ることができました。
b'{"predictions": [{"score": 0.9746658205986023, "predicted_label": 1.0}]}'
前処理等は必要ですが、SageMakerでストレスレスに機械学習をすることができそうです。