「BLOCK CLOCK」という、Chrome拡張のサービスを作りました。リリースの記事をQiitaにも投稿してサービスの紹介をさせていただいたのですが、技術的な内容が全くなかったので、開発に使用したChrome ExtensionのJavaScript APIsにも触れておきたいと思います。
Chrome拡張を作るためのGoogoleが提供しているChrome ExtensionのJavaScript APIsを呼び出しています。公式リファレンスは存在していますが全て英語で書かれており、APIの内容を調べるのに苦労しました。
Chrome拡張の開発で、同じように苦戦する方がいると思うので、少なくとも僕が使ったAPIだけは今回まとめておこうと思います。
BLOCK CLOCK - 仕事の時間をSNSから守るクローム拡張
マニフェストファイル
chrome拡張を動かすためには設定ファイルmanifest.jsonが必要です。ここに記述がないと呼び出せないAPIも存在しています。
詳しくは@mdstoy さんが、詳しくまとめてくれているので、僕は割愛します。
※参考にさせていただきました![]()
今回のサンプルは以下のようなファイルを設定しています。
{
    "manifest_version": 2,
    "version": "1.0.0",
    "name": "Qiitaサンプル",
    "description": "description",
    "browser_action": {
        "default_icon": "/image/qiita_icon.png",
        "default_title": "Qiitaのサンプル用",
        "default_popup": "popup.html"
    },
    "icons": {
        "128": "/image/qiita_icon.png"
    },
    "background": {
        "scripts": [
            "/assets/js/background.js"
        ]
    },
    "permissions": [
        "background",
        "storage",
        "alarms",
        "tabs"
    ]
}
表示されるhtml
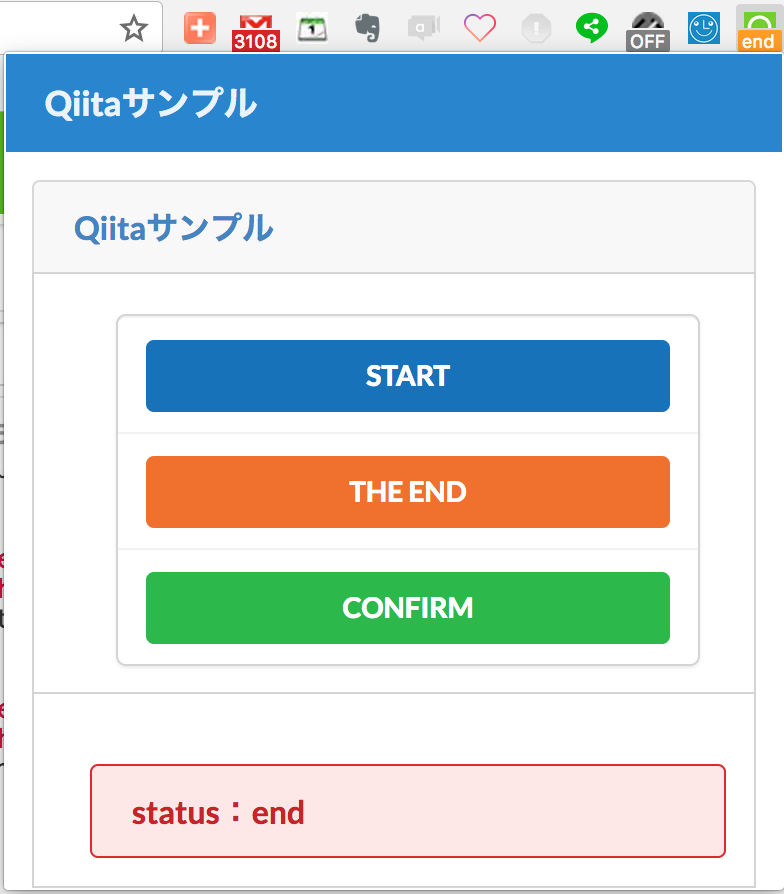
上記のマニフェストファイルを設定すれば、アイコンをクリックしたときに、以下のpopup.htmlが読み込まれるようになります。
<!DOCTYPE html>
<html>
<head>
    <meta charset="utf-8" />
    <title>Qiitaサンプル</title>
    <link rel="stylesheet" type="text/css" href="/static/dist/semantic.min.css">
    <script src="/assets/js/jquery-3.3.1.min.js"></script>
    <script src="/assets/js/push.min.js"></script>
    <link rel="stylesheet" type="text/css" href="/assets/css/dashboard.css">
</head>

<body>
<div class="ui inverted huge borderless fixed fluid menu blue column">
    <a class="header item" id='top'>Qiitaサンプル</a>
</div>

<div class="container">
    <div class="ui attached message">
        <div class="header">
            <a>Qiitaサンプル</a>
        </div>
    </div>

    <div class="ui attached fluid segment">
        <div class="ui stackable four column grid">
            <div class="five wide column">
                <div class="ui card">
                    <div class="extra content">
                        <a>
                            <container id='start_container'>
                                <button class="blue fluid ui button"  id='start_push'>START</button>
                            </container>
                            <container id='pomodoro_container' hidden>
                                <div class="ui orange fluid centered message" id="start_message_label">
                                    <div class="column center aligned">start</div>
                                </div>
                                <div class="ui blue fluid centered message" id="rest_message_label" hidden>
                                    <div class="column center aligned">
                                         end
                                    </div>
                                </div>
                            </container>
                        </a>
                    </div>
                    <div class="extra content" id='end_container'>
                        <a>
                            <container >
                                <button class="orange fluid ui button" id='end_push'>THE END</button>
                            </container>
                        </a>
                    </div>
                    <div class="extra content" id='confirm_container'>
                        <a>
                            <container>
                                <button class="green fluid ui button" id='confirm_push'>CONFIRM</button>
                            </container>
                        </a>
                    </div>
                </div>
            </div>
        </div>
    </div>
    <div class="ui attached fluid segment" id='start_message_container'>
        <div class="ui negative orange message"  id="status_open">
            <div class="header">
                status:open
            </div>
        </div>
        <div class="ui negative blue message" id="status_start" hidden>
            <div class="header">
                status:start
            </div>
        </div>
        <div class="ui negative red message" id="status_end" hidden>
            <div class="header">
                status:end
            </div>
        </div>
    </div>
</div>
</body>
<script src="/assets/js/main.js"></script>
</html>
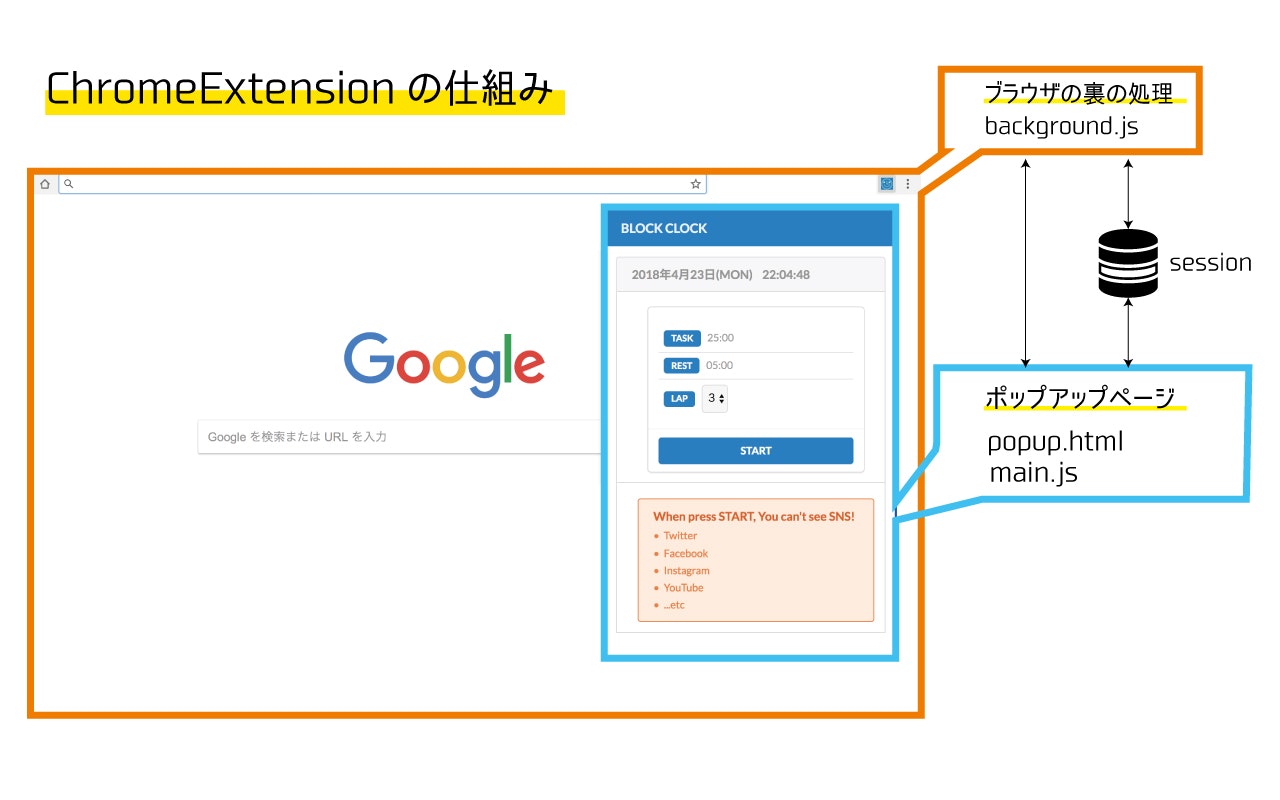
仕組み
Chrome Extensionの仕組みを図化しています。
API解説
runtime
background.jsとmain.jsでメッセージの送受信が可能になります。
chrome.runtime.sendMessage({ text: "QiitaのSampleを送ります。" }, function (response) {
    console.log(response.text); // → QiitaのSampleを返します。
});
chrome.runtime.onMessage.addListener(function (request, sender, sendResponse) {
    alert(request.text); // → QiitaのSampleを送ります。
    sendResponse({ text: "QiitaのSampleを返します。" });
});
簡単に解説すると、main.js → background.js → main.js(callback)というような流れになっています。alertの後に、ログが出力されているはずです。
STARTボタンを押した時にメッセージを送信する書き方は以下のようになります。
// 「START」ボタンを押した時にメッセージを送信する
$('#start_push').click(function () {
    chrome.runtime.sendMessage({ text: "QiitaのSampleを送ります。" }, function (response) {
        console.log(response.text);
    });
});
alarms
経過した時間をセットして、イベント発生させるAPIも用意されています。
// 1分毎実行
chrome.alarms.create("start_count_1", { "periodInMinutes": 1 });

// 5分後に実行
chrome.alarms.create("start_count_2", { "delayInMinutes": 5 });

// alarmsイベント取得
chrome.alarms.onAlarm.addListener(function (alarm) {
    if (alarm.name == "start_count_1") {
        alert("1分経過しました。");
    } else if (alarm.name == "start_count_2"){
        alert("5分経過しました。");
        chrome.alarms.clearAll(); //セットしたアラームをクリア
    }
});
storage
アプリの状態を保持しておきたいときってありますよね。そんなときはstrageを呼び出せば、メモリ上に保持することが可能です。
$('#start_push').click(function () {
    chrome.runtime.sendMessage({ status: "start" }, function (response) {
        console.log(response.status); // → startをセットしました。
    });
});


$('#confirm_push').click(function () {
    chrome.storage.local.get(["status"], function (value) {
        console.log('status : '+value.status) // → status : start
    });
});
chrome.runtime.onMessage.addListener(function (request, sender, sendResponse) {
    if (request.status=='start'){
        chrome.storage.local.set({ 'status': request.status }, function () {});
        sendResponse({ status: "startをセットしました。" });
    }
});
tabs
タブが切り替わった時、更新された時のイベントを取得できます。
// タブが切り替わった時のイベント
chrome.tabs.onActivated.addListener(function (tabId) {
    chrome.tabs.query({"active": true}, function (tab) {
        console.log(tab[0].url); // 切り替わったタブのURL
        chrome.tabs.remove(tab[0].id); //切り替わったタブを削除
    });
});

// タブが更新された時のイベント
chrome.tabs.onUpdated.addListener(function (tabId, info, tab) {
    console.log(tab.url); // → 更新されたURL
    console.log(info.status); //→ loading,complete
    chrome.tabs.remove(tabId); // 更新されたタブのidを削除
});

//新規タブを開く
chrome.tabs.create({ "url": "index.html" });
setBadgeText, setBadgeBackgroundColor
アイコンの下にメッセージを表示するAPIも用意されています。(そろそろ溜まっているメール見ないと...)
$('#start_push').click(function () {
    chrome.browserAction.setBadgeText({ text: "start" });
    chrome.browserAction.setBadgeBackgroundColor({ color: [0, 0, 255, 100] });
});

$('#end_push').click(function () {
    chrome.browserAction.setBadgeText({ text: "end" });
    chrome.browserAction.setBadgeBackgroundColor({ color: [255, 140, 0, 100]});
});

chrome.browserAction.setBadgeText({ text: "" }); // 削除
browserAction
マニフェストファイルに設定している、デフォルトのアイコンを変更することができます。
chrome.browserAction.setIcon({ path: "変更するパスを指定" });
まとめ
少ないですが、今回作ったクローム拡張で使ったAPIを紹介しました。Chrome ExtensionのJavaScript APIsには他にも豊富なAPIがあるので、ぜひ試して使ってみてください!


