Gradleでマルチプロジェクトを行う方法です。
単一プロジェクトでjarファイル作成
マルチプロジェクトの前に、まず単一のプロジェクトでjarファイルを作成して実行してみます。
gradleプロジェクト作成
$ gradle init

Select type of project to generate:
  1: basic
  2: application
  3: library
  4: Gradle plugin
Enter selection (default: basic) [1..4] 1

Select build script DSL:
  1: Groovy
  2: Kotlin
Enter selection (default: Groovy) [1..2] 1

Project name (default: JavaMultiProject):

> Task :init
Get more help with your project: https://guides.gradle.org/creating-new-gradle-builds

BUILD SUCCESSFUL in 6s
2 actionable tasks: 2 executed
build.gradleファイルの修正
自動で作成されたbuild.gradleファイルを少し修正します。
重要なのは、jarタスクの作成です。
apply plugin: 'java'
apply plugin: 'application'

sourceCompatibility = 11
targetCompatibility = 11

repositories {
    jcenter()
}

dependencies {
}

mainClassName = 'App'
jar {
    manifest {
        attributes 'Main-Class': "App"
    }
}
ソース作成
実行するソースを作成します。
public class App {
    public static void main(String[] args) {
        System.out.println("Hello");
    }
}
buildと実行をしてみます。
$ gradle build

BUILD SUCCESSFUL in 2s
5 actionable tasks: 1 executed, 4 up-to-date

$ java -jar build/libs/JavaMultiProject.jar
Hello
これで無事単一のプロジェクトでjarファイルの作成と実行ができました。
マルチプロジェクトの作成
ではマルチプロジェクトの作成をしてみます。
今回のディレクトリ構成です。
.(JavaMultiProject)
├── bar  (アプリケーションプロジェクト)
│   ├── src
│   ├── build.gradle
├── foo  (アプリケーションプロジェクト)
│   ├── src
│   ├── build.gradle
├── share  (共通ライブラリとして利用するプロジェクト)
│   ├── src
│   ├── build.gradle
├── build.gradle
├── setting.gradle
ディレクトリを作成しておきます。
$ mkdir -p bar/src/main/java
$ mkdir -p foo/src/main/java
$ mkdir -p share/src/main/java
setting.gralde修正
マルチプロジェクトにする場合はsetting.gradleに設定を行います。
includeにサブプロジェクトを指定します。
rootProject.name = 'JavaMultiProject'
include 'foo', 'bar', 'share'
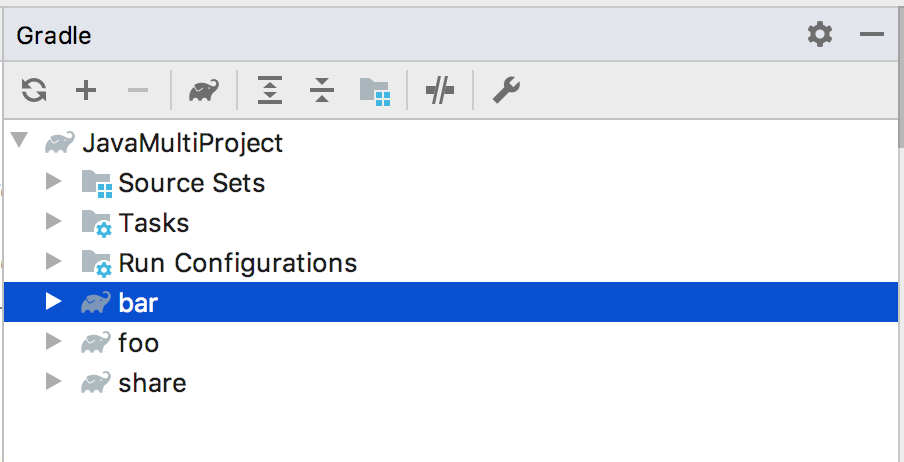
これによってfor bar share ディレクトリがそれぞれサブプロジェクトとして認識されるようになりました。
IntelliJ IDEAでもこのようにプロジェクトが認識されます。
 |
|---|
build.gradleの修正
プロジェクトrootに存在するbuild.gradleでは、subprojectsを指定することでサブプロジェクト全てに適用する設定を指定します。
allprojects {
}

subprojects {
    apply plugin: 'java'

    sourceCompatibility = 11
    targetCompatibility = 11

    repositories {
        jcenter()
    }
}
続いてサブプロジェクトのbuild.gradleになります。
アプリケーションプロジェクトであるbarから見ていきます。
apply plugin: 'application'

dependencies {
    implementation project(":share")
}

mainClassName = 'com.example.Bar'
jar {
    manifest {
        attributes 'Main-Class': "com.example.Bar"
    }
    from configurations.compileClasspath.collect { it.isDirectory() ? it : zipTree(it) }
}
重要な部分を解説しておくと、
dependencies 内のimplementation project(":share")で、別のサブプロジェクトであるshareに依存していることを定義しています。
また、jarタスクの中で from 〜を指定していますが、これは依存ライブラリをBarプロジェクトのjarに含めることを意味しています。
ちなみに、fromメソッドが存在しない場合はjarに依存ライブラリが含まれないのでNoClassDefFoundErrorエラーが出力します。私がこれで詰まったので念のため。
$ java -jar bar/build/libs/bar.jar
Exception in thread "main" java.lang.NoClassDefFoundError: com/example/Hello
	at com.example.Bar.main(Bar.java:5)
Caused by: java.lang.ClassNotFoundException: com.example.Hello
	at java.base/jdk.internal.loader.BuiltinClassLoader.loadClass(BuiltinClassLoader.java:581)
	at java.base/jdk.internal.loader.ClassLoaders$AppClassLoader.loadClass(ClassLoaders.java:178)
	at java.base/java.lang.ClassLoader.loadClass(ClassLoader.java:521)
	... 1 more
fooプロジェクトはbarプロジェクトとほぼ同じですが念のために記載しておきます。
mainClassNameのみをFooに変更しています。
apply plugin: 'application'

dependencies {
    implementation project(":share")
}

mainClassName = 'com.example.Foo'
jar {
    manifest {
        attributes 'Main-Class': "com.example.Foo"
    }
    from configurations.compileClasspath.collect { it.isDirectory() ? it : zipTree(it) }
}
shareのbuild.gradleは今回は特に何も記載していません。
コード
最後にコードを記載します。
package com.example;

public class Bar {
    public static void main(String[] args) {
        var hello = new Hello("Bar");
        System.out.println(hello.say());
    }
}
package com.example;

public class Foo {
    public static void main(String[] args) {
        var hello = new Hello("Foo");
        System.out.println(hello.say());
    }
}
package com.example;

public class Hello {
    private final String name;
    public Hello(String name) {
        this.name = name;
    }

    public String say() {
        return name + " Hello!";
    }
}
buildと実行
buildしてみます。
サブプロジェクトのタスクは:(プロジェクト名):(タスク名)で実行します。
また、barが依存しているshareプロジェクトのbuildもこのタイミングで同時に実行してくれます。
$ gradle :bar:build

BUILD SUCCESSFUL in 804ms
7 actionable tasks: 7 up-to-date

$ ls -l bar/build/libs/
total 8
-rw-r--r--  1 ysaito  staff  1591  4 29 21:15 bar.jar
参考に作成されたjarを解凍してみるとshareの中身のHello.classが作成されたbar.jarに含まれていることがわかります。
$ jar xvf bar.jar
  META-INF/が作成されました
 META-INF/MANIFEST.MFが展開されました
  com/が作成されました
  com/example/が作成されました
 com/example/Bar.classが展開されました
 com/example/Hello.classが展開されました
jarが出来たので実行してみます。
$ java -jar bar/build/libs/bar.jar
Bar Hello!
$ java -jar foo/build/libs/foo.jar
Foo Hello!