目次
- 1.前書き
- 2.contexrtとは(概念)
- 3.contexrtとは(具象)
- 4.Elementの役割
- 5._parentの使い方
- 6.find~/dependOnInherited~の動き
- 7.まとめ
1.前書き
なぜ、この記事を書こうと思ったのか。Flutterといえば、ios,android両方のアプリを開発できるフレームワークで ある程度の知識があれば簡単なアプリなら作業量ほぼ半分で作れてしまう便利な代物です。
しかし、ある程度以上のものを作るとなると必ずと言っていいほど
【contextとは何か】
という壁に当たってしまいます。
そして、このcontextを理解していないとバグの温床になるケースになってしまうことも...
そこで今回、実際にcontextが生み出したバグの実例を交えつつ実践的な知識を備忘録として残すため記事にしようと思いました。
※この記事で得られる知識
・contextの実態について
・バグを生み出すcontextの使い方
※本ページではcontextとは何であるかということを知る目的として
一部のcontextの使用方法(内部処理)を理解することで
狭義のcontextとは何かについて解説していきます。
2.contexrtとは(概念)
Flutterにおけるcontextの意味について理解する前に
プログラミングにおける広義のcontextの意味について理解します。
コンテクストはプログラミングの分野でも使われています。コードの記述やプログラムの中での要素などが同
じであっても、プログラム内での場所や位置付け、プログラムが実行される時の内部設定などによって出力す結果や挙動が変化することがあります。そのコードが受けている影響や制約のことを指してコンテクストと呼ぶことがあります。
Flutterにおいても同じく
Widget自身がどこに配置されているかを知るための要素
と言えます。
3.contexrtとは(具象)
widgetにでよく見掛ける
@override
  Widget build(BuildContext context) {

  }
がどこで何が引き渡されているのかを見ればcontextの正体が分かりそうです。
実際には
// StatelessWidgetのcontextはStatelessElement
class StatelessElement extends ComponentElement {

  @override
  Widget build() => widget.build(this);//←thisで自分自身を渡している
}
// StatelessfullWidgetのcontextはStatefulElement
class StatefulElement extends ComponentElement {

  @override
  Widget build() => state.build(this);
}
となっており、
「context=Element」ということが分かりました。
Elementとは「WidgetTreeの要素1つ1つと対となるElement」であると言えます。
以下イメージ

以下の画像はflutterのサンプルアプリです。
右側はflutterDevToolの一種の機能であるInspectorといい
WidgetTreeがどのような構成をしているのかを階層表示してくれます。
 |
 |
|---|
この階層構造になっているWidget1つ1つに対して
Elementが対に存在しています。
ここからElementについて少し深掘りします。
4.Elementの役割
Elemntがどんな情報を持っているか
実際にWidgetをbuildして確認してみましょう。
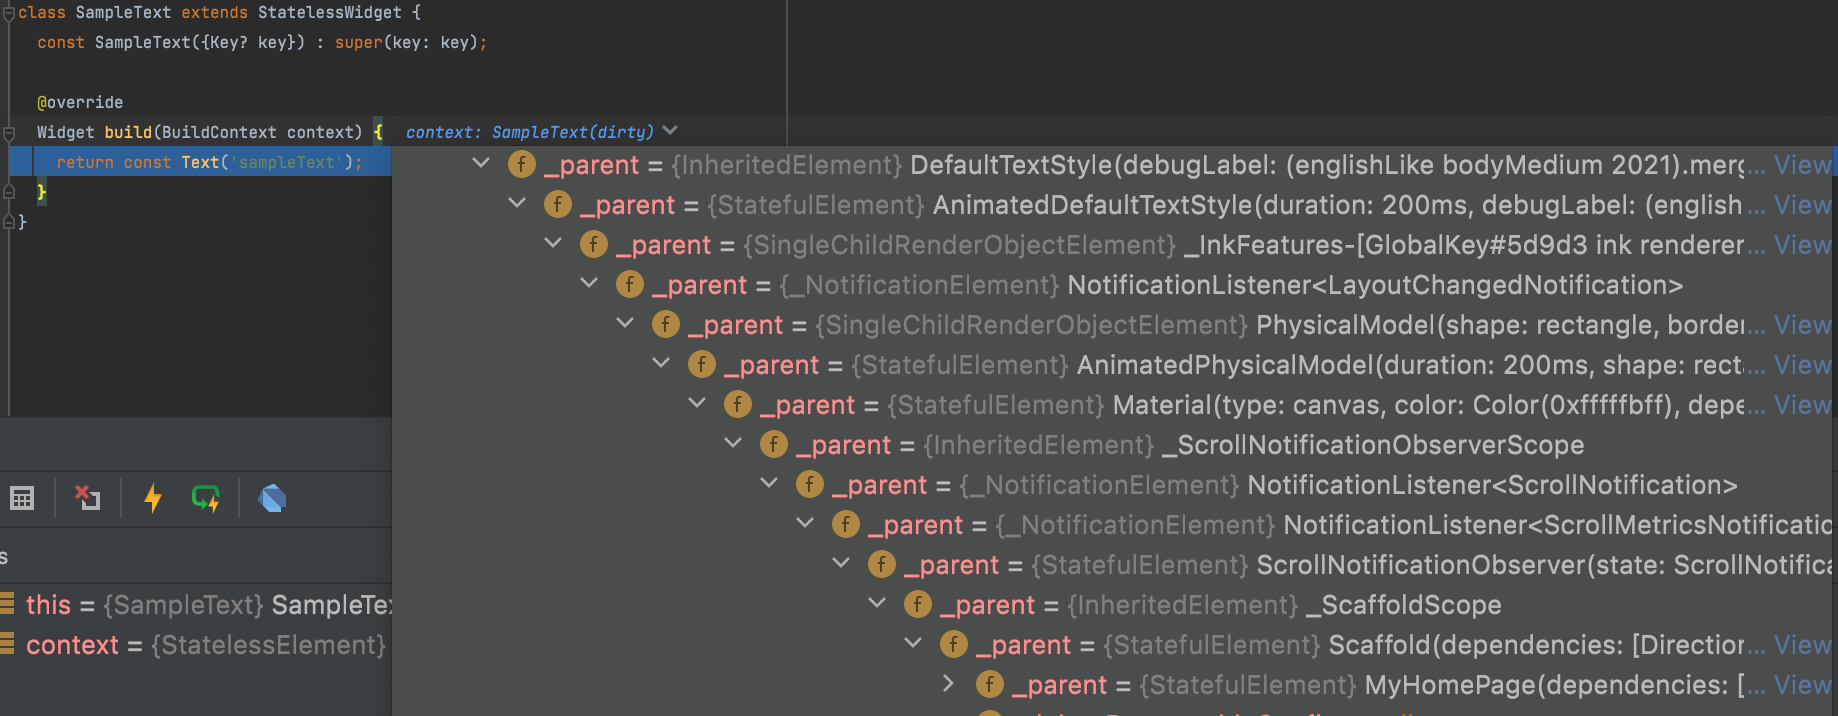
以下のコードで★マーク部分にブレークポイントを貼ってみます。
SampleTextがどのようなcontext情報を受け取っているかを見てみます。
import 'package:flutter/material.dart';

void main() {
  runApp(const MyApp());
}

class MyApp extends StatelessWidget {
  const MyApp({super.key});

  // This widget is the root of your application.
  @override
  Widget build(BuildContext context) {
    return MaterialApp(
      title: 'Flutter Demo',
      theme: ThemeData(
        colorScheme: ColorScheme.fromSeed(seedColor: Colors.deepPurple),
        useMaterial3: true,
      ),
      home: const MyHomePage(title: 'Flutter Demo Home Page'),
    );
  }
}

class MyHomePage extends StatefulWidget {
  const MyHomePage({super.key, required this.title});
  final String title;

  @override
  State<MyHomePage> createState() => _MyHomePageState();
}

class _MyHomePageState extends State<MyHomePage> {
  int _counter = 0;

  void _incrementCounter() {
    setState(() {
      _counter++;
    });
  }

  @override
  Widget build(BuildContext context) {
    return Scaffold(
      appBar: AppBar(
        backgroundColor: Theme.of(context).colorScheme.inversePrimary,
        title: Text(widget.title),
      ),
      body: Center(
        child: Column(
          mainAxisAlignment: MainAxisAlignment.center,
          children: <Widget>[
            const SampleText(),
            Text(
              '$_counter',
              style: Theme.of(context).textTheme.headlineMedium,
            ),
          ],
        ),
      ),
      floatingActionButton: FloatingActionButton(
        onPressed: _incrementCounter,
        tooltip: 'Increment',
        child: const Icon(Icons.add),
      ), // This trailing comma makes auto-formatting nicer for build methods.
    );
  }
}

class SampleText extends StatelessWidget {
  const SampleText({Key? key}) : super(key: key);

  @override
  Widget build(BuildContext context) {
     //★★★★★breakPoint★★★★★
    return const Text('sampleText');
  }
}
}
context(Element)はたくさんのプロパティを持っていますが
注目すべきはプロパティは_parentです。

このparentが何者かというと、
単純にwidgeTreeにあるSampleTextWidgetのElementの親のElementになります。
そして、その親Elementは更に_parentプロパティを持っており
更に上へ上へと続いていきます。
階層を辿っていくと
ScaffoldやMyHomePageが出てくるため
WidgetTreeの階層を辿っていることが分かります。

他にもcontextはたくさんの情報を持っていますが主要は_parentを持っており
親を辿ることが可能であることがひとまず分かりました。
じゃあ、親を辿れるから何だという話ですよね。
次の章で解説します。
5._parentで親を辿ることで可能になること
実は前節で解説した_parentで祖先を追跡することはFlutterにおいて かなりの箇所で使われています。 例として挙げるなら①画面管理
Navigator.of(context)
②テーマカラー取得
Theme.of(context)
③画角の取得
MediaQuery.of(context)
の3つが代表的なcontextの使用パターンになるかと思われます。
それぞれ中身を見ていくととても興味深いです。
①の画面管理から見ていきましょう。
Navigator.of(context)
static NavigatorState of(
  BuildContext context, {
  bool rootNavigator = false,
}) {
  // Handles the case where the input context is a navigator element.
  NavigatorState? navigator;
  if (context is StatefulElement && context.state is NavigatorState) {
      navigator = context.state as NavigatorState;
  }
  if (rootNavigator) {
    navigator = context.findRootAncestorStateOfType<NavigatorState>() ?? navigator;
  } else {
    navigator = navigator ?? context.findAncestorStateOfType<NavigatorState>();
  }
  return navigator!;
}
rootNavigatorのflagによって
2パターンに分かれています。
trueの場合はfindRootAncestorStateOfTypeメソッド
falseの場合はfindAncestorStateOfTypeメソッドとなっています。
②テーマカラー取得
abstract class Element extends DiagnosticableTree implements BuildContext
  static ThemeData of(BuildContext context) {
    final _InheritedTheme? inheritedTheme = context.dependOnInheritedWidgetOfExactType<_InheritedTheme>();//←注目すべき部分
    final MaterialLocalizations? localizations = Localizations.of<MaterialLocalizations>(context, MaterialLocalizations);
    final ScriptCategory category = localizations?.scriptCategory ?? ScriptCategory.englishLike;
    final ThemeData theme = inheritedTheme?.theme.data ?? _kFallbackTheme;
    return ThemeData.localize(theme, theme.typography.geometryThemeFor(category));
  }
}
contextを使用してdependOnInheritedWidgetOfExactTypeメソッドを呼び出しています。
③画角の取得
//media_query.dart

class MediaQuery extends InheritedModel<_MediaQueryAspect> {
  ~省略~
  //①
  static MediaQueryData of(BuildContext context) {
    return _of(context);
  }
  //②
  static MediaQueryData _of(BuildContext context, [_MediaQueryAspect? aspect]) {
    assert(debugCheckHasMediaQuery(context));
    return InheritedModel.inheritFrom<MediaQuery>(context, aspect: aspect)!.data;
  }
  ~省略~
}

//inherited_model.dart
abstract class InheritedModel<T> extends InheritedWidget {
  //③
  static T? inheritFrom<T extends InheritedModel<Object>>(BuildContext context, { Object? aspect }) {
    if (aspect == null) {
      return context.dependOnInheritedWidgetOfExactType<T>();
    }

    // Create a dependency on all of the type T ancestor models up until
    // a model is found for which isSupportedAspect(aspect) is true.
    final List<InheritedElement> models = <InheritedElement>[];
    _findModels<T>(context, aspect, models);
    if (models.isEmpty) {
      return null;
    }

    final InheritedElement lastModel = models.last;
    for (final InheritedElement model in models) {
      final T value = context.dependOnInheritedElement(model, aspect: aspect) as T;
      if (model == lastModel) {
        return value;
      }
    }

    assert(false);
    return null;
  }
}
メソッドが①②③の順番で呼ばれ最終的には
dependOnInheritedElementメソッドが呼ばれています。
ここでそれぞれの最終callメソッドを整理すると
| 初期呼び出し関数 | of~メソッドで呼び出している関数 |
|---|---|
| Navigator.of(context) | findRootAncestorStateOfType findAncestorStateOfType |
| Theme.of(context) | dependOnInheritedWidgetOfExactType |
| MediaQuery.of(context) | dependOnInheritedWidgetOfExactType |
次の章で
findRootAncestorStateOfType
findAncestorStateOfType
dependOnInheritedWidgetOfExactType
dependOnInheritedElement
について解説します。
6.find~/dependOnInherited~の動き
さて、前節でよくcontextを使用する関数 Navigator.of(context) Theme.of(context) MediaQuery.of(context) の内部処理を除いて最終的に ①findAncestorStateOfType ②findRootAncestorStateOfType ③dependOnInheritedWidgetOfExactType ④dependOnInheritedElement にそれぞれが行きついてることが分かりました。一つずつ見ていきます。
①findAncestorStateOfTypeについて
  @override
  T? findAncestorStateOfType<T extends State<StatefulWidget>>() {
    assert(_debugCheckStateIsActiveForAncestorLookup());
    Element? ancestor = _parent;
    while (ancestor != null) {
      if (ancestor is StatefulElement && ancestor.state is T) {
        break;
      }
      ancestor = ancestor._parent;
    }
    final StatefulElement? statefulAncestor = ancestor as StatefulElement?;
    return statefulAncestor?.state as T?;
  }
contextが保持している_parent(親Element)が指定された型(T)であるかを判定して
チェックし続け、最初に型が一致した地点でbreakをしてElementのstateをreturnします。
Navigator.of(context)の場合は、NavigatorState型と最初に一致したElementのstaeを返却します。
補足ですが、Navigatorは画面管理を司る機能です。
Navigator.of(context).popやNavigator.of(context).push
は
「現在のElementからTree構造を一つ一つ遡っていき、最初に型(NavigatorState)と一致したElementの画面管理を司るstateオブジェクトにアクセスして
操作(pop/push)を行なっている」
が答えになります。
②findRootAncestorStateOfTypeについて
  @override
  T? findRootAncestorStateOfType<T extends State<StatefulWidget>>() {
    assert(_debugCheckStateIsActiveForAncestorLookup());
    Element? ancestor = _parent;
    StatefulElement? statefulAncestor;
    while (ancestor != null) {
      if (ancestor is StatefulElement && ancestor.state is T) {
        statefulAncestor = ancestor;
      }
      ancestor = ancestor._parent;
    }
    return statefulAncestor?.state as T?;
  }
こちらは、
findAncestorStateOfTypeとほぼ同じですが、
違うの部分が、最初にTと一致したものではなく、
最後まで探索をし続けるという部分です。
つまり、WidgetTreeを探索し続ける中で型が複数回一致したとしても
最後に一致したElementのstateを返却するということになります。
それはすなわち、WidgetTreeの最上部にある指定した型のElementを取得するということです。
③dependOnInheritedWidgetOfExactTypeについて
  @override
  T? dependOnInheritedWidgetOfExactType<T extends InheritedWidget>({Object? aspect}) {
    assert(_debugCheckStateIsActiveForAncestorLookup());
    final InheritedElement? ancestor = _inheritedElements == null ? null : _inheritedElements![T];
    if (ancestor != null) {
      return dependOnInheritedElement(ancestor, aspect: aspect) as T;
    }
    _hadUnsatisfiedDependencies = true;
    return null;
  }
_inheritedElements![T];
の箇所で指定された型をキーアクセスています。
_inheritedElementsはmapです。
つまり、
Theme.of(context)←アプリ内テーマカラーなど
MediaQuery.of(context)←端末画面などのプロパティ
のようなアプリで唯一のプロパティを持つものなどに即時にアクセスできます。
つまり、WidgetTreeにぶら下がっているElementはそれぞれ同じ参照を_inheritedElements持っており、そこにアプリ固有の値を持つことでどこのTree位置からアクセスしても
同じ情報を1発でアクセスできるという利点があります。
①findAncestorStateOfType
②findRootAncestorStateOfType
はTree構造の最下部にあればあるほど処理回数が多くなるのに対して
③dependOnInheritedWidgetOfExactType
はどこの階層に位置していても必ずアクセスが一回で行えるということです。
7.まとめ
まとめとして
contextとWidgetのTree情報を保持しており
親へのアクセスを可能にしている。
Flutterは状態管理などの機能もWidgetにより実現しているため
親を辿ることで機能へアクセスすることが可能
そのアクセスを実現しているのがcontextになります。