意外とズバリなことを書いてるQiita記事がなかったので、メモっておく。
慣れたら2〜3分あればできそう。
前提
①DebianマシンがVirtual Machineで動いている。
(UbuntuでもCentOSでも多分手順はそんなに変わらない。Debianなのは個人的好み)
②TCP 80番ポートと443番ポートは外からアクセスできる

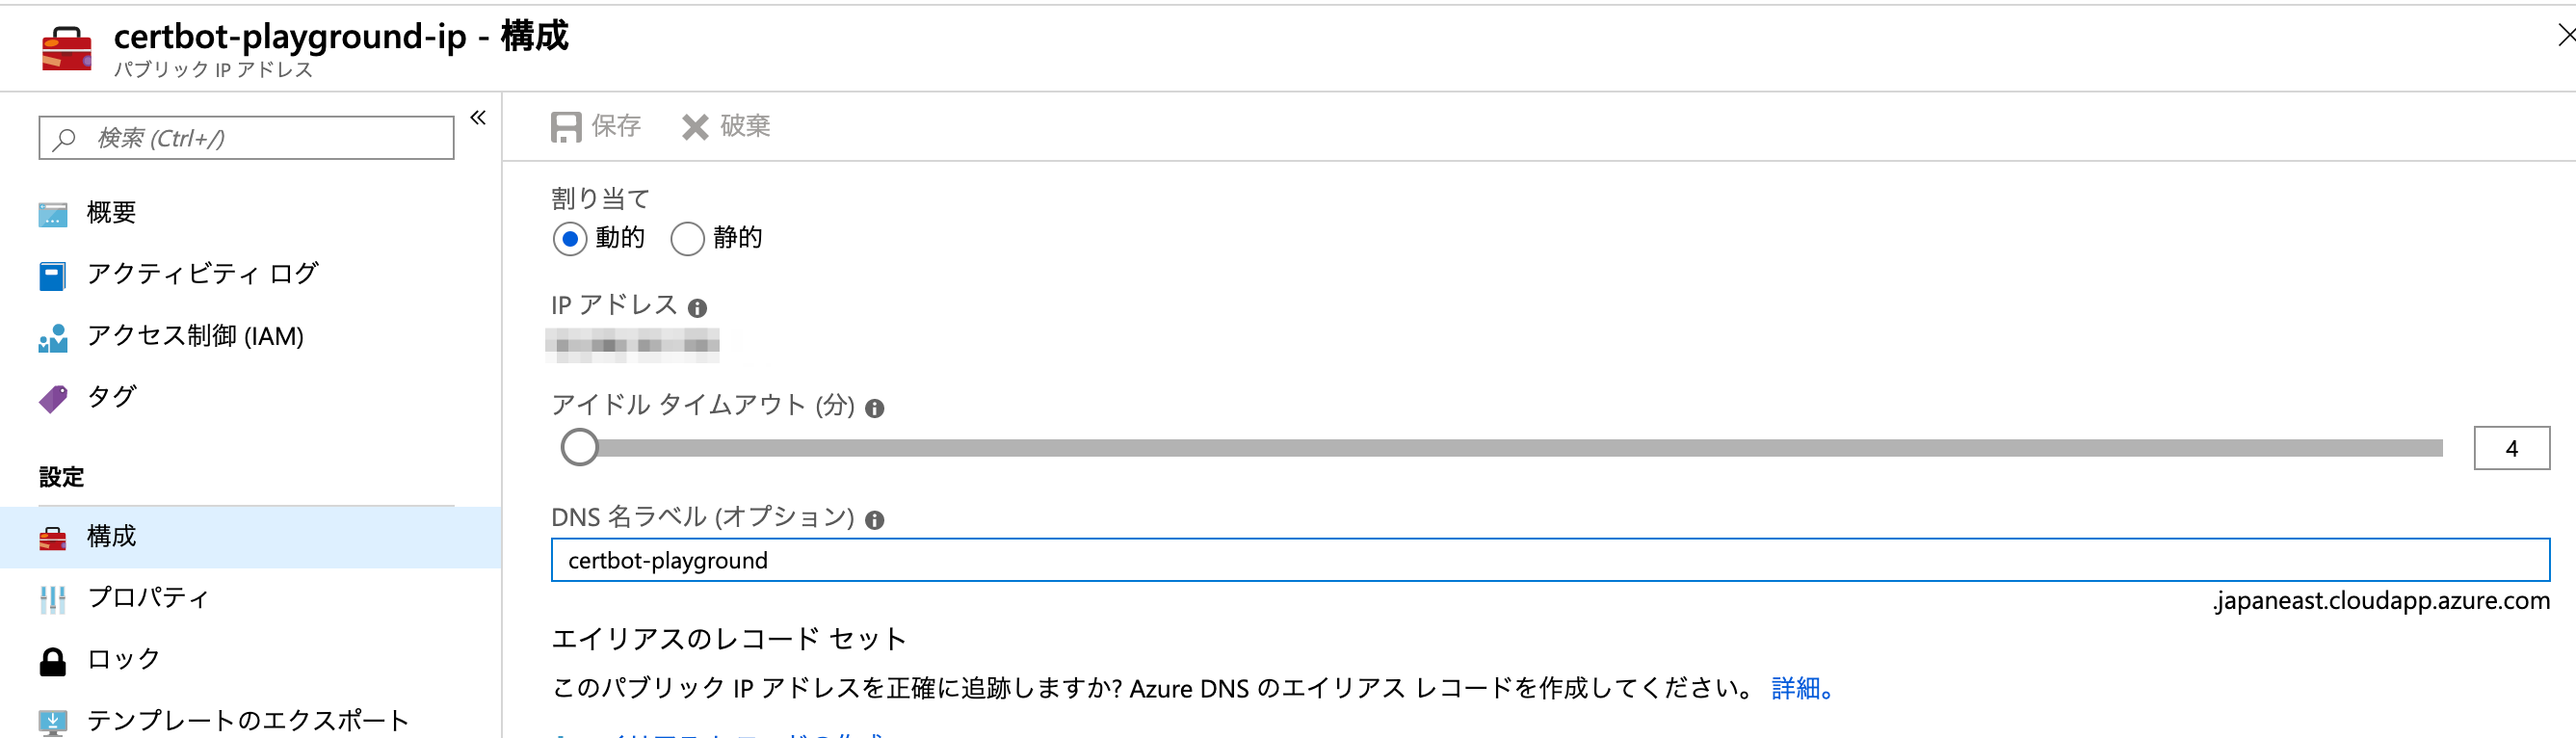
③your-service.japaneast.cloudapp.azure.com なDNS名ラベルを取得している
certbotでSSL証明書をもらってくる
certbotのインストール
https://certbot.eff.org/all-instructions に事細かに説明があるので、それに従う。
$ echo "deb http://deb.debian.org/debian stretch-backports main" | sudo tee /etc/apt/sources.list.d/certbot.list
$ sudo apt-get update && sudo apt-get install certbot
certbotでSSL証明書を発行する
certbot certonly --manual --manual-public-ip-logging-ok -d YOUR-DOMAIN.japaneast.cloudapp.azure.com -m まともなメールアドレス をroot実行する。
$ sudo certbot certonly --manual --manual-public-ip-logging-ok -d certbot-playground.japaneast.cloudapp.azure.com -m yusuke.iwaki@xxxxxx.com

Saving debug log to /var/log/letsencrypt/letsencrypt.log
Plugins selected: Authenticator manual, Installer None

- - - - - - - - - - - - - - - - - - - - - - - - - - - - - - - - - - - - - - - -
Please read the Terms of Service at
https://letsencrypt.org/documents/LE-SA-v1.2-November-15-2017.pdf. You must
agree in order to register with the ACME server at
https://acme-v02.api.letsencrypt.org/directory
- - - - - - - - - - - - - - - - - - - - - - - - - - - - - - - - - - - - - - - -
(A)gree/(C)ancel: A

- - - - - - - - - - - - - - - - - - - - - - - - - - - - - - - - - - - - - - - -
Would you be willing to share your email address with the Electronic Frontier
Foundation, a founding partner of the Let's Encrypt project and the non-profit
organization that develops Certbot? We'd like to send you email about our work
encrypting the web, EFF news, campaigns, and ways to support digital freedom.
- - - - - - - - - - - - - - - - - - - - - - - - - - - - - - - - - - - - - - - -
(Y)es/(N)o: y
Obtaining a new certificate
Performing the following challenges:
http-01 challenge for certbot-playground.japaneast.cloudapp.azure.com

- - - - - - - - - - - - - - - - - - - - - - - - - - - - - - - - - - - - - - - -
Create a file containing just this data:

SVxxY7APvlHPcNkBeGZA5VdrwEg1eBhNABVRkh2Go5E.au7pE6foVeeQ8XwYgWII-iA_LKiTAudzEYYfKZLaA4w

And make it available on your web server at this URL:

http://certbot-playground.japaneast.cloudapp.azure.com/.well-known/acme-challenge/SVxxY7APvlHPcNkBeGZA5VdrwEg1eBhNABVRkh2Go5E

- - - - - - - - - - - - - - - - - - - - - - - - - - - - - - - - - - - - - - - -
Press Enter to Continue
ここで、「本当にあんたのサーバーだよね?それを証明するために、・・・」みたいなチャレンジを求められるので、それに従う。
別のウインドウでSSHで入り、
$ mkdir -p .well-known/acme-challenge/
$ echo 'SVxxY7APvlHPcNkBeGZA5VdrwEg1eBhNABVRkh2Go5E.au7pE6foVeeQ8XwYgWII-iA_LKiTAudzEYYfKZLaA4w' > .well-known/acme-challenge/SVxxY7APvlHPcNkBeGZA5VdrwEg1eBhNABVRkh2Go5E
$ sudo python3 -m http.server 80
Serving HTTP on 0.0.0.0 port 80 ...
こんな具合にPythonでHTTPサーバーを立てればいいだけ。(Python3はcertbotを入れる時に勝手に入っている)
そんで、 Press Enter to Continue のウインドウのほうでEnterキーを叩くと・・・
$ sudo python3 -m http.server 80
Serving HTTP on 0.0.0.0 port 80 ...
34.222.229.130 - - [08/Sep/2019 13:01:39] "GET /.well-known/acme-challenge/SVxxY7APvlHPcNkBeGZA5VdrwEg1eBhNABVRkh2Go5E HTTP/1.1" 200 -
3.14.255.131 - - [08/Sep/2019 13:01:39] "GET /.well-known/acme-challenge/SVxxY7APvlHPcNkBeGZA5VdrwEg1eBhNABVRkh2Go5E HTTP/1.1" 200 -
64.78.149.164 - - [08/Sep/2019 13:01:39] "GET /.well-known/acme-challenge/SVxxY7APvlHPcNkBeGZA5VdrwEg1eBhNABVRkh2Go5E HTTP/1.1" 200 -
18.197.227.110 - - [08/Sep/2019 13:01:40] "GET /.well-known/acme-challenge/SVxxY7APvlHPcNkBeGZA5VdrwEg1eBhNABVRkh2Go5E HTTP/1.1" 200 -
4発くらいHTTP通信がやってきて、
- - - - - - - - - - - - - - - - - - - - - - - - - - - - - - - - - - - - - - - -
Press Enter to Continue
Waiting for verification...
Cleaning up challenges

IMPORTANT NOTES:
 - Congratulations! Your certificate and chain have been saved at:
   /etc/letsencrypt/live/certbot-playground.japaneast.cloudapp.azure.com/fullchain.pem
   Your key file has been saved at:
   /etc/letsencrypt/live/certbot-playground.japaneast.cloudapp.azure.com/privkey.pem
   Your cert will expire on 2019-12-07. To obtain a new or tweaked
   version of this certificate in the future, simply run certbot
   again. To non-interactively renew *all* of your certificates, run
   "certbot renew"
 - Your account credentials have been saved in your Certbot
   configuration directory at /etc/letsencrypt. You should make a
   secure backup of this folder now. This configuration directory will
   also contain certificates and private keys obtained by Certbot so
   making regular backups of this folder is ideal.
 - If you like Certbot, please consider supporting our work by:

   Donating to ISRG / Let's Encrypt:   https://letsencrypt.org/donate
   Donating to EFF:                    https://eff.org/donate-le
めでたく証明書がもらえる。
- /etc/letsencrypt/live/certbot-playground.japaneast.cloudapp.azure.com/fullchain.pem
- /etc/letsencrypt/live/certbot-playground.japaneast.cloudapp.azure.com/privkey.pem
証明書がもらえたら、PythonのHTTPサーバーは落としてもOK。
nginxでSSLオフロード
localhost:8080とかでHTTPサーバーが立ち上がってるサービスに、外からSSLで入れるようにしたい、のような用途であれば、nginxを前段にかませるのが一番手っ取り早い。
nginxのインストール
$ sudo apt-get install nginx
だと古いバージョンのnginxが入ってしまう。古くても多分動くんだろうけど、nginx.confのデフォルトがだいぶ複雑でわかりづらいので、 http://nginx.org/en/linux_packages.html#Debian に従い最新のものを入れよう。
$ sudo apt install curl gnupg2 ca-certificates lsb-release
$ echo "deb http://nginx.org/packages/debian `lsb_release -cs` nginx" | sudo tee /etc/apt/sources.list.d/nginx.list
$ curl -fsSL https://nginx.org/keys/nginx_signing.key | sudo apt-key add -
OK
$ sudo apt update && sudo apt install nginx
nginx.confの確認
$ sudo cat /etc/nginx/nginx.conf

user  nginx;
worker_processes  1;

error_log  /var/log/nginx/error.log warn;
pid        /var/run/nginx.pid;


events {
    worker_connections  1024;
}


http {
    include       /etc/nginx/mime.types;
    default_type  application/octet-stream;

    log_format  main  '$remote_addr - $remote_user [$time_local] "$request" '
                      '$status $body_bytes_sent "$http_referer" '
                      '"$http_user_agent" "$http_x_forwarded_for"';

    access_log  /var/log/nginx/access.log  main;

    sendfile        on;
    #tcp_nopush     on;

    keepalive_timeout  65;

    #gzip  on;

    include /etc/nginx/conf.d/*.conf;
}
$ sudo cat /etc/nginx/conf.d/default.conf
server {
    listen       80;
    server_name  localhost;

    #charset koi8-r;
    #access_log  /var/log/nginx/host.access.log  main;

    location / {
        root   /usr/share/nginx/html;
        index  index.html index.htm;
    }

    #error_page  404              /404.html;

    # redirect server error pages to the static page /50x.html
    #
    error_page   500 502 503 504  /50x.html;
    location = /50x.html {
        root   /usr/share/nginx/html;
    }

    # proxy the PHP scripts to Apache listening on 127.0.0.1:80
    #
    #location ~ \.php$ {
    #    proxy_pass   http://127.0.0.1;
    #}

    # pass the PHP scripts to FastCGI server listening on 127.0.0.1:9000
    #
    #location ~ \.php$ {
    #    root           html;
    #    fastcgi_pass   127.0.0.1:9000;
    #    fastcgi_index  index.php;
    #    fastcgi_param  SCRIPT_FILENAME  /scripts$fastcgi_script_name;
    #    include        fastcgi_params;
    #}

    # deny access to .htaccess files, if Apache's document root
    # concurs with nginx's one
    #
    #location ~ /\.ht {
    #    deny  all;
    #}
}
こんなかんじの、わかりやすいnginx.confがある。今回は、 conf.d/default のほうを書き換える
nginx/conf.d/default.conf の書き換え
server {
    listen      80;

    return 301 https://$host$request_uri;
}
server {
    listen              443 ssl;
    server_name         certbot-playground.japaneast.cloudapp.azure.com;
    ssl_certificate     /etc/letsencrypt/live/certbot-playground.japaneast.cloudapp.azure.com/fullchain.pem;
    ssl_certificate_key /etc/letsencrypt/live/certbot-playground.japaneast.cloudapp.azure.com/privkey.pem;

    location / {
        proxy_pass http://localhost:8080;
    }
}
んで、 sudo service nginx restart する。
動作確認。
ここまで来れば、
ブラウザで certbot-playground.japaneast.cloudapp.azure.com にアクセスすると、
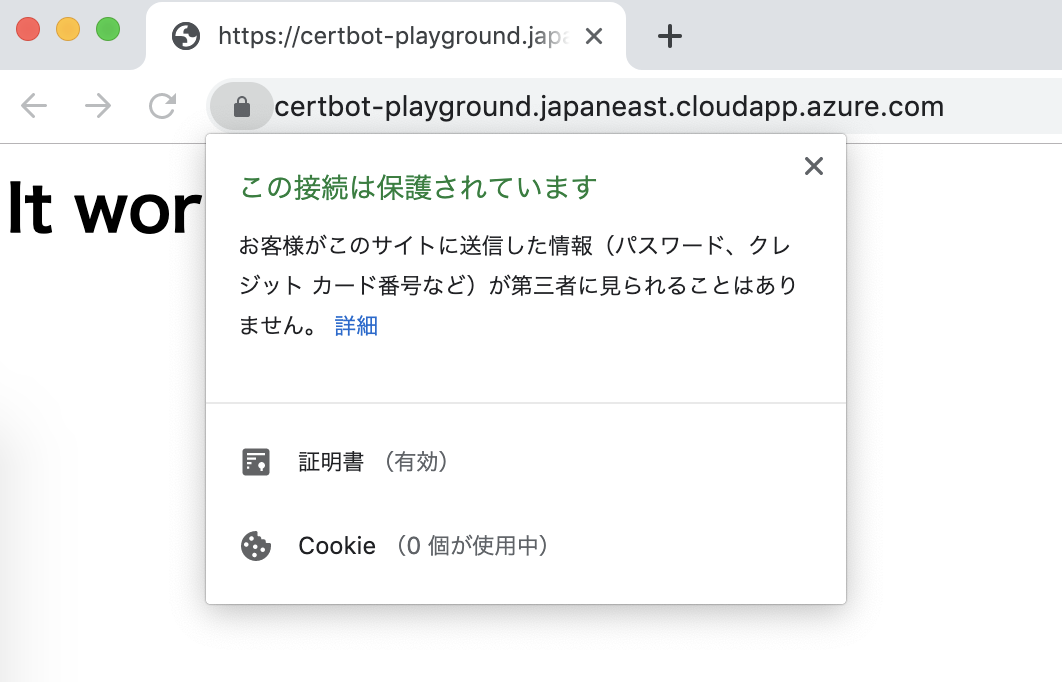
\(^o^)/