はじめに / Introduction
これまでに、Qt Creator 上で ROS Workspace を作成し、トピック通信の実装を行いました。
Qt Creator を使っているのは、GUI を簡単に作りたいという思いがあってのことです。
そこで、今回は ROS Workspace の中で GUI を作成できるようにすることを目標とします。
具体的には、情報取得ノードが受け取った情報をメインウィンドウに表示するところまで行います。

環境 / Environment
OS : Ubuntu 22.04
Qt : Qt 6.7
Qt Creator : Qt Creator 13.0.0
ROS : Humble Hawksbill
GitHub Repository
今回の内容は GitHub に公開しています。
1. Qt Widgets を使用できるようにする
Qt Widgets は GUI を構成する要素を提供するモジュールです。
CMakeLists を編集し、ROS Workspace 内で Qt Widgets を使用できるようにします。
1.1. CMAKE_PREFIX_PATH の編集
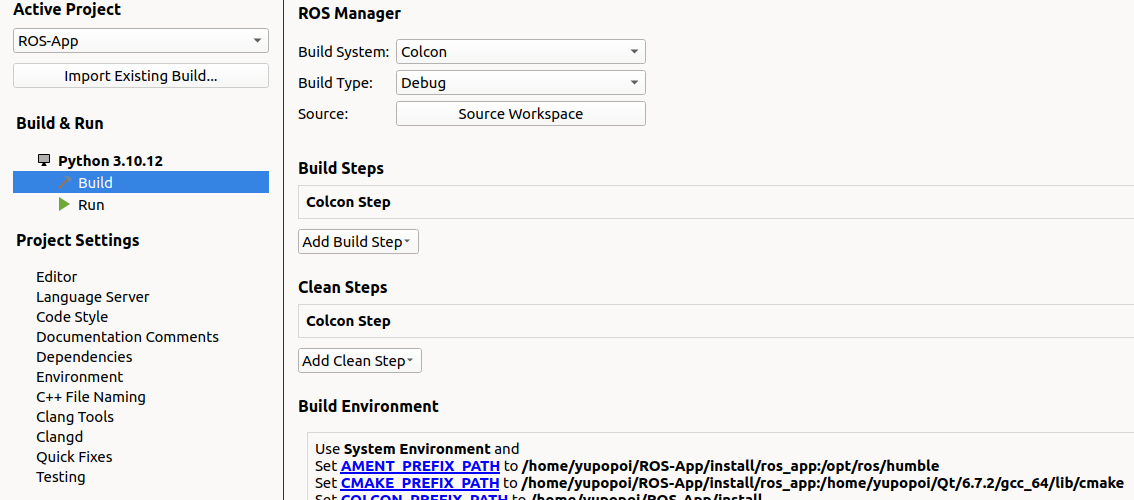
CMake で find_package をした際に、Qt のパッケージを見つけられるように、CMAKE_PREFIX_PATH にパスを追加しておきます。
CMAKE_PREFIX_PATH は「プロジェクト」内の「ビルド」で編集できます。
入力するパスは、どこにQtをインストールしたかによって変わりますが、
<included path>/Qt/<version>/gcc_64/lib/cmake
のような恰好でしょう。
私の場合は下記のようになりました。
CMAKE_PREFIX_PATH=/home/yupopoi/ROS-App/install/ros_app:/home/yupopoi/Qt/6.7.2/gcc_64/lib/cmake
もし、上記のようなディレクトリが見つからない(6.7.x ディレクトリが存在しない場合)は、Qt Maintenance Tool を使用してインストールしてください。

1.2. CMakeLists.txt への追記(Qt6 Core Widgets)
CMakeLists.txt 全文は GitHub を参照してください。
MOC, UIC, RCC の自動化
まず、Qtで使用するツールを自動で実行できるように設定します。
MOC(Meta-Object Compiler)は、QtのC++拡張を扱うプログラムです。シグナル・スロットもこれを使っているそうです。
UIC(User Interface Compiler)は、Qt Designer が生成した XML 形式のUI定義 (.ui) ファイルを読み込み、対応する C++ ヘッダーファイルまたは Python ソースファイルを作成します。
RCC(Resource Compiler) は、ビルド中にリソースを Qt アプリケーションに埋め込むために使用されます。ここでいう「リソース」は画像や音声などです。
set(CMAKE_AUTOMOC ON)
set(CMAKE_AUTOUIC ON)
set(CMAKE_AUTORCC ON)
必要なコンポーネントの追加
Qt6ライブラリのうち、 Core と Widgets コンポーネントを探し、プロジェクトに追加します。
find_package(Qt6 COMPONENTS Core Widgets REQUIRED)
qt_standard_project_setup()
1.3. GUI作成(.uiファイル作成)
今回は、情報取得ノード(subscriber.cpp)が受け取った情報を、メインウィンドウにテキストで表示するところまで行います。Qt で UI 作成を行う際には Qt Designer が便利です。
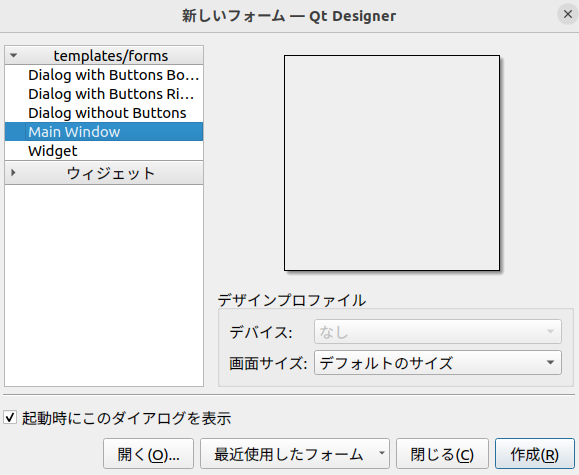
Qt Creator の Terminal に designer と打ちこむと、Qt Designer が立ち上がります。

Main Window を選択し、作成します。
テキスト表示用の QLabel を1つ用意します。名前は subscribedText とでもしておきます。

2. C++プログラム実装
main.cpp と mainwindow.cpp , mainwindow.h を作成します。小文字推奨です。
ついでに、publisher.h , subscriber.h の2つのヘッダーファイルも作成しておきます。
現在のディレクトリ構成は、このようになっています。(参考までに)

2.1. CMakeLists.txt の編集(GUI)
GUIアプリケーションをビルドするためのCMake設定を行います。
CMakeLists.txt に追記します。
追記部分
cmake_minimum_required(VERSION 3.10)
project(communication)  # Change to your package name

if(CMAKE_COMPILER_IS_GNUCXX OR CMAKE_CXX_COMPILER_ID MATCHES "Clang")
  add_compile_options(-Wall -Wextra -Wpedantic)
endif()

set(CMAKE_AUTOMOC ON)
set(CMAKE_AUTOUIC ON)
set(CMAKE_AUTORCC ON)

# find dependencies
find_package(ament_cmake REQUIRED)
find_package(rclcpp REQUIRED)
find_package(std_msgs REQUIRED)

find_package(Qt6 COMPONENTS Core Widgets REQUIRED)
qt_standard_project_setup()

# -------- ここから下を追記 --------

include_directories(${CMAKE_CURRENT_BINARY_DIR})
include_directories(${CMAKE_CURRENT_SOURCE_DIR}/gui/ui)
include_directories(${CMAKE_CURRENT_SOURCE_DIR}/gui/header)
include_directories(${CMAKE_CURRENT_SOURCE_DIR}/src/header)
include_directories(${CMAKE_CURRENT_SOURCE_DIR}/src/source)

set(CMAKE_AUTOUIC_SEARCH_PATHS gui/ui)
set(UI_FILES gui/ui/mainwindow.ui)
qt6_wrap_ui(UI_HEADERS ${UI_FILES})

add_executable(MainWindow
    gui/source/main.cpp
    gui/header/mainwindow.h
    gui/source/mainwindow.cpp
    src/header/publisher.h
    src/source/publisher.cpp
    src/header/subscriber.h
    src/source/subscriber.cpp
    ${UI_HEADERS}
)

ament_target_dependencies(MainWindow rclcpp std_msgs)
target_link_libraries(MainWindow ${Qt6Core_LIBRARIES})
target_link_libraries(MainWindow ${Qt6Widgets_LIBRARIES})

# -------- ここまで追記 --------

if(BUILD_TESTING)
  find_package(ament_lint_auto REQUIRED)
  # the following line skips the linter which checks for copyrights
  # comment the line when a copyright and license is added to all source files
  set(ament_cmake_copyright_FOUND TRUE)
  # the following line skips cpplint (only works in a git repo)
  # comment the line when this package is in a git repo and when
  # a copyright and license is added to all source files
  set(ament_cmake_cpplint_FOUND TRUE)
  ament_lint_auto_find_test_dependencies()
endif()

ament_package()
インクルードパスの追加
CMAKE_CURRENT_BINARY_DIRに存在するヘッダーファイルへのインクルードパスを追加します。具体的なヘッダーファイルの例としては ui_mainwindow.h があります。
また、/gui/ui , /gui/header , /src/header , /src/source へのインクルードパスも追加しておき,
C++ プログラム上で長いパスを書かなくても済むようにしておきます。
include_directories(${CMAKE_CURRENT_BINARY_DIR})
include_directories(${CMAKE_CURRENT_SOURCE_DIR}/gui/ui)
include_directories(${CMAKE_CURRENT_SOURCE_DIR}/gui/header)
include_directories(${CMAKE_CURRENT_SOURCE_DIR}/src/header)
include_directories(${CMAKE_CURRENT_SOURCE_DIR}/src/source)
ui_mainwindow.h の自動生成
set(CMAKE_AUTOUIC_SEARCH_PATHS gui/ui)
set(UI_FILES gui/ui/mainwindow.ui)
qt6_wrap_ui(UI_HEADERS ${UI_FILES})
CMAKE_AUTOUIC_SEARCH_PATHS には、Qtの自動 UI コンパイル(qt6_wrap_ui)のための検索パスを設定します。そのため、mainwindow.ui を含むディレクトリを指定します。
qt6_wrap_ui マクロを使用して、指定された UI ファイル(ここでは mainwindow.ui)を C++ のヘッダーファイル(ui_mainwindow.h)に変換します。${UI_HEADERS} には変換されたヘッダーファイルが設定されます。
実行ファイルの作成
add_executable(MainWindow
    gui/source/main.cpp
    gui/header/mainwindow.h
    gui/source/mainwindow.cpp
    src/header/publisher.h
    src/source/publisher.cpp
    src/header/subscriber.h
    src/source/subscriber.cpp
    ${UI_HEADERS}
)
MainWindow という実行可能ファイルを作成します。
ソースファイル、ヘッダーファイル、変換された UI ヘッダーファイル(${UI_HEADERS})を含めます。
他ライブラリとのリンク付け
ament_target_dependencies(MainWindow rclcpp std_msgs)
target_link_libraries(MainWindow ${Qt6Core_LIBRARIES})
target_link_libraries(MainWindow ${Qt6Widgets_LIBRARIES})
2.2. publisher
2.2.1. publisher.h
全文
#ifndef PUBLISHER_H
#define PUBLISHER_H

#include <rclcpp/rclcpp.hpp>
#include <std_msgs/msg/string.hpp>

#include <QtWidgets/QApplication>

class Publisher : public rclcpp::Node
{
    public:
        explicit Publisher(const std::string &topic_name);

    private:
        std::shared_ptr<std_msgs::msg::String> message_;
        rclcpp::Publisher<std_msgs::msg::String>::SharedPtr publish_;
        rclcpp::TimerBase::SharedPtr timer_;
    };

#endif // PUBLISHER_H
2.2.2. publisher.cpp
全文&解説
#include "publisher.cpp"

Publisher::Publisher(const std::string &topic_name) : Node("publisher")
{
    message_ = std::make_shared<std_msgs::msg::String>();

    auto publish_Message =
        [this]() -> void
        {
            //時刻更新
            auto now = std::chrono::system_clock::now();
            std::time_t now_c = std::chrono::system_clock::to_time_t(now);
            std::string time_str = std::ctime(&now_c);
            message_->data = time_str;

            publish_->publish(*message_);
        };

    publish_ = create_publisher<std_msgs::msg::String>(topic_name, 10);
    timer_ = create_wall_timer(std::chrono::milliseconds(100), publish_Message);
}
コンストラクタの定義
Publisher::Publisher(const std::string &topic_name) : Node("publisher")
ノードを使用するために、rclcpp::Node クラスを継承します。
ラムダ式
auto publish_Message =
        [this]() -> void
        {
            //時刻更新
            auto now = std::chrono::system_clock::now();
            std::time_t now_c = std::chrono::system_clock::to_time_t(now);
            std::string time_str = std::ctime(&now_c);

            message_->data = time_str;

            publish_->publish(*message_);
        };
時刻情報を文字列として取得し、それをメッセージとして送信します。
このラムダ式は値を返しません。
パブリッシャーの作成
publish_ = create_publisher<std_msgs::msg::String>(topic_name, 10);
create_publisher 関数はNodeクラスのメンバ関数です。第2引数は過去のメッセージ履歴をどれだけ保存するかを指定しています。第2引数の省略はできません。
タイマー設定
timer_ = create_wall_timer(std::chrono::milliseconds(100), publish_Message);
create_wall_timer 関数もNodeクラスのメンバ関数です。第1引数が実行周期、第2引数が定期的に実行したい処理(関数オブジェクト)です。
2.3. subscriber
2.3.1. subscriber.h
シグナルを発行するので、Q_OBJECT マクロの記述が必要です。
全文
#ifndef SUBSCRIBER_H
#define SUBSCRIBER_H

#include <rclcpp/rclcpp.hpp>
#include <std_msgs/msg/string.hpp>

#include <QObject>
#include <QtWidgets/QApplication>

class Subscriber : public QObject, public rclcpp::Node
{
    Q_OBJECT

    public:
        explicit Subscriber(const std::string &topic_name);

    signals:
        void logReceived(const QString &log);

    private:
        rclcpp::Subscription<std_msgs::msg::String>::SharedPtr subscription_;
};

#endif // SUBSCRIBER_H
2.3.2. subscriber.cpp
全文&解説
#include "subscriber.h"

Subscriber::Subscriber(const std::string &topic_name) : Node("subscriber")
{
    auto callback =
        [this](const std_msgs::msg::String::SharedPtr message) -> void
        {
            RCLCPP_INFO(this->get_logger(),"%s", message->data.c_str());
            emit logReceived(QString::fromStdString(message->data));
        };

    subscription_ = create_subscription<std_msgs::msg::String>(topic_name, 10, callback);
};
コンストラクタの定義
Subscriber::Subscriber(const std::string &topic_name) : Node("subscriber")
ノードを使用するために、rclcpp::Node クラスを継承します。
ラムダ式
auto callback =
        [this](const std_msgs::msg::String::SharedPtr message) -> void
        {
            RCLCPP_INFO(this->get_logger(),"%s", message->data.c_str());
            emit logReceived(QString::fromStdString(message->data));
        };
メッセージを受信したときに呼び出されるコールバック関数として定義します。
RCLCPP_INFO は 受信したメッセージのデータをログに出力します。必須ではありません。
emit logReceived(QString::fromStdString(message->data)) によってシグナルを発行します。この際、メッセージデータは QString 型に変換されます。
サブスクリプションの作成
subscription_ = create_subscription<std_msgs::msg::String>(topic_name, 10, callback);
create_subscription 関数はNodeクラスのメンバ関数です。第1引数は購読するトピックの名前、第2引数はメッセージの受信待ちキューの最大数を指定します。第3引数には、メッセージを受信したときに呼び出されるコールバック関数を指定します。
2.4. mainwindow
2.4.1. mainwindow.h
画面上に表示するためのスロットを定義しておきます。
[2024/6/5 追記]
QT_BEGIN_NAMESPACE
namespace Ui
{
    class MainWindow;
}
QT_END_NAMESPACE
の class MainWindow は 下で作成する mainwindow クラスとは別物です。
大文字・小文字に注意してください。
全文
#ifndef MAINWINDOW_H
#define MAINWINDOW_H

#include <QtWidgets>
#include <QtWidgets/QMainWindow>
#include <QLabel>

#include "ui_mainwindow.h"

QT_BEGIN_NAMESPACE
namespace Ui
{
    class MainWindow;
}
QT_END_NAMESPACE

class mainwindow : public QMainWindow
{
    Q_OBJECT

    public:
        explicit mainwindow(QWidget *parent = nullptr);

    public slots:
        void DisplaySubscription(const QString &log);

    private:
        std::unique_ptr<Ui::mainwindow> ui = nullptr;
        QLabel* label = nullptr;
};

#endif // MAINWINDOW_H
2.4.2. mainwindow.cpp
全文
#include "mainwindow.h"

mainwindow::mainwindow(QWidget *parent) : QMainWindow(parent)
{
    setWindowTitle("ROS2_With_Qt");
    ui = std::make_unique<Ui::MainWindow>();
    ui->setupUi(this);

    label = ui->subscribedText;
}

void mainwindow::DisplaySubscription(const QString &log)
{
    label->setText(log);
}

#endif // MAINWINDOW_H
2.5. main.cpp
#include "mainwindow.h"

#include "publisher.h"
#include "subscriber.h"

#include <QtWidgets/QApplication>
#include <QObject>

int main(int argc, char *argv[])
{
    setvbuf(stdout, nullptr, _IONBF, BUFSIZ);
    rclcpp::init(argc, argv);

    std::shared_ptr<Publisher> publisher = nullptr;
    std::shared_ptr<Subscriber> subscriber = nullptr;
    std::shared_ptr<rclcpp::executors::MultiThreadedExecutor> executor = nullptr;

    executor = std::make_shared<rclcpp::executors::MultiThreadedExecutor>();

    publisher = std::make_shared<Publisher>("chatter");

    subscriber = std::make_shared<Subscriber>("chatter");

    executor->add_node(publisher);
    executor->add_node(subscriber);

    std::thread executor_thread([executor](){executor->spin();});

    QApplication a(argc, argv);

    mainwindow mainWindow;
    mainWindow.show();

    QObject::connect(subscriber.get(), &Subscriber::logReceived, &mainWindow, &mainwindow::DisplaySubscription);

    return a.exec();
}
ROS2 の初期化
rclcpp::init(argc, argv);
ROS2の初期化を行います。ROS2ノードを作成する前に必ず呼び出します。
マルチスレッド化
std::shared_ptr<rclcpp::executors::MultiThreadedExecutor> executor = nullptr;
executor = std::make_shared<rclcpp::executors::MultiThreadedExecutor>();
MultiThreadedExecutor により複数のメッセージやイベントを並行して処理できるようにします。
Executors については ROS2 公式ドキュメントに詳しく書かれています。
ノードの追加
executor->add_node(publisher);
executor->add_node(subscriber);
実行(スピン)
std::thread executor_thread([executor](){executor->spin();});
MultiThreadedExecutor を別のスレッドで実行します。匿名関数内で executor が spin メソッドを呼び出すことで、ROS2ノードがメッセージを送信・受信し続けるようになります。
シグナル・スロット接続
QObject::connect(subscriber.get(), &Subscriber::logReceived, &mainWindow, &mainwindow::DisplaySubscription);
Subscriber クラスのシグナルを mainwindow クラスのスロットに接続します。
2.6. 実行ファイル指定&実行
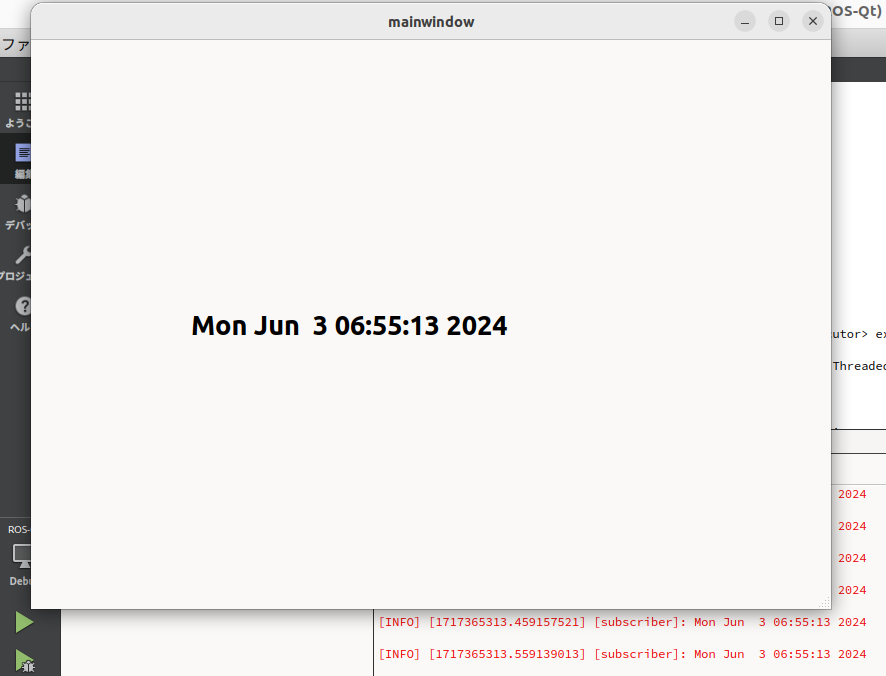
ビルド後、MainWindow を実行ファイルとして指定し、実行します。

ウィンドウが現れ、現在時刻が表示されました。めでたしめでたし。

次回
ついにロボットモデルを動かします。