Canvas を使おうとする時、毎回迷ってしまうこと、何度調べても覚えていられないことを記載しておきます。以下、検証はすべて Chrome 68で行っています。
サイズの変更
Canvas の初期値
<canvas></canvas>
と指定すると、キャンパスの初期値は300pxx150pxとなっています。
<style type="text/css">
        #view_1 {background-color:#ff0000}
</style>

<canvas id="view_1"></canvas><br>
<script>
var cv=document.getElementById('view_1');
var ctx = cv.getContext('2d');
ctx.strokeRect(0, 0, 100, 100);
ctx.strokeRect(100, 100, 100, 100);
console.log(ctx.canvas.width)
console.log(ctx.canvas.height);
console.log(ctx.canvas.clientWidth);
console.log(ctx.canvas.clientHeight);
</script>
このプログラムを動作させると、表示はこのようになります。

width = 300
height = 150
clientWidth = 300
clientHeight = 150
となります。
canvas タグでwidthを指定
<canvas width="600"></canvas>
と指定すると、レゾリューションはそままにcanvas を広げることができます。
<style type="text/css">
        #view_2 {background-color:#00ff00}
</style>

<canvas id="view_2" width="600"></canvas><br>
<script>
var cv2=document.getElementById('view_2');
var ctx2 = cv2.getContext('2d');
ctx2.strokeRect(0, 0, 100, 100);
ctx2.strokeRect(100, 100, 100, 100);
console.log(ctx2.canvas.width)
console.log(ctx2.canvas.height);
console.log(ctx2.canvas.clientWidth);
console.log(ctx2.canvas.clientHeight);
</script>
このプログラムを動作させると、表示はこのようになります。
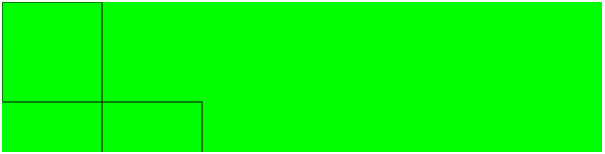
width = 600
height = 150
clientWidth = 300
clientHeight = 150
となります。
CSSでwidthを指定
<style type="text/css">
        #view_3 {background-color:#0000ff; width:600;}
</style>
CSSにwidthを記述すると、初期値の幅が記載された値になるように全体に拡大されます。
<style type="text/css">
        #view_3 {background-color:#0000ff; width:600;}
</style>

<canvas id="view_3"></canvas><br>
<script>
var cv3=document.getElementById('view_3');
var ctx3 = cv3.getContext('2d');
ctx3.strokeRect(0, 0, 100, 100);
ctx3.strokeRect(100, 100, 100, 100);
console.log(ctx3.canvas.width)
console.log(ctx3.canvas.height);
console.log(ctx3.canvas.clientWidth);
console.log(ctx3.canvas.clientHeight);
</script>
このプログラムを動作させると、表示はこのようになります。
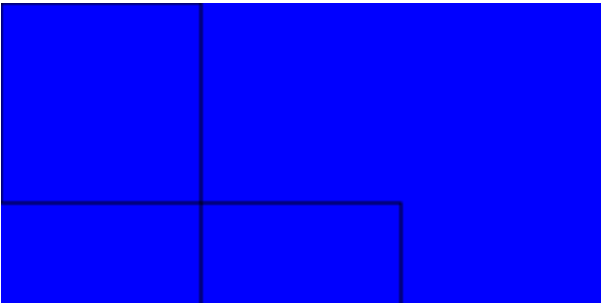
width = 300
height = 150
clientWidth = 600
clientHeight = 300
となります。
位置あわせ
absoluteでTop, Left を設定
<style type="text/css">
	#view_1 {
		background-color:#ff0000;
		position:absolute;
		top: 50px;
		left: 50px;
	}

	#view_2 {
		background-color:#00ff00;
		position:absolute;
		top: 150px;
		left: 150px;
	}
</style>

<canvas id="view_1"></canvas>
<canvas id="view_2"></canvas>
<script>
var cv1=document.getElementById('view_1');
var ctx1 = cv1.getContext('2d');
ctx1.strokeRect(0, 0, 100, 100);
ctx1.strokeRect(100, 100, 100, 100);
console.log(ctx1.canvas.offsetTop);
console.log(ctx1.canvas.offsetLeft);

var cv2=document.getElementById('view_2');
var ctx2 = cv2.getContext('2d');
ctx2.strokeRect(0, 0, 100, 100);
ctx2.strokeRect(100, 100, 100, 100);
console.log(ctx2.canvas.offsetTop);
console.log(ctx2.canvas.offsetLeft);
</script>
このプログラムを動作させると、表示はこのようになります。
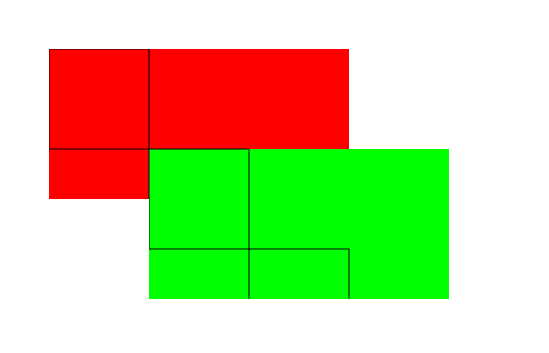
view_1 のtop, left は
offsetTop = 50
offsetLeft = 50
view_2 のtop, left は
offsetTop = 150
offsetLeft = 150
となります。
<body style="margin-right:28px;margin-left:28px;margin-top:20px;">
absolute の設定では、body の中でマージンを設定したとしても位置( offsetTop, offsetLeft ) は同じ値です。
relativeでTop, Left を設定
relativeは、ちょっと面倒。
<body>
<style type="text/css">
	#view_1 {
		background-color:#ff0000;
		position:relative;
		top: 0px;
		left: 0px;
	}

	#view_2 {
		background-color:#00ff00;
		position:absolute;
		top: 0px;
		left: 0px;
	}
</style>

<canvas id="view_1"></canvas>
<canvas id="view_2"></canvas>
~以下略~
</body>
view_1 のtop, left は
offsetTop = 8
offsetLeft = 8
view_2 のtop, left は
offsetTop = 8
offsetLeft = 313
となります。view_1 のマージンはTop もLeft も8、view_2 のLeftはview_1 の右端から +5の位置に配置されます。Chrome が勝手に配置しているものと思われます。FireFox も同じでした。
この初期値、+8 と +313 が以下のような場合にも足し算されます。
<body>
<style type="text/css">
	#view_1 {
		background-color:#ff0000;
		position:relative;
		top: 50px;
		left: 50px;
	}

	#view_2 {
		background-color:#00ff00;
		position:relative;
		top: 150px;
		left: 150px;
	}
</style>

<canvas id="view_1"></canvas>
<canvas id="view_2"></canvas>
view_1 のtop, left は
offsetTop = 58
offsetLeft = 58
view_2 のtop, left は
offsetTop = 158
offsetLeft = 463 ( 313+150 =463 )
となります。
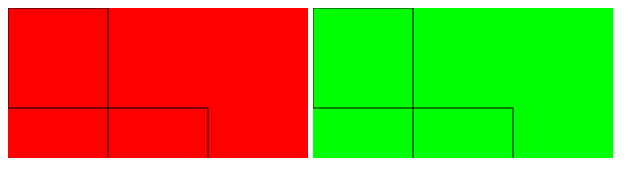
static の場合
position がstaticの場合、top, leftの設定は無視されます。
<canvas> タグが置かれた場所に依存します。<br> があればTop の値が大きくなります。
<body>
<style type="text/css">
	#view_1 {
		background-color:#ff0000;
		position:static;
		top: 50px;
		left: 50px;
	}

	#view_2 {
		background-color:#00ff00;
		position:static;
		top: 150px;
		left: 150px;
	}
</style>
<br><br>
<canvas id="view_1"></canvas>
<canvas id="view_2"></canvas>
<br><br>が2つ入っていると
view_1 のtop, left は
offsetTop = 56
offsetLeft = 8
view_2 のtop, left は
offsetTop = 56
offsetLeft = 313
となりました。