はじめに
以前に記した「TOPPERS/ASP3のビルド環境の検証」でSTM32F401-Nucleo用の TOPPERS/ASP3 3.5.0をビルドして使いましたが、TOPPERS/ASP3 が 3.6.0 にバージョンアップしてRuby 2.7系のshellライブラリ問題が解決したようなので、ビルドを試してみようと思いました。
・「TOPPERS/ASP3のビルド環境の検証」
https://qiita.com/Yukiya_Ishioka/items/2317b35ab0b98e15f6d0
ただし、現時点で TOPPERS/ASP3 が 3.6.0 は Cortex-M用のパッケージは提供されていないため、少し強引に 3.5.0用のCortex-Mターゲットのコードを 3.6.0のソースツリーへコピーしてビルドしています。
TOPPERSやTOPPERSプロジェクト、TOPPERS/ASP3の詳細は以下のページを参照してください。
・TOPPERSのページ
https://www.toppers.jp/
・TOPPERSプロジェクトのページ
https://www.toppers.jp/project.html
・TOPPERS/ASP3カーネルのページ
https://www.toppers.jp/asp3-kernel.html
開発環境
はじめに に記した「TOPPERS/ASP3のビルド環境の検証」の「環境構築」にラズベリーパイを使った開発環境の構築方法を記してあるので、こちらを参照ください。
・「TOPPERS/ASP3のビルド環境の検証」の「環境構築」
https://qiita.com/Yukiya_Ishioka/items/2317b35ab0b98e15f6d0#環境構築
ソースのダウンロード
「TOPPERS/ASP3カーネル ターゲット非依存部パッケージ」のasp3-3.6.0.tar.gzと「TOPPERS/ASP3カーネル簡易パッケージ・Nucleo F401RE簡易パッケージ」のasp3_nucleo_f401re_gcc-20200414.zipを使います。
以下に記す URLから各ファイルをダウンロードしてください。
・asp3-3.6.0.tar.gz
https://www.toppers.jp/download.cgi/asp3-3.6.0.tar.gz
・asp3_nucleo_f401re_gcc-20200414.zip
https://www.toppers.jp/download.cgi/asp3_nucleo_f401re_gcc-20200414.zip
●参考
・「TOPPERS/ASP3カーネル個別パッケージのダウンロード」ページ
https://www.toppers.jp/asp3-d-download.html
・「TOPPERS/ASP3カーネル簡易パッケージのダウンロード」ページ
https://www.toppers.jp/asp3-e-download.html
ソースツリーの構築
前項でダウンロードしたソースファイルから必要なファイル、ディレクトリを集めてビルドに必要なソースツリーを構築します。
ディレクトリの作成
ホームディレクトリ配下にtoppersディレクトリを作成し、ここに先にダウンロードしたasp3-3.6.0.tar.gzとasp3_nucleo_f401re_gcc-20200414.zipを配置します。
/home/ubuntu/toppers
-rw-rw-r--  1 ubuntu ubuntu  718432 Feb  4 01:10 asp3-3.6.0.tar.gz
-rw-rw-r--  1 ubuntu ubuntu 3995145 Dec  4 11:59 asp3_nucleo_f401re_gcc-20200414.zip
/home/ubuntu/toppersディレクトリへ移動し、temp1とtemp2の2つのディレクトリを作成します。
mkdir temp1 temp2
ソースファイルの展開
temp1とtemp2の2つのディレクトリを使い、asp3-3.6.0.tar.gzとasp3_nucleo_f401re_gcc-20200414.zipを展開します。
はじめにtemp1へ移動してasp3-3.6.0.tar.gzファイルを展開します。
cd temp1
tar xzf ../asp3-3.6.0.tar.gz
ubuntu: temp1$ ll
total 12
drwxrwxr-x  3 ubuntu ubuntu 4096 Feb 17 02:14 ./
drwxrwxr-x  8 ubuntu ubuntu 4096 Feb 17 02:14 ../
drwxrwxr-x 16 ubuntu ubuntu 4096 Feb 17 02:14 asp3/
次にtemp2へ移動してasp3_nucleo_f401re_gcc-20200414.zipファイルを展開します。
cd ../temp2
unzip ../asp3_nucleo_f401re_gcc-20200414.zip
ubuntu: temp2$ ll
total 12
drwxrwxr-x  3 ubuntu ubuntu 4096 Feb 17 02:14 ./
drwxrwxr-x  8 ubuntu ubuntu 4096 Feb 17 02:14 ../
drwxr-xr-x 16 ubuntu ubuntu 4096 Apr 14  2020 asp3/
ビルド用のソースツリーの構築
temp1配下でasp3-3.6.0.tar.gzファイルを展開して生成されたasp3ディレクトリ配下に STM32F401-Nucleo用のファイルをコピーして、ビルド用のソースツリーを構築します。
temp1配下へ移動します。
cd ../temp1
temp2/asp3からSTM32F401-Nucleoのビルドに必要な3つのディレクトリをコピーします。
1)gcc版Cortex-M用ディレクトリをasp3/archへコピー
2)gcc版STM32F401-Nucleo用ディレクトリをasp3/targetへコピー
3)TECS用ディレクトリをasp3ディレクトリへコピー
/bin/cp -a ../temp2/asp3/arch/arm_m_gcc ./asp3/arch/
/bin/cp -a ../temp2/asp3/target/nucleo_f401re_gcc ./asp3/target/
/bin/cp -a ../asp3/tecsgen ./asp3
ここまででビルドに必要なソースツリーの構築は完了です。
/home/ubuntu/toppers/temp1/asp3
 |--MANIFEST
 |--README.txt
 |--arch
 |  |--arm_m_gcc
 |  |--gcc
 |  |--simtimer
 |  |--tracelog
 |--cfg
 |--configure.rb
 |--doc
 |--extension
 |--include
 |--kernel
 |--library
 |--sample
 |--syssvc
 |--target
 |  |--dummy_gcc
 |  |--nucleo_f401re_gcc
 |--tecs_kernel
 |--tecsgen
 |--test
 |--test_cfg
 |--utils
STM32F401-Nucleo用TOPPERS/ASP3のビルド
STM32F401-Nucleo用のTOPPERS/ASP3をビルドします。
ビルドディレクトリの作成
はじめにビルド用のディレクトリを作成し、移動します。
mkdir build
cd build/
/home/ubuntu/toppers/temp1/asp3
 |--asp3
 |--build
TOPPERS/ASP3のビルド
ビルドに必要なコンフィギュレーションやMakefileを修正後、TOPPERS/ASP3のビルドを行います。
はじめに、以下のコマンドでSTM32F401-Nucleo用のコンフィギュレーションを行い、Makefileなどを生成します。
../asp3/configure.rb -T nucleo_f401re_gcc
ubuntu: build$ ../asp3/configure.rb -T nucleo_f401re_gcc
Generating Makefile from ../asp3/sample/Makefile.
ubuntu: build$ ll
total 32
drwxrwxr-x 3 ubuntu ubuntu  4096 Feb 17 02:32 ./
drwxrwxr-x 4 ubuntu ubuntu  4096 Feb 17 02:17 ../
-rw-rw-r-- 1 ubuntu ubuntu 17425 Feb 17 02:32 Makefile
drwxrwxr-x 2 ubuntu ubuntu  4096 Feb 17 02:32 objs/
次に、ボードへ書き込むためのバイナリファイルを生成するため、Makefileを修正します。
435行目に「$(OBJNAME).bin」を追加します。
430 #
431 #  エラーチェック処理
432 #
433 .PHONY: check
434 check: check.timestamp ;
435 check.timestamp: cfg2_out.db $(OBJNAME).syms $(OBJNAME).srec
436         $(CFG) --pass 3 $(CFG_KERNEL) -O $(INCLUDES) -T $(TARGET_CHECK_TRB)
↓
430 #
431 #  エラーチェック処理
432 #
433 .PHONY: check
434 check: check.timestamp ;
435 check.timestamp: cfg2_out.db $(OBJNAME).syms $(OBJNAME).srec $(OBJNAME).bin
436         $(CFG) --pass 3 $(CFG_KERNEL) -O $(INCLUDES) -T $(TARGET_CHECK_TRB)
Makefileの修正を終えたら以下のコマンドでビルドを開始します。
make
ビルドの最後に「_kernel_mpfinib_table」がないとエラーメッセージが出力されますが、asp.binなどのasp関連のファイルが生成されていたらビルドは成功です。
arm-none-eabi-nm -n asp > asp.syms
arm-none-eabi-objcopy -O srec -S asp asp.srec
arm-none-eabi-objcopy -O binary -S asp asp.bin
ruby ../asp3/cfg/cfg.rb --pass 3 --kernel asp -O -I. -I../asp3/include  -I../asp3/target/nucleo_f401re_gcc -I../asp3/target/nucleo_f401re_gcc/stm32fcube -I../asp3/arch/arm_m_gcc/stm32f4xx_stm32cube -I../asp3/arch/arm_m_gcc/stm32f4xx_stm32cube/STM32F4xx_HAL_Driver/Inc -I../asp3/arch/arm_m_gcc/stm32f4xx_stm32cube/CMSIS/Device/ST/STM32F4xx/Include -I../asp3/arch/arm_m_gcc/stm32f4xx_stm32cube/CMSIS/Include -I../asp3/arch/arm_m_gcc/common -I../asp3/arch/gcc -I../asp3 -I../asp3/sample -I./gen -I../asp3/tecs_kernel -T ../asp3/target/nucleo_f401re_gcc/target_check.trb \
                        --rom-symbol asp.syms --rom-image asp.srec
error: E_SYS: symbol `_kernel_mpfinib_table' not found
make[1]: *** [Makefile:436: check.timestamp] Error 1
make[1]: Leaving directory '/home/ubuntu/toppers/temp1/build'
make: *** [Makefile:224: all] Error 2
ubuntu: build$ ll
total 1600
drwxrwxr-x 4 ubuntu ubuntu   4096 Feb 17 02:36 ./
drwxrwxr-x 4 ubuntu ubuntu   4096 Feb 17 02:17 ../
-rw-rw-r-- 1 ubuntu ubuntu  17440 Feb 17 02:35 Makefile
-rwxrwxr-x 1 ubuntu ubuntu 558040 Feb 17 02:36 asp*
-rwxrwxr-x 1 ubuntu ubuntu  26784 Feb 17 02:36 asp.bin*
-rwxrwxr-x 1 ubuntu ubuntu  80406 Feb 17 02:36 asp.srec*
-rw-rw-r-- 1 ubuntu ubuntu   9662 Feb 17 02:36 asp.syms
動作確認
ビルドで生成されたasp.binファイルをSTM32F401-Nucleoへ書き込み、mini-B USBコネクタ(ST-Linkポート)からの出力を見ることで動作を確認できます。
asp.binファイルの書き込み
STM32F401-Nucleoボード上のmini-B USBコネクタをラズベリーパイのUSBコネクタへ接続するとでSTM32F401-Nucleoをマスストレージとして認識します。
ubuntu: build$ [38141.175617] sd 0:0:0:0: [sda] No Caching mode page found
[38141.181081] sd 0:0:0:0: [sda] Assuming drive cache: write through
認識したら以下のコマンドでマウントします。
sudo mount /dev/sda /mnt
ubuntu: build$ sudo mount /dev/sda /mnt
ubuntu: build$
ubuntu: build$ ll /mnt
total 16
drwxr-xr-x  2 root root 1024 Jan  1  1970 ./
drwxr-xr-x 20 root root 4096 Feb 16 15:41 ../
-r-xr-xr-x  1 root root   46 May 28  2004 DETAILS.TXT*
-r-xr-xr-x  1 root root  512 May 28  2006 MBED.HTM*
ubuntu: build$
asp.binファイルをSTM32F401-Nucleoへコピーします。
sudo cp asp.bin /mnt
STM32F401-Nucleoをアンマウントしてマスストレージを切り離します。
sudo umount /mnt
動作確認
ラズベリーパイに minicomなどのシリアル端末ソフトをインストールすればラズベリーパイで動作確認ができますが、私はSTM32F401-Nucleoを WindowsPCへ接続しなおして動作確認しました。
STM32F401-Nucleoボード上のmini-B USBコネクタを ST-Linkのドライバをインストールした WindowsPCへ接続することで、仮想COMポートとして認識します。
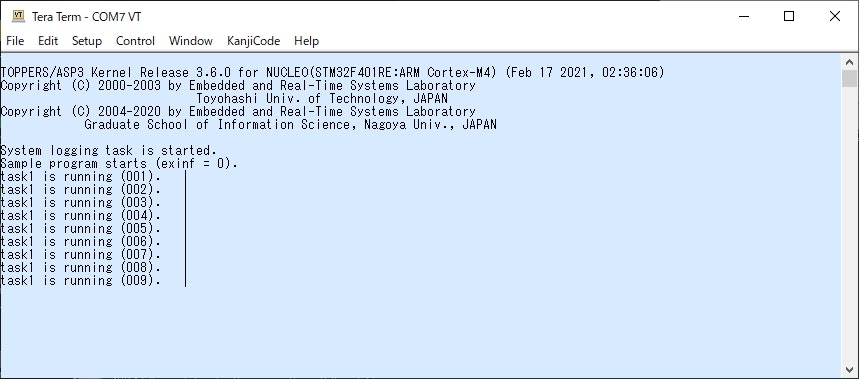
仮想COMポートとして認識後、TeraTERMなどの端末ソフトを起動し、STM32F401-Nucleoのリセットボタンでリセットすることで以下のメッセージが出力されます。
このメッセージが出力されればTOPPERS/ASP3のビルドとSTM32F401-Nucleoへの書き込みが成功です。
TOPPERS/ASP3 Kernel Release 3.6.0 for NUCLEO(STM32F401RE:ARM Cortex-M4) (Feb 17 2021, 02:36:06)
Copyright (C) 2000-2003 by Embedded and Real-Time Systems Laboratory
                            Toyohashi Univ. of Technology, JAPAN
Copyright (C) 2004-2020 by Embedded and Real-Time Systems Laboratory
            Graduate School of Information Science, Nagoya Univ., JAPAN

System logging task is started.
Sample program starts (exinf = 0).
task1 is running (001).   |
task1 is running (002).   |
task1 is running (003).   |
task1 is running (004).   |
task1 is running (005).   |
task1 is running (006).   |
ちなみにこのラズベリーパイ上で3.5.0用の「TOPPERS/ASP3カーネル簡易パッケージ・Nucleo F401RE簡易パッケージ」のasp3_nucleo_f401re_gcc-20200414.zipだけだとコンフィギュレーションが以下ようにエラー終了するので、3.6.0に含まれたコンフィギュレーション対策が機能していることが確認できます。
ubuntu: build$ ../asp3/configure.rb -T nucleo_f401re_gcc
Traceback (most recent call last):
        2: from ../asp3/configure.rb:47:in `<main>'
        1: from /usr/lib/ruby/2.7.0/rubygems/core_ext/kernel_require.rb:92:in `require'
/usr/lib/ruby/2.7.0/rubygems/core_ext/kernel_require.rb:92:in `require': cannot load such file -- shell (LoadError)
さいごに
TOPPERS/ASP3のRuby 2.7系でのコンフィギュレーションの問題回避のために、少し強引ですがSTM32F401-NucleoでTOPPERS/ASP3 3.6.0が使える環境を作成してみました。
カーネル共通部分のソースは3.6.0用のソースコードを用いているので、3.6.0としての改善点が反映されていると思うので、正式版が提供されるまでの試行用途には使えると考えています。
また、同様の手順でSTM32L552-Nucleo用ソースコードのビルドにも成功しているので、他のボードへも適用できるかもしれません。
この記事がTOPPERS/ASP3を利用している人やこれから使ってみようと思っている人の参考になればと思います。
- 以上 -
