TL;DR
- Notion APIとNext.jsを使って、Notionに書いた日記をWebサイトにレンダリングした
- NotionをヘッドレスCMSとして活用可能
-> 各デバイスのアプリから投稿/編集ができて便利 - ただしAPIの機能がまだ十分でない部分がある
作ったもの
背景
最近Notionを使い始め、その便利さとUXの良さに感動していました。また同時に友達が日記を始めているのを見て、自分もやりたくなっていました。
そんな折にこちらの記事を拝読し、NotionのUIを利用して記事を投稿できる日記が作れたら便利だろうと考えました。
いわゆるJAMStack構成になるので、静的サイトレンダリングができるフレームワークが適しています。Reactが得意なのでNext.jsを使うことにしました。
Notion API
準備
まずはNotion APIの使い方からご紹介します。
ブラウザでNotionにログインした状態でMy integrationsページからAPIのintegration(クライアント)を作成します。名前とそのクライアントが利用するワークスペースを選択すればOKです。
すると画面上でAPIトークンが得られるのでコピーしておきましょう。
次にNotionのアプリ上で先ほど作ったクライアントにNotionのページ/データベースへのアクセス権限を与えます。方法はシンプルで、対象のページ/データベースの上部Shareメニュー > Invite > Select an integrationで作成したクライアントを選択するだけです1。
これでNotion APIからページ/データベースの内容を取得する準備が整いました。
日記を書く
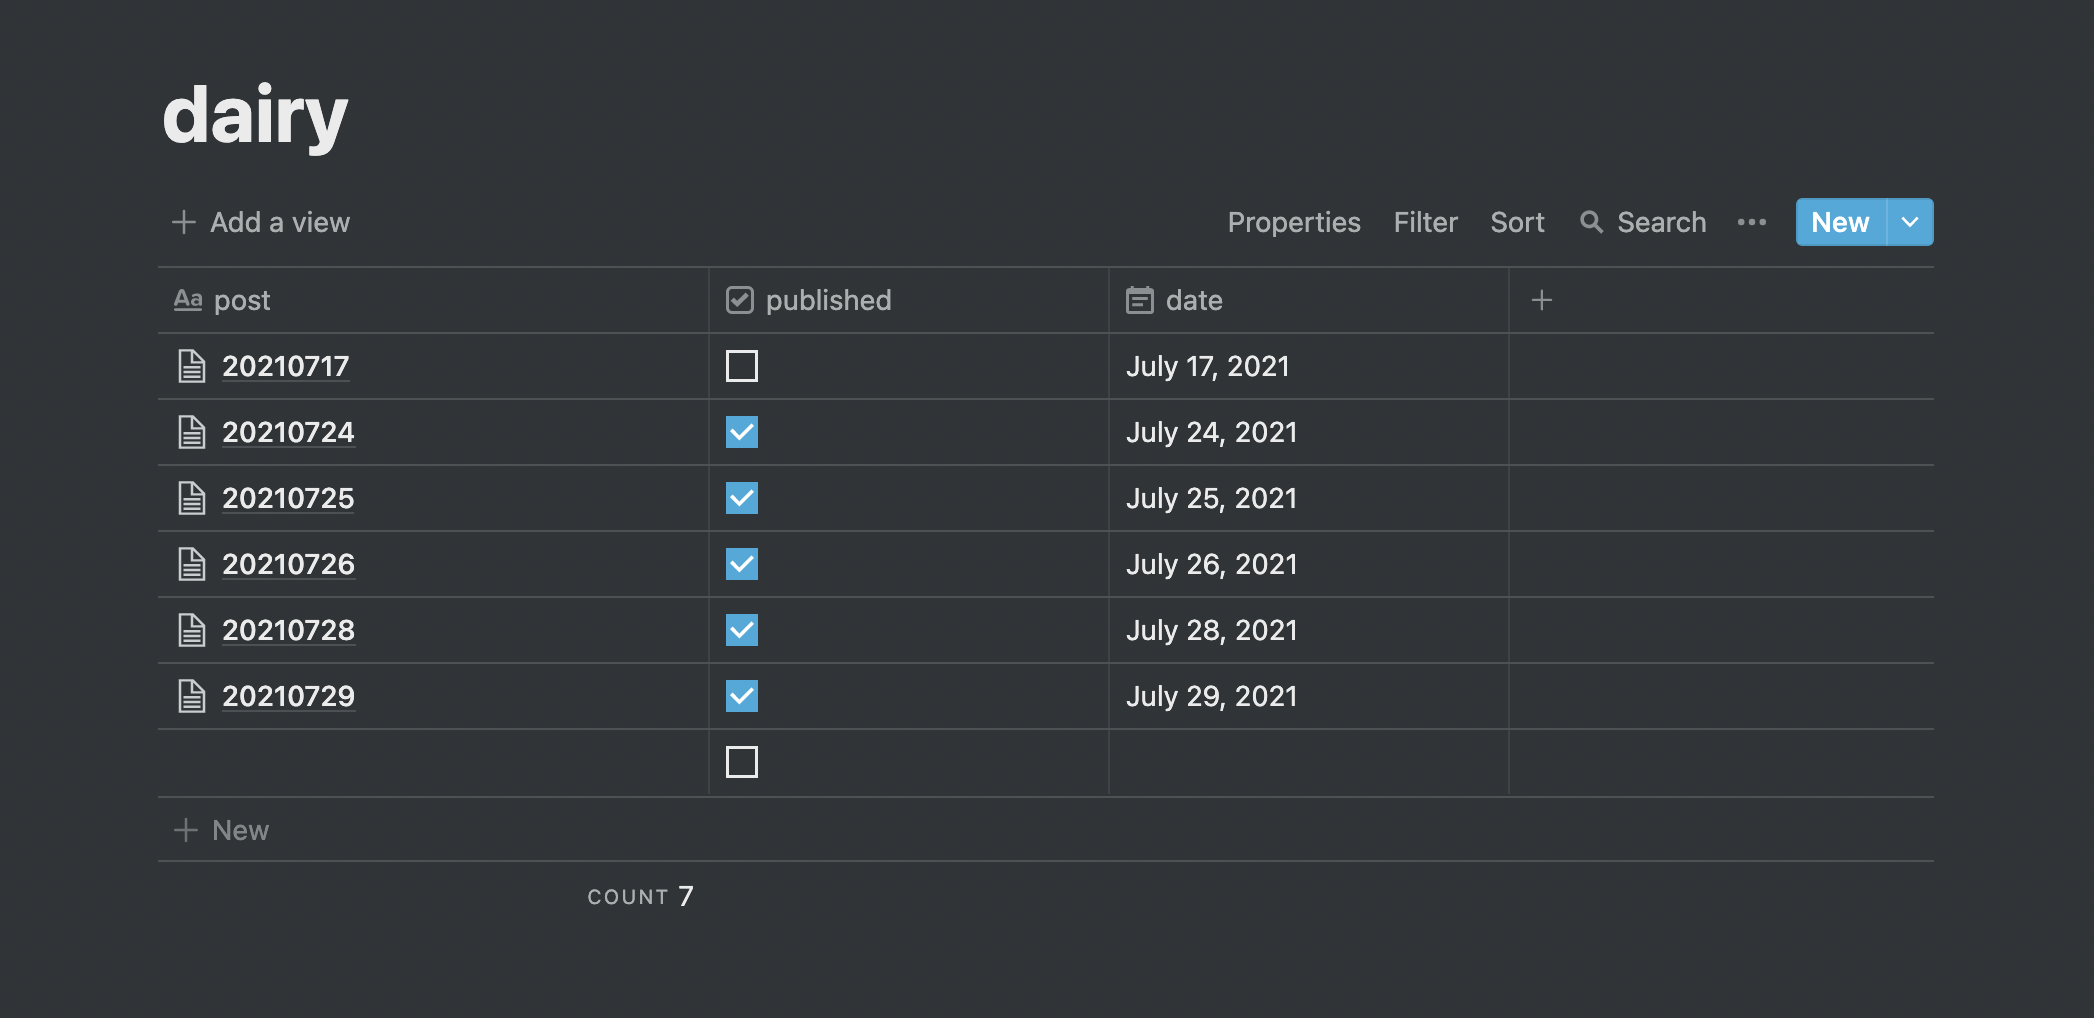
日記はデータベースの形で整理しておくとNotionからAPIで取得する際に便利です。
以下のようにテーブル形式のデータベースを作成します。
APIからデータを取得した際に、published列にチェックが入っている行のみをレンダリングします。またdate列は日記の日付インデックスをつけるためのものです。
こちらのデータベースにintegrationのアクセス権限を与えます。またCopy linkでhttps://www.notion.so/{データベースID}?v=xxxといったURLがコピーされます。このURLからデータベースIDを取り出しておきましょう。APIでデータを取得する際に必要になります。
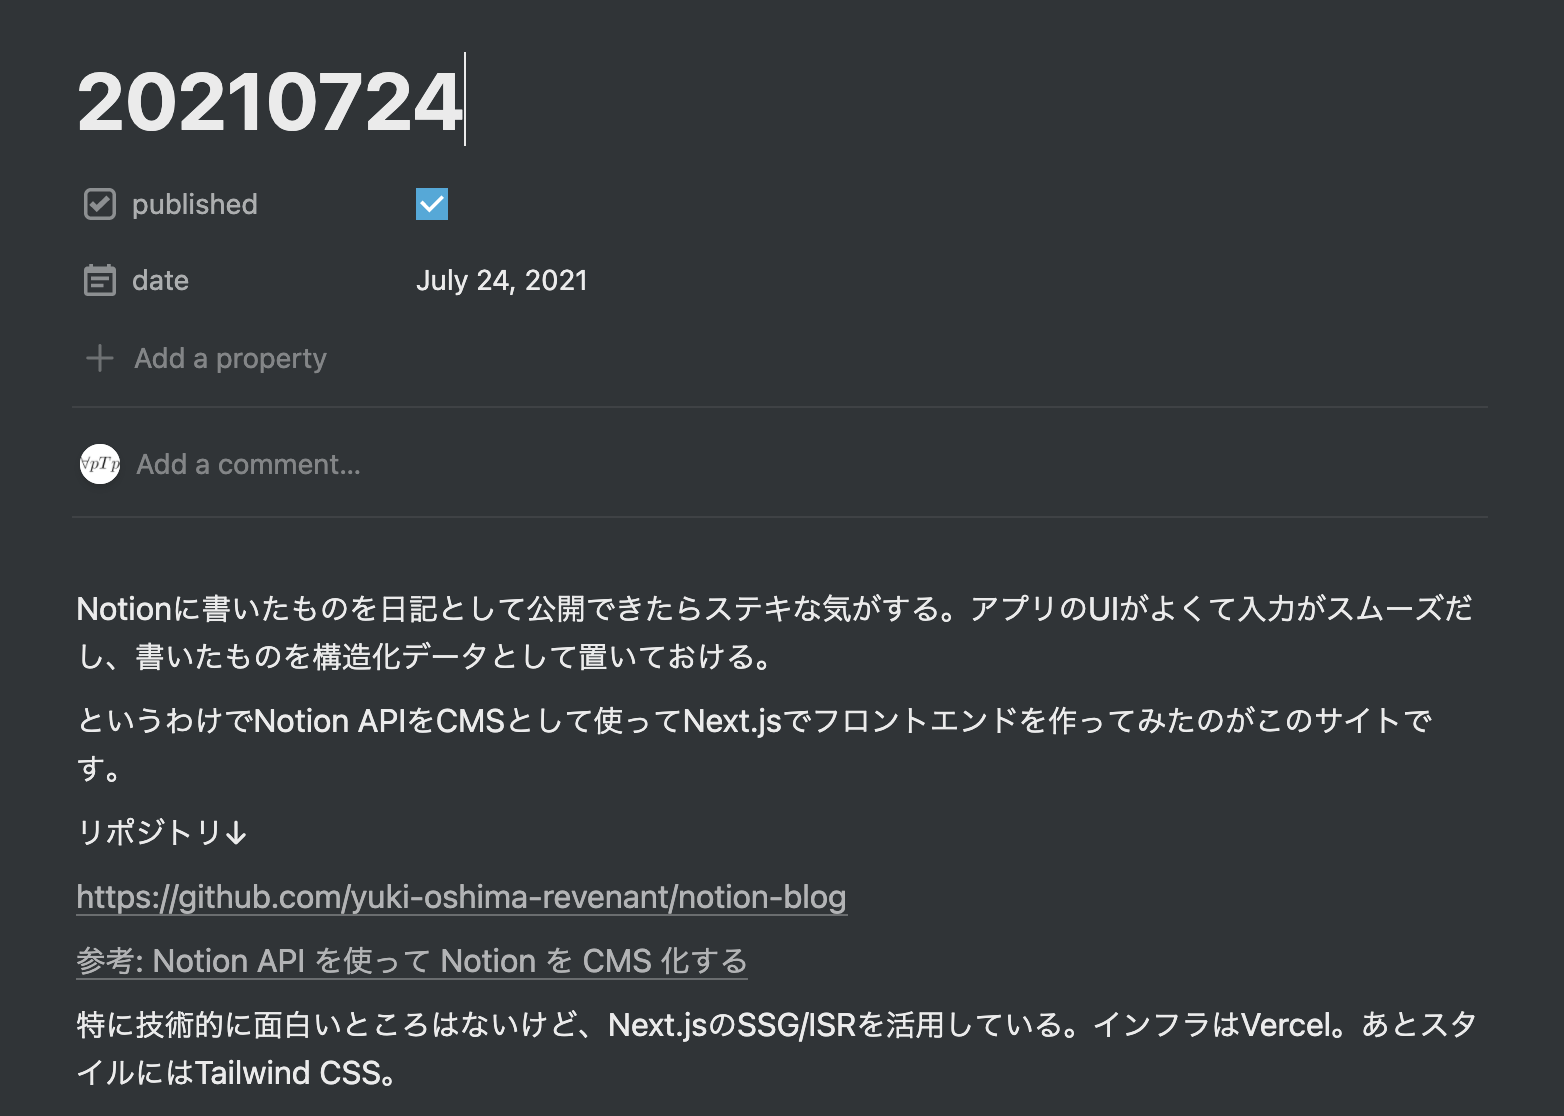
各行に記事を追加していきます。筆者はタイミングによってPCとモバイルのアプリを使い分けて書いています。リアルタイムに同期されるためデバイス間のやりとりがスムーズで便利です。
この記事が以下のようにレンダリングされます。
APIで記事を取得
node.jsのSDKがあるのでそれを利用しました2。
Notion APIにはDatabase/Page/Blockの三種類のオブジェクトがあります。
各リソースの取得方法と取得内容は以下の記事を参考に実装していきました。
Notionに書いた日記の親ページのテーブルの内容はnotion.databases.query()で取得できます。.envファイルを使って環境変数にAPIトークン(NOTION_SECRET)と先ほどURLから取得したデータベースID(NOTION_DATABASE_ID)を入れておいて以下のように実装しました。
import { Client } from '@notionhq/client';

const notion = new Client({
    auth: process.env.NOTION_SECRET,
});

const database = await notion.databases.query({
    database_id: process.env.NOTION_DATABASE_ID || '',
    filter: {
        or: [
            {
                property: 'published',
                checkbox: {
                    equals: true,
                },
            },
        ]
    },
    sorts: [
        {
            property: 'date',
            direction: 'descending',
        },
    ]
});
引数でpublishedにチェックをつけている(=true)行に絞り込み、dateの日付降順に並び替えています。
以下のようなレスポンスが返ってきます。
{
  object: 'list',
  results: [
    {
      object: 'page',
      id: 'xxxxxxxx-xxxx-xxxx-xxxx-xxxxxxxxxxxx',
      created_time: '2021-07-28T14:43:00.000Z',
      last_edited_time: '2021-07-29T17:05:00.000Z',
      parent: {
        type: 'database_id',
        database_id: 'xxxxxxxx-xxxx-xxxx-xxxx-xxxxxxxxxxxx'
      },
      archived: false,
      properties: {
        date: {
          id: 'xxxx',
          type: 'date',
          date: { start: '2021-07-29', end: null }
        },
        published: { id: 'xxxx', type: 'checkbox', checkbox: true },
        post: {
          id: 'title',
          type: 'title',
          title: [
            {
              type: 'text',
              text: { content: '20210729', link: null },
              annotations: {
                bold: false,
                italic: false,
                strikethrough: false,
                underline: false,
                code: false,
                color: 'default'
              },
              plain_text: '20210729',
              href: null
            }
          ]
        }
      },
      url: 'https://www.notion.so/20210729-xxxxxxxxxxxxxxxxxxxxxxxxxxxxxxxx'
    }
    ...
  ],
  next_cursor: null,
  has_more: false
}
resultsの項目に各行のデータが入っています。次に各記事のIDを使って記事内容を取得します。notion.blocks.children.list()でblock_idに記事のIDを入れてリクエストすると記事内容が取得できます。
const page = notion.blocks.children.list({ block_id: database.result[0].id });
{
  object: 'list',
  results: [
    {
      object: 'block',
      id: 'xxxxxxxx-xxxx-xxxx-xxxx-xxxxxxxxxxxx',
      created_time: '2021-07-29T16:32:00.000Z',
      last_edited_time: '2021-07-29T16:38:00.000Z',
      has_children: false,
      type: 'paragraph',
      paragraph: {
        text: [
          {
            type: 'text',
            text: {
              content: 'xxxxx',
              link: null
            },
            annotations: {
              bold: false,
              italic: false,
              strikethrough: false,
              underline: false,
              code: false,
              color: 'default'
            },
            plain_text: 'xxxxx',
            href: null
          }
        ]
      }
    },
    ...
  ],
  next_cursor: null,
  has_more: false
}
resultsの項目に記事に書いた各ブロックの内容が含まれています。タイプごとに項目名が変わりますがシンプルな文章ブロックの場合はparagraphで返ってきます。
以下に型定義されているタイプのブロックのみが対応されているようです。
コードブロックなどは内容がunsupportedとしか返ってこず、記事で使うことができません。
フロントエンド
記事のレンダリング
以上で取得したデータベースと記事の情報を使って以下のようなデータを作り、Next.jsでレンダリングしています。
export type Post = {
    id: string,
    title: string,
    date: string,
    ymd: string,
    createdTs: string,
    lastEditedTs: string,
    contents: {
        type: 'paragraph',
        text: string | null,
        link: string | null,
        ...
    }[]
};
[
  {
    id: 'xxxxxxxx-xxxx-xxxx-xxxx-xxxxxxxxxxxx',
    title: '20210729',
    date: '2021-07-29',
    ymd: '20210729',
    createdTs: '2021-07-28T14:43:00.000Z',
    lastEditedTs: '2021-07-29T17:05:00.000Z',
    contents: [
      {
        type: 'paragraph',
        text: 'xxxxx',
        link: 'xxxxx'
      }
    ]
  }
]
データベースから記事の一覧を取得してgetStaticPaths()で動的ルーティングを行い、getStaticProps()で各記事の内容を取得して静的サイト生成を行います。
ISRを使ってサイトを更新するためにgetStaticProps()の戻り値にはrevalidateを指定してあります。
記事をレンダリングするコンポーネントはざっくり以下のような様子です。Tailwind CSSを利用しています。対応していないブロックタイプも多いのであまり細かく作っていませんが、リンクのついているブロックはa要素にしています。
const PostBody: React.FunctionComponent<{ post: Post }> = ({ post }) => {
    const router = useRouter();
    return (
        <div key={`${post.title}_content`} className="mb-12">
            <div className="mb-2">
                <h2
                    className="text-2xl font-bold cursor-pointer"
                    onClick={() => { router.push(`/post/${post.ymd}`) }}
                >{post.title}</h2>
                <div className="text-gray-500 text-sm my-1">
                    <div>
                        {`Date: ${post.date}`}
                    </div>
                    <div>
                        {`Last Edited: ${moment(post.lastEditedTs).format('YYYY-MM-DD HH:mm:ss')}`}
                    </div>
                </div>
            </div>
            <div className="whitespace-normal break-words">
                {post.contents.map((content, i) => (
                    content.link
                        ? (
                            <div key={i} className="leading-6 my-3">
                                <a
                                    href={content.link}
                                    className="text-gray-600 underline my-3"
                                    target="_blank"
                                    rel="noreferrer"
                                >
                                {content.text}
                                </a>
                            </div>
                        )
                        : <div key={i} className="leading-6 my-3">{content.text}</div>
                ))}
            </div>
        </div>
    )
};
OGP自動生成
本題と少し離れますが、日記の各ページに対してOGPの自動生成を実装しています。以下の埋め込みで表示されているように記事タイトルなどを含めたOGP画像がページごとに自動生成され、ページヘッダーのメタタグからのリクエストに対して返されます。
実装は以下の記事を参考にさせていただきました。
Next.jsの場合は各記事のページのHead要素のメタタグからAPI Routeにリクエストを送ります。
const Index = ({ post, postsIndex }: InferGetStaticPropsType<typeof getStaticProps>) => {
    if (!post) return <></>;

    return (
        <div>
            <Head>
                <meta property="og:image" content={`https://diary.unronritaro.net/api/ogp?title=${encodeURIComponent(post.title)}`} />
                <meta name="twitter:image" content={`https://diary.unronritaro.net/api/ogp?title=${encodeURIComponent(post.title)}`} />
            </Head>

            ...

        </div>
    )
};
そのAPI Route(/api/ogp)がURLのパラメータを使って記事のタイトルを取得し、ヘッドレスブラウザを起動して画像を生成してレスポンスします。この部分の実装は、上の記事の最後でより高度な適用例として示されていた以下を参考にさせていただきました。
この例ではReactコンポーネントをReactDOMServer.renderToStaticMarkup()を使って静的なマークアップにして、ヘッドレスブラウザでレンダリングしています。その画面をスクリーンショットすることでOGP画像を生成しているわけです。
またVercelを使った際にキャッシュを効かせるためのレスポンスヘッダーも設定されており、参考になりました。
ヘッドレスブラウザにはplaywrightが使われていましたが、Vercelにデプロイした際にplaywright-coreというモジュールが見つからないというエラーが出ました。こちらは単純に
npm i playwright-core
した上でデプロイし直せば解消されました。
まとめ
この記事ではNotion APIを使った日記サイトの実装例をご紹介しました。Notionのアプリはデスクトップ/ブラウザ/モバイルが統合されて使いやすく、記事の更新はとても便利です。
一方で言及したようにコードブロックなどの要素は現状まだAPIで取得することができません。ですから技術ブログのような複雑な要件にはまだ対応することはできないでしょう。ただし将来的にそれらが実装されれば、full-fledgedなヘッドレスCMSとして活用できるかもしれません。
筆者も今回のようにNotion APIを活用しながら今後の発展を注視していこうと思っています。

