1.はじめに
PXE(Preboot eXecution Environment:ピクシー)と呼ばれるネットワークブートの方法があります。
iPXE(アイピクシー)ブートは、PXEブートをベースに、その機能を拡張した規格です。
iPXE ブートを使って、サーバー起動時にインストールするOSの種類の選択メニューを表示させ、メニューから選択したOSのイメージを導入する事のできる環境を作成するための手順を書いてみました。
2.iPXEブートの構成
この手順で実現する方法は以下の方法です。

(1)~(4)のステップが NIC(Network Interface Card)に標準で搭載されている PXE ファームウェアによるブートです。
(6)~(13) のステップは、PXEからチェーンロードで読み込まれた、iPXE ファームウェアによるブートのプロセスです。
※iPXEは HTTPSをサポートしているのですが、イメージをビルドして中にイメージ内にCAの証明書を埋め込む形になるようです。そうなると埋め込んだ証明書の管理なども運用時の考慮点になってくるので、この手順では HTTPを使用します。
上の絵は少し複雑なので、大まかな流れに簡略化したのが以下の図になります。

3.環境のセットアップ
この手順では、エンタープライズ環境での使用を想定して、RHEL 8 を使って必要なサーバーをセットアップしていきます。
環境の構成の概要図は以下の通りです。

3.1. DHCPサーバーのセットアップ
3.1.1.DHCP のセットアップ
以下の手順を参考にDHCPサーバーをセットアップします。
RHEL 8 で DHCPサーバーを構築する
3.1.2.DHCP の dhcpd.conf のカスタマイズ
以下のように dhcpd.conf をカスタマイズします。
iPXE boot用に書き加えた部分は、コメントを参照下さい。
#
# DHCP Server Configuration file.
#   see /usr/share/doc/dhcp-server/dhcpd.conf.example
#   see dhcpd.conf(5) man page
#

# Add for PXE - start
option space PXE;
option PXE.mtftp-ip    code 1 = ip-address;
option PXE.mtftp-cport code 2 = unsigned integer 16;
option PXE.mtftp-sport code 3 = unsigned integer 16;
option PXE.mtftp-tmout code 4 = unsigned integer 8;
option PXE.mtftp-delay code 5 = unsigned integer 8;
option arch code 93 = unsigned integer 16; # RFC4578
# Add for PXE - end

option domain-name "example.local";
default-lease-time 86400;

authoritative;

subnet 172.16.0.0 netmask 255.255.255.0 {
  range 172.16.0.1 172.16.0.99;
  option domain-name-servers 172.16.0.102;
  option routers 172.16.0.110;
  option broadcast-address 172.16.0.255;
  max-lease-time 172800;

#  Added for PXE Boot  -  start
  class "pxeclients" {
      match if substring (option vendor-class-identifier, 0, 9) = "PXEClient";
      next-server 172.16.0.101;  # TFTP Server address

      if option arch != 00:00 { # UEFI

            # 1st time, tell iPXE image place as boot file on TFTP server.
            # 2nd time, tell iPXE script place on HTTP server.

            if exists user-class and option user-class = "iPXE" { #  the 2nd time. Go to HTTP Server to get iPXE script
                filename "http://172.16.0.101/pxeboot.ipxe";
            } else {  # the 1st time. Go to TFTP to get iPXE.
                filename "ipxe.efi";
            }

      } else {  # BIOS machines (未検証。この手順では使用しない)
        filename "undionly.kpxe";
      }
 }

#  Added for PXE Boot  - end
この dhcpd.conf の中で、pxeboot.ipxeや、ipxe.efiなるファイルを参照していますが、この後の手順で配置していきます。
3.2. TFTPサーバーのセットアップ
3.2.1. TFTPサーバーのセットアップ
以下の手順を見ながら、TFTPサーバーをセットアップします。
RHEL 8 で TFTPサーバーをインストール
3.2.2. 必要なファイルの配置
以下のページからダウンロードできる ファームウェアを TFTPサーバーの /var/lib/tftpboot に配置します。(デフォルトではこのパスがTFTPのルートのディレクトリです)
http://boot.ipxe.org/undionly.kpxe
http://boot.ipxe.org/ipxe.efi
上記の2つの Firmwareは以下からリンクされています。
https://ipxe.org/howto/chainloading
ダウンロードしたら /var/lib/tftpboot に配置します。
[root@bastion tftpboot]# pwd
/var/lib/tftpboot
[root@bastion tftpboot]# ls -ltr
-rwxrwxrwx. 1 root root  67060 Sep 23 15:00 undionly.kpxe
-rwxr-xr-x. 1 root root 970752 Sep 27 12:21 ipxe.efi
[root@bastion tftpboot]#
3.3. HTTPサーバーのセットアップ
3.3.1.HTTPサーバーのセットアップ
以下の手順を見ながら、HTTPサーバーをセットアップします。
RHEL 8 での nginx のインストール
3.3.2.iPXEスクリプトの作成
HTTP サーバーに /pxeboot.ipxe という以下のファイルを配置します。ここでは、HTTPサーバーのルート(nginxの Document ルートは/usr/share/nginx/html) に配置しています。
このファイルの URLが、DHCPサーバーにより NIC上の iPXE Firmware に渡され、iPXE Firmware がダウンロードし実行します。
内容はスクリプトを書いた事がある人であれば、なんとなく読むだけで想像が付くと思います。
# !ipxe

# dhcp
# Some menu defaults
set menu-timeout 300000
isset ${menu-default} || set menu-default exit


:start

menu Please choose an type of node you want to install
item --gap --           -------------------------- node type -------------------------
item --key b bootstrap  Install Bootstrap Node
item --key m master     Install Master Node
item --key w worker     Install Worker Node
item --gap --           -------------------------- Advanced Option --------------------
item --key c config     Configure settings
item shell              Drop to iPXE shell
item reboot             Reboot Computer
choose --timeout ${menu-timeout} --default ${menu-default} selected || goto cancel
goto ${selected}

:bootstrap   # ここはインストールしたい OS毎に異なる
kernel  http://192.2.0.101/rhcos-4.5.6-x86_64-installer-kernel-x86_64 ip=dhcp rd.neednet=1 initrd=rhcos-4.5.6-x86_64-installer-initramfs.x86_64.img console=tty0 console=ttyS0 coreos.inst=yes coreos.inst.install_dev=sda coreos.inst.image_url=http://192.2.0.101/rhcos-4.5.6-x86_64-metal.x86_64.raw.gz coreos.inst.ignition_url=http://192.2.0.101/bootstrap.ign
initrd http://192.2.0.101/rhcos-4.5.6-x86_64-installer-initramfs.x86_64.img
boot

:master   # ここはインストールしたい OS毎に異なる
kernel  http://192.2.0.101/rhcos-4.5.6-x86_64-installer-kernel-x86_64 ip=dhcp rd.neednet=1 initrd=rhcos-4.5.6-x86_64-installer-initramfs.x86_64.img console=tty0 console=ttyS0 coreos.inst=yes coreos.inst.install_dev=sda coreos.inst.image_url=http://192.2.0.101/rhcos-4.5.6-x86_64-metal.x86_64.raw.gz coreos.inst.ignition_url=http://192.2.0.101/master.ign
initrd http://192.2.0.101/rhcos-4.5.6-x86_64-installer-initramfs.x86_64.img
boot

:worker   # ここはインストールしたい OS毎に異なる
kernel  http://192.2.0.101/rhcos-4.5.6-x86_64-installer-kernel-x86_64 ip=dhcp rd.neednet=1 initrd=rhcos-4.5.6-x86_64-installer-initramfs.x86_64.img console=tty0 console=ttyS0 coreos.inst=yes coreos.inst.install_dev=sda coreos.inst.image_url=http://192.2.0.101/rhcos-4.5.6-x86_64-metal.x86_64.raw.gz coreos.inst.ignition_url=http://192.2.0.101/worker.ign
initrd http://192.2.0.101/rhcos-4.5.6-x86_64-installer-initramfs.x86_64.img
boot

:exit
exit

:cancel
echo You cancelled the menu, dropping you to a shell

:shell
echo Type 'exit' to get the back to the menu
shell
set menu-timeout 0
goto start

:reboot
reboot

:exit
exit
iPXEのスクリプト・ファイルは、#!iPXE と書けば拡張子は何でもよいそうですが、ここでは .ipxe としています。
この例で使用したサンプルは、以下のコードを参考にシンプルに改造したものです。
https://gist.github.com/robinsmidsrod/2234639
このファイルは、 OSインストール時のブートメニューになります。
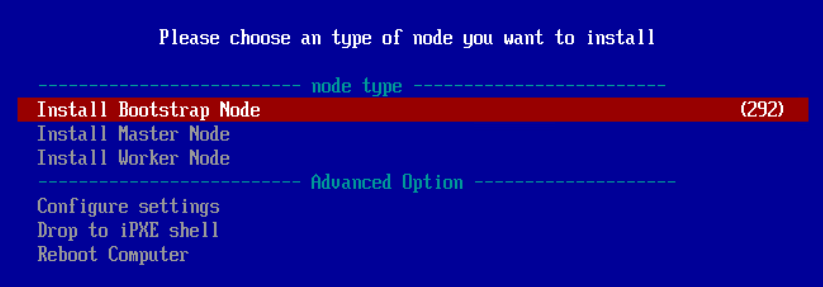
上記のファイルは、実際のブート時には以下のように表示されます。
メニューを選択すると、pxeboot.ipxe スクリプト内の対応した :bootstrap、:master、workerのラベルに書かれたプロセス (iPXEのコマンド) が実行されます。このラベル名自体も、あくまでサンプルで自由につけられます。
この部分は、ユーザー固有の部分になります。この例で書かれている、:bootstrap、:master、:workerのラベルを選択時に実行される内容もあくまで、サンプルになります。サンプル内で使用しているkenrnel initrd 等のコマンドについては、iPXEのページに解説があります。
3.3.3.設定の確認
以下のコマンドを実行して 200 が返ってくればOKです。
# curl -D - -s -o /dev/null http://localhost/pxeboot.ipxe
4.iPXEブートの実行
4.1 サーバーの起動
適当なサーバーをネットワークにつないで、電源をONにして PXE でブートをします。
この時、PXEのファームウェアは DHCPサーバーにアクセスに行き、iPXE Firmware の置かれているTFTPサーバーにアクセスに行きます。

その後、iPXEの Firmware が読み込まれ再度、スタートアップ・プロセスが走ります。

その後、iPXEのスクリプトが読み込まれ、以下のようなブートメニューが表示されるはずです。
メニューを選択すると、そのメニューに書かれた iPXEのコマンド実行され、OSのインストールが開始されます。
4.2.VMware を使用する場合の注意点
VMWare の仮想マシンをベアメタルサーバーに見立てて作業する場合は、以下の点に注意して下さい。
VMware の標準では、起動オプションはBIOSになっています。
この手順自体はUEFIで動作するように書かれています。

VMWare を使用してこの手順を試す場合は、デフォルトの仮想マシンの設定をEFI(=UEFI)に変更して下さい。