0.はじめに
ROSA には Classic ( Control Plane node がユーザーの AWS アカウント内に作られるもの) と、HCP (Hosted Control Plane: Compute Node だけがユーザーのAWSアカウントに作られるもの)の2種類のタイプがあります。
この記事は、ROSA Classic に関する記事です。
過去に ROSA クラスターを作成していない綺麗な環境での実行を想定しています。
(ROSA HCP を Terraform でインストールする記事はこちらです。)
ROSA は CLIでも作成できるのですが、Enterprise 向けの製品だけあって、オプションが山のようにあります。
Terraform を使う事で、いつも使うオプション構成で気軽にクラスターをデプロイしたり、削除する事が可能です。
1. 各種 CLI を準備する
・AWS CLI コマンド
・git コマンド
・terraform コマンド
・rosa / oc コマンド
が構成されている事が前提です。こちらの ガイドを参考にしてください。
2. サンプルの設定ファイルをダウンロードする
いろいろ設定ファイル(.tf)を幾つか手書きする必要があるのですが、面倒な人向けにマニュアルに載っているサンプルファイルを、ほぼそのまま書き起こしたものを用意しました。
以下のコマンドでダウンロードできます。
git clone https://github.com/yuhkih/rosa-classic-terraform
ダウンロードしたディレクトリに移動します。
cd rosa-classic-terraform
3. [Option] 作成される Compute Node のタイプや数を変更する。
このサンプルファイルでは、ap-northeast-1 に、m5.xlarge の Compute Node を 2つ作成します。
variables.tf を編集する事でインストール内容をカスタマイズできます。
variables.tf の以下の部分で、インストールする OpenShift のバージョンを変更できます。
variable "rosa_openshift_version" {
  type        = string
  default     = "4.15.0"
  description = "Desired version of OpenShift for the cluster, for example '4.15.0'. If version is greater than the currently running version, an upgrade will be scheduled."
}
作成する Compute Node のインスタンスタイプと本数を指定できます。
variable "machine_type" {
  description = "The AWS instance type used for your default worker pool."
  type        = string
  default     = "m5.xlarge"
}

variable "worker_node_replicas" {
  default     = 2
  description = "Number of worker nodes to provision. Single zone clusters need at least 2 nodes, multizone clusters need at least 3 nodes"
  type        = number
}
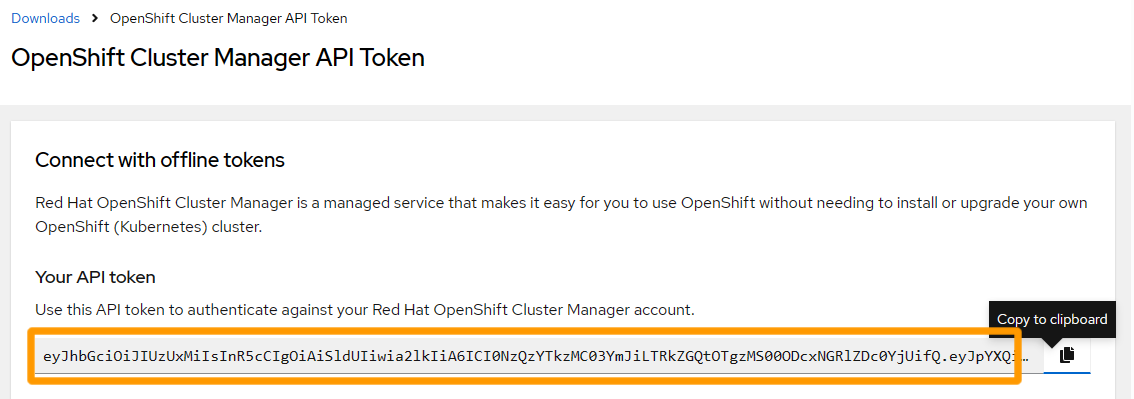
4. ROSA の token を取得する
ROSA クラスターを作成するための https://console.redhat.com/openshift/token から Token を取得します。以下の部分をコピーします。
取得した Token を変数にセットします。
export RHCS_TOKEN=<上記のページからコピーした Token>
既に rosa login でログイン済みの場合は、以下の方法で、ローカルに保存されている Token を使って環境変数をセットできます。
Mac
export RHCS_TOKEN="$(jq -r .refresh_token ~/Library/Application\ Support/ocm/ocm.json)"
Linux
export RHCS_TOKEN="$(jq -r .refresh_token ~/.config/ocm/ocm.json)"
5. ROSA Cluster の作成
terraform を初期化します。
terraform init
もしファイルを編集した場合は、validateで編集ミスが無いか確認します。
terraform validate
以下で plan を作成します。
terraform plan --out rosa.plan
以下でクラスターが作成が開始されます。(途中で確認を求められるので yesと入力します)
terraform apply rosa.plan
途中経過のログが流れはじめ、40-50分ほど待つと完了するはずです。
正常に完了したら、以下のコマンドでクラスター名を取得して変数にセットします。
jq コマンドが無い場合は、普通に rosa list clusters でクラスター名を表示させてからコピーしてセットします。
CLUSTER_NAME=$(rosa list clusters -o json | jq '.[0].name' | sed 's/"//g')
変数がセットされてるか確認します。
echo $CLUSTER_NAME
以下のコマンドでクラスター用の管理者ユーザー (cluster-admin という名前になります)を作成します。
rosa create admin -c $CLUSTER_NAME
上記のコマンドを実行すると標準出力にログイン用のコマンドストリングが表示されるので、それを使ってログイン可能です。(ログインできるようになるまで数分かかります 401が出る場合は暫く待ちます)
出力例
$ rosa create admin -c $CLUSTER_NAME
I: Admin account has been added to cluster 'rosa-22aoom'.
I: Please securely store this generated password. If you lose this password you can delete and recreate the cluster admin user.
I: To login, run the following command:

   oc login https://api.rosa-22aoom.6qk7.p1.openshiftapps.com:6443 --username cluster-admin --password abcdef-1234556-pFV3Y-g45BV

I: It may take several minutes for this access to become active.
$
5. ROSA Cluster の基本コマンド
ログイン ( 前段で実行した rosa create admin -c $CLUSTER_NAME の出力に初期 userid / password が出ています)
oc login https://api.rosa-22aoom.6qk7.p1.openshiftapps.com:6443 --username cluster-admin --password abcdef-1234556-pFV3Y-g45BV
コンソールの URL の表示 (CLIと同じ UserID/パスワードでログインできます)
oc whoami --show-console
6. ROSA クラスターの削除
以下で ROSA クラスターを削除できます。
terraform destroy