StoryboardからUITableVIewのCellの中でTextFiledなどを配置して
ViewControllerへ連携したら、ビルドする時にエラーになりました:
Outlet cannot be connected to repeating content
Cellは繰り返し使用されるオブジェクトであるため、直接Outlet接続できないらしい、
解決方法としてサブクラスで実装、つまりXibファイルで実装になります。
こちらの記事を参考しました。
TableViewとTexFieldの組み合わせ実装の備忘録としてメモしておきます。
1.セールの中身を一括で宣言
enum Section: CaseIterable {
    case a
    case t

    var text:[String]? {
        switch self {
        case .a:
            return ["A","a","あ"]
        default:
            return nil
        }
    }

    var identifiers:[String]{
        switch  self {
        case .a:
            return ["acell","acell","acell"]
        case .t:
            return ["tcell","tcell","tcell"]
        }
    }

    var header:String{
        switch self {
        case .a:
            return "aHeader"
        case .t:
            return "tHeader"
        }
    }

    var indicator:Bool{
        switch self {
        case .a:
            return true
        case .t:
            return false
        }
    }
}
2.ViewControllerでデータを反映
extension ViewController: UITableViewDataSource {

    func numberOfSections(in tableView: UITableView) -> Int {
        return Section.allCases.count
    }
    func tableView(_ tableView: UITableView, numberOfRowsInSection section: Int) -> Int {
        return Section.allCases[section].identifiers.count
    }

    func tableView(_ tableView: UITableView, titleForHeaderInSection section: Int) -> String? {
        return Section.allCases[section].header
    }

    func tableView(_ tableView: UITableView, cellForRowAt indexPath: IndexPath) -> UITableViewCell {
        let section = Section.allCases[indexPath.section]
        let cell = tableView.dequeueReusableCell(withIdentifier: section.identifiers[indexPath.row], for: indexPath)
        return cell
    }
}

extension ViewController: UITableViewDelegate{

    func tableView(_ tableView: UITableView, heightForRowAt indexPath: IndexPath) -> CGFloat {
        return 45.0
    }

    func tableView(_ tableView: UITableView, willDisplay cell: UITableViewCell, forRowAt indexPath: IndexPath) {
        let section = Section.allCases[indexPath.section]
        if section.indicator {
            cell.accessoryType = .disclosureIndicator
        }

        if section.identifiers[indexPath.row] == "acell"{
            cell.textLabel?.text = section.text![indexPath.row]
        }
    }
}
3.二種類のCellを作る
1)Cellの中にLableを配置してTextを表示する”acell”
2)Cellの中にTextFieldを配置して入力できるようにする”tcell”
4.Xibファイルで作ったCellを登録
class ViewController: UIViewController {

    @IBOutlet weak var tableView: UITableView!

    override func viewDidLoad() {
        super.viewDidLoad()
        let nib = UINib.init(nibName: "TextFieldCell", bundle: nil)
        tableView.register(nib, forCellReuseIdentifier: "tcell")
    }
}
5.StoryBoardでDataSourceとDelegateの連携も忘れずに
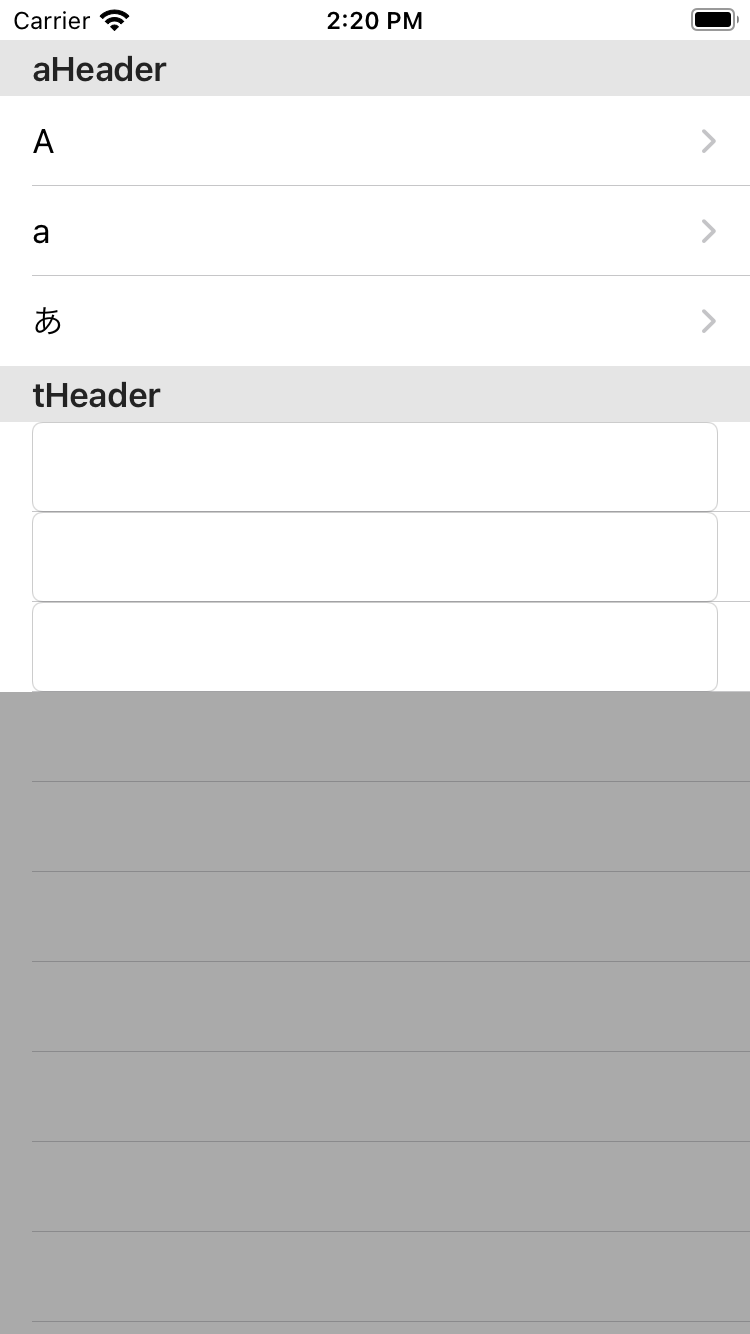
この段階ではこのようなTableViewになっています。
6.Keyboardを閉じる処理
TextFieldで入力中、TableViewをスクロールすると、Keyboardを閉じる処理
func scrollViewWillBeginDragging(_ scrollView: UIScrollView) {
    self.view.endEditing(true)
}
7.入力箇所が常に画面の真ん中に表示するように処理
例えば、画面の下側のCellのTextFieldをタップしたら、TableView全体を上へスクロール、
入力中のCellが常に真ん中に表示するようには、2ステップです。
1)UITextFieldDelegateのBeginEditingが入力始めると(Keyboardが表示すると)呼ばれるDelegateで
TableView.ScrollToRowを実装
2)Keyboardの高さ分を画面全体を上へ持ち上げる実装
1)はUITextFieldのXibクラスでDelegateを作り、使用します。delegate = selfを忘れずに
protocol TestTextFieldDelegate: class {
    func beginEditing(_ cell:TextFieldCell)
}

extension TextFieldCell: UITextFieldDelegate {
    func textFieldDidBeginEditing(_ textField: UITextField) {
        self.textField!.becomeFirstResponder()
        self.delegate?.beginEditing(self)
    }
}
extension ViewController: TestTextFieldDelegate {
    func beginEditing(_ cell: TextFieldCell) {
        let index = tableView.indexPath(for: cell)
        tableView.scrollToRow(at: index!, at: .middle, animated: true)
    }
}
2)はVieControllerの方で実装
class ViewController: UIViewController {

    @IBOutlet weak var tableView: UITableView!
    @IBOutlet weak var tableBottomLayout: NSLayoutConstraint!

    override func viewDidLoad() {
        super.viewDidLoad()
        let nib = UINib.init(nibName: "TextFieldCell", bundle: nil)
        tableView.register(nib, forCellReuseIdentifier: "tcell")
    }

    override func viewWillAppear(_ animated: Bool) {
        super.viewWillAppear(animated)
        regsiterKeyboardNotification()
    }

    private func regsiterKeyboardNotification(){
        let notification = NotificationCenter.default
        notification.addObserver(self, selector: #selector(keyboardWillShow(_:)), name: UIResponder.keyboardWillShowNotification, object: nil)
        notification.addObserver(self, selector: #selector(keyboardWillHide(_:)), name: UIResponder.keyboardDidHideNotification, object: nil)
    }

    @objc func keyboardWillShow(_ notification:Notification?){
        guard let userInfo = notification?.userInfo,
              let keyboradInfo = userInfo[UIResponder.keyboardFrameEndUserInfoKey] as? NSValue,
              let duration = userInfo[UIResponder.keyboardAnimationDurationUserInfoKey] as? Double else{
            return
        }
        let keyboardHieght = keyboradInfo.cgRectValue.size.height
        self.tableBottomLayout.constant = keyboardHieght

        UIView.animate(withDuration: duration){
            self.view.layoutIfNeeded()
        }
    }

    @objc func keyboardWillHide(_ notification:Notification?){
        guard let userInfo = notification?.userInfo,
              let duration = userInfo[UIResponder.keyboardAnimationDurationUserInfoKey] as? Double else{
            return
        }

        self.tableBottomLayout.constant = 0

        UIView.animate(withDuration: duration){
            self.view.layoutIfNeeded()
        }
    }
}
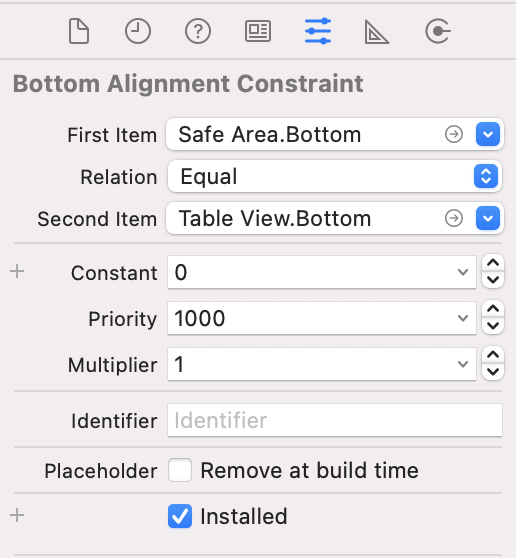
tableBottomLayoutですが、SotryBoardはこのようになっています。
FirstItemとSecondItemが逆だとうまくいかないみたい。
8.入力内容制限
1)xx文字以上入力できない
StoryBoardからTextFieldのAction:EditingChangedをXibファイルへ接続して、実装します。
@IBAction func textChanged(_ sender: UITextField) {
    checkMaxLength()
}

private func checkMaxLength(){
    var text = textField.text
    guard text != nil else{
        return
    }
    if text!.count > 5 {
        text = String(text!.prefix(5))
    }
    if self.textField.text != text{
        self.textField.text = text
    }
}
2)特殊の文字を入れないようにする
例えば、英数字記号以外を入力できないようにするには以下で実装します
extension String {

    var ns: NSString{
        return self as NSString
    }

    func deleteMatched(parttern:String?)-> String{
        guard let parttern = parttern else{
            return self
        }

        guard let regex = try? NSRegularExpression(pattern: parttern, options:
                                                    NSRegularExpression.Options.caseInsensitive) else { return self }
        let range = NSRange(location: 0, length: self.ns.length)
        let modStirng = regex.stringByReplacingMatches(in: self, options: [], range: range, withTemplate: "")
        return modStirng
    }
}
入力できない文字列を宣言
let NONAlphanumericAndSymbols = "[^a-zA-Z0-9!#&'()*+,/:;=?@\\[\\]\\-\\._~]+"
private func checkMaxLength(){
    var text = textField.text
    guard text != nil else{
        return
    }

 ///こちらを追加
    text = text?.deleteMatched(parttern: self.NONAlphanumericAndSymbols)

    if text!.count > 5 {
        text = String(text!.prefix(5))
    }
    if self.textField.text != text{
        self.textField.text = text
    }
}