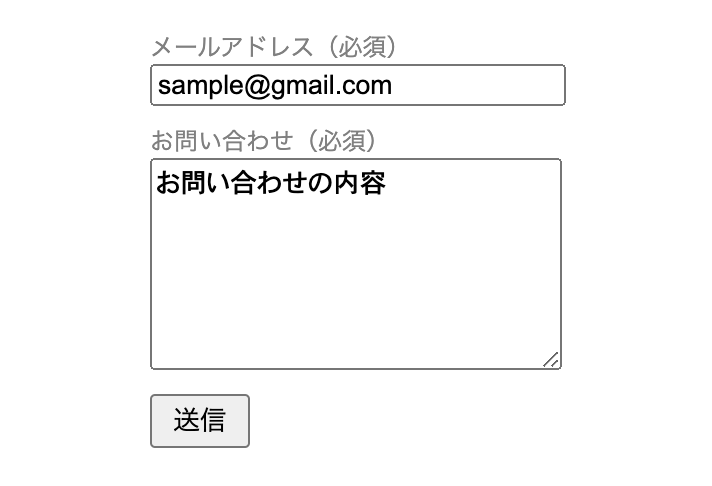
今回はReactを使って、下図のようなお問い合わせフォームを実装していきます。
真偽値を使ったフォームの変換と入力情報の取得、エラーメッセージを実装していきます。
Reactを使えばフォームの入力やボタンのクリックに応じてリアルタイムに表示を変えることができます。
完成図
お問い合わせ入力フォームがあり、
送信すると、
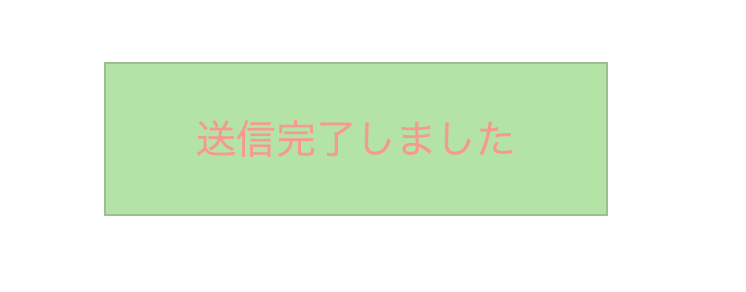
このように表示されているフォームを変換していきます。
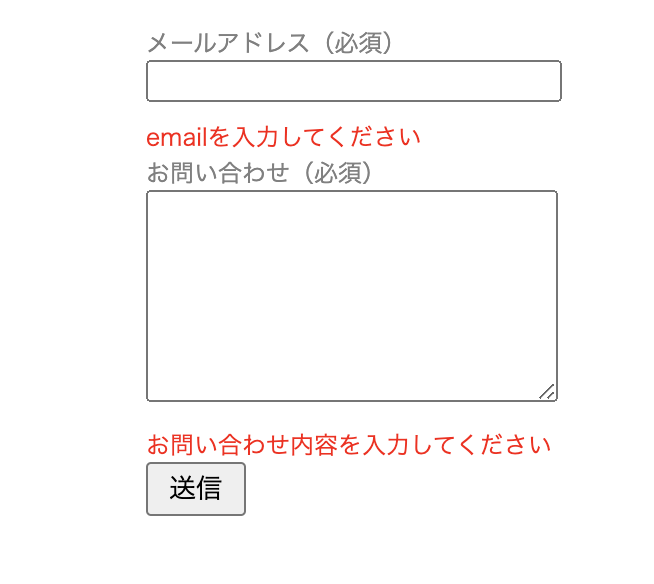
また、入力がない場合にエラーメッセージが出力されるようにしましょう。
雛形
完成コードになります。
要所で詳細に説明していきます。
import React from 'react';

class ContactForm extends React.Component {
  constructor(props) {
    super(props);
    this.state = {
      isSubmitted: false,
      email: "sample@gmail.com",
      hasEmailError: false,
      content: "お問い合わせ内容",
      hasContactError: false,
    };
  }

  handleSubmit() {
    this.setState({isSubmitted: true});
  }

  handleEmailChange(event) {
    const inputValue = event.target.value;
    const isEmpty = inputValue === "";
    this.state = {
      emial: inputValue,
      hasEmailError: isEmpty,
    }
  }

  handleContentChange(event) {
    const inputValue = event.target.value;
    const isEmpty = inputValue === "";
    this.state = {
      content: inputValue,
      hasContentError: isEmpty,
    }
  }

  render() {
    let emailErrorText;
    if (this.state.hasEmailError) {
      emailErrorText = (
        <span>
          emailを入力してください
        </span>
      );
    }

    let contentErrorText;
    if (this.state.hascontentError) {
      contentErrorText = (
        <span>
          お問い合わせ内容を入力してください
        </span>
      );
    }

    let contactForm;
    if (this.state.isSubmitted) {
      contactForm = (
        <span className = "message">送信完了しました<span>
      );
    } else {
      contactForm = (
        <form onSubmit={()=>{handleSubmit()}}>
          <p>メールアドレス(必須)</p>
          <input
            value = {this.state.email}
            onChange={(event)=>{handleEmailChange(event)}}
          />
          {emailErrorText}
          <p>お問い合わせ(必須)</p>
          <textarea
            value = {this.state.content}
            onChange={(event)=>handleContenttChange(event)}
          />
          {contentErrortext}
          <input type="submit" value="送信" />
        </form>
      );
    }

    return(
      <div className = "container">
        {contactForm}
     </div>
    );
  }

export default ContactForm;

}
送信ボタンで表示を切り替える
↓
stateを定義
stateでフォームが送信されたかどうかを管理していきます。
最初フォームは送信されていないため、isSubmittedの初期値はfalseです。
  constructor(props) {
    super(props);
    this.state = {
      isSubmitted: false,
    };
  }
stateの表示と条件分岐
stateの表示と表示切り替えの条件分岐を作っていきます。
    // 空の変数を準備
    let contactForm;
    // フォームが送信された場合の処理
    if (this.state.isSubmitted) {
      contactForm = (
        <span className = "message">送信完了しました<span>
      );
    } else {
      // stateの初期値はfalseなので以下のJSXが初期で表示されます
      contactForm = (
        <form onSubmit={()=>{handleSubmit()}}>
          <p>メールアドレス(必須)</p>
          <input
            value = {this.state.email}
            onChange={(event)=>{handleEmailChange(event)}}
          />
          {emailErrorText}
          <p>お問い合わせ(必須)</p>
          <textarea
            value = {this.state.content}
            onChange={(event)=>handleContenttChange(event)}
          />
          {contentErrortext}
          <input type="submit" value="送信" />
        </form>
      );
    }

    return(
      <div className = "container">
        // 変数contactFormを定義しstateを表示
        {contactForm}
     </div>
    );
  }
表示の切り替え
onSubmitイベントを使って、表示を切り替えていきましょう。
まずはsetStateを使ったhandleSubmitメソッドを作っていきます。
  handleSubmit() {
    this.setState({isSubmitted: true});
  }
次に<form>に対してonSubmitイベントを作っていきます。
    // 省略

    } else {
      contactForm = (
        // フォームを送信するとhandleSubmitメソッドを呼び出しstateが変更される
        <form onSubmit={()=>{handleSubmit()}}>
          <p>メールアドレス(必須)</p>

    // 省略
以上でお問い合わせフォームの切り替えの実装は終了です。
次にエラーメッセージの実装です。
入力情報の取得とエラーメッセージの表示
入力情報の取得かつ入力欄に何も内容がない場合にエラーメッセージを出力させましょう。
stateの設定と表示
stateを設定します。
  constructor(props) {
    super(props);
    this.state = {
      isSubmitted: false,
      // emailの初期値を設定します
      email: "sample@gmail.com",
      // 入力値が空かどうかの状態を管理します
      hasEmailError: false,
    };
  }
stateを表示します。
inputでstateを表示させる時はvalue属性に値を指定しましょう。
    } else {
      contactForm = (
        <form onSubmit={()=>{handleSubmit()}}>
          <p>メールアドレス(必須)</p>
          <input
            // state.emailの初期値を表示
            value = {this.state.email}
            onChange={(event)=>{handleEmailChange(event)}}
          />
          // 省略
      );
    }
入力された値の取得
このままではstateの初期値は表示されたが、値の入力ができません。
フォームの入力や削除が行われたときに処理を実行するには、onChangeイベントを用います。
inputタグに対してonChangeイベントを指定しましょう。
    } else {
      contactForm = (
        <form onSubmit={()=>{handleSubmit()}}>
          <p>メールアドレス(必須)</p>
          <input
            value = {this.state.email}
            // onChangeイベントを使ってhandleEmailChangeメソッドを呼び出し値を更新します
            onChange={(event)=>{handleEmailChange(event)}}
          />
       // 省略
    }
stateの更新
① event.target.velueとすることで入力値を取得することができます。定数inputValueに代入します。
② isEmptyに空のinputValueを代入します。
③ emailの更新の値をinputValueとすることで入力値を取得できます。
④ 入力値が空の時、hasEmailErrorの値をtrueにします。
  // 引数にeventを持たせる
  handleEmailChange(event) {
    const inputValue = event.target.value; ①
    const isEmpty = inputValue === ""; ②
    // 複数同時更新
    this.state = {
      emial: inputValue, ③
      hasEmailError: isEmpty, ④
    }
  }
エラーメッセージの表示
条件分岐を用いて、エラーメッセージの処理をしていきます。
    // 空の変数を準備
    let emailErrorText;
    // hasEmailErrorの値が空の場合の処理
    if (this.state.hasEmailError) {
      emailErrorText = (
        <span>
          emailを入力してください
        </span>
      );
    }
エラーメッセージを表示します。
    } else {
      contactForm = (
        <form onSubmit={()=>{handleSubmit()}}>
          <p>メールアドレス(必須)</p>
          <input
            value = {this.state.email}
            onChange={(event)=>{handleEmailChange(event)}}
          />
          // 変数を定義しエラーメッセージを表示します
          {emailErrorText}
      // 省略
    }
お問い合わせ入力値の取得とエラーメッセージの表示は、
emailと同様の処理になるので割愛します。
以上で一連の実装は終わりになります。