本記事について
本記事は 【Androidで姓名診断アプリを作ろう】 を Fragment を使用した形で実装し、
その際に調べたことなどをまとめています。
いわゆる、学習ノートです。
ベース
今回のプロジェクトのベースは、ドットインストール様のプレミアムプランに含まれる
【Androidで姓名診断アプリを作ろう】がベースとなっています。
関連ワード
- Fragment
- Activity
- Bundle
- LinearLayout
- 画面遷移
- 画面固定
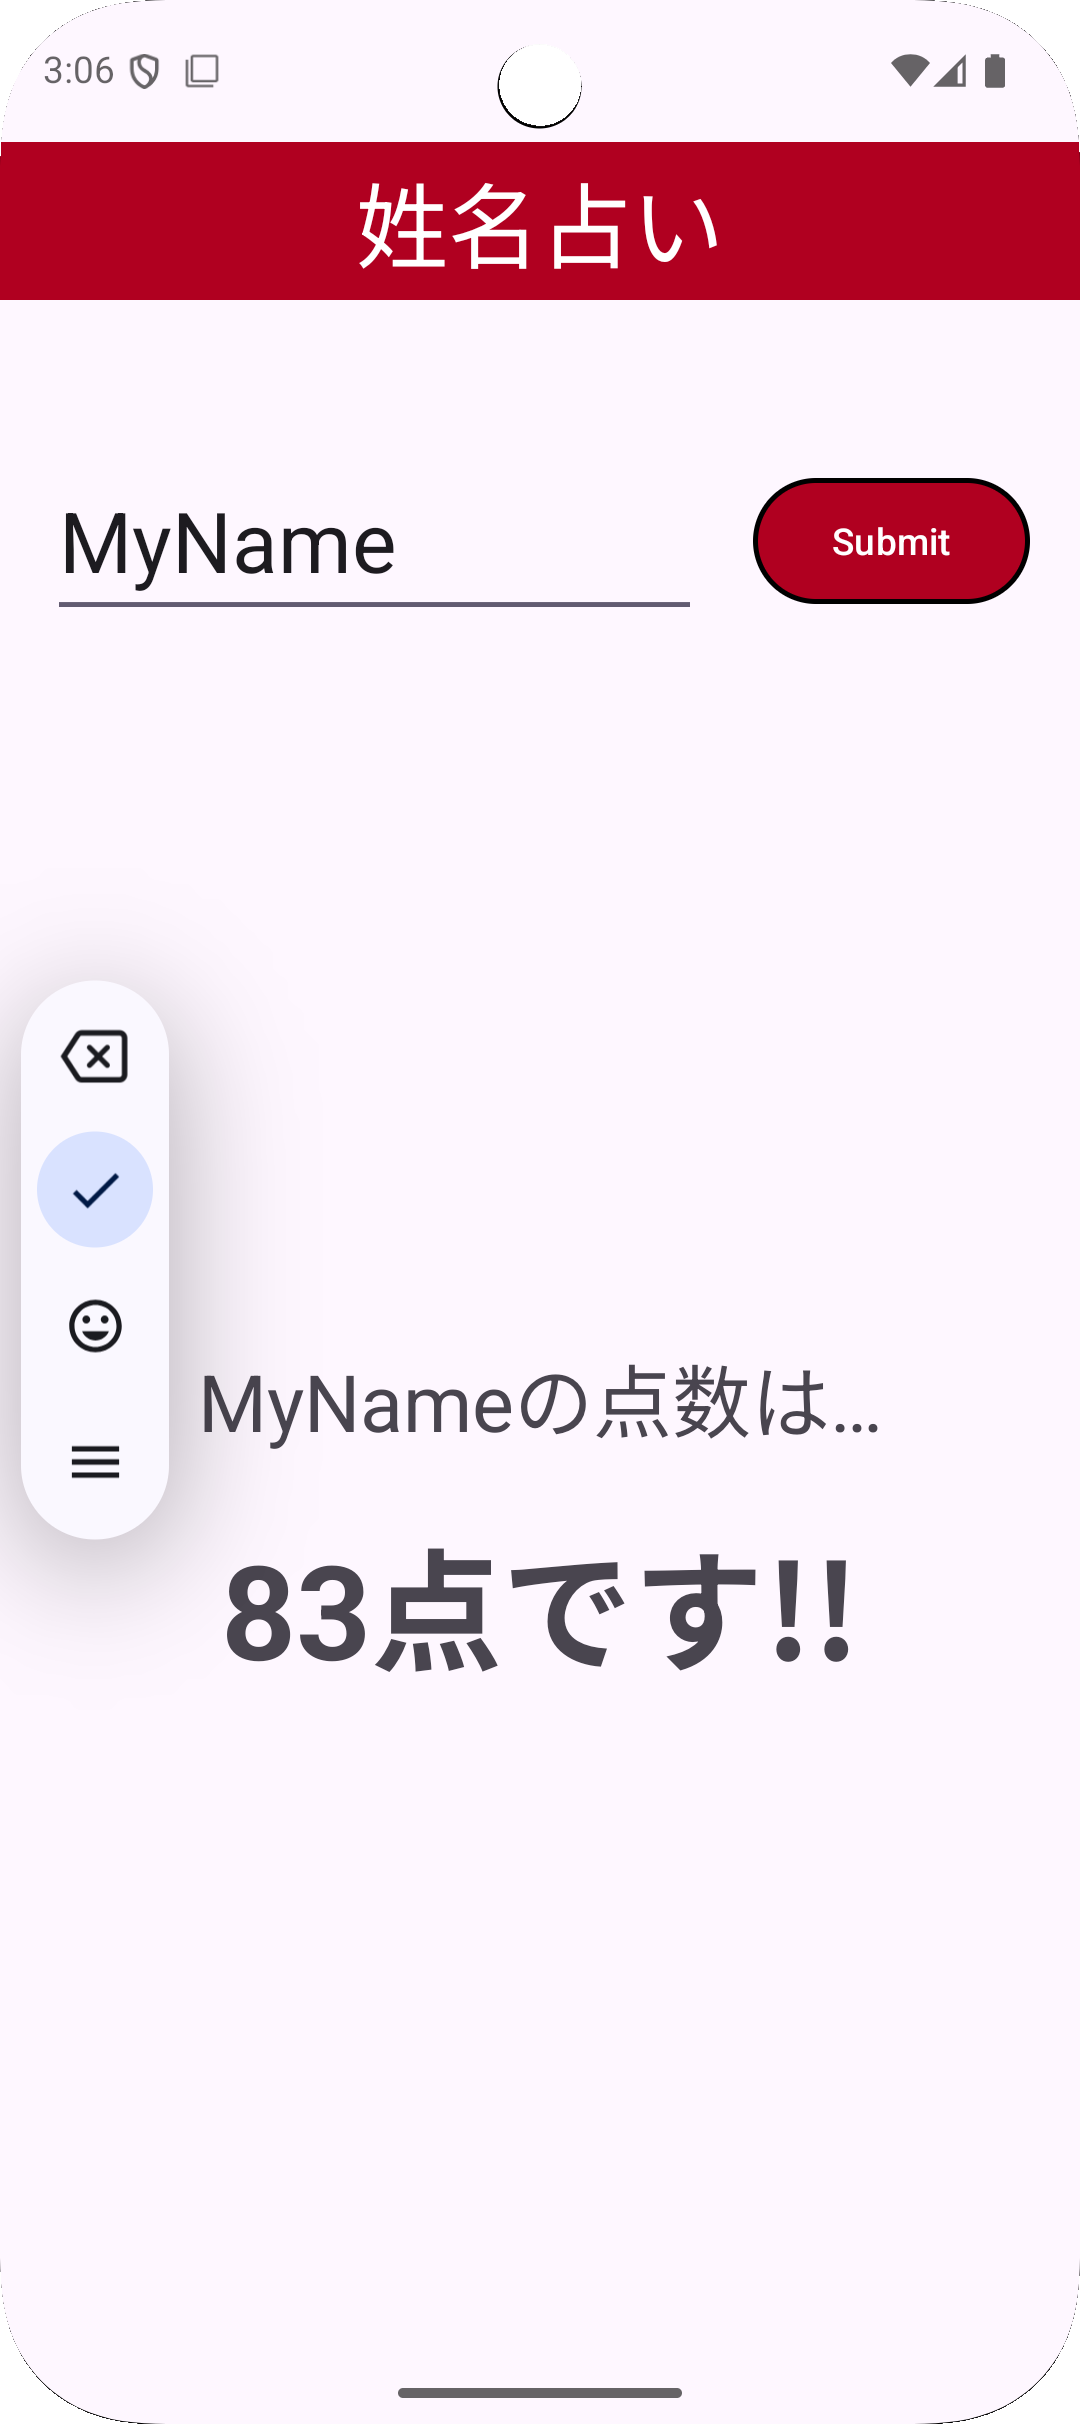
完成画面
名前(文字)を入力し、「Submit」ボタンを押すとランダムな点数が表示されます。
入力された名前は、「 (名前)の点数は...」として表示されます。

完成コード
画面レイアウト
activity_main.xml
アプリを起動して最初に表示されるメインの画面です。
<?xml version="1.0" encoding="utf-8"?>
<androidx.constraintlayout.widget.ConstraintLayout
    android:id="@+id/main"
    tools:context=".MainActivity"
    android:layout_width="match_parent"
    android:layout_height="match_parent"
    xmlns:tools="http://schemas.android.com/tools"
    xmlns:app="http://schemas.android.com/apk/res-auto"
    xmlns:android="http://schemas.android.com/apk/res/android" >

    <FrameLayout
        android:id="@+id/titlebar_frame"
        android:layout_height="60dp"
        android:layout_width="match_parent"
        app:layout_constraintTop_toTopOf="parent" >

        <TextView
            android:layout_width="match_parent"
            android:layout_height="match_parent"
            android:text="@string/titlebar_app_name"
            android:textSize="35dp"
            android:gravity="center"
            android:textColor="@color/color_FFF"
            android:background="@color/color_B00020" />

    </FrameLayout>

    <LinearLayout
        android:id="@+id/enter_filed_liner_frame"
        android:orientation="horizontal"
        android:layout_width="match_parent"
        android:layout_height="wrap_content"
        android:gravity="center"
        android:paddingTop="20dp"
        android:paddingBottom="20dp"
        android:layout_marginTop="40dp"
        app:layout_constraintTop_toBottomOf="@id/titlebar_frame" >

        <EditText
            tools:ignore="SpUsage"
            android:id="@+id/enter_name_filed"
            android:layout_width="wrap_content"
            android:layout_height="wrap_content"
            android:autofillHints="name"
            android:hint="@string/edit_textView_hint"
            android:textColorHint="@color/color_78909C"
            android:textSize="32dp"
            android:inputType="text" />

        <Space
            android:layout_width="20dp"
            android:layout_height="match_parent" />

        <Button
            android:id="@+id/submit_button"
            android:onClick="getScore"
            android:layout_width="wrap_content"
            android:layout_height="wrap_content"
            android:paddingEnd="30dp"
            android:paddingStart="30dp"
            android:text="@string/submit_button"
            app:backgroundTint="@null"
            android:background="@drawable/submit_button" />

    </LinearLayout>

    <FrameLayout
        android:id="@+id/result_view_content"
        android:layout_height="0dp"
        android:layout_width="match_parent"
        app:layout_constraintBottom_toBottomOf="parent"
        app:layout_constraintTop_toBottomOf="@+id/enter_filed_liner_frame" >

    </FrameLayout >

</androidx.constraintlayout.widget.ConstraintLayout >
fragment_result.xml
メイン画面に配置されている「Submit」ボタンを押した時に結果を表示するための画面です。
<?xml version="1.0" encoding="utf-8"?>
<androidx.constraintlayout.widget.ConstraintLayout
    android:layout_width="match_parent"
    android:layout_height="match_parent"
    xmlns:android="http://schemas.android.com/apk/res/android" >

    <LinearLayout
        android:orientation="vertical"
        android:layout_width="match_parent"
        android:layout_height="match_parent"
        android:gravity="center" >

        <!-- ResultViewFragmentで文章を設定 -->
        <TextView
            android:id="@+id/nameLabel"
            android:layout_width="match_parent"
            android:layout_height="wrap_content"
            android:textSize="30sp"
            android:gravity="center" />

        <Space
            android:layout_height="20dp"
            android:layout_width="match_parent" />

        <!-- ResultViewFragmentでスコアを設定 -->
        <TextView
            android:id="@+id/scoreLabel"
            android:layout_width="match_parent"
            android:layout_height="wrap_content"
            android:textSize="50sp"
            android:textStyle="bold"
            android:gravity="center" />

    </LinearLayout>
</androidx.constraintlayout.widget.ConstraintLayout >
処理コード
MainActivity.java
ボタンを押された時に入力欄(EditText)が空欄じゃないかの確認や
入力値(データ)をResultViewFragment.javaへ渡すなどの処理が書かれています。
package com.example.namefortuneapp;

import android.content.pm.ActivityInfo;
import android.os.Bundle;
import android.view.View;
import android.widget.EditText;
import android.widget.Toast;

import androidx.activity.EdgeToEdge;
import androidx.appcompat.app.AppCompatActivity;
import androidx.core.graphics.Insets;
import androidx.core.view.ViewCompat;
import androidx.core.view.WindowInsetsCompat;
import androidx.fragment.app.FragmentManager;
import androidx.fragment.app.FragmentTransaction;

import com.example.namefortuneapp.fragment.ResultViewFragment;

public class MainActivity extends AppCompatActivity {

    private FragmentManager fragmentManager;

    @Override
    protected void onCreate(Bundle savedInstanceState) {
        super.onCreate(savedInstanceState);
        EdgeToEdge.enable(this);
        setContentView(R.layout.activity_main);
        fragmentManager = getSupportFragmentManager();

        ViewCompat.setOnApplyWindowInsetsListener(findViewById(R.id.main), (v, insets) -> {
            Insets systemBars = insets.getInsets(WindowInsetsCompat.Type.systemBars());
            v.setPadding(systemBars.left, systemBars.top, systemBars.right, systemBars.bottom);
            return insets;
        });

        /* 画面を縦方向に固定する */
        setRequestedOrientation(ActivityInfo.SCREEN_ORIENTATION_PORTRAIT);
    };

    public void getScore(View view) {

        /* idでEditTextのビューを特定し、`editText`の変数に代入 */
        EditText editText = findViewById(R.id.enter_name_filed);

        /*
        * `getText`で`editText`(`EditText`)に入力された文字列を取得し、
        * `toString`で文字列型に変換し、
        * `trim`で前後の空白を除いて`enteredName`という変数に代入
        *  */
        String enteredName = editText.getText().toString().trim();

        /* `enteredName`が`isEmpty`、つまり入力欄が空欄かどうかを確認 */
        if (enteredName.isEmpty()) {
            /*
            * 空欄だった場合はエラーを表示させる。
            *
            * エラーの表示法方法 :
            *  setError : editText が持っているメソッドで入力欄にエラーのアイコンとメッセージを表示させる
            *  Toast : 画面の下に指定の間小さな通知を表示させる
            *  */

            editText.setError(getString(R.string.editText_error_notification));
            Toast.makeText(this, R.string.editText_error_notification, Toast.LENGTH_SHORT).show();
        } else {
            Bundle bundle = new Bundle();
            bundle.putString("name", enteredName);
            ResultViewFragment fragment = new ResultViewFragment();

            fragment.setArguments(bundle);
            FragmentTransaction transaction = fragmentManager.beginTransaction();
            transaction
                    .replace(R.id.result_view_content, fragment)
                    .addToBackStack(null)
                    .commit();
        };
    };
};
ResultViewFragment.java
fragment_result.xmlで組まれたレイアウトを表示するために必要な処理や
MainActivity.javaから受取った入力値(データ)扱うための処理が書かれています。
package com.example.namefortuneapp.fragment;

import android.os.Bundle;
import android.view.LayoutInflater;
import android.view.View;
import android.view.ViewGroup;
import android.widget.TextView;

import androidx.fragment.app.Fragment;

import com.example.namefortuneapp.R;
import java.util.Random;

public class ResultViewFragment extends Fragment {

    @Override
    public View onCreateView(LayoutInflater inflater, ViewGroup container, Bundle savedInstanceState) {
        View nameLabelView = inflater.inflate(R.layout.fragment_result, container, false);

        Bundle args = getArguments();
        if (args != null) {
            String labelText = args.getString("name") + getString(R.string.result_view_name);
            TextView nameLabel = nameLabelView.findViewById(R.id.nameLabel);
            nameLabel.setText(labelText);
        };

        Random randomGenerator = new Random();
        int score = randomGenerator.nextInt(101);

        TextView scoreLabel = nameLabelView.findViewById(R.id.scoreLabel);
        scoreLabel.setText(score + getString(R.string.result_view_score));

        return nameLabelView;
    };
};
その他
submit_button.xml
drawableディレクトリ内にsubmit_button.xmlというファイルを作成、配置します。
activity_main.xmlにある「Sumit」ボタンのデザインを作成しています。
<?xml version="1.0" encoding="utf-8"?>
<shape
    xmlns:android="http://schemas.android.com/apk/res/android"
    android:shape="rectangle" >
    <corners android:radius="100dp"/>
    <solid android:color="@color/color_B00020"/>
    <stroke
        android:width="2dp"
        android:color="@color/color_000"/>
</shape >
colors.xml
valuesディレクトリ内のcolors.xmlというファイルに以下の内容を記述します。
ボタンやテキスト、背景色などを設定する際に呼出すための名前と色を設定しています。
<?xml version="1.0" encoding="utf-8"?>
<resources >
    <color name="color_000" >#000</color >
    <color name="color_FFF" >#FFF</color >
    <color name="color_555" >#555</color >
    <color name="color_B00020" >#B00020</color >
    <color name="color_78909C" >#78909C</color >
</resources >
strings.xml
valuesディレクトリ内のstrings.xmlというファイルに以下の内容を記述します。
XML側でボタンやヘッダーに表示する文字、(今回は)Java側で値と文字を連結して表示する際に呼出すための名前と文章(文字)を設定しています。
今回コード側では、コメントで result_view と書かれた所から下2行を呼出、連結して結果画面に表示しています。
<resources >
    <string name="app_name" >NameFortuneApp</string >

    <!-- main view -->
    <string name="submit_button" >Submit</string >
    <string name="titlebar_app_name" >姓名占い</string >
    <string name="edit_textView_hint" >Enter Your Name</string >

    <!-- error_message -->
    <string name="editText_error_notification" >Please enter your name</string >

    <!-- result_view -->
    <string name="result_view_name" >の点数は…</string >
    <string name="result_view_score" >点です!!</string >
</resources >
実装コード説明
調べつつまとめていますが、javaを学びたての初学者のため間違いはご容赦下さい。
activity_main.xml
【 LinearLayout 】
<LinearLayout>

  <!-- Views -->

</LinearLayout>
LinearLayout は、設定した方向にViewを並べて表示することが出来ます。
設定可能な方向には以下の2つがあります。
-
android:orientation="horizontal":横方向に並べる -
android:orientation="vertical":縦方向に並べる
今回は使用していませんが LinearLayout には、weightというものがあります。
このweightを使うことでdpなど具体的な数値ではなく、比率で幅や高さを指定することができます。
また今回は直接幅を指定していますが、
Space に weight 設定することで View との間に比率で隙間を作ることが出来ます。
<Space
    android:layout_width="20dp"
    android:layout_height="match_parent" />
参考サイト
【 EditText 】
<EditText
    android:autofillHints="name"
    android:hint="@string/edit_textView_hint"
    android:textColorHint="@color/color_78909C"
    android:inputType="text" />
EditText は、編集可能なテキストつまり、入力欄を表示することが出来ます。
-
autofillHints:自動入力を行う際にどんなテキストを入力する欄なのかを端末(システム)に伝える -
hint:入力欄に表示され、ユーザーにどのようなテキストを入力する欄なのかを伝える- テキストが入力されると自動で表示が消え、空欄になると再度表示されます
-
textColorHint:hint の文字色を設定する -
inputType:どのようなテキスト(値)を入力するか(できるか)を設定する
inputType を numberPasswordにした場合
【 FrameLayout 】
<FrameLayout
    android:id="@+id/result_view_content"
    android:layout_height="match_parent"
    android:layout_width="match_parent" >

    <!-- Views -->

</FrameLayout >
FrameLayout は、LinearLayout のような役割を持たず View を囲むために使われます。
子ビューが複数ある場合、それらはすべて左上に重なって表示されます。
今回でいえば、タイトルバーにあるテキスト(TextView)を囲うのに使っています。
FrameLayout のメリットとして今回のように、
複数ビューの下に1個のビューという構成の時に FrameLayout で囲っていれば調整がしやすくなります。
frameLayout1 と frameLayout2 とで調整すれば良くなり楽かつ調整しやすい。
<FrameLayout
    android:id="@+id/frameLayout1" >
    <EditText
        android:id="@+id/editText"/>
    <Button
        android:id="@+id/button" />
</FrameLayout>

<FrameLayout
    android:id="@+id/frameLayout2" >
</FrameLayout >
fragment_result.xml
    <FrameLayout
        android:id="@+id/result_view_content"
        android:layout_height="0dp"
        android:layout_width="match_parent"
        app:layout_constraintBottom_toBottomOf="parent"
        app:layout_constraintTop_toBottomOf="@+id/enter_filed_liner_frame" >

    </FrameLayout >
fragment_result.xml で作成された画面は、activity_main.xml のこの箇所に表示されます。
MainActivity.java 内に記述された .replace(R.id.result_view_content, fragment)
によってこの FrameLayout が fragment_result.xmlのレイアウトに置き換わり、
最終的に結果画面が表示されます。
Fragmentとは
Fragment が何かを一言で表すと
Fragment は activitの上で使う画面を構成する部品
例えば今回の場合、結果を表示する画面をこの Fragment で作成しています。
今回くらいシンプルであれば Fragment を使う必要もないとは思いますが、
ベースの講座が Acitivity から Acitivity へ遷移する方法を使っており、
そこを変える形で作成しているので今回は使用しました。
Fragment のメリットとしては以下のようなものがあります
- レイアウトを使いまわせる
- デザインの修正がしやすい
- 画面遷移の処理でメモリを食いにくい
画面遷移では Fragment を使わず Acitivity から Acitivity へ遷移する方法もありますが、
基本的に画面遷移は Fragment を使う方がいいみたいです。
画面遷移では、展開されたFragmentを入れ替える(replace)することで遷移したように見せます。(今回は遷移動作を取っ払っていますが😅)
(というよりも Acitivity から Acitivity への遷移の方が例外的らしい?とか)
Acitivity から Acitivity への遷移
そして使いまわせるというのは大きなメリットです。
例えばツールバーを Fragment で作成していれば、複数の画面で同じツールバーを作るときにこの Fragment を展開させればいいだけなので楽になります。
もしツールバーのデザインの修正や変更があっても、ツールバーの Fragment だけ直せば全画面で修正後のデザインのツールバーを使うことが出来ます。
MainActivity.java
【 setRequestedOrientation 】
setRequestedOrientation(ActivityInfo.SCREEN_ORIENTATION_PORTRAIT);
画面の向きをコード側から固定するための記述です。
上記のサイトでAndroidManifest.xmlに以下のように記述して設定する方法もあります。
android:screenOrientation="portrait"
ただし、これを設定するとコード部分は取り消し線が自動で入れられ、警告が表示されます。
Should not restrict activity to fixed orientation.
This may not be suitable for different form factors, causing the app to be letterboxed.
これは、Android12で導入された Letterboxing の影響です。
Androidは、普通サイズのスマホ・縦長サイズのスマホ・タブレット・折りたたみと、
良くも悪くもバリエーション豊かです。
この警告の意味をざっくりと捉えると、
「画面の向きを固定すると一部のデバイスでアプリが適切に表示されない可能性があるから固定しないで」と言っています。
(私はiPhoneユーザーなので縦長のAndrodスマホとかを見ると「もうちょい短くてもええんやで」と毎回思いますね)
Expecting `android:screenOrientation="unspecified"` or `"fullSensor"`
for this activity so the user can use the application
in any orientation and provide a great experience on Chrome OS devices
もう一つの警告は、
アプリを自由に回転できるよう unspecified か fullSensor に設定するように言われています。
こちらの警告も意味をざっくりと捉えると、
「画面回転できる方がユーザー体験の向上につながるから回転できるどっちかの設定にして」と言っています。
これらは、tools:ignore というもので設定すれば警告を非表示にさせることが出来ます。
ただ AndroidManifest.xml に直接書いて設定する方法はあまり良くないらしく、
先ほどのようにコード側で設定する方がいいみたいです。
【 getScore 】
public void getScore(View view) {

 // Processing

}
ここで「Submit」ボタンが押された時の処理を設定しています。
このボタンには onClick が設定されており、
ボタンが押される(クリック)されると getScore が呼出され、最終的に結果が表示されます。
<Button
    android:id="@+id/submit_button"
    android:onClick="getScore" />
【 getScore関数の定義 】
public void getScore(View view)
この行で以下を設定しています。
-
public:どこからでも使用できるように設定しています。peivateはその逆 -
void:返り値がなく、処理だけを行う関数であることを示しています。- Javaのvoidメソッドとは?メソッド戻り値の定義方法を学ぶ
- void の意味は、「空間。虚空。真空。」
-
(View view):この関数が`View型のviewという引数(変数)を取ることを示しています。- 「メソッド名(View view)」という書き方は、android:onClick 属性と連携するための書き方です。
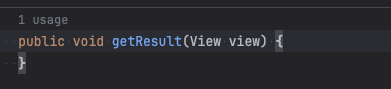
例えば、ボタンのonClickをgetScore から getResult に変更してみてください。

エラーになるので(Macの場合) [ option + Enter ] で
Create 'getResult(view)' in'MainActivity'をクリックすると、

このように新しく関数(メソッド)が作成されます。
onClick で呼べるように public が設定され、返り値を持たないので void も設定されています。
【 getScore関数内で使う変数の設定 】
EditText editText = findViewById(R.id.enter_name_filed);
String enteredName = editText.getText().toString().trim();
EditText editText = findViewById(R.id.enter_name_filed);
この行は、「R(リソース)からidが enter_name_filed のものを変数editText に入れて関数内で扱えるようにする」という事前設定をしています。
変数名の前にあるEditText は、この変数が EditText という型であることを示しています。
この型を記すことで、以降の処理でEditTextが持つ機能(メソッド)を使えるようになります。
逆に外すとエラーになります。
String enteredName = editText.getText().toString().trim();
この行は、editText から今回の場合はテキスト(文字列)を取得しています。
それぞれ以下の処理をしています。
-
getText:editTextに入力された文字を取得する。 -
toString:入力された文字を文字列(String型)に変換する。 -
trim:文字列の前後から空白をを削除する- そして、
enteredNameという変数に代入し、Stringと記してこの変数が文字列を扱っていることを宣言します。
- そして、
【 入力状態に基づく条件分岐 】
if (enteredName.isEmpty()) {

    editText.setError(getString(R.string.editText_error_notification));
    Toast.makeText(this, R.string.editText_error_notification, Toast.LENGTH_SHORT).show();

} else {

 // Processing

};
if (enteredName.isEmpty())
ここで enteredName つまり入力欄が空欄かどうかを判定しています。
- enteredName.isEmpty() →
- enteredName is Empty →
- enteredName がエンプティー →
- 入力欄が空っぽです
- enteredName がエンプティー →
- enteredName is Empty →
入力欄が空(未入力)の時は、以下のエラー表示処理が行われます。
editText.setError(getString(R.string.editText_error_notification));
Toast.makeText(this, R.string.editText_error_notification, Toast.LENGTH_SHORT).show();
また、if (enteredName.isEmpty()) 以外にも以下のような書き方があります。
(IDEからの修正提案に従って直していくと、結局最初の書き方に行きつきますが。)
// 書き方1
if (enteredName == "") {

// 書き方2
if (enteredName.equals("")) {
【 入力状態に基づく条件分岐 - エラー表示 】
editText.setError(getString(R.string.editText_error_notification));
Toast.makeText(this, R.string.editText_error_notification, Toast.LENGTH_SHORT).show();
editText.setError(getString(R.string.editText_error_notification));
setError は、EditText型が持つエラー表示のメソッドで画像のように表示されます。
! のマークをタッチすると設定したエラーメッセージが表示されます。
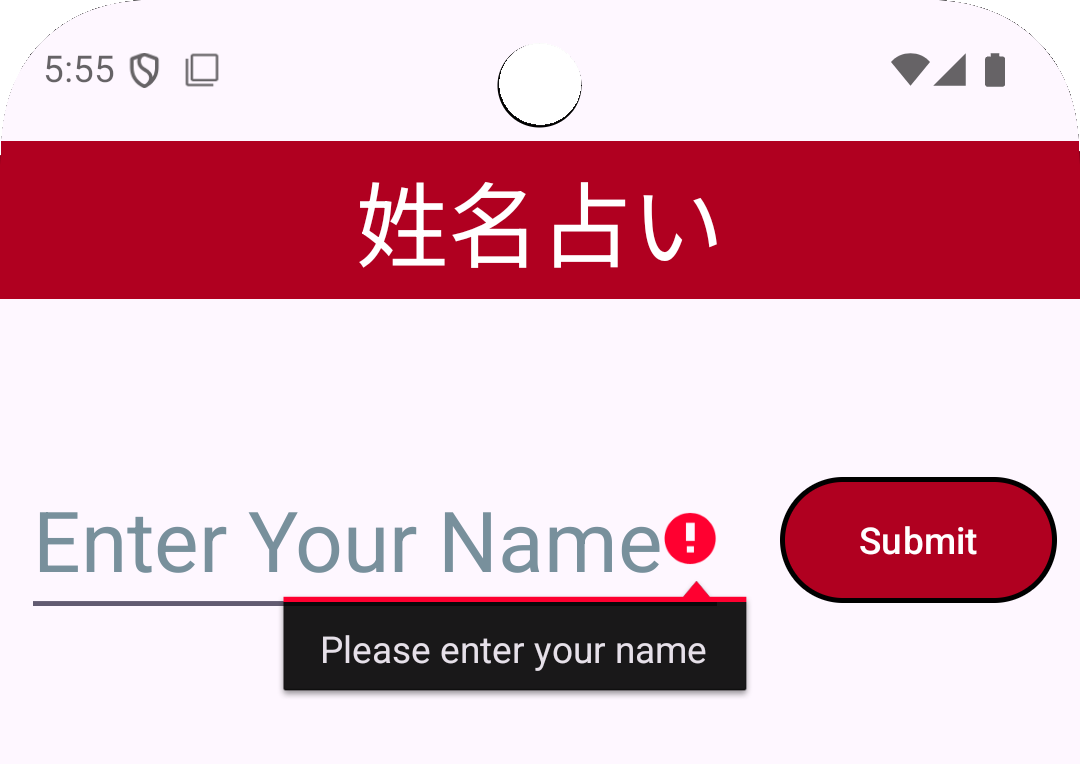
このエラーメッセージは getString(R.string.editText_error_notification) で設定しています。
この行は、「R(リソース)からstring(文字列)で editText_error_notification という名前で設定されている文字列を取得(getString)します」という設定をしています。
editText_error_notification を(Macは)Command・(Windowsは)Controlを押しながらクリックすると、strings.xml が開かれます。
<string name="editText_error_notification" >Please enter your name</string >
Toast.makeText(this, R.string.editText_error_notification, Toast.LENGTH_SHORT).show();
makeText は、Toastという通知機能の持つメソッドで画像のように表示されます。

Toast.makeText(this, R.string.editText_error_notification, Toast.LENGTH_SHORT).show();
この中の this は、自分自身のインスタンス(今回でいえばMainActivity.java)を指します。
IDE上では、このthisの左側に context と表示されます。
Contextは、「文脈」や「環境」を意味し、「どの環境(Context)で使うか」ということを明確にします。
また、以下のように記述することも出来ます。
// thisの前に`MainActivity.`を追加
Toast.makeText(MainActivity.this, R.string.editText_error_notification, Toast.LENGTH_SHORT).show();
続く内容は、先ほどと同じように表示するメッセージを設定し、
.LENGTH_SHORT で表示時間を設定し、.show() で表示するように設定します。
エラー表示は、上記以外にもダイアログ方式があります。
/* `AlertDialog.Builder`は変数名の型指定 */
AlertDialog.Builder alertDialogBuilder = new AlertDialog.Builder(this);

alertDialogBuilder
    .setTitle(R.string.editText_error_dialog_title)
    .setMessage(R.string.editText_error_dialog_message)

    // 今回は閉じるボタンを押しても何もしないので`null`を設定、でボタンを押下したら閉じるだけに設定
    .setPositiveButton(R.string.editText_error_dialog_button, null);

    // 上記のタイトル・メッセ・位置の設定(設計書)をインスタンス(実態)化させる
    AlertDialog alertDialog = alertDialogBuilder.create();
    alertDialog.show();
【 入力状態に基づく条件分岐 - 結果表示の準備 】
Bundle bundle = new Bundle();
bundle.putString("name", enteredName);

ResultViewFragment fragment = new ResultViewFragment();
fragment.setArguments(bundle);
FragmentTransaction transaction = fragmentManager.beginTransaction();
transaction
        .replace(R.id.result_view_content, fragment)
        .addToBackStack(null)
        .commit();
Bundle bundle = new Bundle();
Bundleは、ActivityからFragmentへデータを渡すために使われるクラスです。
この行で Bundle クラスを引数なしで呼び出して初期化し、bundleという変数名に格納、
そして、この変数がBundle型であると宣言しています。
ActivityからActivityの場合、intent を使用します。
bundle.putString("name", enteredName);
Bundle(正確にはその上のBaseBundle)クラスにあるputStringを使い、
enteredName(入力された名前)を name というキーでつか変えるようにします。
(自分は、「連想配列みたいだなぁ」って認識してます。)
ResultViewFragment fragment = new ResultViewFragment();
ResultViewFragment.java をインスタンス化(実体化)し、fragment という変数で利用できるようにします。
fragment.setArguments(bundle);
この行でFragment.javaクラスが持つ setArguments を使い fragment(ResultViewFragment.java)にデータを渡します。
渡されたデータは、ResultViewFragment.java側でgetArgumentsによって取り出されます。
引数になっている bundle には、putString によってユーザーが入力した名前が name というキーで格納されています。
FragmentTransaction transaction = fragmentManager.beginTransaction();
FragmentManagerクラスが持つ beginTransaction メソッドを呼び出して transaction に格納。
画面遷移に必要な準備を整えます。
transaction.replace(R.id.result_view_content, fragment).addToBackStack(null).commit();
ここで実際の遷移(に見せる)処理を実行します。
(R.id.result_view_content, fragment)
R.id.result_view_contentでidが result_view_contentのView
(今回はactivity_main.xmlにあるFrameLayout)を取得し、これをfragmentに置き換えることで結果画面を表示します。
.addToBackStack(null)
戻るボタンを押した時に遷移が取り消され前の状態に戻せるようにします。
その際に遷移前の画面にここで名前をつけることで、画面名で指定して戻すことが出来ます。
直前以外にも、名前をつけておくことで特定の画面に戻すといった動作も組めるようになります。
.commit();
上記の設定で確定させ、遷移を実行します。
コミットは、データベースのお話でも出てくるもので、トランザクション(一連の作業)を確定させることをコミットというようです。
あとは、Gitにも git commit で出てきますねぇ
【 渡されたデータの取り出しと設置 】
Bundle args = getArguments();
if (args != null) {
    String labelText = args.getString("name") + getString(R.string.result_view_name);
    TextView nameLabel = nameLabelView.findViewById(R.id.nameLabel);
    nameLabel.setText(labelText);
};
Bundle args = getArguments();
この行で MainActivity.java の setArguments によって渡されたデータを取り出し、Bundle型の変数argsに格納します。
if (args != null)
ここでは、argsが null ではないかを確認しています。
これにより NullPointerException のエラー・アプリクラッシュを回避します。
getArguments で中身を取得しても、そもそもデータが
(今回であればsetArgumentsでBundleが引数として)渡されていないければ、変数args の中身は何もない状態(null)になります。
その状態で(今回であれば名前の)データを取得しようとすれば当然、処理を正常に行うことはできずに終わります。
この行はその問題を回避するための条件分岐です。
String labelText = args.getString("name") + getString(R.string.result_view_name);
nullチェックを終えると実際に名前のデータを取得します。
args.getString("name") とすることで変数args の中から name というキーで文字列(今回は、名前)を取得できます。
そして、 + getString(R.string.result_view_name) で strings.xmlで定義された文字を取得し、+ で文字列を連結して1つの文章(文字列)にして labelText という文字列の変数に格納します。
TextView nameLabel = nameLabelView.findViewById(R.id.nameLabel);
次に結果画面からidが nameLabel のViewを取得し、nameLabel というTextView型の変数に格納します。
nameLabel.setText(labelText);
表示するための名前とViewを取得したら、TextViewクラスが持つ setText というメソッドを使い、nameLabelにlabelText(名前)を設定します。
ResultViewFragment.java
【 ランダムな点数の生成 】
Random randomGenerator = new Random();
int score = randomGenerator.nextInt(101);

TextView scoreLabel = nameLabelView.findViewById(R.id.scoreLabel);
scoreLabel.setText(score + getString(R.string.result_view_score));
まず以下の2行で0から100の間で数をランダムに生成してます。
Random randomGenerator = new Random();
int score = randomGenerator.nextInt(101);
その後、点数を表示するためのViewを取得し、setTextと文字列結合で結果(点数)を設定します。
TextView scoreLabel = nameLabelView.findViewById(R.id.scoreLabel);
scoreLabel.setText(score + getString(R.string.result_view_score));
【 結果の表示(処理結果の返却) 】
return nameLabelView;
ResultViewFragment.javaでのデータの取得やテキストの設置、ランダムな点数の生成や設置を終え、
returnで返り値を返すことで最終的に占いの結果が表示されます。