Eclipse4.7とGradleを使ってSpringBoot2.0.1の新規プロジェクト構築
環境
開発環境として
- Windows 10 64bit
- Eclipse
- Spring Boot
を利用した開発環境の構築手順です。
利用しているツール
- Eclipse
- Oxygen.2 Release (4.7.2)
- Pleiades all in oneを使用
- http://mergedoc.osdn.jp/
- JDK8
- Gradleを利用するためにJava7以上が必要。
Eclipseのセットアップ
Springツール(STS)をインストール
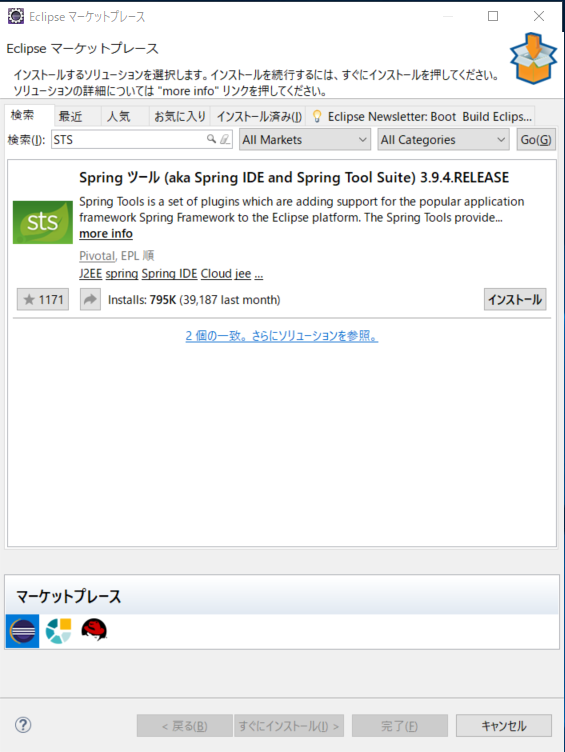
Eclipseのマーケットプレース機能からSTSをインストールします。
2018/05/01時点ではSpringツール(aka Spring IDE and Spring Tool Suite) 3.9.4.RELEASEとなっていました。
Windows環境でGradleを使う準備
gradleのモジュールをダウンロード
以下のリンク先からzipをダウンロードする。
https://gradle.org/next-steps/?version=4.7&format=all
任意のディレクトリへ展開
任意のディレクトリへダウンロードしたzipを展開する。
gradle.batにEncodingの定義を追加
gradle-4.7\bin\gradle.batに以下の定義を追加します。
set DEFAULT_JVM_OPTS="-Dfile.encoding=UTF-8"
環境変数の設定
gradle-4.7\binまでのパスを環境変数のPATHに追加する。
セットアップが正常にできたか確認
確認のため、gradleコマンドを実行し、Gradleのバージョンを確認します。
コマンドプロンプトを起動して、以下のコマンドを実行してください。
gradle -v

# 以下のような結果が出力されればOK
Welcome to Gradle 4.7!

Here are the highlights of this release:
 - Incremental annotation processing
 - JDK 10 support
 - Grouped non-interactive console logs
 - Failed tests are re-run first for quicker feedback

For more details see https://docs.gradle.org/4.7/release-notes.html


------------------------------------------------------------
Gradle 4.7
------------------------------------------------------------

Build time:   2018-04-18 09:09:12 UTC
Revision:     b9a962bf70638332300e7f810689cb2febbd4a6c

Groovy:       2.4.12
Ant:          Apache Ant(TM) version 1.9.9 compiled on February 2 2017
JVM:          1.8.0_112 (Oracle Corporation 25.112-b15)
OS:           Windows 10 10.0 amd64
プロジェクトを新規構築
プロジェクト用のディレクトリを作成
ここではC:\projects\gradle-spring-bootをプロジェクトのルートフォルダとして、
新規に空のフォルダを作成しておきます。
プロジェクトの初期化
以下のコマンドを実行して、Gradleプロジェクトの初期化を行います。
cd /D C:\projects\gradle-spring-boot
gradle init

# コマンドの結果
BUILD SUCCESSFUL in 4s
2 actionable tasks: 2 executed
上記コマンドで生成されるファイルは以下のような構成です。
dir

# コマンドの結果
2018/05/03  21:26    <DIR>          .
2018/05/03  21:26    <DIR>          ..
2018/05/03  21:26    <DIR>          .gradle
2018/05/03  21:26               207 build.gradle
2018/05/03  21:26    <DIR>          gradle
2018/05/03  21:26             5,296 gradlew
2018/05/03  21:26             2,260 gradlew.bat
2018/05/03  21:26               375 settings.gradle
               4 個のファイル               8,138 バイト
               4 個のディレクトリ  29,642,649,600 バイトの空き領域
build.gradleファイルを編集
build.gradleファイルをテキストエディタで以下の内容に編集します。
参考:https://spring.io/guides/gs/spring-boot/
buildscript {
    repositories {
        mavenCentral()
    }
    dependencies {
        classpath("org.springframework.boot:spring-boot-gradle-plugin:2.0.1.RELEASE")
    }
}

apply plugin: 'java'
apply plugin: 'eclipse'
apply plugin: 'idea'
apply plugin: 'org.springframework.boot'
apply plugin: 'io.spring.dependency-management'

bootJar {
    baseName = 'gs-spring-boot'
    version =  '0.1.0'
}

repositories {
    mavenCentral()
}

sourceCompatibility = 1.8
targetCompatibility = 1.8

dependencies {
    compile("org.springframework.boot:spring-boot-starter-web")
    testCompile("junit:junit")
}
とりあえず動作確認のためサンプルソースコードを作成
src/main/java/hello/HelloController.java
package hello;

import org.springframework.web.bind.annotation.RestController;
import org.springframework.web.bind.annotation.RequestMapping;

@RestController
public class HelloController {

    @RequestMapping("/")
    public String index() {
        return "Greetings from Spring Boot!";
    }

}
src/main/java/hello/Application.java
package hello;

import java.util.Arrays;

import org.springframework.boot.CommandLineRunner;
import org.springframework.boot.SpringApplication;
import org.springframework.boot.autoconfigure.SpringBootApplication;
import org.springframework.context.ApplicationContext;
import org.springframework.context.annotation.Bean;

@SpringBootApplication
public class Application {

    public static void main(String[] args) {
        SpringApplication.run(Application.class, args);
    }

    @Bean
    public CommandLineRunner commandLineRunner(ApplicationContext ctx) {
        return args -> {

            System.out.println("Let's inspect the beans provided by Spring Boot:");

            String[] beanNames = ctx.getBeanDefinitionNames();
            Arrays.sort(beanNames);
            for (String beanName : beanNames) {
                System.out.println(beanName);
            }

        };
    }

}
buildタスクを実行
ここまで準備できたら、一度Gradleのbuildタスクを実行します。
gradle initでGradleプロジェクトの初期化を行うと、gradlewが同時にセットアップされます。
以降の手順ではgradlewを利用した手順で記載します。
gradlew build

# コマンドの結果
BUILD SUCCESSFUL in 16s
2 actionable tasks: 2 executed
buildタスク実行後のディレクトリ構成
C:\projects\gradle-spring-boot>dir
 ドライブ C のボリューム ラベルは Windows です
 ボリューム シリアル番号は FE8D-C53C です

 C:\projects\gradle-spring-boot のディレクトリ

2018/05/04  08:39    <DIR>          .
2018/05/04  08:39    <DIR>          ..
2018/05/03  21:29    <DIR>          .gradle
2018/05/04  08:40    <DIR>          build        # ← buildディレクトリが追加で生成されている。
2018/05/03  21:28               840 build.gradle
2018/05/03  21:26    <DIR>          gradle
2018/05/03  21:26             5,296 gradlew
2018/05/03  21:26             2,260 gradlew.bat
2018/05/03  21:26               375 settings.gradle
2018/05/04  08:39    <DIR>          src
               4 個のファイル               8,771 バイト
               6 個のディレクトリ  29,562,568,704 バイトの空き領域
C:\projects\gradle-spring-boot\build>dir /S /B
C:\projects\gradle-spring-boot\build\classes
C:\projects\gradle-spring-boot\build\libs
C:\projects\gradle-spring-boot\build\tmp
C:\projects\gradle-spring-boot\build\classes\java
C:\projects\gradle-spring-boot\build\classes\java\main
C:\projects\gradle-spring-boot\build\classes\java\main\hello
C:\projects\gradle-spring-boot\build\classes\java\main\hello\Application.class
C:\projects\gradle-spring-boot\build\classes\java\main\hello\HelloController.class
C:\projects\gradle-spring-boot\build\libs\gs-spring-boot-0.1.0.jar  # ← 生成された実行可能jar(FAT jar)
C:\projects\gradle-spring-boot\build\tmp\bootJar
C:\projects\gradle-spring-boot\build\tmp\compileJava
C:\projects\gradle-spring-boot\build\tmp\bootJar\MANIFEST.MF
生成された実行可能jarの動作確認
cd /D C:\projects\gradle-spring-boot
java -jar build\libs\gs-spring-boot-0.1.0.jar
コマンド実行後、以下URLにアクセスしてGreetings from Spring Boot!と表示されればひとまず新規プロジェクトとしてサンプルソースでの構築が完了です。
