Open-Auditとは
Open-Auditは対象機器に何もインストールする必要がなくエージェントレスでインベントリ収集できます。
Open-Auditは、無償で使用できるCommunity版と、有償のProfessional版、Enterprise版があり、有償版を使用すると、追加機能を使用することができます。
違いは以下に詳しく記載されております。
https://community.opmantek.com/pages/viewpage.action?pageId=7866047
Open-Auditの詳細は以下をご参照ください。
https://www.open-audit.org/index.php
https://www.ossl.co.jp/
また、本記事は以下記事のアップデート版となります。
https://qiita.com/satoruf/items/6e6bf2f93db18e16fd00
Open-Auditの仕組み
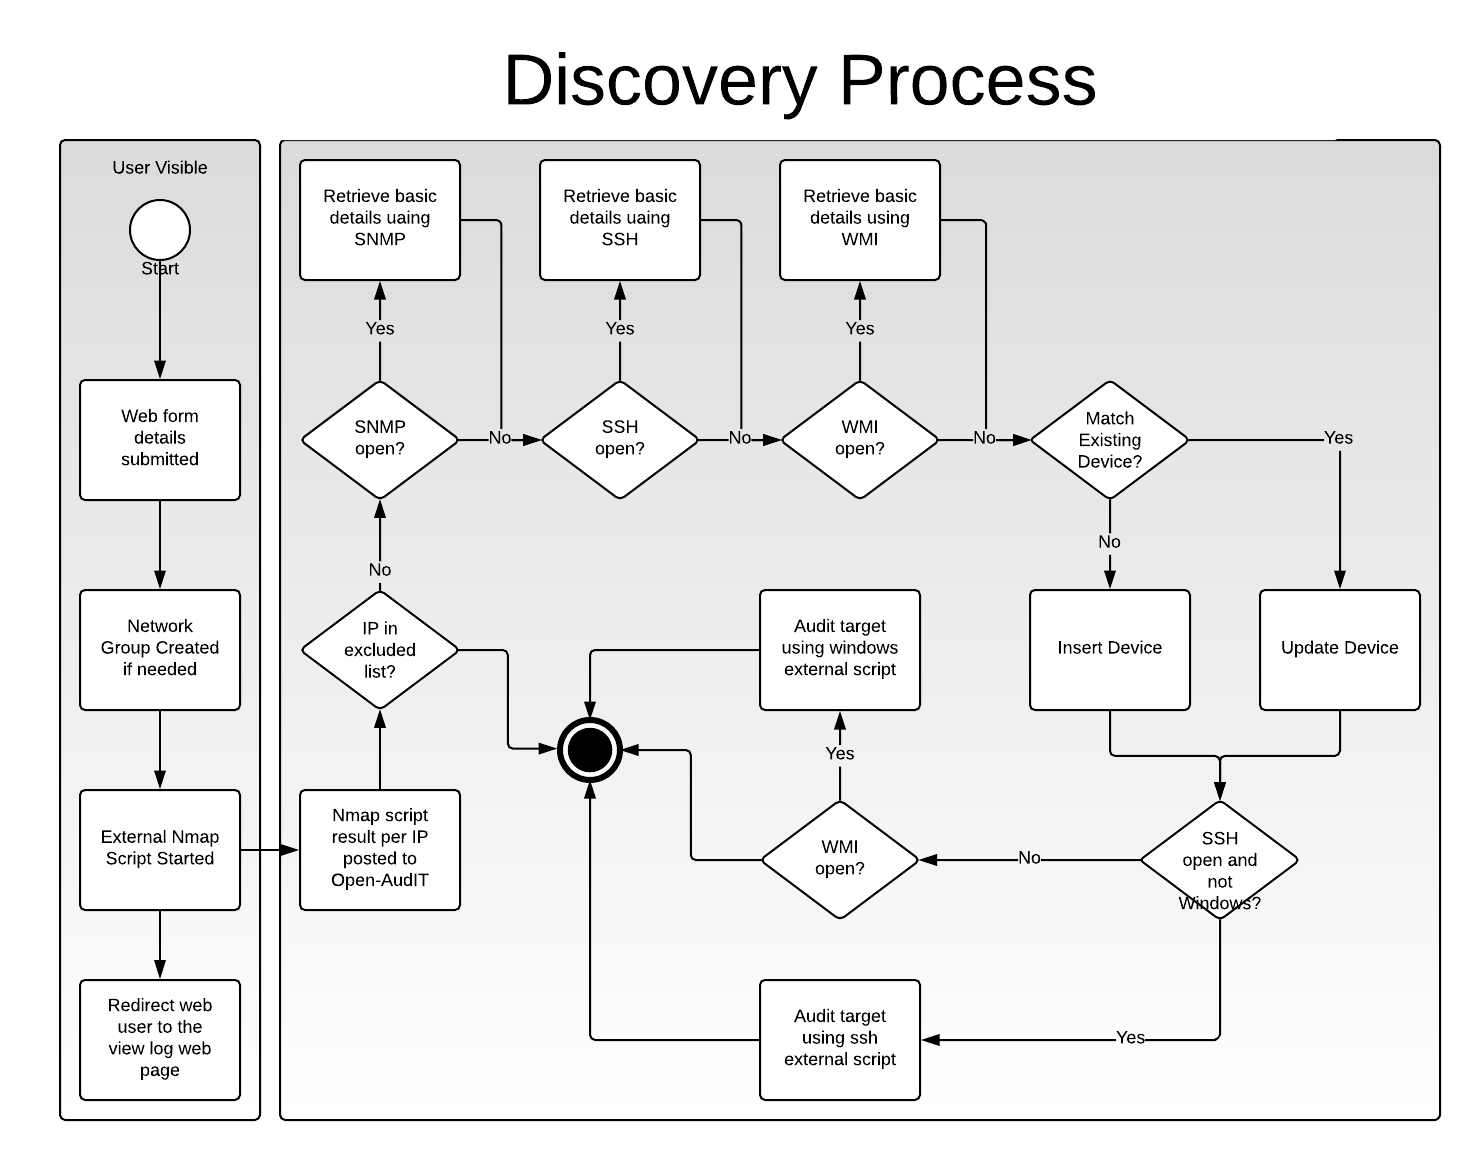
Open-Auditは、対象機器に対してnmapスキャンを実行し、snmpポートがあればsnmpポーリングし、ssh/WMIポートがあればssh/WMIログインしインベントリ収集スクリプトを実行して、ハードウェア情報やソフトウェア情報を収集します。
詳細は以下に記載されております。
https://community.opmantek.com/display/OA/How+to+use+Open-AudIT+Discovery+on+a+Subnet
環境
・CentOS 7.7
・Open-Audit 3.4.0
・MariaDB 5.5
・Apache 2.4
・PHP 5.4
・SELinuxはDisabled、Firewalldは停止されていること
・作業はすべてrootで実施
・Open-Auditインストール時に必要なパッケージをインストールするためインターネットへの接続が可能なこと
※Open-Auditインストーラ実行するとMariDB/Apache/PHP等必要なものは自動的にインストールされます。
Open-Auditインストール
以下より、Linux版のインストーラをダウンロードし、適当なディレクトリに配置します。
http://www.open-audit.org/downloads.php
・ファイル名:OAE-Linux-x86_64-release_3.4.0-r2.run
・配置先:/root
配置後、インストーラを実行し、Open-Auditのインストールを行います。
# cd /root
# chmod +x OAE-Linux-x86_64-release_3.4.0-r2.run
# ./OAE-Linux-x86_64-release_3.4.0-r2.run
インストール完了後、ブラウザから以下にアクセスできることを確認する
http://<OpenAuditのIPアドレス>/open-audit
ユーザ:admin
パスワード:password
インベントリ収集対象ホスト設定
・Linux/vSphere ESXi/Mac OSX
rootユーザでsshログイン可能なこと。
または、TTY無し、パスワード無しでのsudoを許可しているユーザであること。
sudoを許可していないユーザでインベントリ収集を行う際には以下の情報が取得できません。
| Table | Attributes not retrieved | Required Command |
|---|---|---|
| system | uuid, serial, form factor. | dmidecode |
| bios | serial, version, smversion (pre 2.0.12), serial, smversion post 2.0.12 |
dmidecode |
| processor | socket | dmidecode |
| memory | all. | dmidecode |
| motherboard | all (pre 2.0.12), serial, processor_type, memory_slot_count post 2.0.12. |
dmidecode |
| netstat | program name where process not owned by current user. | dmidecode |
インベントリ収集にsudoを必要とする情報は、以下に詳しく記載されております。
https://community.opmantek.com/display/OA/Auditing+Linux+without+root
Windows
対象ホストがWindowsの場合は、Windowsセキュリティポリシーの設定変更を行う必要があります。
設定方法は以下を参照ください。
https://community.opmantek.com/display/OA/Target+Client+Configuration
https://qiita.com/satoruf/items/6e6bf2f93db18e16fd00
インベントリ収集手順
本書ではLinux(CentOS)のホストのインベントリ収集を行うものとします。
クレデンシャルの作成
メニューバより Discover > Credentials > Create Credentials の順で移動し、必要情報を入力し、「Submit」を選択します。

Name:test
Type:SSH
Username:root
Password:<rootユーザパスワード>
ディスカバリ(インベントリ収集ホスト情報)の作成
メニューバより Discover > Discoveries > Create Discover の順で移動し、必要情報を入力し、「Submit」を選択します。
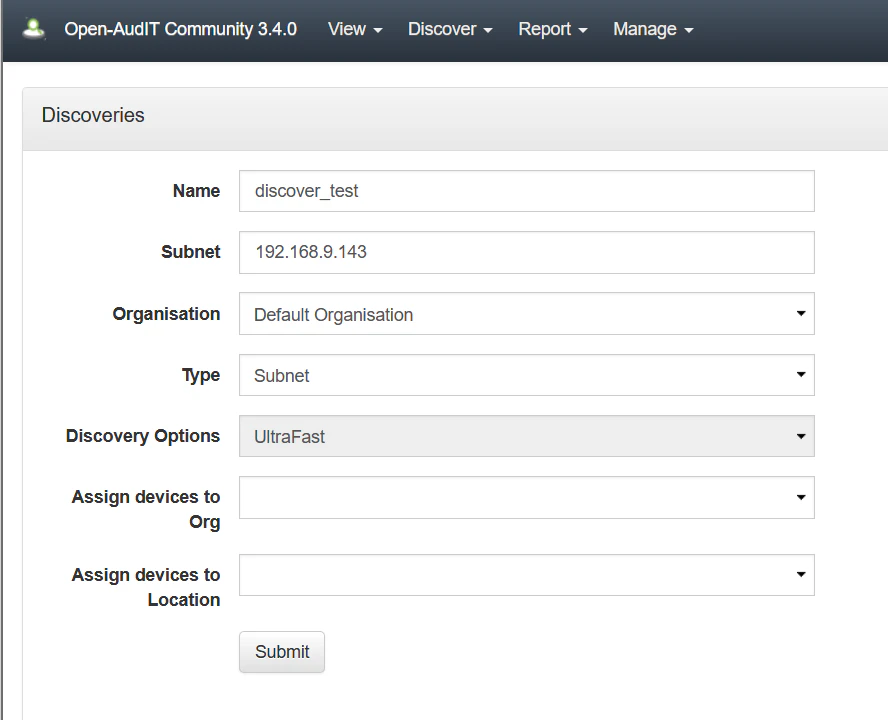
Name:discover_test
Subnet:192.168.9.143
Type:Subnet
※Subnetの指定は、単一のアドレス指定の他、以下のように範囲指定、サブネット指定することができます。
・単一アドレス指定例:192.168.0.1
・範囲指定例:192.168.0.1-5
・サブネット指定例:192.168.0.0/24
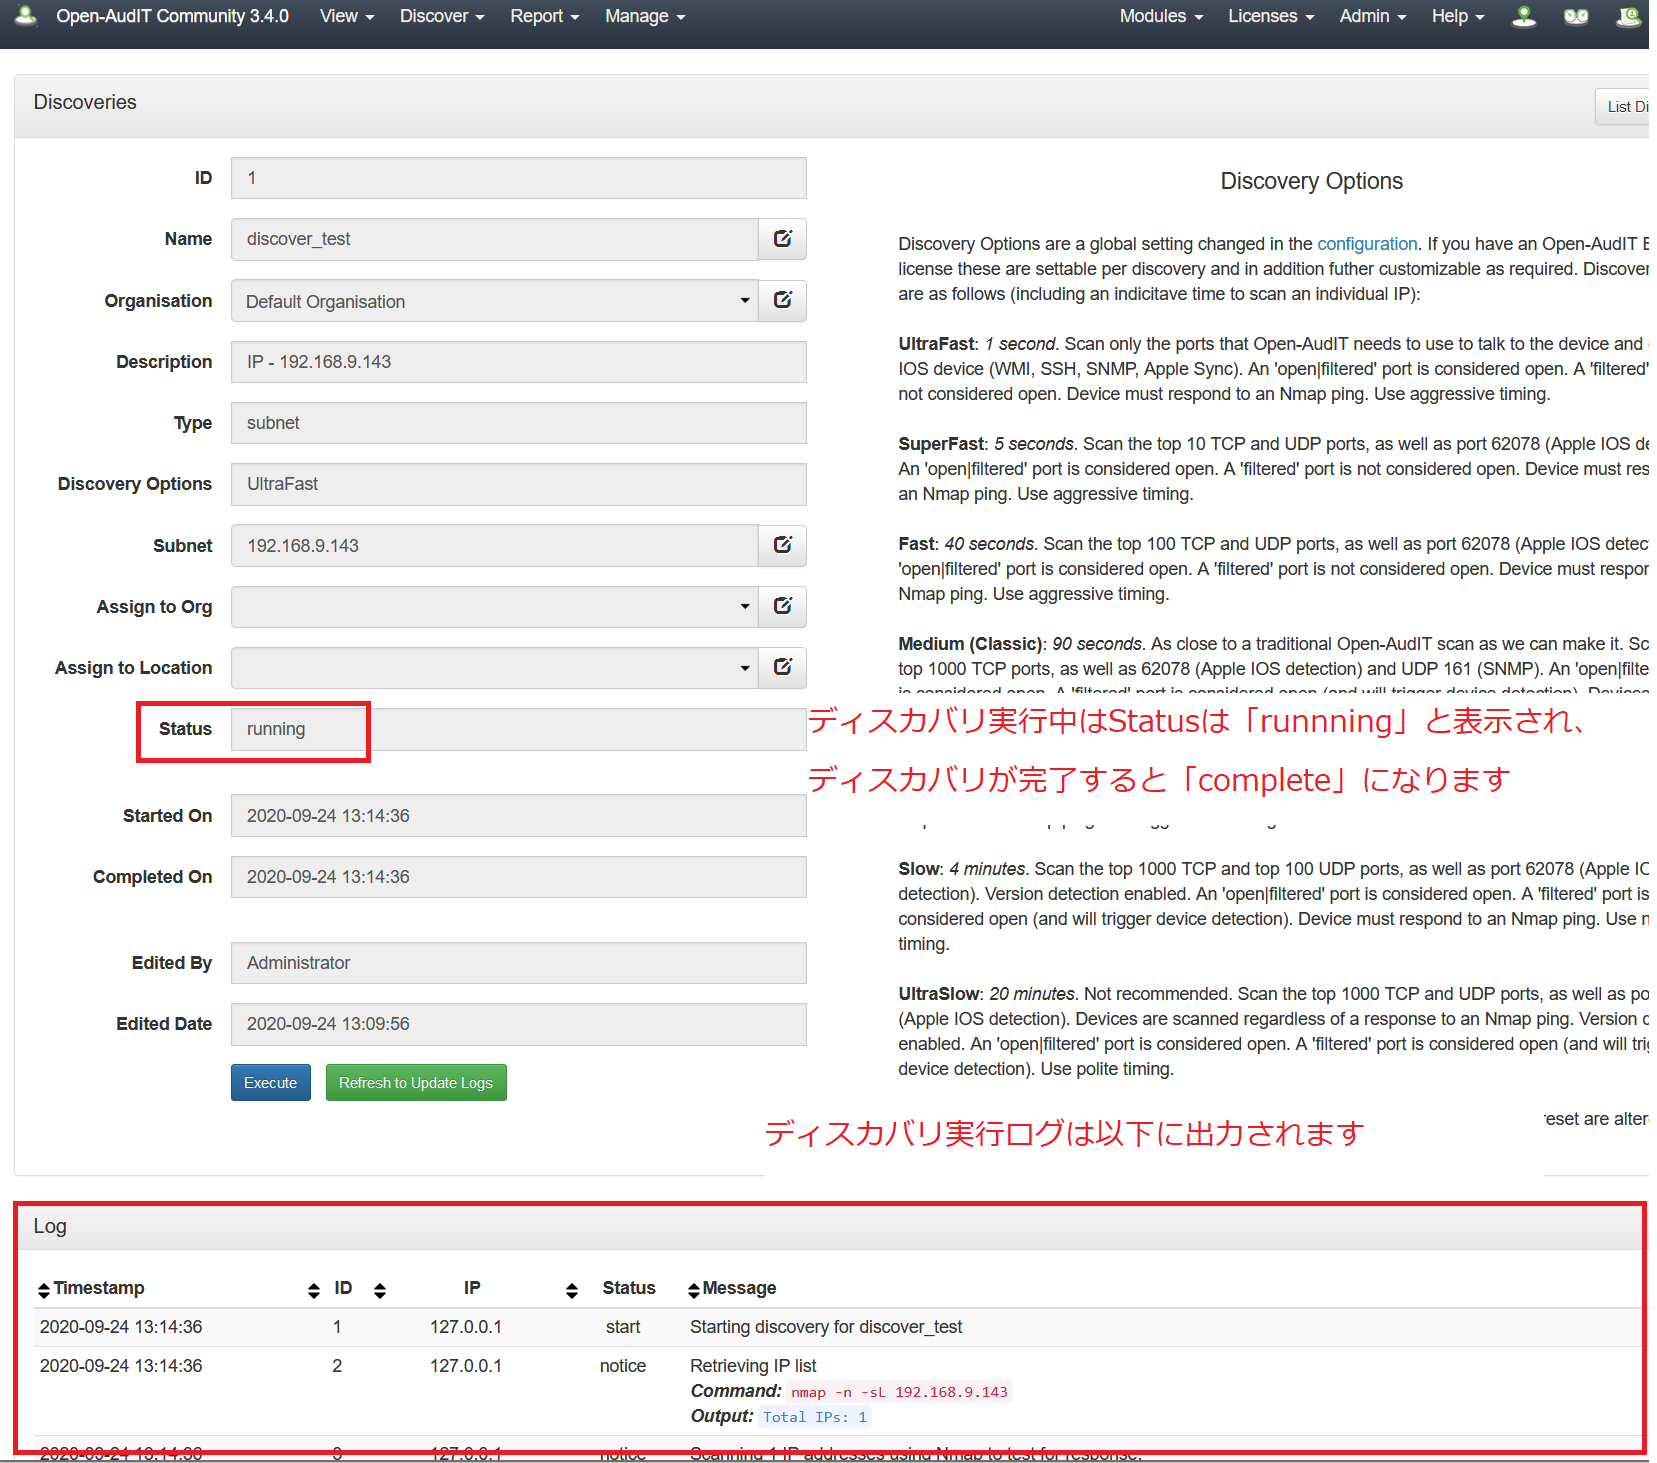
ディスカバリの実行
メニューバより Discover > Discoveries > List Discoveries の順で移動し、作成した「discover_test」のExecuteボタンを選択し、ディスカバリを実行します。
インベントリ収集の確認
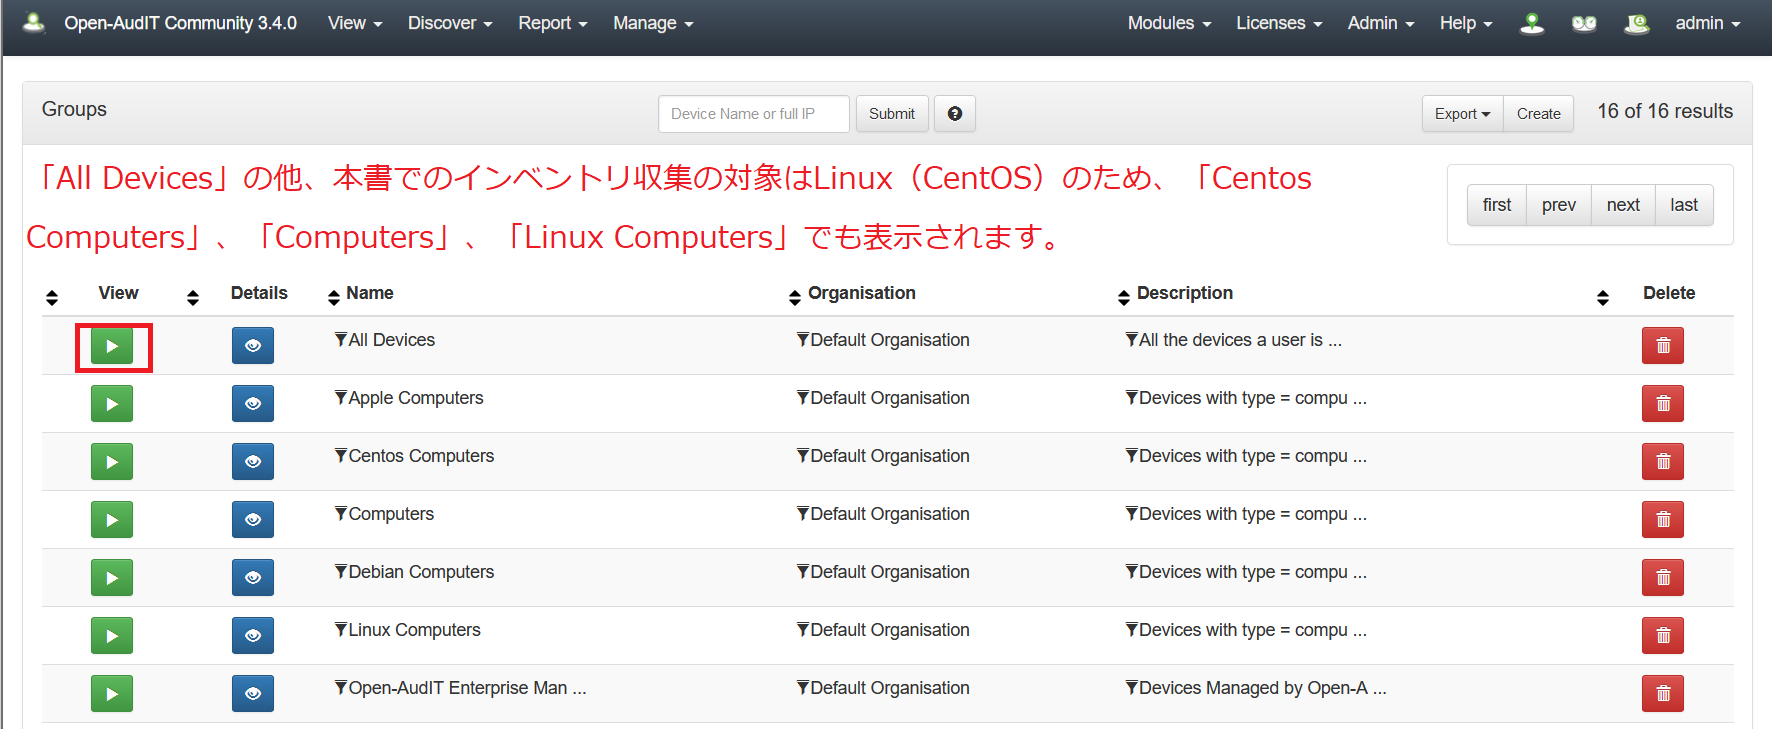
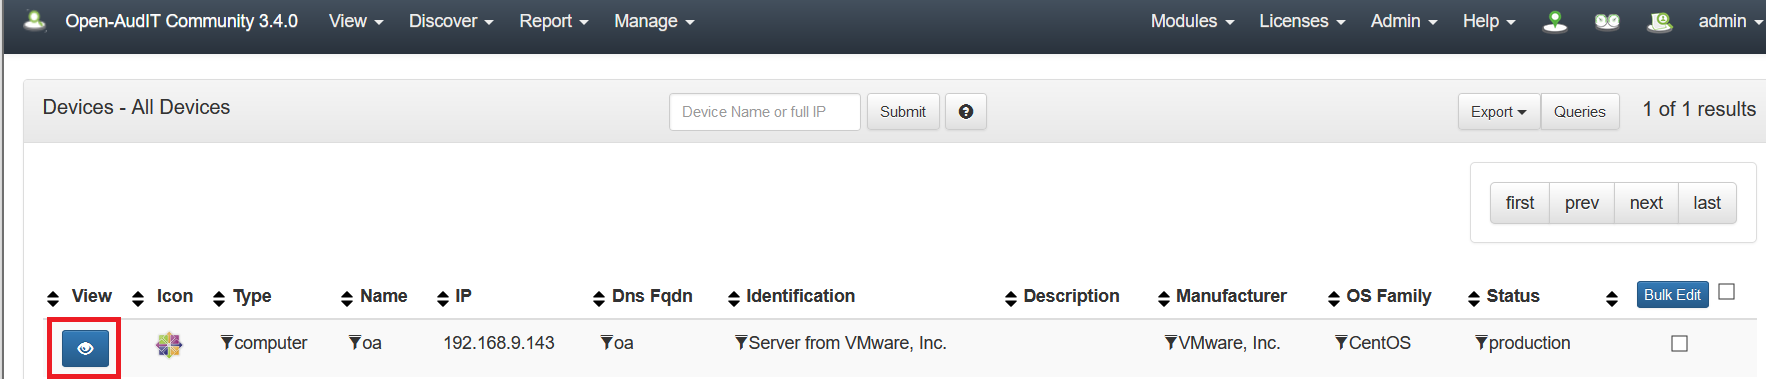
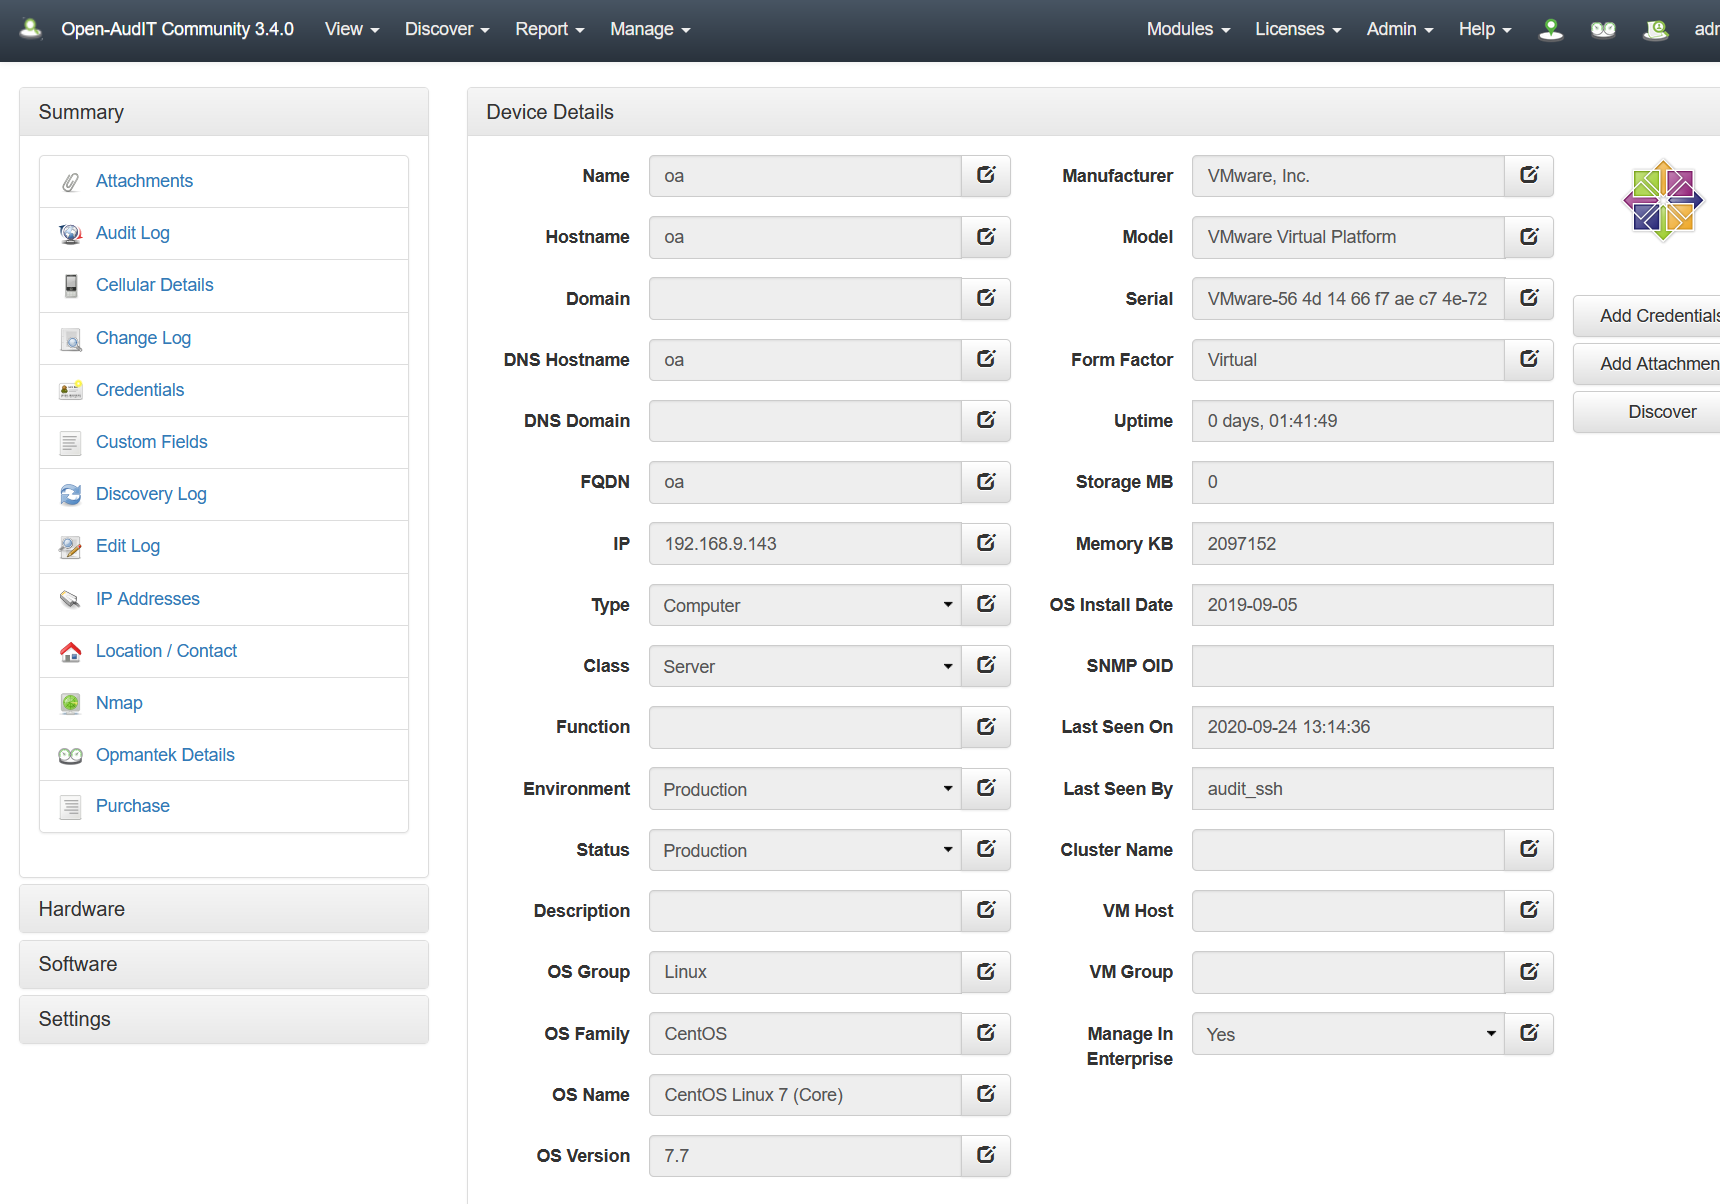
Open-Auditのホーム画面の「All Devices」のViewボタンを選択し、インベントリ収集を行った対象のホストが存在し、情報が取得できていることを確認します。
デバイスの削除
不要になったデバイスは、以下の方法で削除することができます。
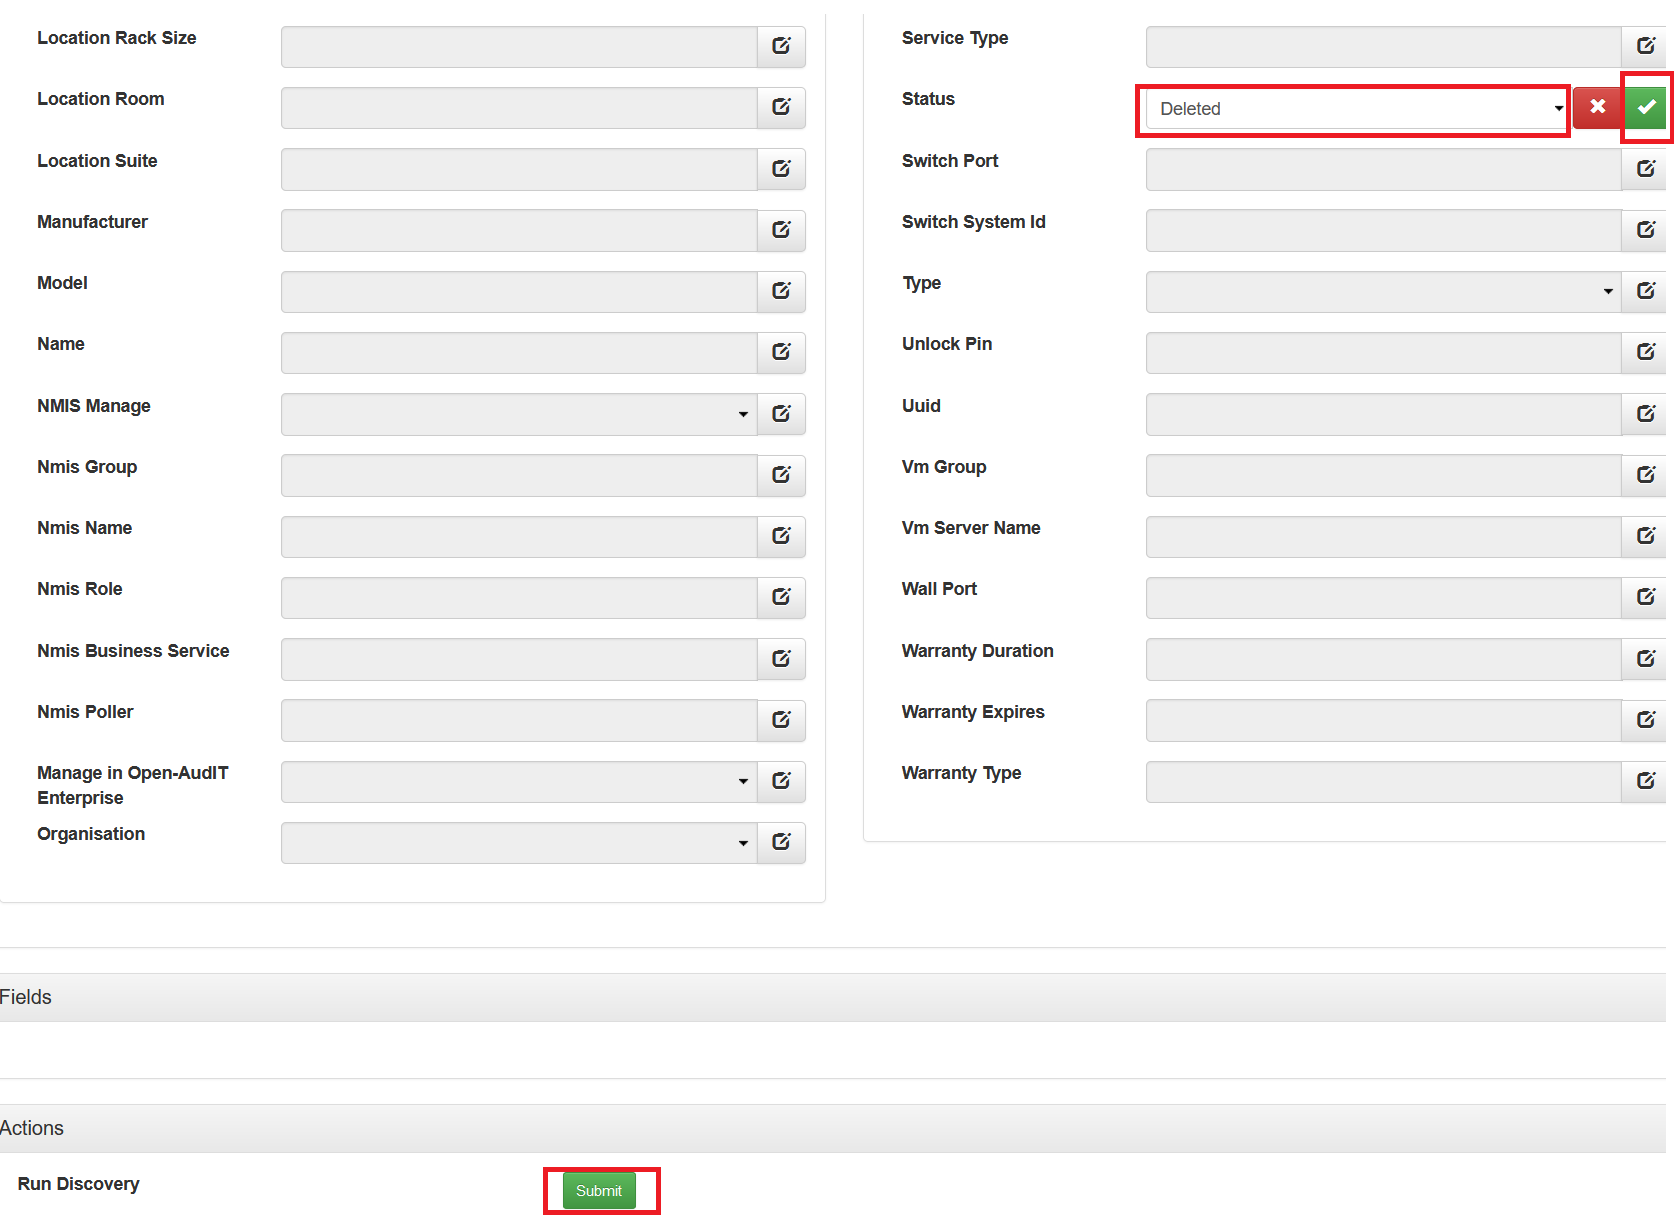
Open-Auditのホーム画面の「All Devices」のViewボタンを選択し、削除するデバイスを選択後、「Bulk Edit」を選択します。
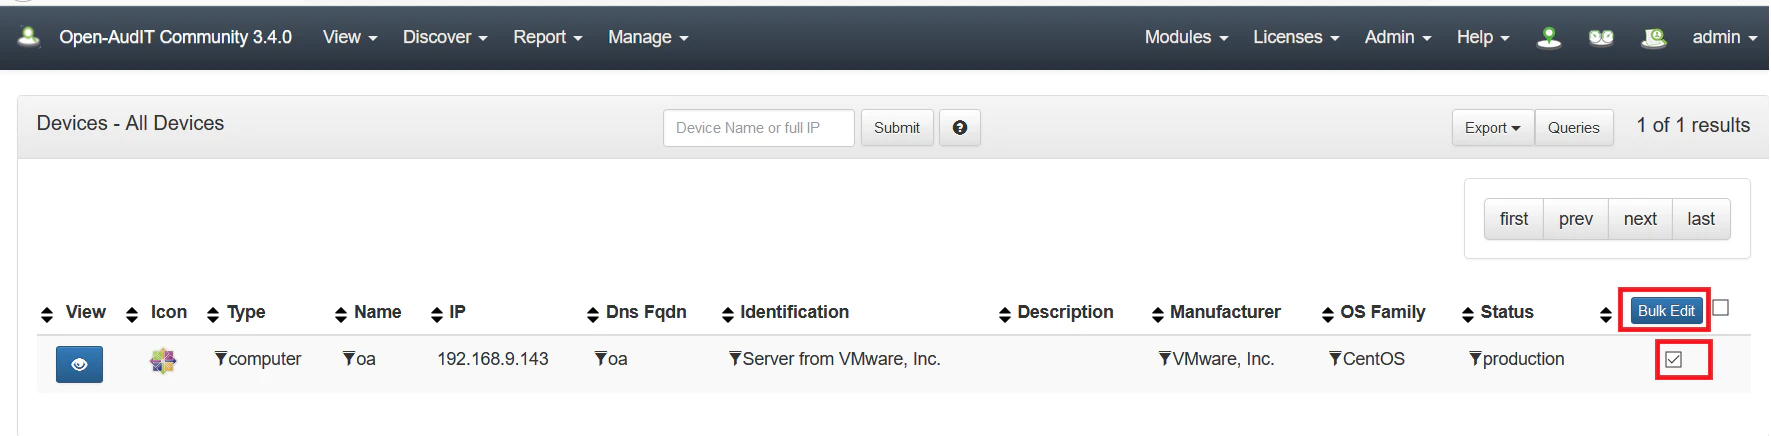
Statusの項目でプルダウンより「Deleted」を選択し、チェックマークボタンを選択し、Submitボタンを選択します。
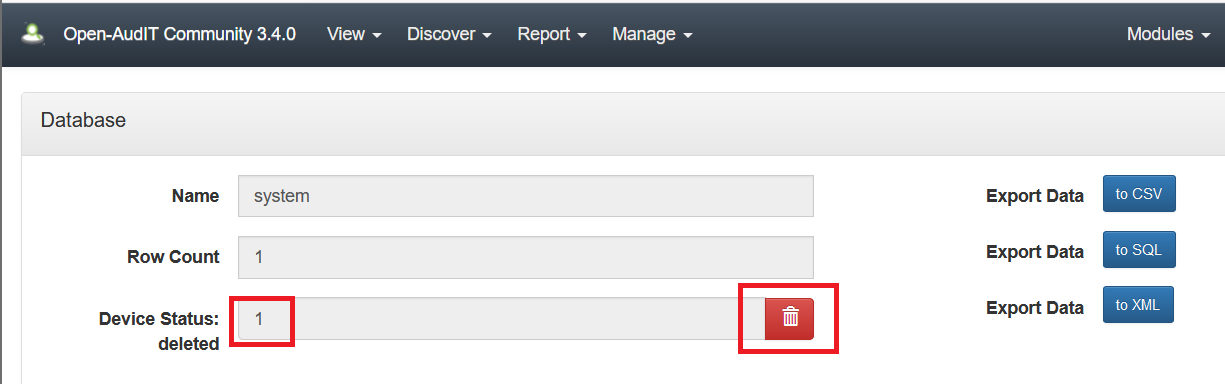
メニューバより、Admin > Database > List Tables の順に移動し、「system」を選択します。

「Device Status deleted」で削除するデバイスの数を確認し、削除ボタンを選択し、デバイスを削除します。
Open-Auditのホーム画面の「All Devices」のViewボタンを選択し、デバイスが削除されたことを確認します。
Open-Auditのカスタマイズ
Open-Auditは、カスタムフィールドや、インベントリ収集スクリプトを変更することにより、様々な情報を取得することができます。
本書では、LinuxOSのソフトウェア情報のインストール日はデフォルトでは取得、WebUIへの表示が行えていないため表示するようにカスタマイズする手順を記載します。
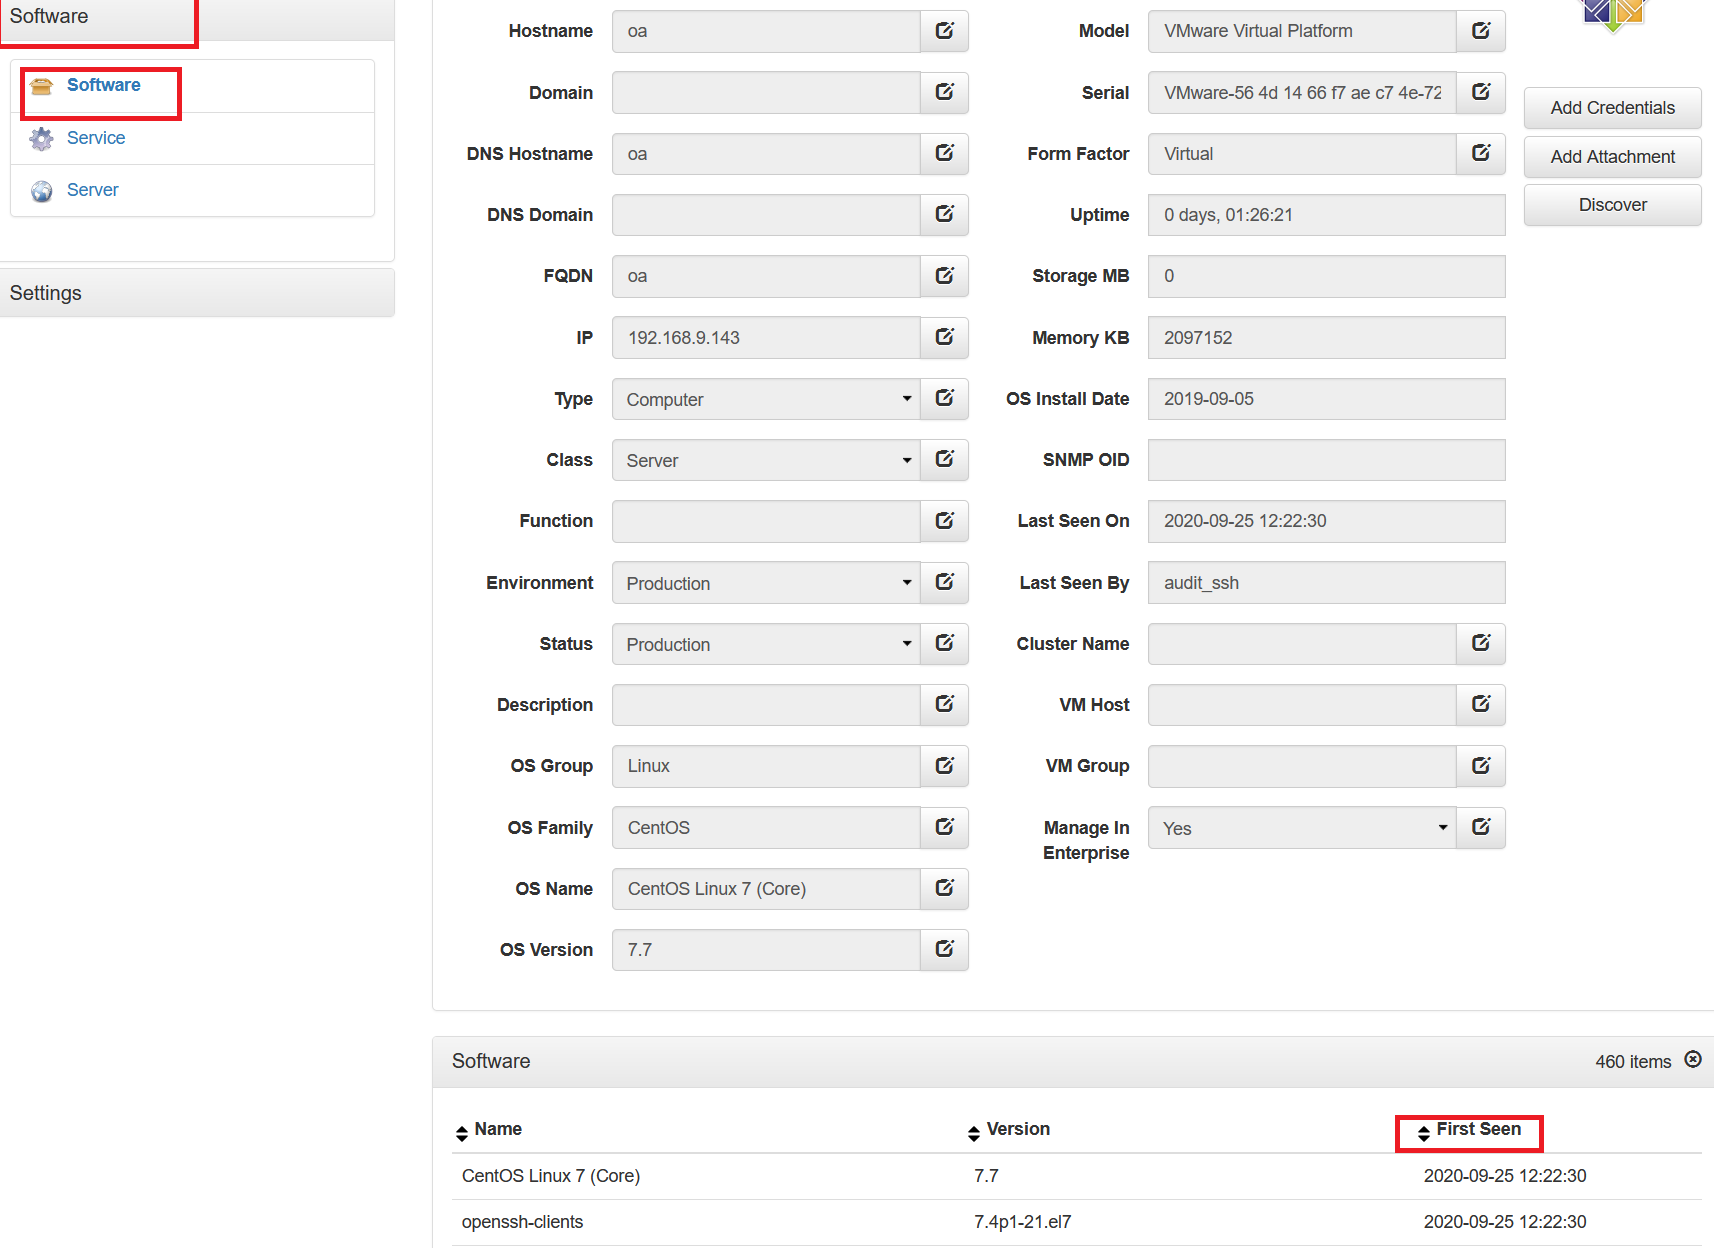
Open-Auditのホーム画面の「All Devices」のViewボタンを選択し、対象のデバイス > Software > Software の順で移動し、Softwareの項目を確認します。
デフォルトでは、以下のように「First Seen」のディスカバリの最初の日時は表示されますが、インストール日が表示されないためこの項目をインストール日に修正を行います。
WebUI表示項目の修正
パス:/usr/local/open-audit/code_igniter/application/views/theme-bootstrap
設定ファイル:v_devices_read.php
# cd /usr/local/open-audit/code_igniter/application/views/theme-bootstrap
# vi v_devices_read.php
以下の行を修正
    $attributes['software'] = array('name' => 'Name', 'version' => 'Version', 'first_seen' => 'First Seen');
                   ↓
    $attributes['software'] = array('name' => 'Name', 'version' => 'Version', 'install_date' => 'Install Date');
修正後、サービスを再起動します。
# systemctl restart httpd.service
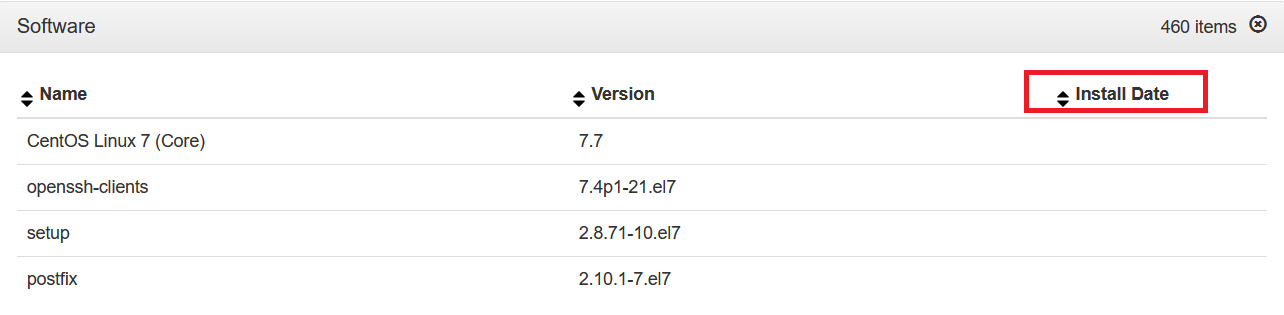
再起動後、再度WebUIにログインし、Softwareの項目が「First Seen」から「Install Date」に修正されていることを確認します。
インベントリ収集スクリプトの修正
LinuxのOSのインベントリ収集を行うスクリプト「audit_linux.sh」はデフォルトではインストール日を取得しないためスクリプトの修正を行います。
※本スクリプト修正後のサービス再起動は不要です。
パス:/usr/local/open-audit/other
設定ファイル:audit_linux.sh
# cd /usr/local/open-audit/other
# vi audit_linux.sh
以下の行を修正
rpm -qa --queryformat="\t\t<item>\n\t\t\t<name><\!\[CDATA\[%{NAME}\]\]></name>\n\t\t\t<version><\!\[CDATA\[%{VERSION}-%{RELEASE}\]\]></version>\n\t\t\t<url><\!\[CDATA\[%{URL}\]\]></url>\n\t\t</item>\n" |\
↓
rpm -qa --queryformat="\t\t<item>\n\t\t\t<name><\!\[CDATA\[%{NAME}\]\]></name>\n\t\t\t<version><\!\[CDATA\[%{VERSION}-%{RELEASE}\]\]></version>\n\t\t\t<install_date><\!\[CDATA\[%{INSTALLTIME:date}\]\]></install_date>\n\t\t\t<url><\!\[CDATA\[%{URL}\]\]></url>\n\t\t</item>\n" |\
動作確認
上記のファイルを修正後、再度ディスカバリを実行します。
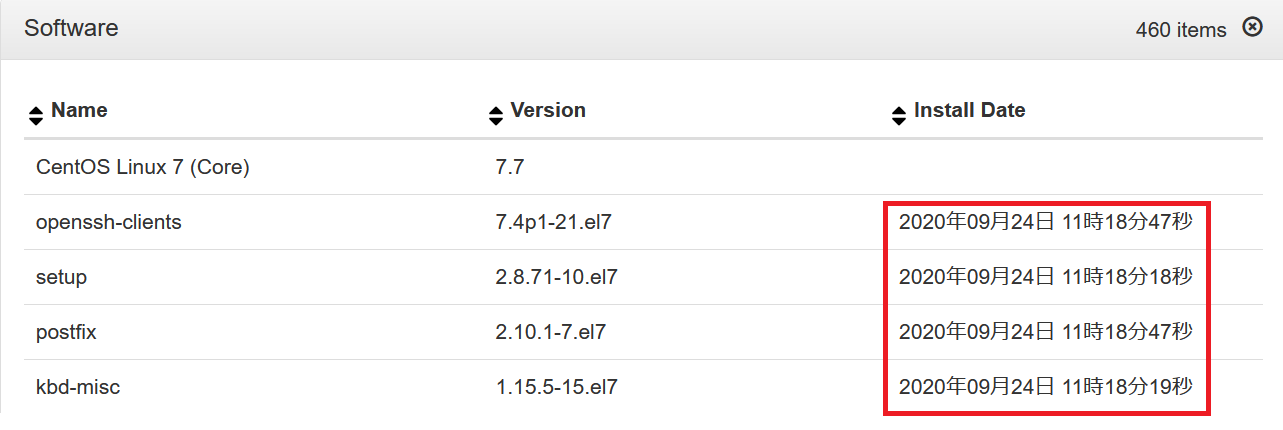
ディスカバリ完了後、再度Softwareの項目にてインストール日が取得できていることを確認します。
備考
WindowsのOSの場合は、インベントリ収集スクリプトでデフォルトでSoftwareのインストール日は取得しているため、特に修正は不要ですが、LinuxのOSと同様に、以下のようにインストール日はデフォルトで表示されない設定のため以下の設定を修正することにより表示させることができます。

パス:/usr/local/open-audit/code_igniter/application/views/theme-bootstrap
設定ファイル:v_devices_read.php
# cd /usr/local/open-audit/code_igniter/application/views/theme-bootstrap
# vi v_devices_read.php
以下の行を修正
##    $attributes['software'] = array('name' => 'Name', 'version' => 'Version', 'installed_on' => 'Installed On', 'installed_by' => 'Installed By', 'first_seen' => 'First Seen', 'location' => 'Location', 'type' => 'Type');
                   ↓
    $attributes['software'] = array('name' => 'Name', 'version' => 'Version', 'installed_on' => 'Installed On', 'installed_by' => 'Installed By', 'install_date' => 'Install Date', 'location' => 'Location', 'type' => 'Type');
修正後、サービスを再起動します。
# systemctl restart httpd.service
再起動後、再度WebUIにログインし、Softwareの項目が「First Seen」から「Install Date」に修正され、インストール日が表示されていることを確認します。

APIでのインベントリ収集手順
Open-Audit 3.3.0未満のバージョンだと「discover_subnet.vbs」、「discover_subnet.sh」のスクリプトを使用することにより、ディスカバリを実行することをができましたが、3.3.0以降は、「discover_subnet.vbs」、「discover_subnet.sh」は廃止されているためスクリプトからの実行は行えません。
そのため、スクリプトではなく、APIを使用して実行する必要があります。
APIの使用方法の詳細は以下になります。
https://community.opmantek.com/display/OA/API+Examples+for+Postman
https://community.opmantek.com/display/OA/2019/06/16/Using+Postman+to+query+the+Open-AudIT+API
以下の手順にてAPIを使用したディスカバリ方法を記載します。
※クレデンシャル、ディスカバリは上記で作成したものを使用します。
認証
# curl -X POST -i -H "Accept: application/json" -F username="admin" -F password="password" http://<OpenAuditのIPアドレス>/open-audit/index.php/logon
HTTP/1.1 100 Continue

HTTP/1.1 200 OK
Date: Thu, 24 Sep 2020 06:36:02 GMT
Server: Apache/2.4.6 (CentOS) PHP/5.4.16
X-Powered-By: PHP/5.4.16
Set-Cookie: PHPSESSID=vc774v2md1nnqhv9bf161mq691; path=/
Expires: Thu, 19 Nov 1981 08:52:00 GMT
Cache-Control: no-store, no-cache, must-revalidate, post-check=0, pre-check=0
Pragma: no-cache
Content-Length: 584
Content-Type: text/html; charset=UTF-8
<以下略>

# cookie="PHPSESSID=s7nubclg9grv3skjvrhcsmci74;"
ディスカバリIDの取得
# curl -i -X GET --cookie ${cookie} -H "Accept: application/json" http://<OpenAuditのIPアドレス>/open-audit/index.php/discoveries
HTTP/1.1 200 OK
Date: Thu, 24 Sep 2020 11:52:22 GMT
Server: Apache/2.4.6 (CentOS) PHP/5.4.16
X-Powered-By: PHP/5.4.16
Expires: 0
Cache-Control: no-cache, no-store, must-revalidate
Pragma: no-cache
Content-Disposition: attachment;filename="Discoveries.json"
Content-Length: 2621
Content-Type: application/json
{
  "meta": {
    "access_token": "e88ba375d5bd63a5e3c2fb7bab689763852b2ade4ea10665f0a0e8f6eb07",
    "action": "collection",
    "baseurl": "http://localhost/open-audit/",
    "collection": "discoveries",
    "current": "y",
<中略>
  "data": [
    {
      "id": <ディスカバリID>,         #ディスカバリIDを確認
      "type": "discoveries",
      "attributes": {
        "id": 1,
        "name": "test",
        "org_id": 1,
        "description": "Subnet - 192.168.9.143",
        "type": "subnet",
<以下略>
※上記の出力は見やすいように加工しております。
ディスカバリの実行
# curl -i -X GET --cookie ${cookie} -H "Accept: application/json" http://<OpenAuditのIPアドレス>/open-audit/index.php/discoveries/<ディスカバリID>/execute
HTTP/1.1 200 OK
Date: Thu, 24 Sep 2020 09:27:10 GMT
Server: Apache/2.4.6 (CentOS) PHP/5.4.16
X-Powered-By: PHP/5.4.16
Expires: 0
Cache-Control: no-cache, no-store, must-revalidate
Pragma: no-cache
Content-Disposition: attachment;filename="Discoveries.json"
Content-Length: 2389
Content-Type: application/json
<以下略>
ディスカバリの実行ログは、Open-AuditのWebUIにログインし、
Discover > Discoveries > List Discoveries > 「ディスカバリID」のLogの項目に出力されます。
※executeは3.3.0以降の機能のため、3.3.0未満のバージョンでは使用できません。
デバイスの確認
インベントリ収集を行ったデバイスの情報をAPIを使用して取得することもできます。
情報を取得するデバイスIDを確認します。
※以下の出力は見やすいように加工しております。
# curl -s -i -X GET --cookie ${cookie} -H "Accept: application/json" http://<OpenAuditのIPアドレス>/open-audit/index.php/devices
HTTP/1.1 200 OK
Date: Fri, 25 Sep 2020 03:27:53 GMT
Server: Apache/2.4.6 (CentOS) PHP/5.4.16
X-Powered-By: PHP/5.4.16
Expires: 0
Cache-Control: no-cache, no-store, must-revalidate
Pragma: no-cache
Content-Disposition: attachment;filename="Devices.json"
Content-Length: 1810
Content-Type: application/json
{
  "meta": {
    "access_token": "fae76b071de3c07185e77025e36accb35b150e6851ecb76b6b772824a8c2",
    "action": "collection",
    "baseurl": "http://localhost/open-audit/",
    "collection": "devices",
    "current": "y",
    "debug": false,
    "filtered": 1,
    "format": "json",
    "groupby": "",
    "header": "HTTP/1.1 200 OK",
<中略>
  "included": [],
  "data": [
    {
      "id": 3,
      "type": "system",
      "attributes": {
        "system.id": <デバイスID>,        #デバイスIDを確認
        "system.icon": "centos",
        "system.type": "computer",
        "system.name": "oa",
        "system.domain": "",
        "system.ip": "192.168.9.143",
        "system.identification": "Server from VMware, Inc.",
        "system.description": "",
        "system.manufacturer": "VMware, Inc.",
        "system.os_family": "CentOS",
        "system.status": "production",
        "orgs.name": "Default Organisation",
        "system.ip_padded": "192.168.009.143"
      },
      "links": {
        "self": "http://localhost/open-audit/index.php/system/3"
      }
    }
  ]
}
デバイスIDを取得し、デバイスの詳細情報を取得します。
# curl -s -i -X GET --cookie ${cookie} -H "Accept: application/json" http://<OpenAuditのIPアドレス>/open-audit/index.php/devices/<デバイスID>
HTTP/1.1 200 OK
Date: Fri, 25 Sep 2020 03:31:25 GMT
Server: Apache/2.4.6 (CentOS) PHP/5.4.16
X-Powered-By: PHP/5.4.16
Expires: 0
Cache-Control: no-cache, no-store, must-revalidate
Pragma: no-cache
Content-Disposition: attachment;filename="Devices.json"
Transfer-Encoding: chunked
Content-Type: application/json
<中略>
  "data": [
    {
      "id": 3,
      "type": "devices",
      "attributes": {
        "id": 3,
        "uuid": "66144d56-aef7-4ec7-7275-90a167674b4b",
        "name": "oa",
        "ip": "192.168.9.143",
        "hostname": "oa",
        "dns_hostname": "oa",
        "domain": "",
        "dns_domain": "",
        "dbus_identifier": "bd13bde978504f1e90f242f940ffc02e",
        "fqdn": "oa",
        "dns_fqdn": "oa",
        "description": "",
        "type": "computer",
        "comments": "",
        "icon": "centos",
        "os_group": "Linux",
        "os_family": "CentOS",
        "os_name": "CentOS Linux 7 (Core)",
<以下略>