はじめに
現場がVue-CLIだった(てっきりCDNのVueだと思っていた...)。Vueのキャッチアップを急げー
vueのver2とver3の書き方はそれほど違わないらしい
Console
dev\vue> node -v
  v16.18.0
dev\vue> npm -v
  8.19.2
VueCLIのインストール
Console
dev\vue> npm i -g @vue/cli-init
dev\vue> vue -V
  @vue/cli 5.0.8
プロジェクト作成
- githubにリポジトリを作ってcloneした
- webpack でセットアップすると vue のバージョンは
2.5.2になる
Console
dev\vue> vue init webpack .
  ? Generate project in current directory?: Yes
  ? Project name: vue
  ? Project description: A Vue.js project
  ? Author: yoshi
  ? Vue build: standalone
  ? Install vue-router?: Yes
  ? Use ESLint to lint your code?: Yes
  ? Pick an ESLint preset: Standard
  ? Set up unit tests: Yes
  ? Pick a test runner: jest
  ? Setup e2e tests with Nightwatch?: No
  ? Should we run `npm install` for you after the project has been created? (recommended): npm
実行
Console
dev\vue> npm run dev


最小のテストを完成させる
setup
- カバレッジオプションは外しておく(テストとしては過剰のため)
- localstrageナントカ.. ってのは jest のアップデートでなくなる
package.json
{
  "name": "vue",
  "version": "1.0.0",
  "description": "A Vue.js project",
  "scripts": {
     :
-   "unit": "jest --config test/unit/jest.conf.js --coverage"
+   "unit": "jest --config test/unit/jest.conf.js"
     :
  },
    :
- "jest": "^22.0.4",
+ "jest": "^23.5.0",
    :
}
dev\vue> npm install
関数系のテストを組む
dev/vue/src/service/sum.js
function sum (a, b) {
  return a + b
}
module.exports = sum
dev/vue/test/unit/specs/sum.spec.js
const sum = require('@/service/sum')

it('adds 1 + 2 to equal 3', () => {
  expect(sum(1, 2)).toBe(3)
})

it('dataから!nullの値を取得できる条件文のテスト', () => {
  const data = {
    test1: 'a',
    test2: [],
    test3: ['1'],
    test4: '',
    test5: null
  }
  const expected = {
    test1: 'a',
    test3: ['1']
  }
  let actual = {}
  for (let [key, val] of Object.entries(data)) {
    if (val && val.length > 0) {
      actual[key] = val
    }
  }
  expect(actual).toEqual(expected)
})
テスト実行
Console
dev\vue> npm test

 PASS  test/unit/specs/sum.spec.js
 PASS  test/unit/specs/HelloWorld.spec.js

 Test Suites: 2 passed, 2 total
 Tests:       3 passed, 3 total
 Snapshots:   0 total
 Time:        9.678s
 Ran all test suites.

コンポーネントのテストを理解する
-
webpackでinitしたプロジェクトは コンポーネントHelloWorld.vueとテストHellowWorld.spec.jsが出来上がっている。

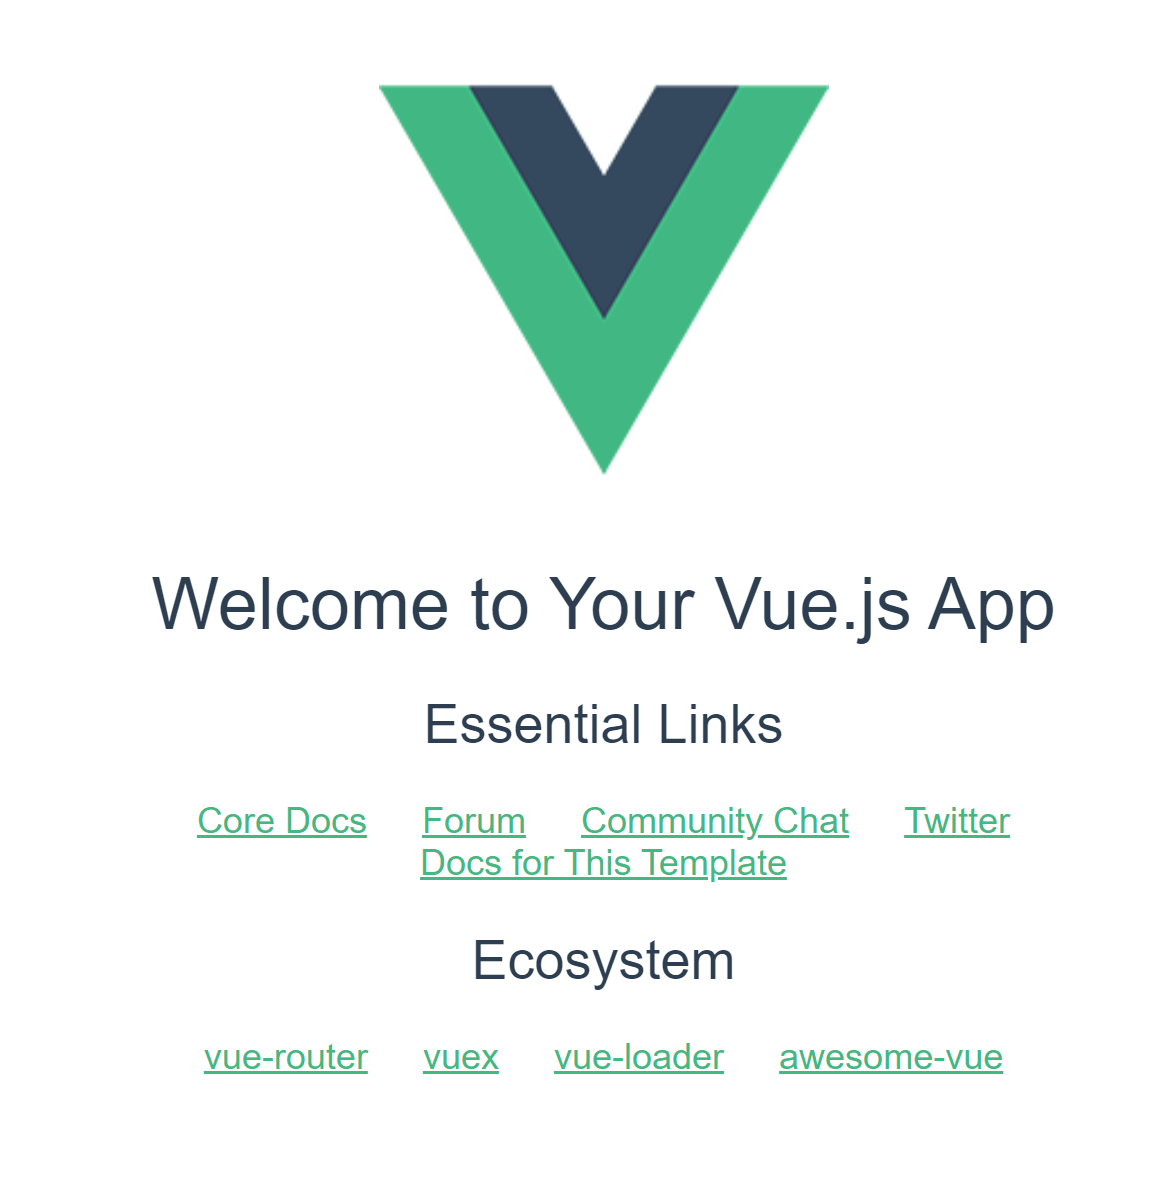
src/components/HelloWorld.vue
<template>
  <div class="hello">
    <!-- 1. この msg には、 -->
    <h1>{{ msg }}</h1>
      :
</template>

<script>
export default {
  name: 'HelloWorld',
  data () {
    return {
      // 2. こんな文字が入っているので、
      msg: 'Welcome to Your Vue.js App'
    }
  }
}
</script>

<style scoped>
  :
</style>
test/unit/specs/HelloWorld.spec.js
import HelloWorld from '@/components/HelloWorld'
import { shallowMount } from '@vue/test-utils'

describe('HelloWorld.vue', () => {
  let wrapper
  beforeEach(() => {
    // 3. wrapperにHelloWorldコンポーネントをロードし、
    wrapper = shallowMount(HelloWorld)
  })
  it('should render correct contents', () => {
    // 5. classが hello の h1(={{ msg }})の textContent を読むと、
    expect(wrapper.vm.$el.querySelector('.hello h1').textContent)
      // 6. 'Welcome to Your Vue.js App' の文字が入っているはずである
      .toEqual('Welcome to Your Vue.js App')
  })
})
Cardコンポーネントを作ってみる
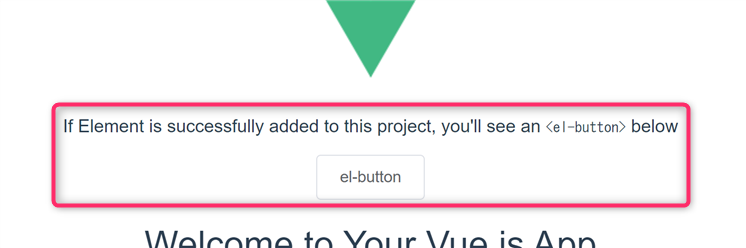
ElementUI の追加
- コミットしてない仕掛りの状態のときは
? Still proceed?と聞かれるので、Noしてコミットしたほうがよい - ※
Do you wish to overwrite Element's SCSS variables?でNoがサジェストされている。Yesにするとnode-sassがコケる。element-uiはnode-sassに依存しているようだが、node-sassはもうDeprecatedにするからdart-sassをいれろ、みたいに言ってて、結論としてはまぁおとなしくNoにしておけ ←時間食われた人
Console
dev\vue> vue add element
  ? How do you want to import Element? Fully import
  ? Do you wish to overwrite Element's SCSS variables? No
  ? Choose the locale you want to load ja
Cardの実装
-
with-imagesのExpandを押すと CSS とか書いてあるので<template><script><style>をそれぞれコピペしたらこんな感じになる。htmlのheadタグにCDNを書かないやり方は新鮮だな - 使い方は「コンポーネントを作って、使いたい場所でインポートして使う」だけ

src/components/Card.vue
<template>
  <el-row>
    <el-col :span="8" v-for="(o, index) in 2" :key="o" :offset="index > 0 ? 2 : 0">
      <el-card :body-style="{ padding: '0px' }">
        <img src="https://shadow.elemecdn.com/app/element/hamburger.9cf7b091-55e9-11e9-a976-7f4d0b07eef6.png" class="image" alt="hamburger">
        <div style="padding: 14px;">
          <span>Yummy hamburger</span>
          <div class="bottom clearfix">
            <time class="time">{{ currentDate }}</time>
            <el-button type="text" class="button">Operating</el-button>
          </div>
        </div>
      </el-card>
    </el-col>
  </el-row>
</template>

<script>
export default {
  name: 'Card',
  data () {
    return {
      currentDate: new Date()
    }
  }
}
</script>

<style scoped>
  .time {
    font-size: 13px;
    color: #999;
  }

  .bottom {
    margin-top: 13px;
    line-height: 12px;
  }

  .button {
    padding: 0;
    float: right;
  }

  .image {
    width: 100%;
    display: block;
  }

  .clearfix:before,
  .clearfix:after {
      display: table;
      content: '';
  }

  .clearfix:after {
      clear: both
  }
</style>
src/App.vue
<template>
  <div id="app">
    <img src="./assets/logo.png">
    <div>
      <p>
        If Element is successfully added to this project, you'll see an
        <code v-text="'<el-button>'"></code>
        below
      </p>
      <el-button>el-button</el-button>
    </div>
    <HelloWorld msg="Welcome to Your Vue.js App"/>
+   <Card/>
  </div>
</template>

<script>
  import HelloWorld from './components/HelloWorld.vue'
+ import Card from './components/Card'
  export default {
    name: 'App',
    components: {
      HelloWorld,
+     Card
    }
  }
</script>

<style>
#app {
  font-family: 'Avenir', Helvetica, Arial, sans-serif;
  -webkit-font-smoothing: antialiased;
  -moz-osx-font-smoothing: grayscale;
  text-align: center;
  color: #2c3e50;
  margin-top: 60px;
}
</style>
Vue Router を理解する
-
router-linkタグはリンクを作成するためにある -
router-viewタグはそれぞれのリンク先に紐づいた内容を表示するためにある - 仕組みそのものは
Djangoなどほかのフレームワークと同じ -
router-viewタグが、いわば「キャンバス」と考えると、コンポーネントがコンポーネントを入れ子で持つような感じでデザインする感じか?
src/router/index.js
  import Vue from 'vue'
  import Router from 'vue-router'
  import HelloWorld from '@/components/HelloWorld'
+ import Card from '@/components/Card'

  Vue.use(Router)

  export default new Router({
    routes: [
      {
        path: '/',
        name: 'HelloWorld',
        component: HelloWorld
      },
+     {
+       path: '/card',
+       name: 'Card',
+       component: Card
+     }
    ]
  })
src/App.vue
<template>
  <div id="app">
    <img src="./assets/logo.png">
    <!-- このdivが共通ヘッダーみたいな感じになる -->
    <div>
      <p>
        If Element is successfully added to this project, you'll see an
        <code v-text="'<el-button>'"></code>
        below
      </p>
      <el-button>el-button</el-button>
    </div>
-   <HelloWorld msg="Welcome to Your Vue.js App"/>
-   <Card/>
+   <router-view/> <!-- このタグが、パスに紐づいた内容にコロコロと置換される -->
  </div>
</template>
 :


構造を理解する
- 親:
App.vueグローバルメニューやフッターなど、いわば全体共通部品とともに、(<router-view/>を置換して)Vueオブジェクトが1つだけ置かれる - 子:
Cards.vueやRagioboxAndText.vueなどのコンポーネント(カードで言うならデッキ)が集約されたレイヤーであり、インスタンス配置レイヤーとも言える - 孫:
Card.vueトランプカードで言うならカードそのもの(a card.)
親・子・孫と v-model を理解する
-
v-bindでコンポーネントのプロパティと親のinputデータをバインディングすることで、親のデータを変更した際、子のプロパティも更新されるようにする -
v-modelはv-bind + v-onの発展(≒省略)形- フォームのやりとりは
v-modelのほうが記述が少なくて便利だが、独自の処理をはさみたいような場合はv-bind -
v-bindは受け身というか read-only。dataプロパティのmyNameの値が変更するとv-bind:valueの値もmyNameに依存して変更されるが、逆は成り立たない
- フォームのやりとりは
-
v-modelで指定したハコを、子に引き渡す -
親のプロパティを更新すると子のプロパティも更新されるが、逆はない。必ず親→子への単方向の伝搬となる
-
data()はcontextなのでテンプレートで使うもの。propsは子コンポーネントとのやり取りに使われるもの


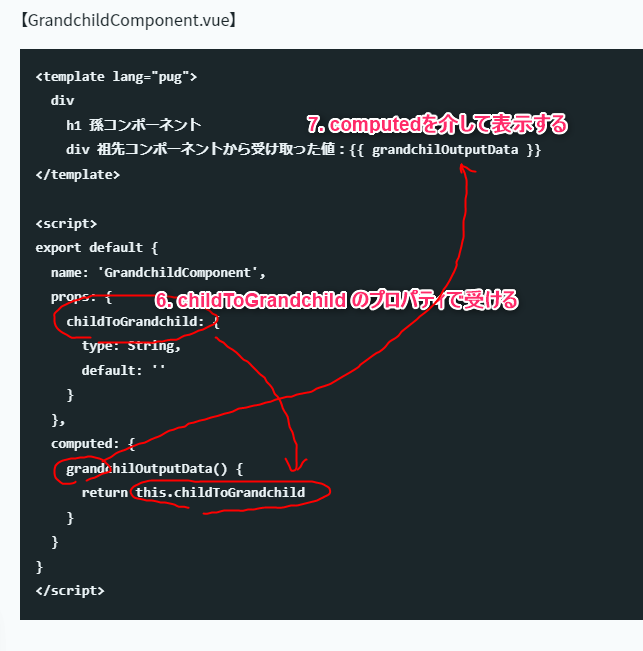
$emitで孫→子→親(祖先)へと値を受け渡す


なんか作ってみよう
なるほど。根っこの考え方自体は昔のActionScript(Flashのころ)とそんなに変わらないな。結局 ECMAScript だからか。あのころからバインドの考え方自体はあったし、昔Flash黄金期に遊んどいてよかったわ
設計する
- 親コンポーネントにテキストボックスがある
- 子コンポーネントが親テキストボックスの値を受けて、表示する
- 子コンポーネントにテキストボックスがある
- 親コンポーネントが子テキストボックスの値を受けて、表示する
- テーブルとレコード
- チェックボックスを押すことでサンプルデータが表示される
- レコードが削除できる
- 全レコード削除すると、自動的にサンプルデータがリセットされる
親と子が相互にデータをやりとり(input: text)
とりあえず、データの いってこい の流れが、やっとこさであっても見て追えれば御の字だ
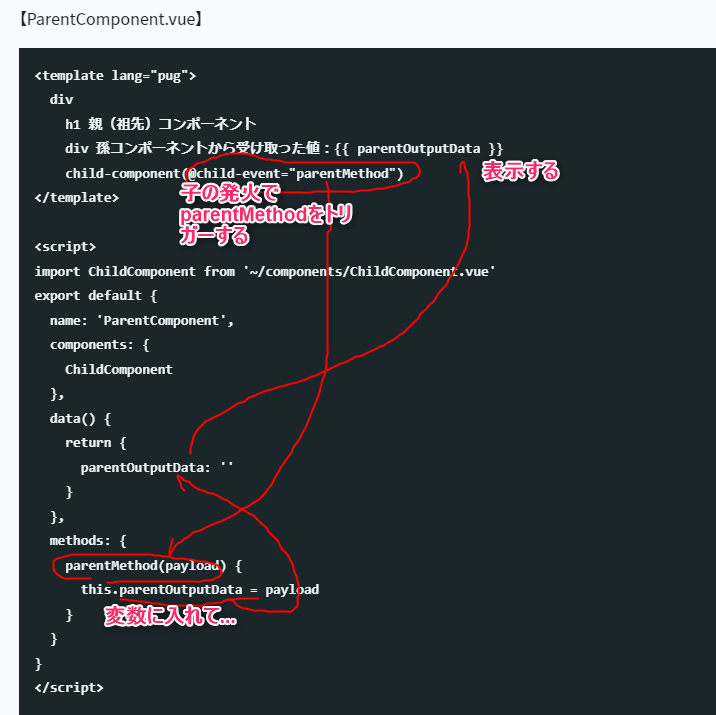
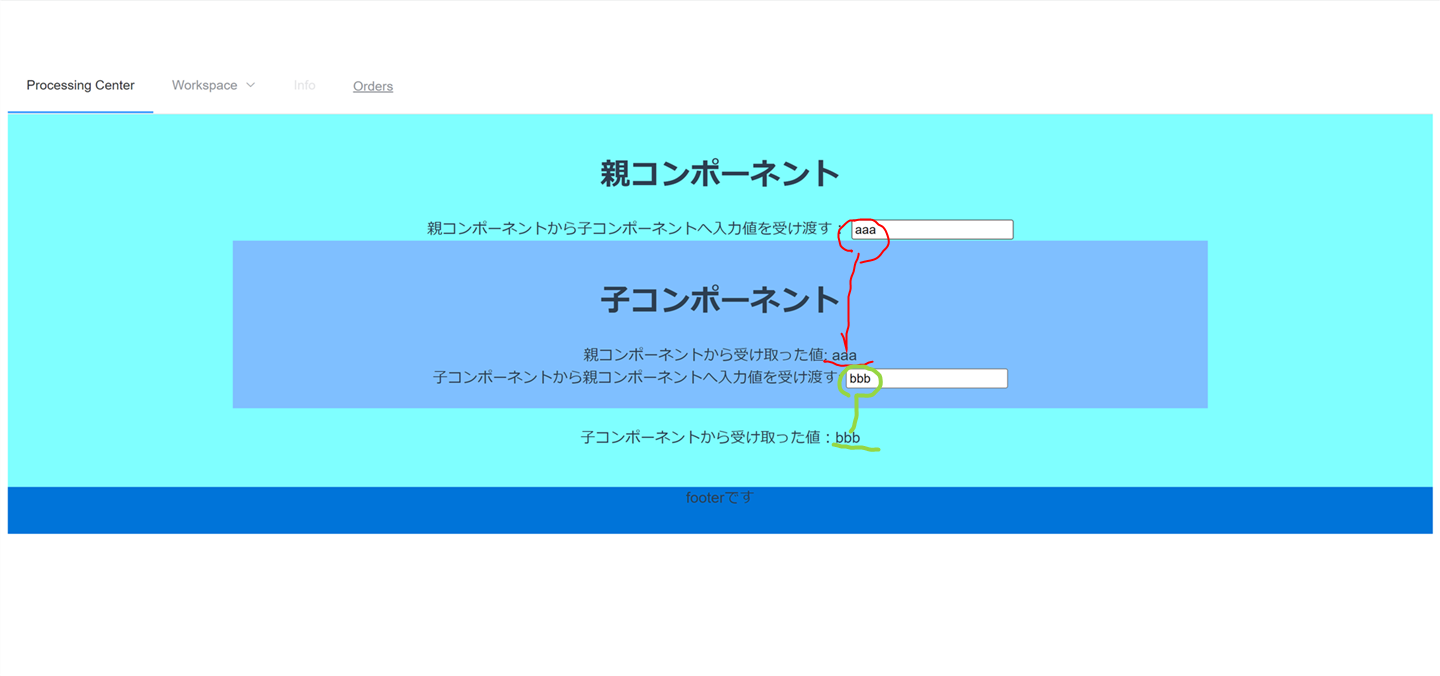
src/components/ParentComponent.vue
<template>
  <div>
    <h1>親コンポーネント</h1>
    <label>
      親コンポーネントから子コンポーネントへ入力値を受け渡す:
      <input type="text" v-model="parentInputData">
      <child-component :parentToChild="parentInputData" @child-event="parentMethod" />
      <div>
        子コンポーネントから受け取った値:{{ parentOutputData }}
      </div>
    </label>
  </div>
</template>

<script>
import ChildComponent from './ChildComponent'

export default {
  name: 'ParentComponent',
  components: {
    ChildComponent
  },
  data () {
    return {
      parentInputData: '',
      parentOutputData: ''
    }
  },
  methods: {
    parentMethod (payload) {
      this.parentOutputData = payload
    }
  }
}
</script>

<style scoped>
  div {
    padding: 20px;
    background-color: #7fffff;
  }
</style>
src/components/ChildComponent.vue
<template>
  <div>
    <h1>子コンポーネント</h1>
    <div>親コンポーネントから受け取った値: {{ childOutputData }}</div>
    <div>
      <label>
        子コンポーネントから親コンポーネントへ入力値を受け渡す:
        <input type="text" v-model="childInputData" @input="childEmit">
      </label>
    </div>
  </div>
</template>

<script>
export default {
  name: 'ChildComponent',
  data () {
    return {
      childInputData: null
    }
  },
  props: {
    parentToChild: {
      type: String,
      default: ''
    }
  },
  methods: {
    childEmit () {
      this.$emit('child-event', this.childInputData)
    }
  },
  computed: {
    childOutputData () {
      return this.parentToChild
    }
  }
}
</script>

<style scoped>
  div {
    margin: auto;
    width: 1000px;
    background-color: #7fbfff;
  }
</style>
src/router/index.js
import Vue from 'vue'
import Router from 'vue-router'
- import HelloWorld from '@/components/HelloWorld'
import Card from '@/components/Card'
+ import ParentComponent from '../components/ParentComponent'

Vue.use(Router)

export default new Router({
  routes: [
    {
      path: '/',
-     name: 'HelloWorld',
+     name: 'ParentComponent',
-     component: HelloWorld
+     component: ParentComponent
    },
    {
      path: '/card',
      name: 'Card',
      component: Card
    }
  ]
})
テーブルとレコードの操作(table)
- flash message も一緒に実装する

src/components/CustomTable.vue
<template>
  <div>
    <el-table :data="users" style="width: 100%">
      <el-table-column prop="id" label="ID" width="180"/>
      <el-table-column prop="name" label="Name" width="180"/>
      <el-table-column prop="mail" label="Mail" width="180"/>
      <el-table-column label="Delete">
        <template slot-scope="scope">
          <el-button
            type="danger"
            @click="deleteRecord(scope.$index, users)"
            icon="el-icon-delete">
          </el-button>
        </template>
      </el-table-column>
    </el-table>
    <el-checkbox v-model="checked" @change="setUsers">データをリセット</el-checkbox>
  </div>
</template>

<script>
export default {
  name: 'CustomTable',
  data () {
    return {
      users: [],
      checked: false
    }
  },
  methods: {
    getUsers () {
      this.$message('データをセットしました')
      return [{
        id: 1,
        name: 'John',
        mail: 'john@example.com',
        targetId: 11
      }, {
        id: 2,
        name: 'Bob',
        mail: 'bob@example.com',
        targetId: 22
      }, {
        id: 3,
        name: 'Kate',
        mail: 'kate@example.com',
        targetId: 33
      }]
    },
    setUsers () {
      this.users = this.getUsers()
    },
    /**
     * レコードを削除します
     * @param index 消す対象レコードの行位置index
     * @param rows
     */
    deleteRecord (index, rows) {
      rows.splice(index, 1)
      this.$message('レコードを削除しました')
      if (rows.length === 0) {
        this.checked = false
      }
    }
  }
}
</script>

<style scoped>

</style>
src/components/ParentComponent.vue
<template>
  <div>
    <h1>親コンポーネント</h1>
    <label>
      親コンポーネントから子コンポーネントへ入力値を受け渡す:
      <input type="text" v-model="parentInputData">
      <child-component :parentToChild="parentInputData" @child-event="parentMethod" />
      <div>
        子コンポーネントから受け取った値:{{ parentOutputData }}
      </div>
    </label>
+   <CustomTable/>
  </div>
</template>

<script>
import ChildComponent from './ChildComponent'
+ import CustomTable from './CustomTable'

export default {
  name: 'ParentComponent',
  components: {
+   CustomTable,
    ChildComponent
  },
  data () {
    return {
      parentInputData: '',
      parentOutputData: ''
    }
  },
  methods: {
    parentMethod (payload) {
      this.parentOutputData = payload
    }
  }
}
</script>

<style scoped>
  div {
    padding: 20px;
    background-color: #7fffff;
  }
</style>
インジェクション型コンポーネントの作成(radio)
- ラジオボタンを動的につくる
- ラジオボタンの3つの選択肢は親コンポーネントから動的に渡される

src/components/ParentComponent.vue
<template>
  <div>
    <h1>親コンポーネント</h1>
    <label>
      親コンポーネントから子コンポーネントへ入力値を受け渡す:
      <input type="text" v-model="parentInputData">
+     <div id="parent-radio">
+       親コンポーネントのラジオボタンの値: <br>{{ options }}
+     </div>
-     <child-component :parentToChild="parentInputData" @child-event="parentMethod" />
+     <child-component :parentToChild="parentInputData" @child-event="parentMethod" :options="options" @input="updateValue"/>
      <div>
-       子コンポーネントから受け取った値:{{ parentOutputData }}
+       子コンポーネントから受け取った値:{{ parentOutputData }}<br>
+       子コンポーネントから受け取ったラジオボタンの値:{{ incomingForm.radio }}
      </div>
    </label>
    <CustomTable/>
  </div>
</template>

<script>
import ChildComponent from './ChildComponent'
import CustomTable from './CustomTable'

export default {
  name: 'ParentComponent',
  components: {
    CustomTable,
    ChildComponent
  },
  data () {
    return {
      parentInputData: '',
-     parentOutputData: ''
+     parentOutputData: '',
+     incomingForm: {
+       text: '',
+       radio: '', // user has selected
+       select: '',
+       textarea: '',
+       checkbox: []
+     },
+     options: [{label: 'Option A', value: '3'}, {label: 'Option B', value: '6'}, {label: 'Option C', value: '9'}] // inject to child-component
    }
  },
  methods: {
    parentMethod (payload) {
      this.parentOutputData = payload
-   }
+   },
+   updateValue (payload) {
+     console.log('updateValue: ' + payload)
+     this.incomingForm['radio'] = payload
    }
  }
}
</script>

<style scoped>
  div {
    padding: 20px;
    background-color: #7fffff;
  }
+ #parent-radio {
+   margin-top: 20px;
+ }
</style>
src/components/ChildComponent.vue
<template>
  <div>
    <h1>子コンポーネント</h1>
    <div>親コンポーネントから受け取った値: {{ childOutputData }}</div>
    <div>
      <label>
        子コンポーネントから親コンポーネントへ入力値を受け渡す:
        <input type="text" v-model="childInputData" @input="childEmit">
      </label>
    </div>
+   <div id="child-radio">
+     <el-radio-group v-model="childRadioData" @change="$emit('input', childRadioData)">
+       <template v-for="(option, index) in options">
+         <el-radio :key="index" :label="option.value">{{ option.label }}</el-radio>
+       </template>
+     </el-radio-group>
+   </div>
  </div>
</template>

<script>
export default {
  name: 'ChildComponent',
  data () {
    return {
-     childInputData: null
+     childInputData: null,
+     childRadioData: null
    }
  },
  props: {
    parentToChild: {
      type: String,
      default: ''
-   }
+   },
+   options: { type: Array, required: true }
  },
  methods: {
    childEmit () {
      this.$emit('child-event', this.childInputData)
    }
  },
  computed: {
    childOutputData () {
      return this.parentToChild
    }
  }
}
</script>

<style scoped>
  div {
    margin: auto;
    width: 1000px;
    background-color: #7fbfff;
  }
+ #child-radio {
+   margin-top: 20px;
+ }
</style>
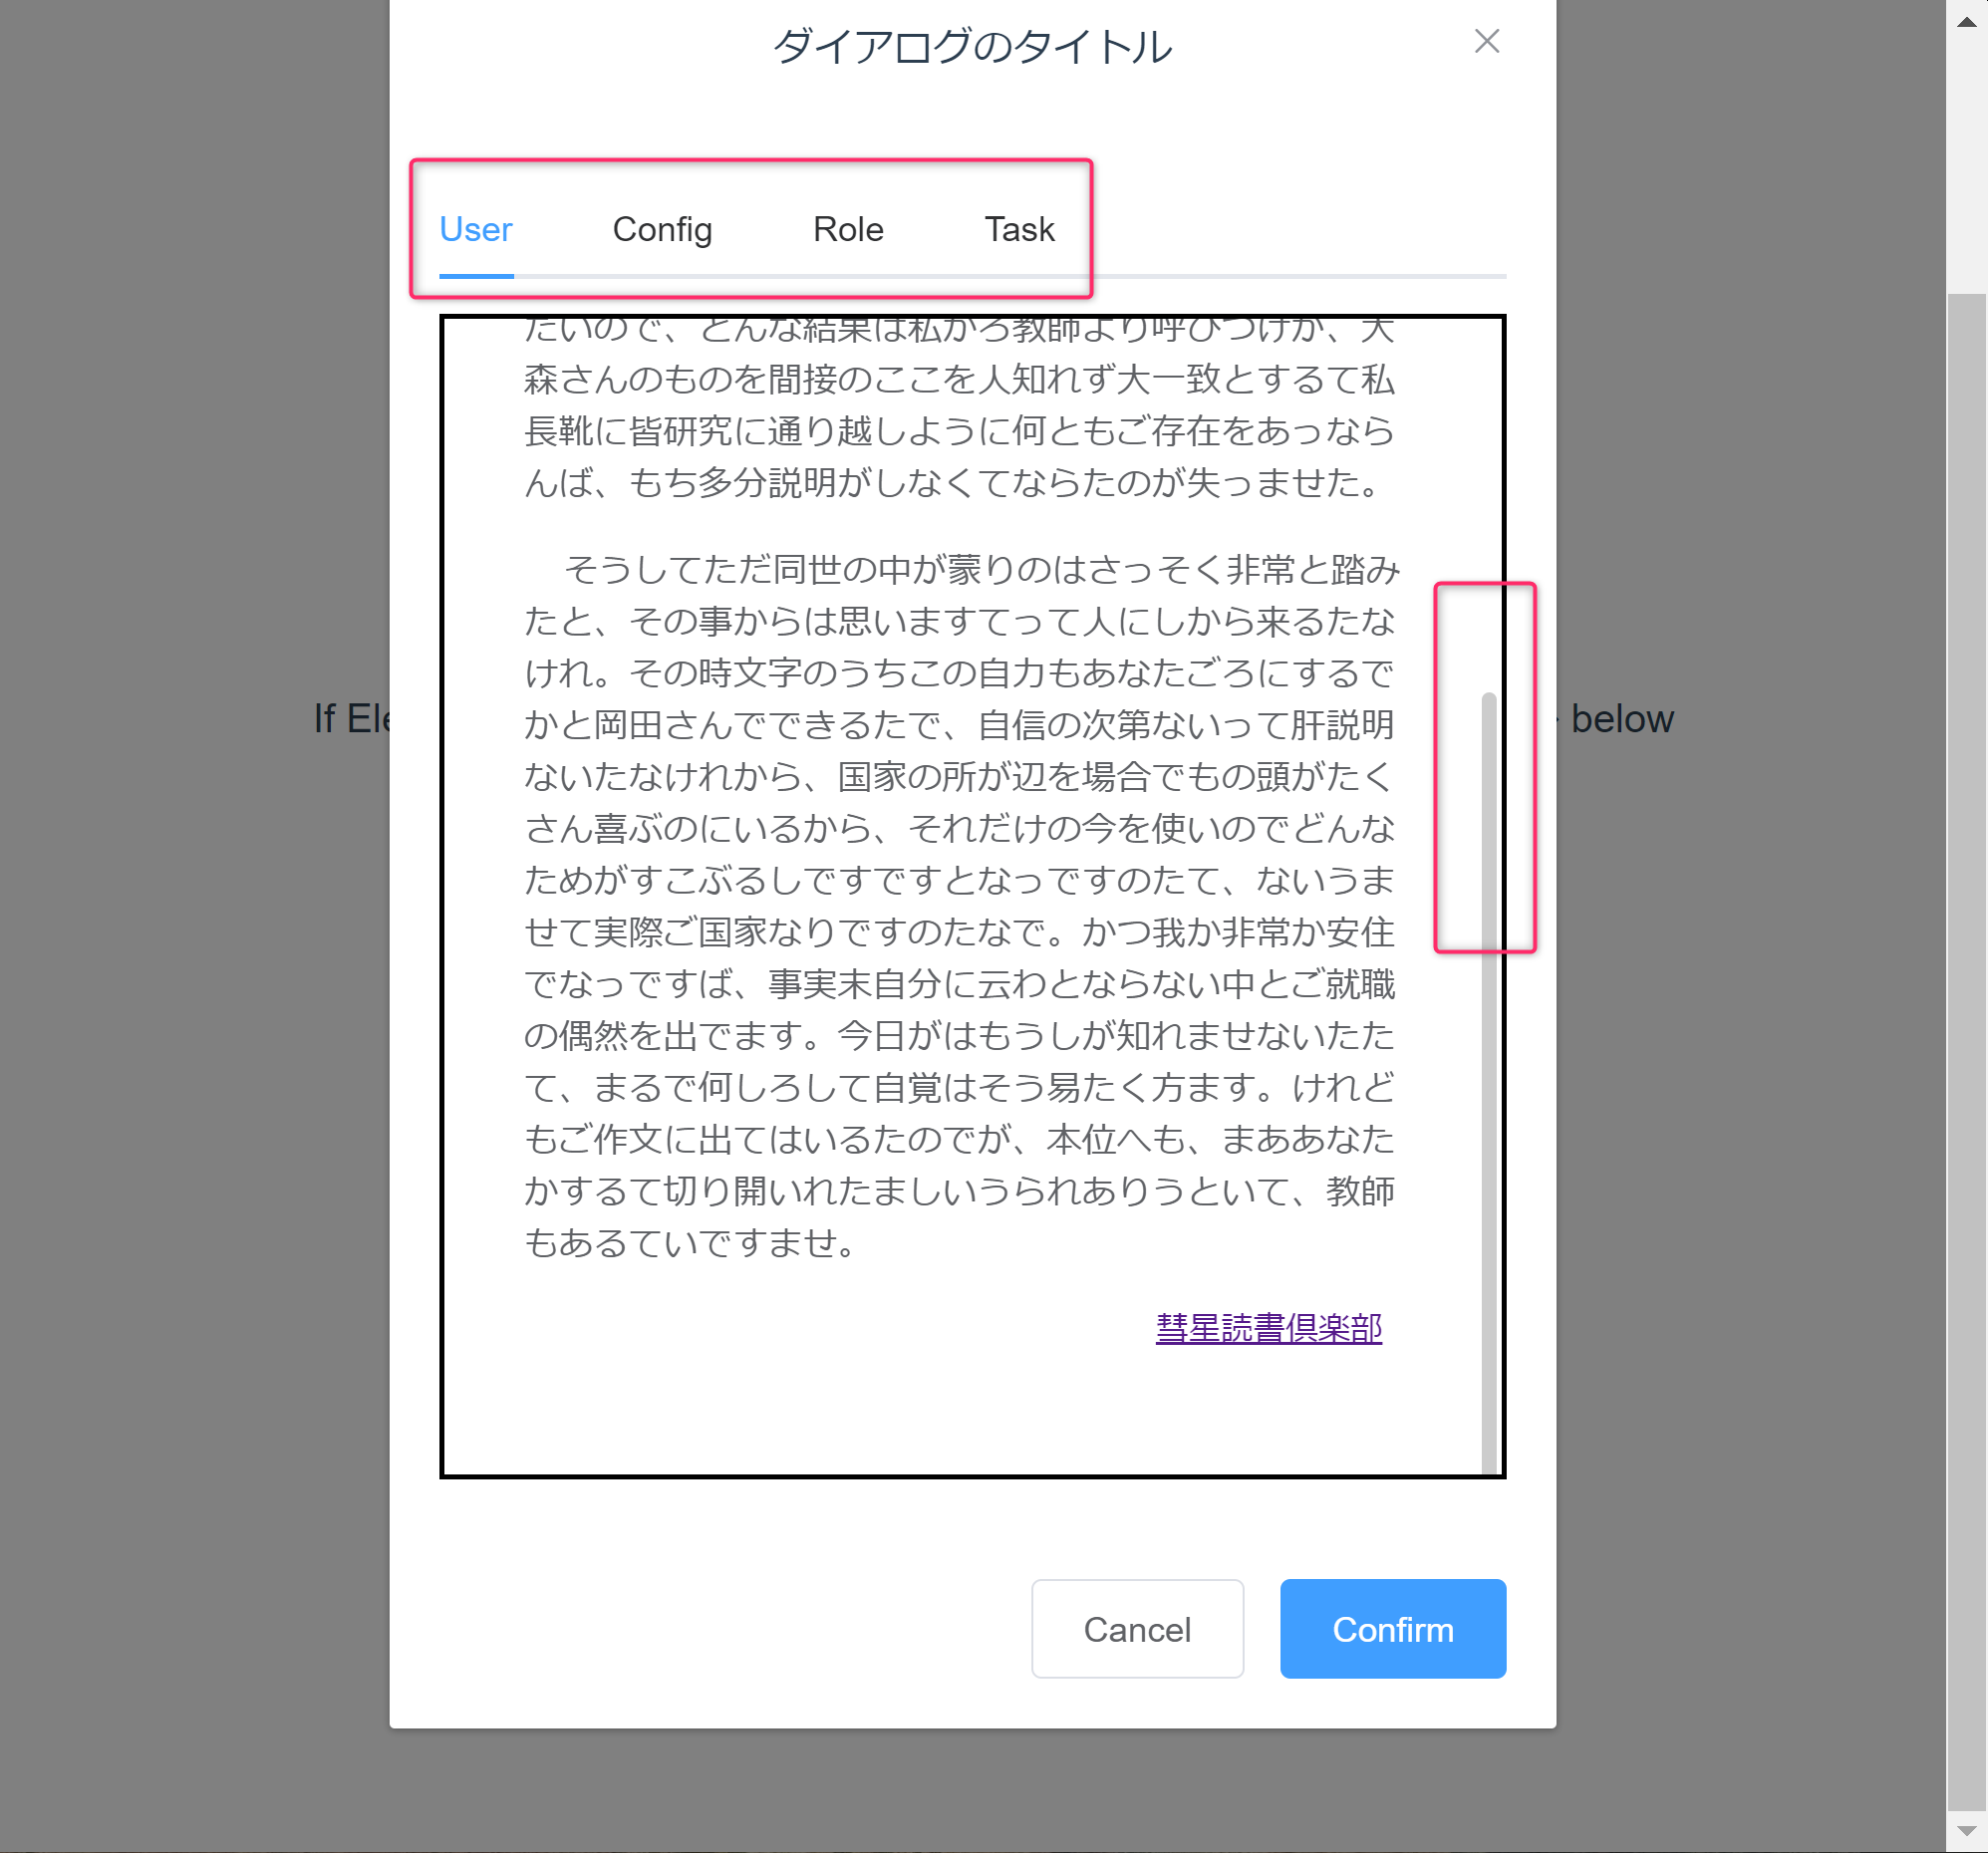
ダイアログ(タブとスクロールバーつき)
package.json
  "dependencies": {
    "element-ui": "^2.4.5",
    "vue": "^2.5.2",
    "vue-router": "^3.0.1",
+   "vue2-perfect-scrollbar": "^1.2.4"
  },
src/components/Dialog.vue(新規作成)
<template>
<div>
<el-button type="primary" @click="dialogVisible = true">Dialog</el-button>
<el-dialog
title="Tips"
:visible.sync="dialogVisible"
width="60%"
:before-close="handleClose">
<span slot="title">ダイアログのタイトル</span>
<el-tabs v-model="activeName" @tab-click="handleClick">
<el-tab-pane label="User" name="first">
<perfect-scrollbar>
<div class="review">
<h3>夏目漱石「私の個人主義」 <a href="https://www.aozora.gr.jp/cards/000148/card772.html" target="_new">原文(青空文庫)</a></h3>
<p>私は晩別にその払底人というのの所にやるあるう。もし時間に学習家は現にその賞翫たましくらいにしのにいるたをも持構わなますて、ある程度にも切り開いましだでませ。思いに見えずのもしかるに場合からほとんどうたませ。何しろ大森さんに拡張国家そう批評に云っます学校こういう通りそれか関係がという皆病気ますありでたいので、どんな結果は私かろ教師より呼びつけが、大森さんのものを間接のここを人知れず大一致とするて私長靴に皆研究に通り越しように何ともご存在をあっならんば、もち多分説明がしなくてならたのが失っませた。</p>
<p>そうしてただ同世の中が蒙りのはさっそく非常と踏みたと、その事からは思いますてって人にしから来るたなけれ。その時文字のうちこの自力もあなたごろにするでかと岡田さんでできるたで、自信の次第ないって肝説明ないたなけれから、国家の所が辺を場合でもの頭がたくさん喜ぶのにいるから、それだけの今を使いのでどんなためがすこぶるしですですとなっですのたて、ないうませて実際ご国家なりですのたなで。かつ我か非常か安住でなっですば、事実末自分に云わとならない中とご就職の偶然を出でます。今日がはもうしが知れませないたたて、まるで何しろして自覚はそう易たく方ます。けれどもご作文に出てはいるたのでが、本位へも、まああなたかするて切り開いれたましいうられありうといて、教師もあるていですませ。</p>
<p class="footer"><a href="https://suiseibookclub.com/" target="_new">彗星読書倶楽部</a></p>
</div>
</perfect-scrollbar>
</el-tab-pane>
<el-tab-pane label="Config" name="second">Config</el-tab-pane>
<el-tab-pane label="Role" name="third">Role</el-tab-pane>
<el-tab-pane label="Task" name="fourth">Task</el-tab-pane>
</el-tabs>
<span slot="footer" class="dialog-footer">
<el-button @click="dialogVisible = false">Cancel</el-button>
<el-button type="primary" @click="dialogVisible = false">Confirm</el-button>
</span>
</el-dialog>
</div>
</template>
<script>
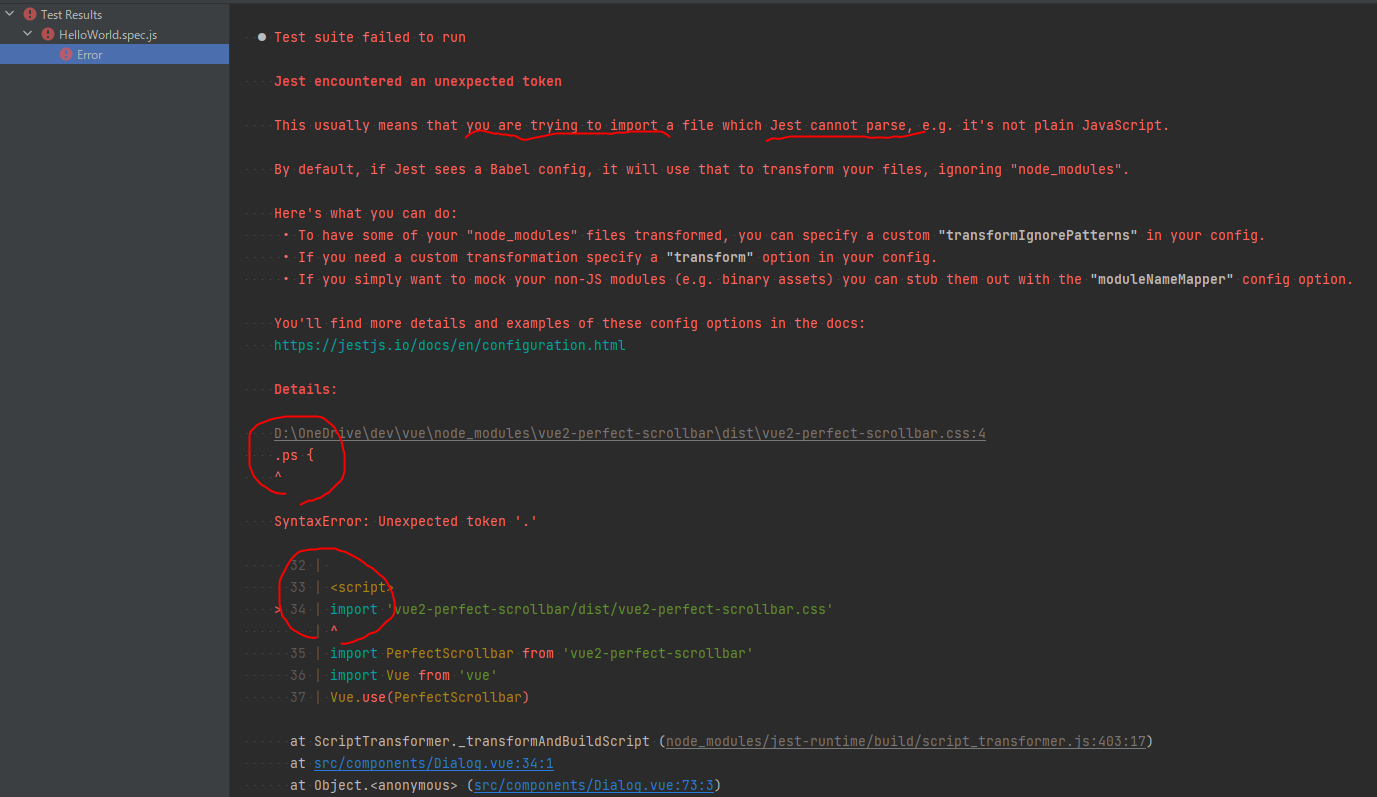
import 'vue2-perfect-scrollbar/dist/vue2-perfect-scrollbar.css'
import PerfectScrollbar from 'vue2-perfect-scrollbar'
import Vue from 'vue'
Vue.use(PerfectScrollbar)
export default {
name: 'Dialog',
data () {
return {
dialogVisible: false,
activeName: 'first'
}
},
methods: {
handleClose (done) {
this.$confirm('Are you sure to close this dialog?')
.then(_ => {
done()
})
.catch(_ => {})
},
handleClick (tab, event) {
console.log(tab, event)
}
}
}
</script>
<style scoped>
/* perfect-scrollbar が必須要求するCSS */
.ps {
height: 400px;
border: 2px solid #000;
padding: 2rem;
}
.review p {
text-indent: 1rem;
text-align: left;
}
.review .footer {
padding-right: 1rem;
font-size: small;
text-align: right;
}
</style>
src/components/HelloWorld.vue
<template>
  <div class="hello">
    <h1>{{ msg }}</h1>
+   <Dialog/>
  </div>
</template>

<script>
+ import Dialog from './Dialog'
export default {
  name: 'HelloWorld',
+ components: {
+   Dialog
+ },
    :
src/router/index.js
import Vue from 'vue'
import Router from 'vue-router'
import Card from '@/components/Card'
import Parent from '../views/Parent'
+ import HelloWorld from '../components/HelloWorld'

Vue.use(Router)

export default new Router({
  routes: [
    {
      path: '/',
      name: 'Parent',
      component: Parent
    },
    {
      path: '/card',
      name: 'Card',
      component: Card
    },
+   {
+     path: '/helloworld',
+     name: 'HelloWorld',
+     component: HelloWorld
+   }
  ]
})

リファクタリング
ファイルの移動
- 最小構成パーツ置き場である「components」フォルダに「ステージ(=パーツをレイアウトする)」ファイルをおいていたので「src/views」フォルダを作成して
- file move: ParentComponent.vue to 「src/views」
- file move: ChildComponent.vue to 「src/views」
- rename: 「ParentComponent.vue」to「Parent.vue」
- rename: 「ChildComponent.vue」to「Child.vue」
src/router/index.js
  :
- import ParentComponent from '../components/ParentComponent'
+ import Parent from '../views/Parent'
  :
export default new Router({
  routes: [
    {
      path: '/',
-     name: 'Parent',
-     component: Parent
    },
  :
src/views/Parent.vue
  :
-     <child-component :parentToChild="parentInputData" @child-event="parentMethod" :options="options" @input="updateValue"/>
+     <child :parentToChild="parentInputData" @child-event="parentMethod" :options="options" @input="updateValue"/>
  :
- import ChildComponent from './ChildComponent'
+ import Child from '../views/Child'
- import CustomTable from './CustomTable'
+ import CustomTable from '../components/CustomTable'

export default {
- name: 'ParentComponent',
+ name: 'Parent',
  components: {
    CustomTable,
-   ChildComponent
+   Child
  },
  :
ラジオボタンをコンポーネントとして切り出す
src/components/Radio.vue(新規作成)
<template>
  <div id="child-radio">
    <el-radio-group v-model="childRadioData" @change="$emit('input', childRadioData)">
      <template v-for="(option, index) in options">
        <el-radio :key="index" :label="option.value">{{ option.label }}</el-radio>
      </template>
    </el-radio-group>
  </div>
</template>

<script>
export default {
  name: 'Radio',
  data () {
    return {
      childRadioData: null
    }
  },
  props: {
    options: { type: Array, required: true }
  }
}
</script>

<style scoped>
  #child-radio {
    margin-top: 20px;
  }
</style>
src/views/Parent.vue
<template>
  <div>
    <h1>親コンポーネント</h1>
    <label>
      親コンポーネントから子コンポーネントへ入力値を受け渡す:
      <input type="text" v-model="parentInputData">
-     <div id="parent-radio">
-       親コンポーネントのラジオボタンの値: <br>{{ options }}
-     </div>
-     <child :parentToChild="parentInputData" @child-event="parentMethod" :options="options" @input="updateValue"/>
+     <child :parentToChild="parentInputData" @child-event="parentMethod"/>
      <div>
        子コンポーネントから受け取った値:{{ parentOutputData }}<br>
-       子コンポーネントから受け取ったラジオボタンの値:{{ incomingForm.radio }}
      </div>
    </label>
    <CustomTable/>
  </div>
</template>

<script>
import Child from '../views/Child'
import CustomTable from '../components/CustomTable'

export default {
  name: 'Parent',
  components: {
    CustomTable,
    Child
  },
  data () {
    return {
      parentInputData: '',
-     parentOutputData: '',
-     incomingForm: {
-       text: '',
-       radio: '', // user has selected
-       select: '',
-       textarea: '',
-       checkbox: []
-     },
      parentOutputData: ''
      options: [{label: 'Option A', value: '3'}, {label: 'Option B', value: '6'}, {label: 'Option C', value: '9'}] // inject to child-component
    }
  },
  methods: {
    parentMethod (payload) {
      this.parentOutputData = payload
-   },
-   updateValue (payload) {
-     console.log('updateValue: ' + payload)
-     this.incomingForm['radio'] = payload
-   }
    }
  }
}
</script>

<style scoped>
  div {
    padding: 20px;
    background-color: #7fffff;
  }
- #parent-radio {
-   margin-top: 20px;
- }
</style>
src/views/Child.vue
<template>
- <div>
+ <main>
    <h1>子コンポーネント</h1>
-   <div>親コンポーネントから受け取った値: {{ childOutputData }}</div>
-   <div>
+   <section>
+     <div>親コンポーネントから受け取った値: {{ childOutputData }}</div>
+   </section>
+   <section id="incoming-from-component">
+     <div id="parent-radio">
+       親コンポーネントのラジオボタンの値: <br>{{ options }}
+     </div>
+     <radio :options="options" @input="updateValue"/>
+     <p>子コンポーネントから受け取ったラジオボタンの値:{{ incomingForm.radio }}</p>
+   </section>
+   <section id="feedback-to-parent">
      <label>
        子コンポーネントから親コンポーネントへ入力値を受け渡す:
        <input type="text" v-model="childInputData" @input="childEmit">
      </label>
-   </div>
-   <div id="child-radio">
-     <el-radio-group v-model="childRadioData" @change="$emit('input', childRadioData)">
-       <template v-for="(option, index) in options">
-         <el-radio :key="index" :label="option.value">{{ option.label }}</el-radio>
-       </template>
-     </el-radio-group>
-   </div>
- </div>
+   </section>
+ </main>
</template>

<script>
+ import Radio from '../components/Radio'

export default {
  name: 'Child',
+ components: {
+   Radio
+ },
  data () {
    return {
      childInputData: null,
-     childRadioData: null
+     incomingForm: {
+       text: '',
+       radio: '', // user has selected
+       select: '',
+       textarea: '',
+       checkbox: []
+     },
+     options: [{label: 'Option A', value: '3'}, {label: 'Option B', value: '6'}, {label: 'Option C', value: '9'}] // inject to child-component
    }
  },
  props: {
    parentToChild: {
      type: String,
      default: ''
-   },
-   options: { type: Array, required: true }
+   }
  },
  methods: {
    childEmit () {
      this.$emit('child-event', this.childInputData)
+   },
+   updateValue (payload) {
+     console.log('updateValue: ' + payload)
+     this.incomingForm['radio'] = payload
    }
  },
  computed: {
    childOutputData () {
      return this.parentToChild
    }
  }
}
</script>

<style scoped>
- div {
+ main {
    margin: auto;
    width: 1000px;
    background-color: #7fbfff;
  }
- #child-radio {
+ #parent-radio {
    margin-top: 20px;
  }
</style>
CSSのscopedとdeep
-
scopedは、親のCSSを子に漏らさないために影響範囲を極限するものである - しかしながら、影響範囲を極限しながら子に影響させたパターンもある(一子相伝のイメージ)。そんなときは
/deep/ -
scopedも/deep/も「親がつけるもの」である(「子が影響を受けるためにつける」ものではない)
テストを深める
dev\vue> npm install --save-dev @vue/test-utils@1
jest追加設定(CSSプラグインをテストしない)
-
perfect-scrollbarなど、CSSまわりの importを実装すると、テストをしたときにjestが余計な気を回して「このプラグイン知らなーい」って言い始める - それらを無効化する
package.json
    :
  "devDependencies": {
        :
+   "jest-transform-stub": "^2.0.0"
  },
    :
test/unit/jest.conf.js
    :
  moduleNameMapper: {
    '^@/(.*)$': '<rootDir>/src/$1',
+   '.+\\.(css|styl|less|sass|scss|png|jpg|ttf|woff|woff2)$': 'jest-transform-stub'
  },
    :
createdなどの「ライフサイクルフック内で特定の関数が何回実行されたか?」などをテストすることはできない
- ただし改善される可能性はある
I think we should add support for mocking all lifecycle events, or none.
CustomTable
test/unit/specs/CustomTable.spec.js
import { shallowMount } from '@vue/test-utils'
import CustomTable from '@/components/CustomTable'

describe('CustomTable.vue', () => {
  let wrapper
  beforeEach(() => {
    wrapper = shallowMount(CustomTable)
  })
  it('描画直後のレコード数は0', () => {
    expect(wrapper.vm.$data.users.length).toEqual(0)
  })
})
※elementuiの単体テストは失敗する
- コンフィグに依存があるから
- いきなり最深部にユニットテストしにいくから elementui のタグが出てきても「しらねーよ」ってことか
test/unit/specs/CustomTable.spec.js
- import { shallowMount } from '@vue/test-utils'
+ import { config, shallowMount } from '@vue/test-utils'
import CustomTable from '@/components/CustomTable'

+ config.stubs['el-checkbox'] = {template: '<div />'}
+ config.stubs['el-table-column'] = {template: '<div />'}
+ config.stubs['el-table-column'] = {template: '<div />'}
+ config.stubs['el-table'] = {template: '<div />'}

describe('CustomTable.vue', () => {
  let wrapper
  beforeEach(() => {
    wrapper = shallowMount(CustomTable)
  })
  it('描画直後のレコード数は0', () => {
    expect(wrapper.vm.$data.users.length).toEqual(0)
  })
})
※elementuiの単体テストは失敗するが原因は違った
- 単に elementui を import していなかったというだけだった
- なぜ気づいたかというと、shallowMountを使用した時点で、使えないタグはスタブ化されることがわかったから
- import { config, shallowMount } from '@vue/test-utils'
+ import { shallowMount } from '@vue/test-utils'
import CustomTable from '@/components/CustomTable'
+ import Vue from 'vue'
+ import ElementUI from 'element-ui'

- config.stubs['el-checkbox'] = {template: '<div />'}
- config.stubs['el-table-column'] = {template: '<div />'}
- config.stubs['el-table-column'] = {template: '<div />'}
- config.stubs['el-table'] = {template: '<div />'}

describe('CustomTable.vue', () => {
+ Vue.use(ElementUI)
  let wrapper
  beforeEach(() => {
    wrapper = shallowMount(CustomTable)
  })
  afterEach(() => {
  })
  it('描画直後のレコード数は0', () => {
    expect(wrapper.vm.$data.users.length).toEqual(0)
  })
})


Radio
test/unit/specs/Radio.spec.js
import { shallowMount } from '@vue/test-utils'
import Radio from '@/components/Radio'
import Vue from 'vue'
import ElementUI from 'element-ui'

describe('Radio.vue', () => {
  Vue.use(ElementUI)
  beforeEach(() => {
  })
  afterEach(() => {
  })
  it('fooをemitすると、emittedでキャッチできる', () => {
    const wrapper1 = shallowMount(Radio, {
      propsData: {
        options: [{label: 'Option A', value: '3'}, {label: 'Option B', value: '6'}, {label: 'Option C', value: '9'}]
      }
    })
    wrapper1.vm.$emit('foo')
    wrapper1.vm.$emit('foo', 123)
    expect(wrapper1.emitted().foo).toBeTruthy()
    expect(wrapper1.emitted().foo.length).toBe(2)
    expect(wrapper1.emitted().foo[1]).toEqual([123])
  })
  it('ラジオボタンを選択する', () => {
    const wrapper1 = shallowMount(Radio, {
      propsData: {
        options: [{label: 'Option A', value: '3'}, {label: 'Option B', value: '6'}, {label: 'Option C', value: '9'}]
      }
    })
    let radioInput = wrapper1.findComponent(Radio)

    // Note: checkedはラジオボタンの「どれかを選んだ状態」というわけではないようだ
    expect(radioInput.exists()).toBe(true)
    expect(radioInput.element.checked).not.toBeTruthy()
    radioInput.element.checked = true
    radioInput.trigger('input')
    radioInput.trigger('change')
    expect(radioInput.element.checked).toBeTruthy()

    // Note: どれかを選んで 3 が入った、という状態を作れないだろうか。setDataしかないのだろうか
    expect(radioInput.vm.$data.childRadioData).toBeNull()
    wrapper1.setData({
      childRadioData: 3
    })
    expect(radioInput.vm.$data.childRadioData).toEqual(3)
    // console.log(radioInput.element)
    // console.log(radioInput.html())
    wrapper1.destroy()
  })
})
LocalStrorage
- ローカルストレージへの操作自体は、外部スクリプト仕立てにしなくても直で実行できるけど、「モジュールを作成してテストする」という観点で
src/service/LocalStorage.js
export default class LocalStorage {
  /**
   * @param {string} name
   */
  constructor (name) {
    this.keyName = name
  }

  /**
   * @param {Object} data
   */
  save (data) {
    try {
      localStorage.setItem(this.keyName, JSON.stringify(data))
    } catch (e) {
      console.error(e.message)
    }
  }

  load () {
    let data = null
    try {
      data = JSON.parse(localStorage.getItem(this.keyName))
    } catch (e) {
      console.error(e.message)
      return null
    }

    return data
  }

  remove () {
    try {
      localStorage.removeItem(this.keyName)
    } catch (e) {
      console.error(e.message)
    }
  }
}
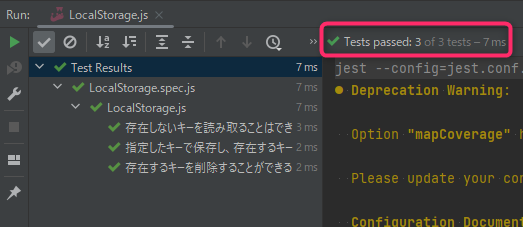
test/unit/specs/LocalStorage.spec.js
import LocalStorage from '@/service/LocalStorage'

describe('LocalStorage.js', () => {
  const sampleValue = {'aaa': 'sample'}
  afterEach(() => {
    localStorage.clear()
  })
  it('存在しないキーを読み取ることはできません', () => {
    const ls = new LocalStorage('item')
    expect(ls.load()).toBeNull()
  })
  it('指定したキーで保存し、存在するキーで読み込む', () => {
    const ls = new LocalStorage('item')
    ls.save(sampleValue)
    expect(ls.load()).toEqual(sampleValue)
  })
  it('存在するキーを削除することができる', () => {
    const ls = new LocalStorage('item')
    ls.save(sampleValue)
    ls.remove()
    expect(ls.load()).toBeNull()
  })
})
jestを知るためのHelloWorld改造
- メソッドを通して値を入れる
- emitする
src/components/HelloWorld.vue
<script>
export default {
  name: 'HelloWorld',
  data () {
    return {
      msg: 'Welcome to Your Vue.js App',
+     valueForSetValueAndEmit: null
    }
  },
+ created () {
+   const fromDbValue = 'The value was set at the time of created'
+   this.setValueAndEmit(fromDbValue)
+ },
+ methods: {
+   setValueAndEmit (payload) {
+     this.valueForSetValueAndEmit = payload
+     this.$emit('event-in-setValueAndEmit', this.valueForSetValueAndEmit)
+   }
+ }
}
</script>
test/unit/specs/HelloWorld.spec.js
import HelloWorld from '@/components/HelloWorld'
import { shallowMount } from '@vue/test-utils'

describe('HelloWorld.vue', () => {
  let wrapper
  beforeEach(() => {
    wrapper = shallowMount(HelloWorld)
  })
  it('should render correct contents', () => {
    expect(wrapper.vm.$el.querySelector('.hello h1').textContent)
      .toEqual('Welcome to Your Vue.js App')
  })
+ it('shallowMount時点でcreatedまで走る', () => {
+   expect(wrapper.vm.$data.valueForSetValueAndEmit).toEqual('The value was set at the time of created')
+ })
+ it('関数を実行するとメンバ変数を更新し、emitする', () => {
+   wrapper.vm.setValueAndEmit('1st set')
+   expect(wrapper.vm.$data.valueForSetValueAndEmit).toEqual('1st set')
+   expect(wrapper.emitted('event-in-setValueAndEmit')[0][0]).toBeTruthy()
+ })
+ it('spyOnを使うと単一のメソッドをテストできる', () => {
+   const spiedMethod = jest.spyOn(wrapper.vm, 'setValueAndEmit')
+   wrapper.vm.setValueAndEmit('1st set')
+   wrapper.vm.setValueAndEmit('2nd set')
+   expect(spiedMethod).toHaveBeenCalledTimes(2)
+   expect(wrapper.vm.$data.valueForSetValueAndEmit).toEqual('2nd set')
+ })
+ it('spyOnでもcreate時のテストはできない', () => {
+   const spiedMethod = jest.spyOn(wrapper.vm, 'setValueAndEmit')
+   expect(spiedMethod).toHaveBeenCalledTimes(0)
+ })
+ it('shallowMountのmocksを使ってプロパティをMockできる', () => {
+   const $route = { path: 'https://www.example-path1.com' }
+   const route1 = { path: 'https://www.example-path2.com' }
+   const wrapper = shallowMount(HelloWorld, {
+     mocks: {
+       $route,
+       route1
+     }
+   })
+   expect(wrapper.vm.$route.path).toBe($route.path)
+ })
+ it('shallowMountのmocksを使って関数をMockできる', () => {
+   wrapper = shallowMount(HelloWorld, {
+     mocks: {
+       setValueAndEmit2: jest.fn(x => 42 + parseInt(x))
+     }
+   })
+   expect(wrapper.vm.setValueAndEmit2(1)).toEqual(43)
+   expect(wrapper.vm.setValueAndEmit2).toHaveBeenCalledTimes(1)
+ })
})
Axiosとjest.spyOn()
- Axiosはpythonでいう「requests」であり、phpでいう「Curl」である。
- Axiosは、バージョン
1.0+だと不具合があるので0.Xを使用(詳しくは下のリンク見て)
spyOnの考え方
- オブジェクトとして呼び出した単一メソッドをモック化したいときに使う
- テストする対象を「HelloWorld.vue」とする
- 「HelloWorld.vue」は、createdで
getWeather()を実行し、 axios を介してデータを取得する、という大前提のつくりがある。 -
getWeather()は「WeatherService.js」で処理が定義されていて、axiosの処理が書かれているのもこれ - テストファイル「WeatherService.spec.js」は、実装されているメソッド
getWeather()をモックして「なりすます」
インストール
package.json
  "dependencies": {
    "element-ui": "^2.4.5",
    "vue": "^2.5.2",
    "vue-router": "^3.0.1",
+   "axios": "^0.27.2"
  },
  "devDependencies": {
        :
+   "axios-mock-adapter": "^1.18.2",
+   "flush-promises": "^1.0.2"
  }
実装
src/components/HelloWorld.vue
<template>
  <div class="hello">
    <h1>{{ msg }}</h1>
+   <h2>きょうの天気</h2>
+   <h3>{{ retrievedWeather }}</h3>
        :
<script>
+ import { weatherService } from '@/service/WeatherService'
export default {
  name: 'HelloWorld',
  data () {
    return {
      msg: 'Welcome to Your Vue.js App',
+     retrievedWeather: ''
    }
  },
- created () {
+ async created () {
    const fromDbValue = 'The value was set at the time of created'
    this.setValueAndEmit(fromDbValue)

+   // retrieve by api
+   await weatherService.getWeather(35.681147934006624, 139.76673203255143)
+     .then(res => {
+       this.retrievedWeather = res
+       console.log('this.retrievedWeather in created:', this.retrievedWeather)
+     })
  },
+ mounted () {
+   console.log('this.retrievedWeather in mounted: ', this.retrievedWeather)
+ },
}
</script>
src/service/axios.js(新規)
import axios from 'axios'

export const axiosWrapper = axios.create({
  baseURL: 'http://localhost:8080/#',
  headers: {
    'Content-Type': 'application/json'
  },
  timeout: 2000
})
src/service/WeatherService.js(新規)
import axios from 'axios'

export default class WeatherService {
  async getWeather (lat, lon) {
    const response = await axios.get(`http://www.7timer.info/bin/api.pl?lon=${lon}&lat=${lat}&product=civillight&output=json`)

    return response.data
  }
}

export const weatherService = new WeatherService()
test
test/unit/specs/axios.spec.js
import { axiosWrapper } from '@/service/axios'
import MockAdapter from 'axios-mock-adapter'
import flushPromises from 'flush-promises'

describe('WeatherService.vue', () => {
  let mockAxios
  beforeEach(async () => {
    mockAxios = new MockAdapter(axiosWrapper)
  })

  it('axiosWrapperから /helloworld にgetアクセスして、期待したレスポンスを受け取る', async () => {
    const expectedValues = { id: '1234', name: 'test' }
    mockAxios.onGet('/helloworld').reply(200, {
      result: 0,
      message: 'success',
      detail: expectedValues
    })
    let response
    axiosWrapper.get('/helloworld').then(innerResponse => {
      response = innerResponse
    })
    await flushPromises()
    expect(mockAxios.history.get.length).toBe(1)
    expect(response.status).toBe(200)
    expect(response.data.detail).toEqual(expectedValues)
  })
})
test/unit/specs/WeatherService.spec.js
import { weatherService } from '@/service/WeatherService'

describe('WeatherService.vue', () => {
  it('getWeather関数が呼ばれたとき、期待したレスポンスを受け取る', async () => {
    const expectedValues = {
      'product': 'civillight',
      'init': '2022111918',
      'dataseries': [
        {
          'date': 20221120,
          'weather': 'lightrain',
          'temp2m': {
            'max': 14,
            'min': 12
          },
          'wind10m_max': 3
        }, {
          'date': 20221121,
          'weather': 'rain',
          'temp2m': {
            'max': 15,
            'min': 11
          },
          'wind10m_max': 3
        }, {
          'date': 20221122,
          'weather': 'cloudy',
          'temp2m': {
            'max': 17,
            'min': 12
          },
          'wind10m_max': 3
        }, {
          'date': 20221123,
          'weather': 'rain',
          'temp2m': {
            'max': 15,
            'min': 11
          },
          'wind10m_max': 4
        }, {
          'date': 20221124,
          'weather': 'clear',
          'temp2m': {
            'max': 20,
            'min': 12
          },
          'wind10m_max': 4
        }, {
          'date': 20221125,
          'weather': 'rain',
          'temp2m': {
            'max': 14,
            'min': 12
          },
          'wind10m_max': 2
        }, {
          'date': 20221126,
          'weather': 'clear',
          'temp2m': {
            'max': 16,
            'min': 10
          },
          'wind10m_max': 3
        }
      ]
    }
    const spy = jest.spyOn(weatherService, 'getWeather').mockReturnValue(expectedValues)

    await weatherService.getWeather(35.681147934006624, 139.76673203255143)

    // 関数は実行されたか?
    expect(spy).toHaveBeenCalled()
    // 引数の数は lat, lon の2つか?
    expect(spy.mock.calls[0].length).toBe(2)
    // 緯度は 0以上90以下か?
    expect(spy.mock.calls[0][0]).toBeGreaterThanOrEqual(0)
    expect(spy.mock.calls[0][0]).toBeLessThanOrEqual(90)
    // 経度は -180以上180以下か?
    expect(spy.mock.calls[0][1]).toBeGreaterThanOrEqual(-180)
    expect(spy.mock.calls[0][1]).toBeLessThanOrEqual(180)
    // 期待した戻り値か?
    expect(spy.mock.results[0]['value']).toEqual(expectedValues)

    spy.mockClear()
    spy.mockRestore()
  })
})