はじめに
仕事場がCodeigniter3(On Docker)なんだけど、Dockerで動かそうとしてあまりに失敗するんで、Djangoみたいにローカルバッテリーサーバで動かせないの!?って思ってたらあったわ...
php.ini
// 763行目
- ;extension_dir = "ext"
+ extension_dir = "C:/php/ext"

// 915行目
- ;extension=curl // プロジェクト作成時にcomposerが動かない
+ eextension=curl
- ;extension=fileinfo
- ;extension=gd
+ extension=fileinfo
+ extension=gd
- ;extension=intl // codeigniterの動作要件
+ extension=intl
- ;extension=mbstring // codeigniterの動作要件
+ extension=mbstring
- ;extension=mysqli // MySQLが動かない
+ extension=mysqli
- ;extension=openssl // プロジェクト作成時にcomposerが動かない
+ extension=openssl


// 966行目
- ;date.timezone = // 任意
+ date.timezone = "Asia/Tokyo"
ci4というプロジェクトを作成
dev> composer create-project codeigniter4/appstarter ci4
  Creating a "codeigniter4/appstarter" project at "./ci4"
  Warning from https://repo.packagist.org: Support for Composer 1 is deprecated and some packages will not be available. You
  should upgrade to Composer 2. See https://blog.packagist.com/deprecating-composer-1-support/
  Installing codeigniter4/appstarter (v4.1.4)
  :
.env 変更
envファイルをコピーして設定
- デバッグモードへ
- db接続設定
dev\> cd ci4
dev\ci4> cp env .env
// 17行目
- # CI_ENVIRONMENT = production
+ CI_ENVIRONMENT = development

// 40行目
- # database.default.hostname = localhost
- # database.default.database = ci4
- # database.default.username = root
- # database.default.password = root
- # database.default.DBDriver = MySQLi
+ database.default.hostname = localhost
+ database.default.database = ci4db
+ database.default.username = root
+ database.default.password = your_cool_password
+ database.default.DBDriver = MySQLi

- # database.tests.hostname = localhost
- # database.tests.database = ci4
- # database.tests.username = root
- # database.tests.password = root
- # database.tests.DBDriver = MySQLi
- # database.tests.DBPrefix =
+ database.tests.hostname = localhost
+ database.tests.database = ci4db
+ database.tests.username = root
+ database.tests.password = your_cool_password
+ database.tests.DBDriver = MySQLi
+ database.tests.DBPrefix = test_
データベースを手で作っておく
ci4db で作成。テーブルはひとつも無い状態です
dev\ci4> php spark db:create ci4db
サーバーを動かす
プロジェクトルートフォルダにある spark ってとこに cd してないとコマンド通らないよ。djangoでいう manage.py
dev\ci4> php spark serve
  CodeIgniter v4.1.4 Command Line Tool - Server Time: 2021-09-18 19:41:09 UTC-05:00
  CodeIgniter development server started on http://localhost:8080
  :
すぐにテストをつくる
PHPUnitのインストール
    "require-dev": {
        "fakerphp/faker": "^1.9",
        "mikey179/vfsstream": "^1.6",
+       "phpunit/phpunit": "^9.1"
    },
testsフォルダにある _support フォルダについて
このディレクトリは、テストファイルを保持するように設定されています。このディレクトリには、テストの作成中に使用できるさまざまなモッククラスやその他のユーティリティが含まれています。このディレクトリを本番サーバーに転送する必要はありません。_support
削除するファイル
この2つのファイルを削除しないと、PHPUnitを動かした瞬間にサンプルテーブルが作成される
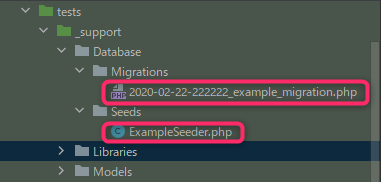
実は上記でdb接続情報やdb作成を先に済ませたのもPHPUnitがdb使用しないのになぜか読みたがってエラーが出るから
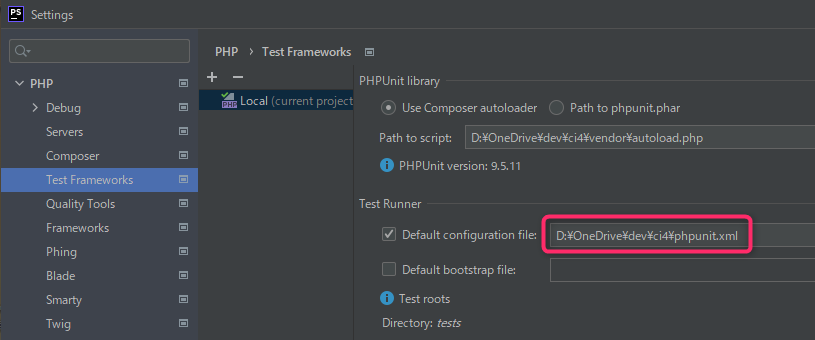
phpunit.xmlを設定
なくても実は動くが、いわゆるphpunitの設定ファイルなので有効化しといて損はない
dev\ci4> cp phpunit.xml.dist phpunit.xml
- autoload.php
- phpunit.xml
テストするためのフォルダを作成
dev\ci4> mkdir tests/controller
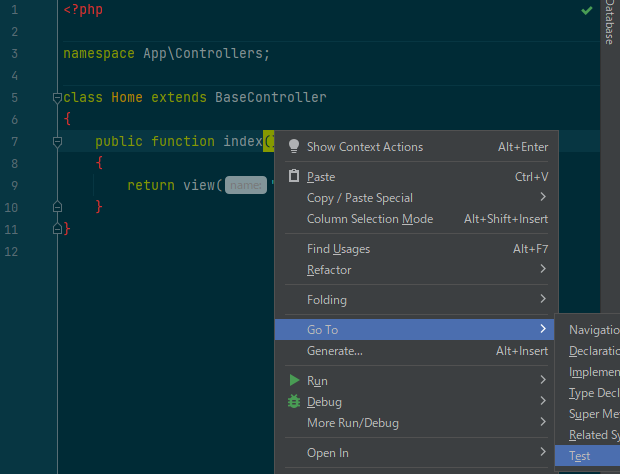
Homeコントローラからテストを作る
Home というコントローラ(app/Controllers/Home.php)はテンプレとして作成される。
テストの作成はphpStormの機能を使う
下図の Directory: と Namespace: を、作成したフォルダの場所に書き換えた
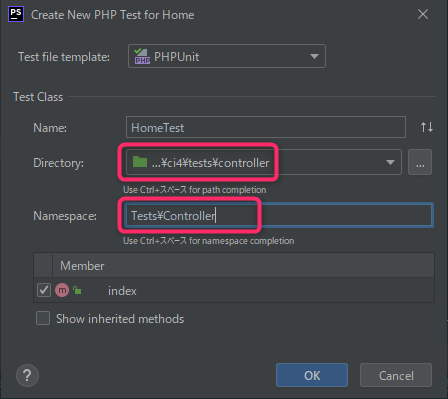
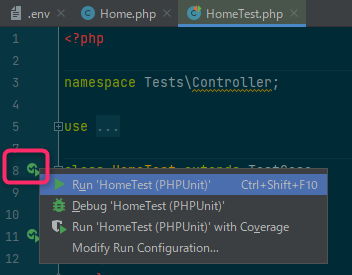

extends TestCase は extends CIUnitTestCase に変更すること
<?php

namespace Tests\Controller;

use CodeIgniter\Router\Exceptions\RedirectException;
use CodeIgniter\Test\CIUnitTestCase;
use CodeIgniter\Test\DatabaseTestTrait;
use CodeIgniter\Test\FeatureTestTrait;
use Exception;

class HomeTest extends CIUnitTestCase
{
    use DatabaseTestTrait;
    use FeatureTestTrait;

    /**
     * @throws RedirectException
     * @throws Exception
     */
    public function testIndex()
    {
        // Get a simple page
        $result = $this->call('get', '/');
        $result->assertOK();

        // $result = $this->call('get', '/Home/store');
        // $result->assertOK();
    }

}
確認
安心感が違うわぁ。これがTDD
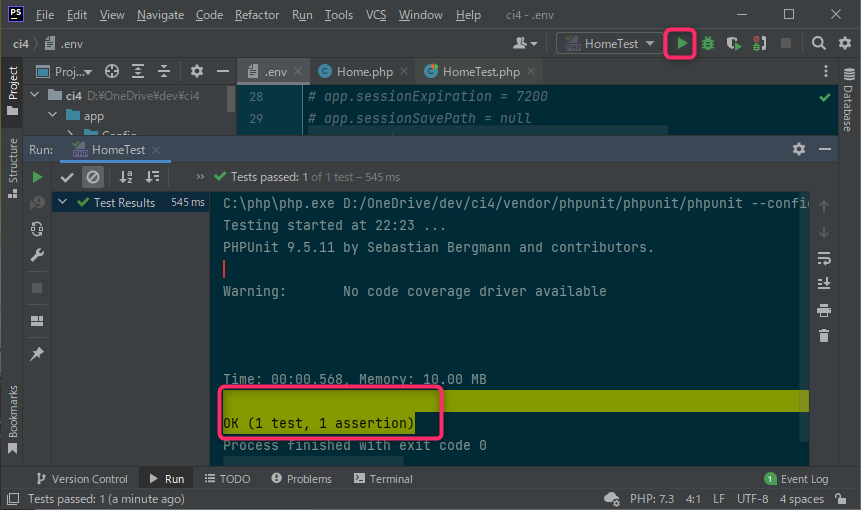

※テスト実行するとこんなんが出る
C:\php\php.exe D:/OneDrive/dev/ci4/vendor/phpunit/phpunit/phpunit --configuration D:\OneDrive\dev\ci4\phpunit.xml --filter "/(database\\Models\\Domain\\Logic\\School\\Demo\\HighSchool\\Csv\\GradesEntityTest::testCreateEntity)( .*)?$/" --test-suffix GradesEntityTest.php D:\OneDrive\dev\ci4\tests\database\Models\Domain\Logic\School\Demo\HighSchool\Csv --teamcity
Testing started at 10:17 ...
PHP Warning:  require(./app/Config/Paths.php): Failed to open stream: No such file or directory in D:\OneDrive\dev\ci4\vendor\codeigniter4\framework\system\Test\bootstrap.php on line 40

Warning: require(./app/Config/Paths.php): Failed to open stream: No such file or directory in D:\OneDrive\dev\ci4\vendor\codeigniter4\framework\system\Test\bootstrap.php on line 40
PHPUnit 9.5.21 #StandWithUkraine

Error in bootstrap script: Error:
Failed opening required './app/Config/Paths.php' (include_path='.;C:\php\pear')
#0 D:\OneDrive\dev\ci4\vendor\phpunit\phpunit\src\Util\FileLoader.php(65): include_once()
#1 D:\OneDrive\dev\ci4\vendor\phpunit\phpunit\src\Util\FileLoader.php(49): PHPUnit\Util\FileLoader::load('D:\\OneDrive\\dev...')
#2 D:\OneDrive\dev\ci4\vendor\phpunit\phpunit\src\TextUI\Command.php(562): PHPUnit\Util\FileLoader::checkAndLoad('D:\\OneDrive\\dev...')
#3 D:\OneDrive\dev\ci4\vendor\phpunit\phpunit\src\TextUI\Command.php(344): PHPUnit\TextUI\Command->handleBootstrap('D:\\OneDrive\\dev...')
#4 D:\OneDrive\dev\ci4\vendor\phpunit\phpunit\src\TextUI\Command.php(111): PHPUnit\TextUI\Command->handleArguments(Array)
#5 D:\OneDrive\dev\ci4\vendor\phpunit\phpunit\src\TextUI\Command.php(96): PHPUnit\TextUI\Command->run(Array, true)
#6 D:\OneDrive\dev\ci4\vendor\phpunit\phpunit\phpunit(98): PHPUnit\TextUI\Command::main()
#7 {main}

Process finished with exit code 1
落ち着いてよく読んでみると require(./app/Config/Paths.php) に定義しろよ、と書いてある。定義してあるパスを総当りで試すようだ
   :
+ public string $phpUnit = 'D:\OneDrive\dev\ci4\phpunit.xml';
Config関連
App.php
- public $defaultLocale = 'en';
+ public $defaultLocale = 'ja';
- public $appTimezone = 'America/Chicago';
+ public $appTimezone = 'Asia/Tokyo';
Routes.php
ルーティングを理解する
$routes->setDefaultNamespace('App\Controllers');
$routes->setDefaultController('Home');
$routes->setDefaultMethod('index');
- $routes->setAutoRoute(true);
+ $routes->setAutoRoute(false);

// We get a performance increase by specifying the default
// route since we don't have to scan directories.
$routes->get('/', 'Home::index');
$routes->get('/api/(\w+)/(\d+)', 'Home::store/$1/$2');
$routes->get('school', 'School::index');
-
http://localhost:8080/でHomeコントローラのindexをトリガーする(setDefaultControllerとsetDefaultMethodが効いている) -
http://localhost:8080/api/hoge/8でHomeコントローラのstoreをパラメータつき[hoge, 8]でトリガーする - codeigniterの仕組みとして、
http://localhost:8080/Home/indexでHomeコントローラのindexをトリガーする。setAutoRoute(false)でそれを止めることができる(公式が推奨)
Filters.php
- public $methods = [];
+ public $methods = [
+     'get' => ['csrf'],
+     'post' => ['csrf'],
+ ];
Database Configuration
Migrationファイルの作成
いまのところこんな認識だけどあってんのかな。。。DjangoだとModelを更新するとMigrationが差分を自動作成してくれるから全部独立してるといまいちわからんわ。。。
- Migrationはあくまで実体のテーブルを作りにいくための仕組み(下準備)
- Modelはciが実体のテーブルを取り扱うための手段(Migrationとはリンクしてないので調整する必要がある。findAll()とか)
- Entityは実体のレコードを取り扱うための型(全部textで返ってくるので、idはintegerで取り扱う、など)
マイグレーションファイルの作成
ファイルの雛形を作成します
dev\ci4> php spark make:migration --suffix
  Migration class name : VocabularyBook
  CodeIgniter v4.1.4 Command Line Tool - Server Time: 2021-09-18 20:37:01 UTC-05:00
  File created: APPPATH\Database\Migrations\2021-09-19-013702_VocabularyBookMigration.php
up() と down() メソッドを記述
ってことはここで実体のテーブルを作り込むんだな?
<?php

namespace app\Database\Migrations;

use CodeIgniter\Database\Migration;

class VocabularyBookMigration extends Migration
{
    public function up()
    {
        // ここから
        $this->forge->addField(
            [
                'id' => [
                    'type' => 'INT',
                    'constraint' => 11,
                    'unsigned' => true,
                    'auto_increment' => true,
                ],
                'sentence' => [
                    'type' => 'VARCHAR',
                    'constraint' => '200',
                    'null' => false,
                ],
                'created_at' => ['type' => 'datetime', 'null' => true],
                'updated_at' => ['type' => 'datetime', 'null' => true],
            ]
        );
        $this->forge->addPrimaryKey('id');
        $this->forge->createTable('vocabulary_book');
        // ここまで
    }

    public function down()
    {
        // ここから
        $this->forge->dropTable('vocabulary_book');
        // ここまで
    }
}
マイグレーションの実行
dev\ci4> php spark migrate
  CodeIgniter v4.1.4 Command Line Tool - Server Time: 2021-09-19 03:18:14 UTC-05:00
  Running all new migrations...
        Running: (App) 2021-09-19-013702_app\Database\Migrations\VocabularyBookMigration
  Done migrations.
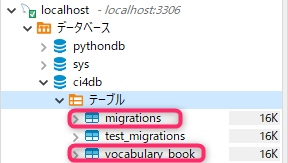
確認
マイグレーションを実行したらmysqlにテーブルが出来上がったことを確認する
CREATE TABLE `vocabulary_book` (
  `id` int unsigned NOT NULL AUTO_INCREMENT,
  `sentence` varchar(200) NOT NULL,
  PRIMARY KEY (`id`)
) ENGINE=InnoDB DEFAULT CHARSET=utf8
※テーブル構造に差分が出る場合は、マイグレーションファイルを増やすか、勝手に出来上がっているmigrationsテーブルの履歴を削除してマイグレーションする
ci4db.migrations というテーブルは自動でできる。
seeder(サンプルデータ)を作る
dev\ci4> php spark make:seeder --suffix
  Seeder class name : Simple
  File created: APPPATH\Database\Seeds\SimpleSeeder.php
<?php

namespace App\Database\Seeds;

use CodeIgniter\Database\Seeder;

class SimpleSeeder extends Seeder
{
    public function run()
    {
        // ここから
        $data = [
            ['sentence' => 'I would like an aisle seat.'],
            ['sentence' => 'My son asked for a window seat.'],
            ['sentence' => 'They wrapped the baby in a soft blanket.'],
            ['sentence' => 'Can I see your boarding pass?'],
        ];

        // Using Query Builder
        $this->db->table('vocabulary_book')->insertBatch($data);
        // ここまで
    }
}
dev\ci4> php spark db:seed SimpleSeeder
SQLで表すとこれと同じです
INSERT INTO ci4db.vocabulary_book (sentence,created_at,updated_at) VALUES
	 ('I would like an aisle seat.',NULL,NULL),
	 ('My son asked for a window seat.',NULL,NULL),
	 ('They wrapped the baby in a soft blanket.',NULL,NULL),
	 ('Can I see your boarding pass?',NULL,NULL);
VocabularyBookエンティティを作成
エンティティはcodeIgniterが取り扱うモデルのレコードの構造体らしい。str 以外の型で取り扱いたいときは casts に指定する。
dev\ci4> php spark make:entity --suffix
  Entity class name: VocabularyBook
  File created: APPPATH\Entities\VocabularyBookEntity.php
<?php

namespace App\Entities;

use CodeIgniter\Entity\Entity;

class User extends Entity
{
    protected $datamap = [];
-   protected $dates   = ['created_at', 'updated_at', 'deleted_at'];
+   protected $dates   = ['created_at', 'updated_at'];
    protected $casts   = [
+       'id' => 'integer',
    ];
}
VocabularyBookModelモデルを作成
あくまでテンプレとして出来上がるので、実体にあわせて調整する。
-
@methodタグを指定するとfind() が entity を返してくれる -
$allowedFieldsはforeign keyも含めてください。
dev\ci4> php spark make:model --suffix
  Model class name: VocabularyBook
  File created: APPPATH\Models\VocabularyBookModel.php
<?php

namespace App\Models;

use CodeIgniter\Model;

class VocabularyBookModel extends Model
{
    protected $DBGroup          = 'default';
-   protected $table            = 'vocabularybooks';
+   protected $table            = 'vocabulary_book';
    protected $primaryKey       = 'id';
    protected $useAutoIncrement = true;
    protected $insertID         = 0;
-   protected $returnType       = 'array';
+   protected $returnType       = VocabularyBookEntity::class;
    protected $useSoftDeletes   = false;
    protected $protectFields    = true;
-   protected $allowedFields    = [];
+   protected $allowedFields    = ['cool_your_fk_id', 'sentence'];

    // Dates
-   protected $useTimestamps = false;
+   protected $useTimestamps = true;
    protected $dateFormat    = 'datetime';
    protected $createdField  = 'created_at';
    protected $updatedField  = 'updated_at';
-   protected $deletedField  = 'deleted_at';

    // Validation
    protected $validationRules      = [];
    protected $validationMessages   = [];
    protected $skipValidation       = false;
    protected $cleanValidationRules = true;

    // Callbacks
    protected $allowCallbacks = true;
    protected $beforeInsert   = [];
    protected $afterInsert    = [];
    protected $beforeUpdate   = [];
    protected $afterUpdate    = [];
    protected $beforeFind     = [];
    protected $afterFind      = [];
    protected $beforeDelete   = [];
    protected $afterDelete    = [];
}
バックエンド側をつくる
controller
view()の第2引数(型はArray)が、キーを変数名としたものに変換されてView上の変数として定義される。テンプレートからのアクセスの際は $vocabulary_book のような形で参照する。
<?php
namespace App\Controllers;
use App\Models\VocabularyBookModel;
class Home extends BaseController
{
public function index()
{
// ここから
$vocabularyBook = new VocabularyBookModel();
$sentences = [];
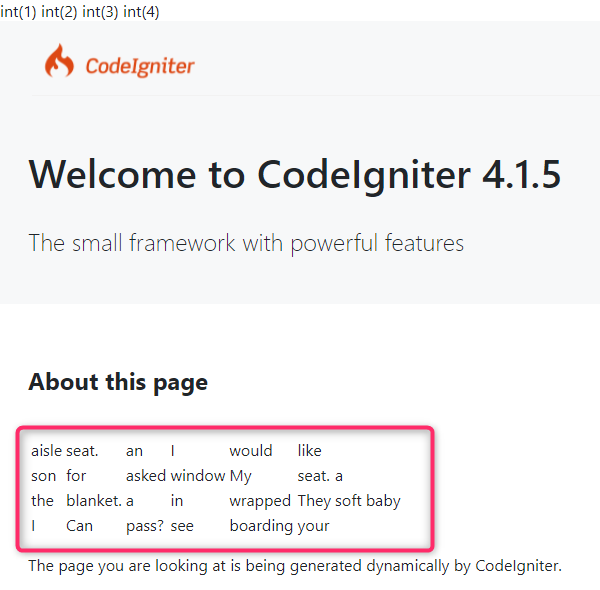
foreach ($vocabularyBook->findAll() as $row) {
var_dump($row->id); // entityに接続されているか(intになっているか)点検
$sentenceArray = explode(' ', $row->sentence);
shuffle($sentenceArray);
$sentences[] = $sentenceArray;
}
$data['vocabulary_book'] = $sentences;
// ここまで
- return view('welcome_message');
+ return view('welcome_message', $data);
}
}
html
<!DOCTYPE html>
<html lang="en">
<head>
 :
</head>
<body>
 :
    <h1>About this page</h1>

    <!--ここから-->
    <table>
        <tbody>
        <?php
        if (!empty($vocabulary_book)) {
            foreach ($vocabulary_book as $item): ?>
                <tr>
                    <?php foreach ($item as $td): ?>
                        <td><?= $td ?></td>
                    <?php endforeach;?>
                </tr>
            <?php endforeach;
        } ?>
        </tbody>
    </table>
    <!--ここまで-->

    <p>The page you are looking at is being generated dynamically by CodeIgniter.</p>
 :
</body>
</html>
確認

フロントエンド側をつくる
※(大ハマリ)publicフォルダにassetsフォルダを作成
dev\ci4> mkdir public/assets
フォーラム で質問して解決したけど、どうやらサーバーのルーティングには2段階あるようだ。まぁ言われてみればそうやな。
First, the web server looks for paths in the DOCUMENT_ROOT (public directory) and if it doesn’t find it, then it passes control to php.
まず、WebサーバーはDOCUMENT_ROOT(パブリックディレクトリ)でパスを探し、見つからない場合は、制御をphpに渡します。
If you have a /public/school directory, then when you go to the address
http://localhost/school, the web server will try to read it. So in your case, I would recommend changing the paths.
/public/assets/school
/public/assets/home
/public/schoolディレクトリがある場合、アドレス
http//localhost/schoolにアクセスすると、Webサーバーはそれを読み取ろうとします。したがって、あなたの場合は、パスを変更することをお勧めします。
The web server first of all looks for the directory or file specified in the URL. By default, if a file or directory is not found, the server generates a 404 error. For software routing to work, instructions are prescribed to the web server to redirect the processing of requests to the front controller in the absence of a file or directory. Absolutely all frameworks work on this principle.
Webサーバーはまず、URLで指定されたディレクトリまたはファイルを探します。デフォルトでは、ファイルまたはディレクトリが見つからない場合、サーバーは404エラーを生成します。ソフトウェアルーティングが機能するために、ファイルまたはディレクトリがない場合に要求の処理をフロントコントローラーにリダイレクトするようにWebサーバーに指示が規定されています。絶対にすべてのフレームワークがこの原則に基づいて機能します。
html
<!DOCTYPE html>
<html lang="en">
<head>
<meta charset="UTF-8">
<title>Welcome to CodeIgniter 4!</title>
<meta name="description" content="The small framework with powerful features">
<meta name="viewport" content="width=device-width, initial-scale=1.0">
<link rel="shortcut icon" type="image/png" href="/favicon.ico"/>
<!-- for bootstrap -->
<link href="https://cdn.jsdelivr.net/npm/bootstrap@5.0.0-beta1/dist/css/bootstrap.min.css" rel="stylesheet" integrity="sha384-giJF6kkoqNQ00vy+HMDP7azOuL0xtbfIcaT9wjKHr8RbDVddVHyTfAAsrekwKmP1" crossorigin="anonymous">
<!-- for css -->
<link rel="stylesheet" href="assets/css/index.css">
<!-- fontawesome -->
<link href="https://use.fontawesome.com/releases/v5.6.1/css/all.css" rel="stylesheet">
</head>
<body>
<div class="jumbotron">
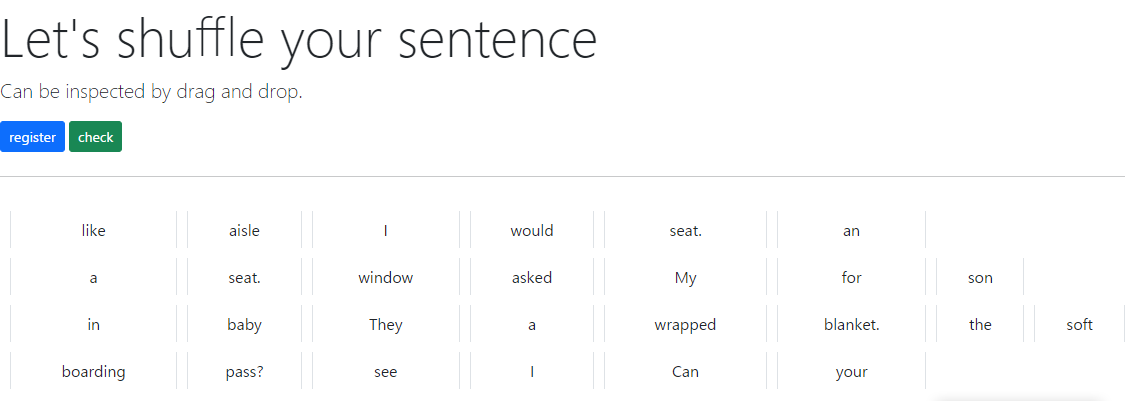
<h1 class="display-4">Let's shuffle your sentence</h1>
<p class="lead">Can be inspected by drag and drop.</p>
<a class="btn btn-primary btn-sm" href="#" role="button">register</a>
<a class="btn btn-success btn-sm" href="#" role="button">check</a>
<hr class="my-4">
</div>
<table class="table table-bordered">
<tbody>
<?php
if (isset($vocabulary_book)) {
foreach ($vocabulary_book as $item): ?>
<tr class="sortable correct">
<?php foreach ($item as $td): ?>
<td><?= $td ?></td>
<?php endforeach;?>
</tr>
<?php endforeach;
} ?>
</tbody>
</table>
<!-- for bootstrap -->
<script src="https://cdn.jsdelivr.net/npm/bootstrap@5.0.0-beta1/dist/js/bootstrap.bundle.min.js" integrity="sha384-ygbV9kiqUc6oa4msXn9868pTtWMgiQaeYH7/t7LECLbyPA2x65Kgf80OJFdroafW" crossorigin="anonymous"></script>
<!-- for drug and drop -->
<script src="https://code.jquery.com/jquery-3.4.1.min.js"></script>
<script src="https://code.jquery.com/ui/1.12.0/jquery-ui.js"></script>
<!-- my script -->
<script src="assets/js/script.js"></script>
</body>
</html>
css
table.table {
    border-collapse:separate;
    border-spacing: 10px 10px;
    text-align: center;
}
.correct:before {
    font-family: "Font Awesome 5 Free";
    font-size: 2.5em;
    content: '\f058';
    font-weight: 900;
}
js
$(function() {
    $(".sortable").sortable();
    $(".sortable").disableSelection();
    $("#submit").click(function() {
        var listIds = $(".sortable").sortable("toArray");
        $("#list-ids").val(listIds);
        $("form").submit();
    });
});
確認
リッチになったね。英単語をドラッグ・アンド・ドロップできる
phpcs
    "require-dev": {
        "fakerphp/faker": "^1.9",
        "mikey179/vfsstream": "^1.6",
        "phpunit/phpunit": "^9.1",
+       "squizlabs/php_codesniffer": "*"
    },
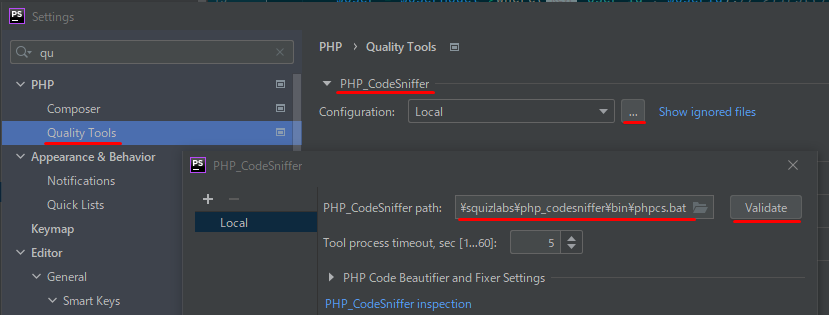

C:\Users\yoshi\AppData\Roaming\Composer\vendor\squizlabs\php_codesniffer\bin\phpcs.bat
ログイン機能
      :
    "require": {
        "php": "^7.3 || ^8.0",
        "codeigniter4/framework": "^4",
+       "myth/auth": "*"
    },
      :
      :
+   use Myth\Auth\Authentication\Passwords\ValidationRules;
      :
    public $ruleSets = [
          :
+       ValidationRules::class,
    ];
      :
      :
+   use Myth\Auth\Collectors\Auth;
      :
    public $collectors = [
          :
+       Auth::class
    ];
      :
      :
+   use Myth\Auth\Filters\LoginFilter;
+   use Myth\Auth\Filters\PermissionFilter;
+   use Myth\Auth\Filters\RoleFilter;
      :
    public $aliases = [
          :
+       'login'         => LoginFilter::class,
+       'role'          => RoleFilter::class,
+       'permission'    => PermissionFilter::class,
    ];
      :
ログインページ割り込み場所の設定
こうすると、ドキュメントルートに入った瞬間にログインページが出てくる
-   public $filters = [];
+   public $filters = ['login' => ['before' => ['/']],];
いっぽうで、以下のようにすると、ニュース用のアプリとしてつくった news/ ページ配下でログインページが出てくる。通常はこっちに設定する(いきなり「名前を言え!」なんていわれたら高圧的だから、会社だけで使うツールでもないかぎりは、誰でも着地できるページは作るべきだ)
-   public $filters = [];
+   public $filters = ['login' => ['before' => ['news/*']],];
ルート処理キュー
モジュールを操作するときに、アプリケーションのルートにワイルドカードが含まれていると問題が発生する可能性があります。そうすると、モジュールルートが正しく処理されなくなります。この問題は、priorityオプションを使用してルート処理の優先度を下げることで解決できます。このパラメーターは、正の整数とゼロを受け入れます。「priority」で指定された数値が大きいほど、処理キューのルート優先度は低くなります。
  /*
   * --------------------------------------------------------------------
   * Router Setup
   * --------------------------------------------------------------------
   */
    :
+ $routes->setPrioritize();

/*
 * --------------------------------------------------------------------
 * Route Definitions
 * --------------------------------------------------------------------
 */
  $routes->get('/', 'Home::index');
+ $routes->get('(:any)', 'Pages::view/$1', ['priority' => 1]);
マイグレーション
マイグレーションを実行して必要なテーブルを作成
$ php spark migrate -n 'Myth\Auth'
- auth_activation_attempts
- auth_groups
- auth_groups_permissions
- auth_groups_users
- auth_logins
- auth_permissions
- auth_reset_attempts
- auth_tokens
- auth_users_permissions
- users
-- 例えば users テーブルはこんなつくり
CREATE TABLE `users` (
  `id` int unsigned NOT NULL AUTO_INCREMENT,
  `email` varchar(255) NOT NULL,
  `username` varchar(30) DEFAULT NULL,
  `password_hash` varchar(255) NOT NULL,
  `reset_hash` varchar(255) DEFAULT NULL,
  `reset_at` datetime DEFAULT NULL,
  `reset_expires` datetime DEFAULT NULL,
  `activate_hash` varchar(255) DEFAULT NULL,
  `status` varchar(255) DEFAULT NULL,
  `status_message` varchar(255) DEFAULT NULL,
  `active` tinyint(1) NOT NULL DEFAULT '0',
  `force_pass_reset` tinyint(1) NOT NULL DEFAULT '0',
  `created_at` datetime DEFAULT NULL,
  `updated_at` datetime DEFAULT NULL,
  `deleted_at` datetime DEFAULT NULL,
  PRIMARY KEY (`id`),
  UNIQUE KEY `email` (`email`),
  UNIQUE KEY `username` (`username`)
) ENGINE=InnoDB DEFAULT CHARSET=utf8;
アカウントを作る
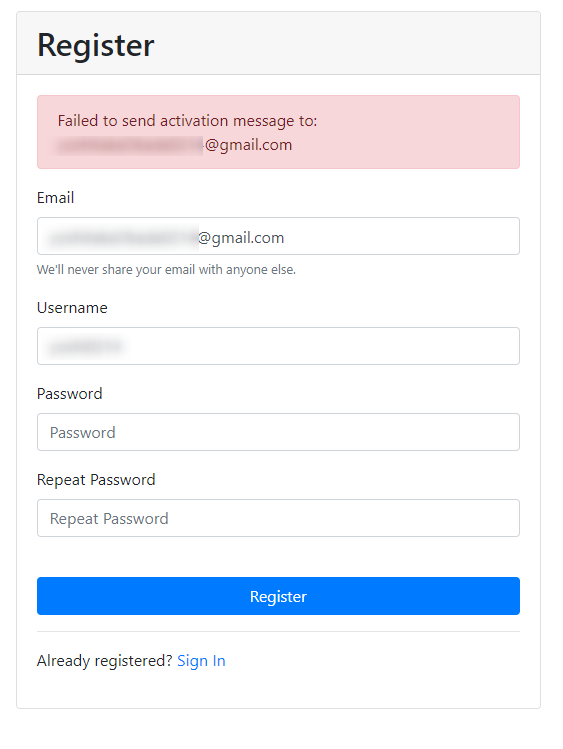
ログインページが割り込んでくるページに移動するとログイン画面が表示され、アカウントを作る画面(Need an account?)にも移動できるので、アカウントを作ろう。しかし、メールは送ることができない ![]()
SMTPの設定が必要だ
SMTPの設定
.env で、キーワード(この例では email)と入力すると、app\Config\Email.php の値を書き換えることができるようだ。えぇこと聞いたわ
  :
+ #----------
+ # Email
+ #----------
+ email.fromEmail = admin@example.jp
+ email.fromName = 'Admin User'
+ email.protocol = smtp
+ email.SMTPHost = smtp.googlemail.com
+ email.SMTPUser = xxxxxxxxxxx@gmail.com
+ email.SMTPPass = xxxxxxxxxxx
+ email.SMTPPort = 465
+ email.SMTPTimeout = 60
+ email.SMTPCrypto = ssl
+ email.mailType = html
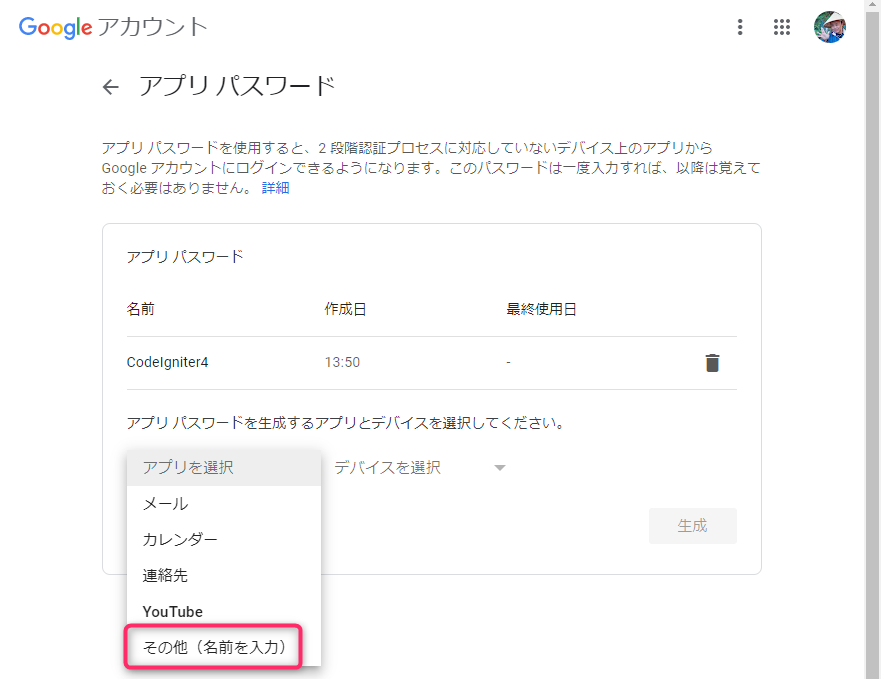
アプリ用パスワードを発行する
メール関連のノウハウサイトを見てると「安全性の低いアプリ」の許可をすることでメールを送っていることが多い。が、2022年5月末以降は、許可すること自体ができなくなるので、アプリケーション用のパスワードを発行することで対応することにした。
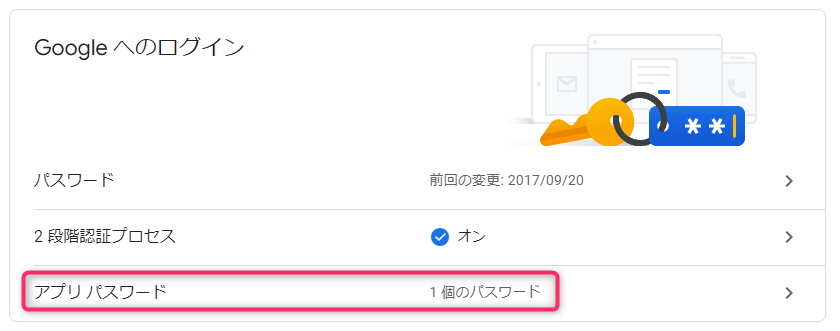
CodeIgniter4用のパスワードを作成し、生成されたパスワードをコピーする。
生成されたパスワードをこの変数に置き換えるとメールを送信できた。
+ email.SMTPPass = xxxxxxxxxxx
ログイン機能を作ったあとに
例えば学校管理システムを作るような場合は、ログインユーザと学校が紐づかないので、承認管理画面を作る必要があると思う(学校のメールアドレス一覧をもらう想定をすればいいと思う)
カスタマイズ:ユーザー登録時のバリデーションをいじる
Myth/Authはデフォルトで便利なんだが、じつは Username に日本語を使用できない。これは学校管理システムを作るような場合はちと辛い(ローマ字の名前なんて何にも使えないから![]() )
)
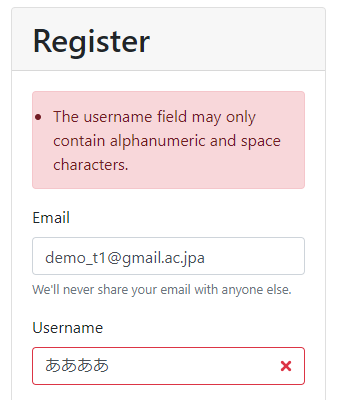
フォーラムでいろいろと相談してみた が、Myth/Auth のカスタマイズで「英数字縛り」を解除できるようだ。
- 現在の状態を知る
php spark routesを実行すると、[POST]registerのHandlerは\Myth\Auth\Controllers\AuthControllerに向いていることがわかる。これはどこを見ているかというとvendor/myth/auth/src/Controllers/AuthController.php、つまりvendorフォルダ(=git管理外)を見ている。
dev\ci4> php spark routes

  CodeIgniter v4.1.9 Command Line Tool - Server Time:
  2022-05-04 12:28:17 UTC+09:00
  +--------+-------------------------------------------+---------------------------------------------------------------+
  | Method | Route                                     | Handler                                                       |
  +--------+-------------------------------------------+---------------------------------------------------------------+
  | GET    | /                                         | \App\Controllers\HomeController::index                        |
   :
  | GET    | login                                     | \Myth\Auth\Controllers\AuthController::login
  | GET    | logout                                    | \Myth\Auth\Controllers\AuthController::logout                 |
  | POST   | register                                  | \Myth\Auth\Controllers\AuthController::attemptRegister               |
- Myth/Auth のカスタマイズでコントローラとモデルを
vendorフォルダからコピーしてくる
dev\ci4> php spark auth:publish

  CodeIgniter v4.1.9 Command Line Tool - Server Time: 2022-05-04 13:25:58 UTC+09:00
  Publish Migration? [y, n]: n
  Publish Models? [y, n]: y
    Created: Models/LoginModel.php   ←(注目)
    Created: Models/UserModel.php    ←(注目)
  Publish Entities? [y, n]: y
    Created: Entities/User.php    ←(注目)
  Publish Controller? [y, n]: y
    Created: Controllers/AuthController.php   ←(注目)
  Publish Views? [y, n]: n
  Publish Filters? [y, n]: n
  Publish Config file? [y, n]: n
  Publish Language file? [y, n]: n
- つぎに、
[POST]registerの向き先を変える
$routes->get('/', 'HomeController::index', ['as' => 'home']);
 :
+ $routes->post('register', 'AuthController::attemptRegister');
- 確認する
php spark routesを実行すると、registerのHandlerは\App\Controllers\AuthControllerに向いている
dev\ci4> php spark routes

  CodeIgniter v4.1.9 Command Line Tool - Server Time:
  2022-05-04 12:28:17 UTC+09:00
  +--------+-------------------------------------------+---------------------------------------------------------------+
  | Method | Route                                     | Handler                                                       |
  +--------+-------------------------------------------+---------------------------------------------------------------+
  | GET    | /                                         | \App\Controllers\HomeController::index                        |
   :
  | GET    | login                                     | \Myth\Auth\Controllers\AuthController::login
  | GET    | logout                                    | \Myth\Auth\Controllers\AuthController::logout                 |
  | POST   | register                                  | \App\Controllers\AuthController::register               |
- つぎに、コントローラから
alpha_numeric_space除外する
    /**
     * Attempt to register a new user.
     */
    public function attemptRegister()
    {
        // Check if registration is allowed
        if (! $this->config->allowRegistration) {
            return redirect()->back()->withInput()->with('error', lang('Auth.registerDisabled'));
        }

        $users = model(UserModel::class);

        // Validate basics first since some password rules rely on these fields
        $rules = [
-           'username' => 'required|alpha_numeric_space|min_length[3]|max_length[30]|is_unique[users.username]',
+           'username' => 'required|min_length[3]|max_length[30]|is_unique[users.username]',
            'email'    => 'required|valid_email|is_unique[users.email]',
        ];
     :
- つぎに、モデルから
alpha_numeric_space除外する
   :
    protected $validationRules = [
        'email'         => 'required|valid_email|is_unique[users.email,id,{id}]',
-       'username'      => 'required|alpha_numeric_space|min_length[3]|max_length[30]|is_unique[users.username,id,{id}]',
+       'username'      => 'required|min_length[3]|max_length[30]|is_unique[users.username,id,{id}]',
        'password_hash' => 'required',
    ];
   :
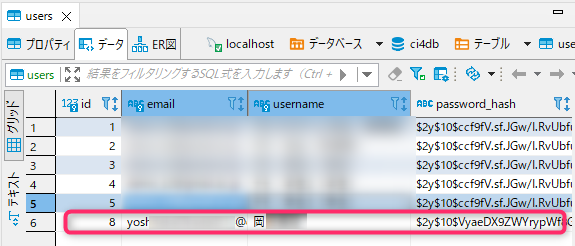
できた!
Xdebug
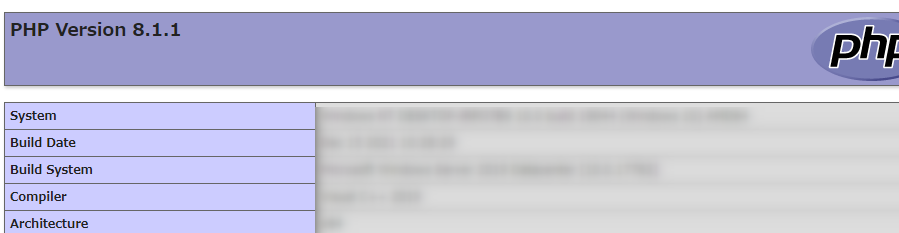
phpinfo()のhtmlを手に入れる
class HomeController extends BaseController
{
    /**
     * @return string
     */
    public function index(): string
    {
        return phpinfo();
    }
<!DOCTYPE html PUBLIC "-//W3C//DTD XHTML 1.0 Transitional//EN" "DTD/xhtml1-transitional.dtd">
<html xmlns="http://www.w3.org/1999/xhtml"><head>
  :
phpinfo()のhtmlを貼り付ける
https://xdebug.org/wizard
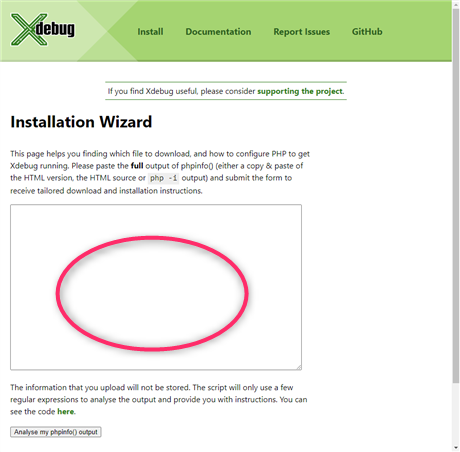
まぁそのままだけd
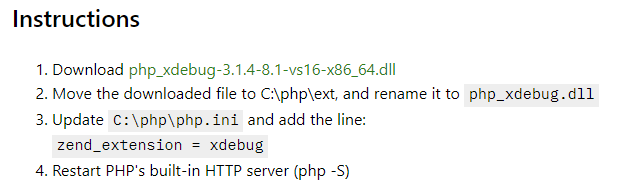
-
dllをダウンロード -
C:\php\extに移動して、php_xdebug.dllにリネーム -
php.ini L953のコメントを外してzend_extension=xdebugに変更
Xdebug を有効にするには、php.ini ファイルで [xdebug] セクションを見つけるか作成して、次のように更新します。
- ;zend_extension=opcache

+ [xdebug]
+ zend_extension="C:\php\ext\php_xdebug.dll"
+ xdebug.mode=debug
+ xdebug.client_host=localhost
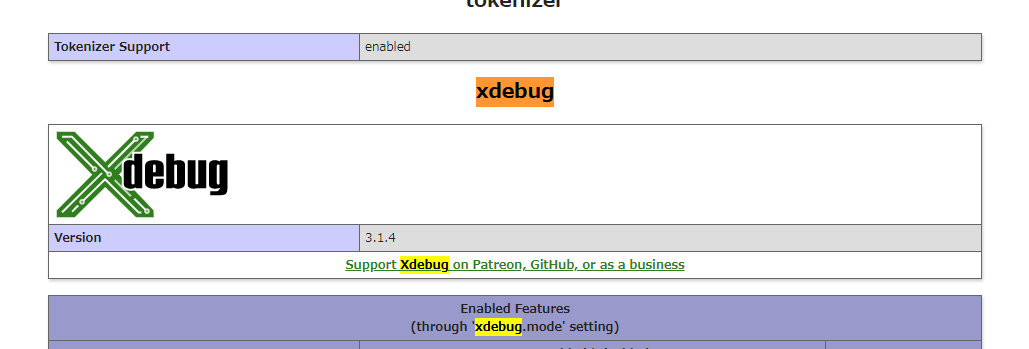
Xdebug のインストールを確認
dev\ci4> php --version
  PHP 8.1.1 (cli) (built: Dec 15 2021 10:31:43) (ZTS Visual C++ 2019 x64)
  Copyright (c) The PHP Group
  Zend Engine v4.1.1, Copyright (c) Zend Technologies
    with Xdebug v3.1.4, Copyright (c) 2002-2022, by Derick Rethans
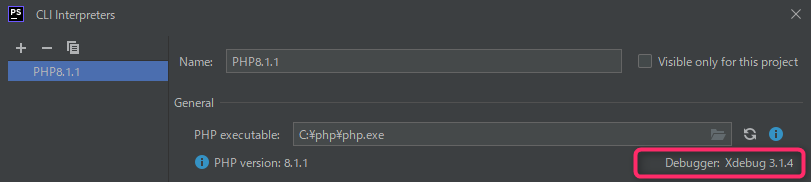
ブレークポイントを仕掛けて止まることを確認

その他の処理を作る
Slackと連携する
バッチ処理をつくる