はじめに
MSのPowerPlatformやServiceNowなど、インフラを意識せずアプリを開発できるローコード開発が一般的になってきています。今回はAWSの世界でローコード開発を実現するサービスであるAWS Amplifyを使って、簡単にWebアプリを作る方法を紹介します。
AWS Amplifyを使用することで、以下が実現できます。
- AWS Cognitoを用いてユーザ認証を行う
- AWS AppSyncを介してDynamoDBからデータを取得する
※今回の記事では技術紹介のためにシンプルな構成を取っています。実際のサービスで利用する場合、必要に応じて多要素認証の有効化や管理ユーザのみ新規登録が可能にする設定の有効化をするようにしてください。
アーキテクチャ
- Amplify CLI: v10.6.2
- Frontend: Next.js v13
- 認証: AWS Cognito
- バックエンド: AppSync & DynamoDB

Amplify初期設定
以下の手順に沿ってAmplifyの初期設定を行う。
- Amplify Dev Centerの情報参考にamplify cliのインストールとamplifyアプリの登録を行う。
# Next.jsのブランクプロジェクト作成 npx create-next-app@latest next-amplified --no-app cd next-amplified # amplifyアプリ初期登録 (選択肢はデフォルトでOK。AWS profileだけは最初に設定しておく必要あり) amplify init # authカテゴリを追加し、AWS Cognitoを構築する amplify add auth ## 以下を選択していく ## Do you want to use the default authentication and security configuration? > Default configuration ## How do you want users to be able to sign in? > Username ## Do you want to configure advanced settings? > No, I am done. # apiカテゴリを追加し、AWS AppSyncとDynamoDBテーブルを構築する amplify add api ## 以下を選択していく ## ? Select from one of the below mentioned services: GraphQL ## ? Here is the GraphQL API that we will create. Select a setting to edit or continue Authorization modes: API key (default, expiration time: 7 days from now) ## ? Choose the default authorization type for the API: Amazon Cognito User Pool ## ? Configure additional auth types? No ## ? Here is the GraphQL API that we will create. Select a setting to edit or continue: Continue ## ? Choose a schema template: Blank Schema ## Do you want to edit the schema now? (Y/n) · yes - amplify/backend/api/nextamplified/schema.graphqlが開くので、中身を下記のように変更する。
このモデルを元にAppSyncのGraphQL APIの定義とDynamoテーブルが作成される。type Todo @model @auth(rules: [{ allow: private, provider: userPools }]) { id: ID! @primaryKey description: String! } - ローカルの変更をリモートのamplifyアプリへ反映する。
これにより、AWS amplifyがCognito、AppSync、Dynamoテーブルを作成する。amplify push ## ? Are you sure you want to continue? > Yes ## 以下を選択していく ## ? Do you want to generate code for your newly created GraphQL API > Yes ## ? Choose the code generation language target > typescript ## ? Enter the file name pattern of graphql queries, mutations and subscriptions > src\graphql\**\*.ts ## ? Do you want to generate/update all possible GraphQL operations - queries, mutations and subscriptions > Yes ## ? Enter maximum statement depth [increase from default if your schema is deeply nested] > 2 ## ? Enter the file name for the generated code > src\API.ts
アプリ実装
- パッケージのインストール
フロントエンドアプリ開発に必要なamplify関連ライブラリをインストールするnpm install --save amplify @aws-amplify/ui-react @aws-amplify/api - pages/index.tsxの中身を以下のように差し替える。
import { API, Amplify, graphqlOperation } from 'aws-amplify';
import '@aws-amplify/ui-react/styles.css';
import { Button, TextField, useAuthenticator, withAuthenticator } from '@aws-amplify/ui-react';
import { GraphQLQuery } from '@aws-amplify/api';
import { listTodos } from '@/src/graphql/queries';
import { Todo, ListTodosQuery, CreateTodoMutation, CreateTodoInput } from '@/src/API';
import { useEffect, useState } from 'react';
import { createTodo } from '@/src/graphql/mutations';

import awsconfig from '@/src/aws-exports';
Amplify.configure(awsconfig);

const HomePage = () => {
  const { user, signOut } = useAuthenticator((context) => [context.user]);
  const [ todos, setTodos ] = useState<(Todo | null)[] | undefined>();
  const [ description, setDescription ] = useState<string>("");

  const getTodos = async () => {
    const result = await API.graphql<GraphQLQuery<ListTodosQuery>>(graphqlOperation(listTodos));
    const todos = result.data?.listTodos?.items;
    setTodos(todos);
  }

  useEffect(() => {
    getTodos();
  }, [])

  const addTodo = async () => {
    const todo: CreateTodoInput = { description: description };
    await API.graphql<GraphQLQuery<CreateTodoMutation>>(graphqlOperation(createTodo, { input: todo }));
    getTodos();
  }

  return (
    <>
      <h1>Hello {user?.username}</h1>
      <div>
        <Button onClick={signOut}>Sign out</Button>
        <TextField label="Todo内容" value={description} onChange={(e) => setDescription(e.target.value)}></TextField>
        <Button onClick={addTodo}>Todo追加</Button>
      </div>
      <div>
        <table>
          <thead>
            <tr>
              <th>ID</th>
              <th>Description</th>
            </tr>
          </thead>
          {todos?.map((todo, index) => (
            <tbody key={index}>
              <tr>
                <th>{todo?.id}</th>
                <th>{todo?.description}</th>
              </tr>
            </tbody>
          ))}
        </table>
      </div >
    </>
  )
};
export default withAuthenticator(HomePage);
アプリ動作確認
-
Next.jsのアプリを起動して、動作を確認する。
npm run dev -
ブラウザで http://localhost:3000/ にアクセスする。
-
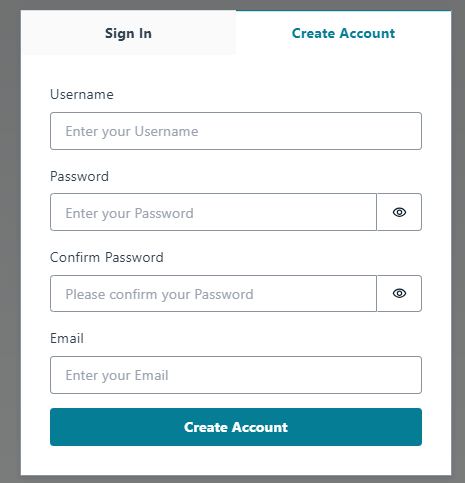
Create Accountを選択 -> ユーザ名、パスワード、メールアドレスを入力して新規アカウントを作成する。
(※メールアドレスに確認コードが送られるので正しいメールアドレスを入力すること)
-
メールアドレスに届いた確認コードを入力してサインインする。
-
サインアウトボタンを押して、サインアウトする。

-
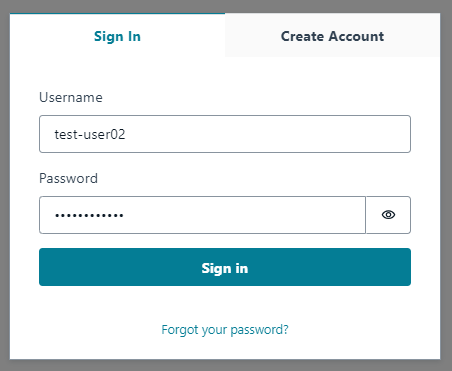
先ほど登録したユーザ名とパスワードを入力して再度サインインする。
-
Todo内容を入力後、「Todo追加」ボタンを押して、Todoリストに登録されたことを確認する。

AWS管理コンソールでの確認
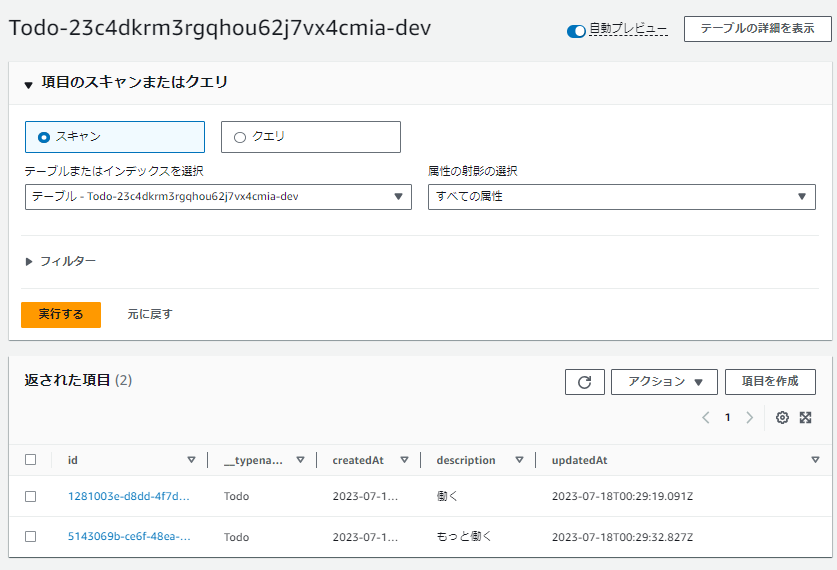
- DynamoDBのテーブルにて先ほど追加した項目が保存されていることが確認できる。
- Cognitoのユーザーとして先ほど新規登録したユーザが追加されていることが確認できる。

事後作業
以下を実行して作成した環境をすべて削除する。
amplify delete
? Are you sure you want to continue? This CANNOT be undone. (This will delete all the environments of the proj
ect from the cloud and wipe out all the local files created by Amplify CLI) > Yes