オリィ研究所(http://orylab.com/) の 椎葉です。
最近blenoを使う機会があったので遊んでみます。
bleno
Mac、Win、LinuxのマルチプラットフォームでBluetoothペリフェラル(デバイス側)の実装が行えるNode.jsのライブラリです。
MacではXCodeが、Winでは対応したBluetoothアダプタが必要と、実行できる環境が限られるので通常のElectronアプリケーションなんかではあまり実用的ではないものの、組み込み用途ではちゃんと機能します。
手元で動かすだけでも、Bluetoothでデバイスを横断しているとなんか楽しいです。
今回は1Keyboard(http://www.eyalw.com/1keyboard) のように、Mac側のキーボード入力で動作するiOSのカスタムキーボードを作ってみたいと思います。
bleno側準備
以下、OS Xでのみ実行を確認しています。
Node.jsプロジェクトを用意して、プロジェクトルートで
npm install bleno --save
します。これでblenoの準備は完了です。ビルドも済みます。
blenoクラス
libにbleno.coffeeとかを作ってblenoクラスを作ります。
bleno = null
readline = require 'readline'

class Bleno

  readLine: null
  stop: false

  constructor: ()->
    try
      # blenoはrequireが例外を吐く
      bleno = require 'bleno'
      @init()
    catch error
      bleno = null

  init: ()->
    name = 'BlenoKeyboard'
    serviceUuids = [ 'fff0' ]

    # Serviceの定義
    primaryService = new bleno.PrimaryService
      uuid: 'fff0'
      characteristics: [

        # Characteristicの定義
        new bleno.Characteristic
          uuid: 'fff1'
          properties: [
            'notify'
          ]

          # Notifyに登録された時
          onSubscribe: (maxValueSize, updateValueCallback)=>
            @stop = false
            @startInput updateValueCallback

          # Notifyが解除された時
          onUnsubscribe: ()=>
            @stopInput()
      ]

    # bluetoothデバイスの状態変化イベント
    bleno.on 'stateChange', (state) ->
      console.log 'stateChange: ' + state
      if state == 'poweredOn'
        bleno.startAdvertising name, serviceUuids, (error) ->
          if error
            console.error error
          return
      else
        # startする
        bleno.stopAdvertising()
      return

    # advertising startイベント
    bleno.on 'advertisingStart', (error) ->
      if !error
        console.log 'start advertising...'
        # Service設置
        bleno.setServices [ primaryService ]
      else
        console.error error
      return

  # コマンドライン入力を受け付けて送信する
  startInput: (valueCallback)->
    @readLine = readline.createInterface
      input: process.stdin
      output: process.stdout

    @readLine.question ">", (answer)=>
      if answer isnt ""
        data = Buffer.from answer, 'utf8'
        # iOSデバイスへ送信!
        valueCallback data
      @readLine.close()
      if @stop then return
      @startInput valueCallback

  # 入力を受け付けて送信する
  stopInput: ()->
    @stop = true
    if @readLine
      @readLine.close()
これをindex.jsから実行すればNode.js側の実装は完了です。
// 無いなら npm install coffee-script --save
require('coffee-script/register');

Bleno = require('./lib/bleno');
new Bleno();
試す
実行してみます。
node index.js
iOSデバイス側でうまく動作しているか確認します。
LightBlue Explorer( https://itunes.apple.com/us/app/lightblue-explorer-bluetooth/id557428110?mt=8 )をiOSデバイスにインストールして、Macや実行デバイスを探してみましょう。
見つかったら接続してnotificationsをサブスクライブします。Node.js側での入力が毎回送信されるか確認しましょう。
ここが動けばもう一息。
iOS側をSwiftで実装する
XCodeとSwift 3に移動して、iOSアプリ側を実装します。
一般的なカスタムキーボードに、CoreBluetoothを組み込んでNode.jsが実行されているデバイスと連携します。
deviceNameにLightBlueで見つかったデバイス名を入れます。自分のMacの名前になるはずです。
import UIKit
import CoreBluetooth

class KeyboardViewController: UIInputViewController, CBCentralManagerDelegate, CBPeripheralDelegate {

  @IBOutlet var nextKeyboardButton: UIButton!

  let deviceName = "Enter your Mac name"
  var centralManager: CBCentralManager!
  var peripheral: CBPeripheral!
  var characteristics = [CBCharacteristic]()

  override func updateViewConstraints() {
    super.updateViewConstraints()

    // Add custom view sizing constraints here
  }

  override func viewDidLoad() {
    super.viewDidLoad()
    self.centralManager = CBCentralManager(delegate: self, queue: nil)

    // Perform custom UI setup here
    self.nextKeyboardButton = UIButton(type: .system)

    self.nextKeyboardButton.setTitle(NSLocalizedString("Next Keyboard", comment: "Title for 'Next Keyboard' button"), for: [])
    self.nextKeyboardButton.sizeToFit()
    self.nextKeyboardButton.translatesAutoresizingMaskIntoConstraints = false

    self.nextKeyboardButton.addTarget(self, action: #selector(handleInputModeList(from:with:)), for: .allTouchEvents)

    self.view.addSubview(self.nextKeyboardButton)

    self.nextKeyboardButton.leftAnchor.constraint(equalTo: self.view.leftAnchor).isActive = true
    self.nextKeyboardButton.bottomAnchor.constraint(equalTo: self.view.bottomAnchor).isActive = true
  }

  override func viewWillAppear(_ animated: Bool) {
    super.viewWillAppear(animated)
    if self.centralManager.state == CBManagerState.poweredOn {
      self.centralManager.scanForPeripherals(withServices: nil, options: nil)
    }
  }
  override func viewWillDisappear(_ animated: Bool) {
    super.viewWillDisappear(animated)
    if let centralManager = self.centralManager {
      if centralManager.state == CBManagerState.poweredOn {
        if let peripheral = self.peripheral {
          if peripheral.state == CBPeripheralState.connected {
            centralManager.cancelPeripheralConnection(peripheral)
          }
        }
      }
    }
  }

  override func didReceiveMemoryWarning() {
    super.didReceiveMemoryWarning()
    // Dispose of any resources that can be recreated
  }

  override func textWillChange(_ textInput: UITextInput?) {
    // The app is about to change the document's contents. Perform any preparation here.
  }

  override func textDidChange(_ textInput: UITextInput?) {
    // The app has just changed the document's contents, the document context has been updated.
  }

  // MARK: - bluetooth

  func centralManagerDidUpdateState(_ central: CBCentralManager) {
    print("ble state: \(central.state)")
    if central.state == CBManagerState.poweredOn {
      print("ble state is on")
      self.centralManager.scanForPeripherals(withServices: nil, options: nil)
    }
  }

  func centralManager(_ central: CBCentralManager,
                      didDiscoverPeripheral peripheral: CBPeripheral,
                      advertisementData: [String : AnyObject],
                      RSSI: NSNumber) {
    print("ble peripheral: \(peripheral)")
    if peripheral.name == self.deviceName {
      if self.centralManager.state == CBManagerState.poweredOn {
        self.centralManager.stopScan()
      }

      self.peripheral = peripheral
      self.centralManager.connect(peripheral, options: nil)
      print("connecting peripheral...")
    }
  }

  func centralManager(_ central: CBCentralManager,
                      didConnect peripheral: CBPeripheral)
  {
    print("connected peripheral")
    self.peripheral.delegate = self
    self.peripheral.discoverServices(nil)
  }

  func peripheral(_ peripheral: CBPeripheral, didDiscoverServices error: NSError?) {
    if let error = error {
      print("error: \(error)")
      return
    }

    if let services = peripheral.services {
      if services.count > 0 {
        for service in services {
          if service.uuid.uuidString == "FFF0" {
            self.peripheral.discoverCharacteristics(nil, for: service)
          }
        }
      }
    }
  }
  func peripheral(_ peripheral: CBPeripheral, didDiscoverCharacteristicsForService service: CBService, error: NSError?) {
    if let error = error {
      print("error: \(error)")
      return
    }

    if let characteristics = service.characteristics {
      print("Found \(characteristics.count) characteristics! : \(characteristics)")
      self.characteristics = characteristics
      self.startNotice()
    }
  }

  func startNotice() {
    for characteristic in self.characteristics {
      if characteristic.uuid.uuidString == "FFF1" {
        print("start notice")
        self.peripheral.setNotifyValue(true, for: characteristic)
      }
    }
  }
  func stopNotice() {
    for characteristic in self.characteristics {
      if characteristic.uuid.uuidString == "FFF1" {
        print("stop notice")
        self.peripheral.setNotifyValue(false, for: characteristic)
      }
    }
  }
  func peripheral(_ peripheral: CBPeripheral, didUpdateValueForCharacteristic characteristic: CBCharacteristic, error: NSError?)
  {
    if let error = error {
      print("error: \(error)")
      return
    }

    print("get data, characteristic UUID: \(characteristic.uuid), value: \(characteristic.value)")
    if let data = characteristic.value {
      let inputText = String(data: data, encoding: .utf8)
      self.textDocumentProxy.insertText(inputText!)
    }
  }

  // MARK: - util

  func showAlertByMessage(message: String) {
    let alert: UIAlertController = UIAlertController(title: nil, message: message, preferredStyle: .alert)
    let okAction: UIAlertAction = UIAlertAction(title: "はい", style: .default) { action -> Void in
    }
    alert.addAction(okAction)
    self.present(alert, animated: true, completion: nil)
  }

}
Keyboardターゲットのinfo.plistでRequestsOpenAccessをYESにしたら準備完了です。
blenoとあわせて試す
Swift製のアプリをXCodeからデバイスに入れます。
キーボードの登録とフルアクセス許可を忘れないように行いましょう。
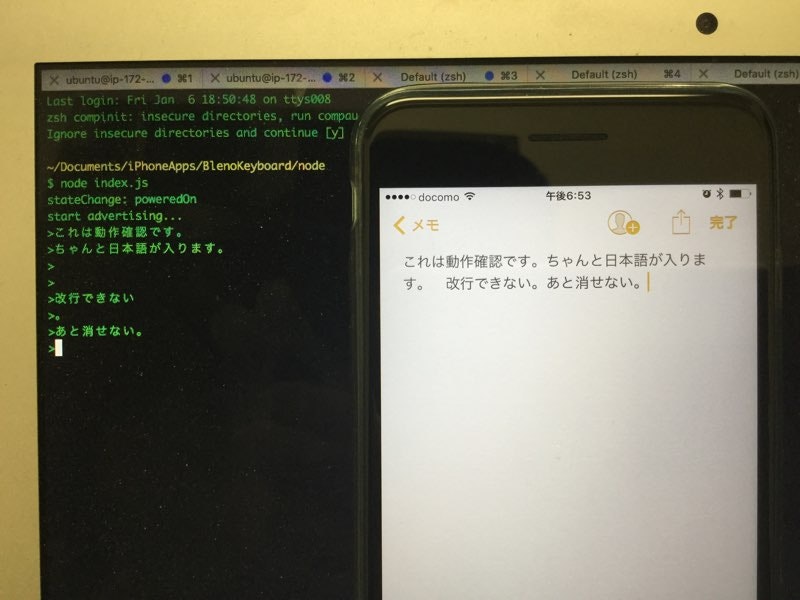
ちゃんと動く!
長文とかURLとかの入力がはかどりそう、と思いきや、このままでは改行できないしBSもないので使い物になりません。
また次回にでも調整を加えようかと思います。