はじめに
横河電機のエッジコントローラe-RT3 Plus F3RP70-2L1をAzure IoT認定デバイス2に登録する担当者として、Azure IoT Edgeについて勉強しました。
その内容を数回に分けてご紹介します。
今回はAzure IoT EdgeランタイムをインストールしたUbuntu 18.04搭載のエッジデバイスをIoT Hubへ接続してみます。
前回の記事はこちらです。
環境
動作確認したデバイス(OS)
- e-RT3 Plus F3RP70-2L(Ubuntu 18.04 32bit)
- Raspberry Pi 4 Model B (Ubuntu Server 18.04 32bit)
これらのデバイスでは armhf アーキテクチャのパッケージが動作します。
また、Windows 10 搭載のPCでデバイスを操作してIoT Edgeをインストールしています。
(前回の記事と同様です。)
Azure IoT Hubとは
Azure IoT Hubとは、クラウドとデバイスを繋いでIoTを実現するサービスです。
デバイスからクラウド、クラウドからデバイスの通信を安全にサポートしてくれます。
前回の記事でランタイムをインストールしたAzure IoT EdgeはAzure IoT Hubの中に含まれるサービスです。
詳しくはAzure IoT Hubのウェブサイトをご覧ください。
準備
IoT Edgeデバイスの追加
-
Azure Portalにサインインし、IoT Hubを選択します。
※IoT Hubの作成手順は前回の記事で紹介しています。 -
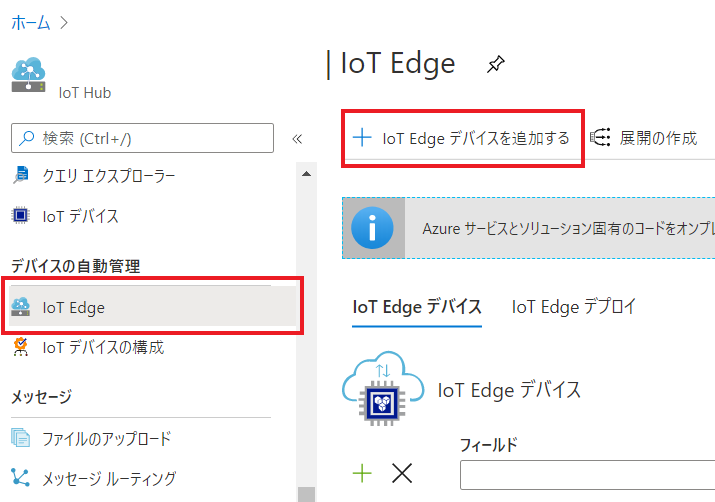
左側に表示されるメニューからデバイスの自動管理カテゴリの「IoT Edge」を探してクリックします。
右側の画面が切り替わるので、上部の「IoT Edgeデバイスを追加する」をクリックします。 -
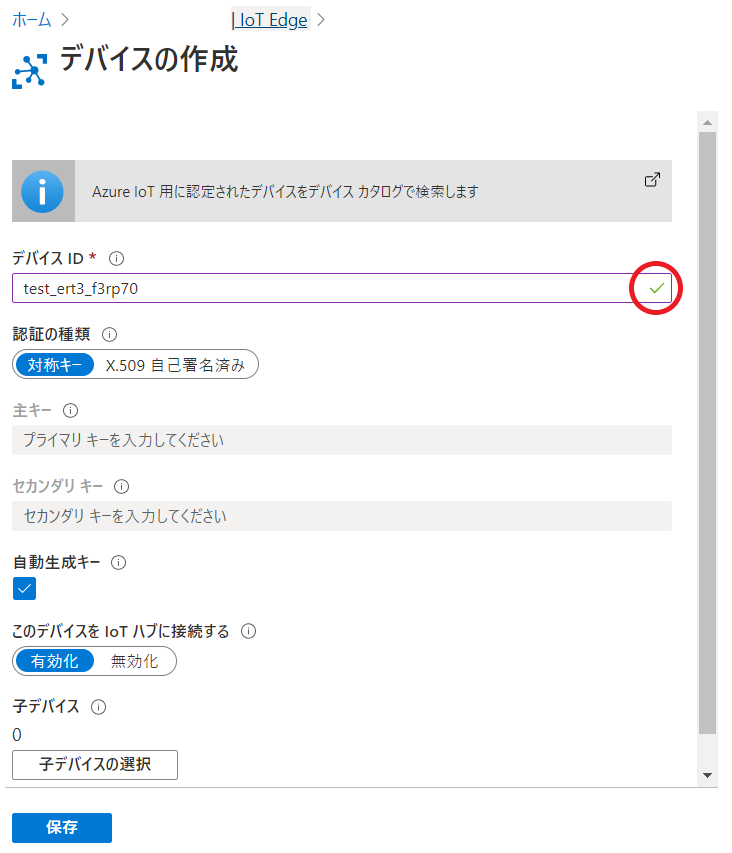
接続するデバイスの識別ができるような任意の名前を「デバイス ID」に入力します。
適切な名前の場合は図のように入力欄の右にチェックマークが付きます。
その他の項目は特に設定を変えずに、左下の「保存」ボタンを押してデバイスを追加します。 -
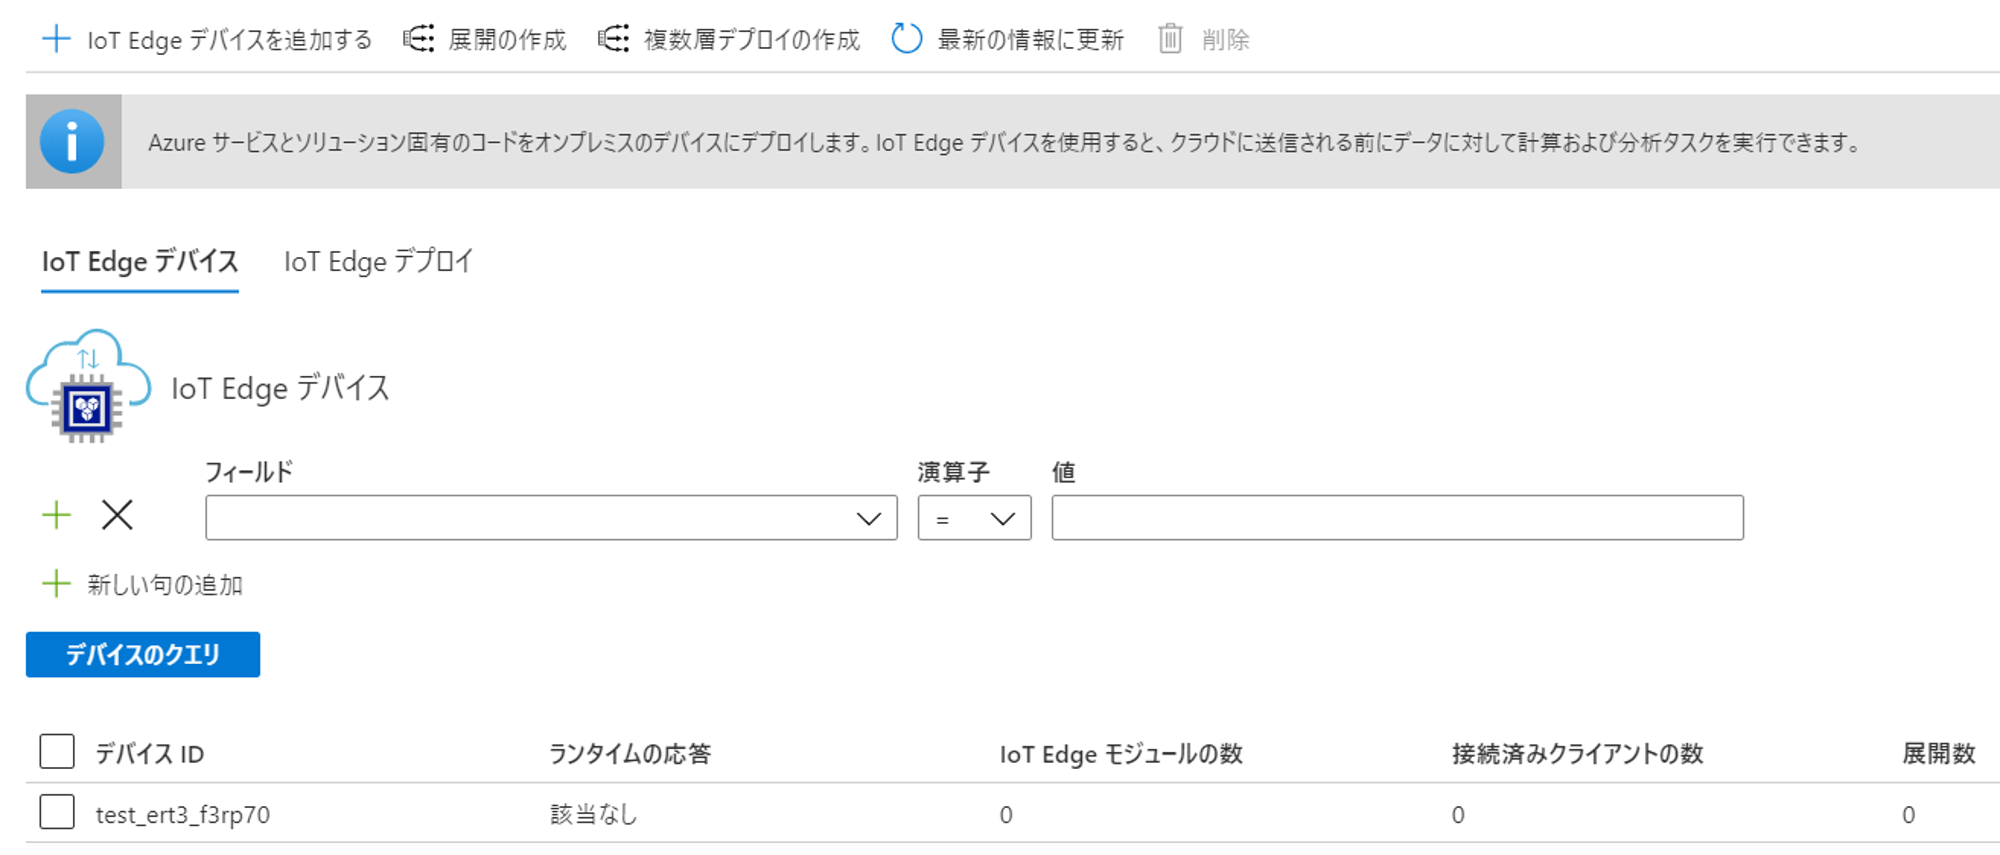
IoT Edgeのメニュー画面に戻り、IoT Edgeデバイスの一覧に作成したIDが追加されていることが確認できたら完了です。
デバイス接続文字列の取得
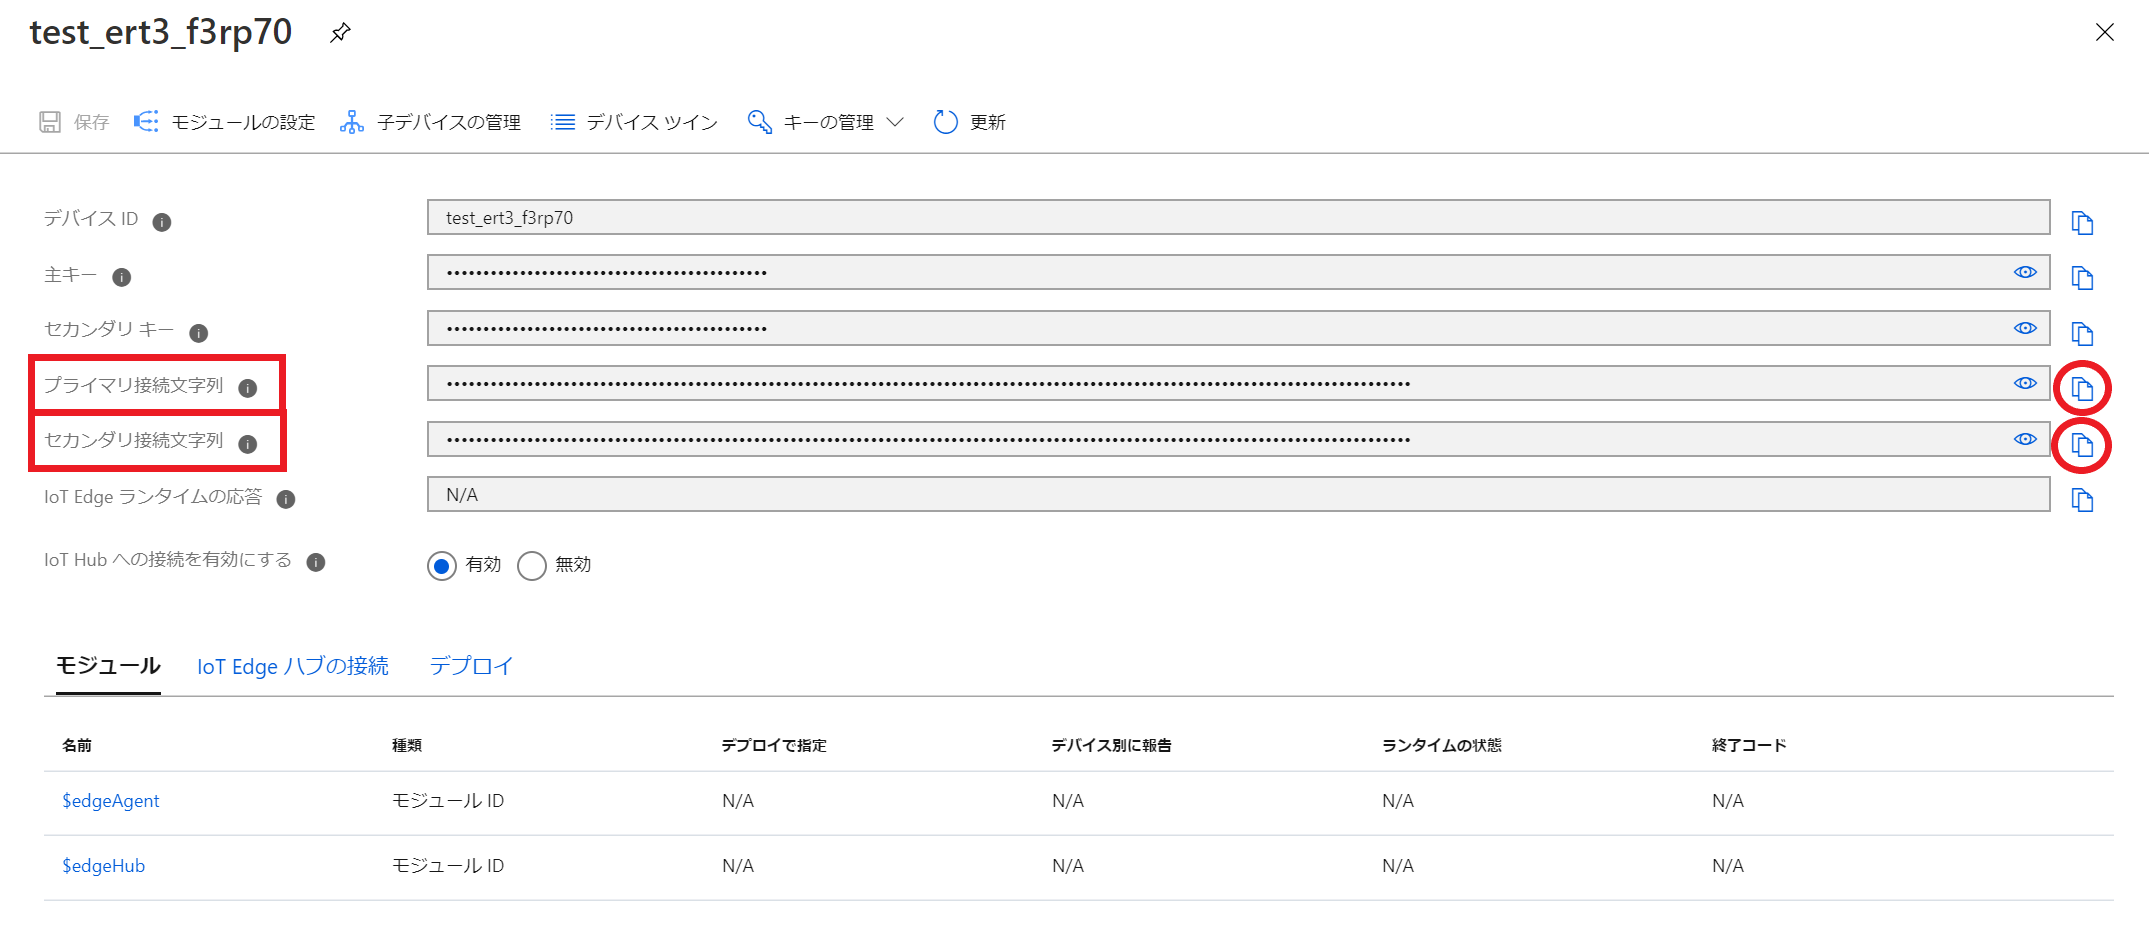
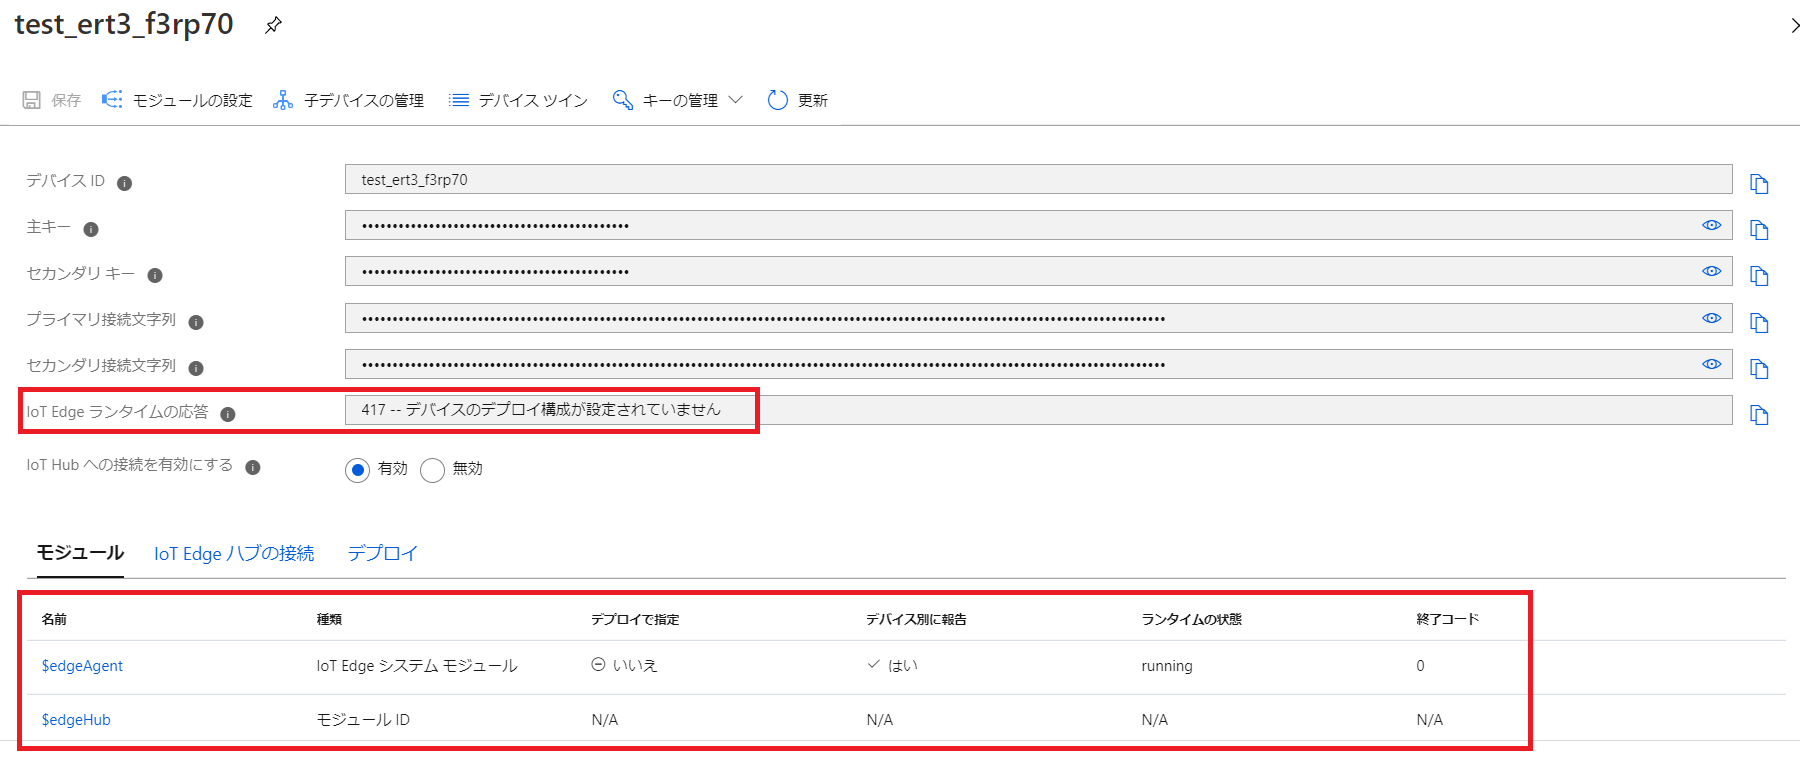
追加したIoT EdgeデバイスのIDをクリックすると、デバイスIDや各種キー、接続文字列が表示されます。
モジュール一覧中の「\$edgeAgent」と「\$edgeHub」はランタイムモジュールであり、必須のものです。
このページでプライマリ接続文字列またはセカンダリ接続文字列をコピーしておきます。
コピーは欄の中の文字を選択してコピーするか、右側のコピーマークをクリックします。
IoT Hubへの接続
基本的にはMicrosoft公式のドキュメント3に従いますが、こちらではARM 32bitデバイスでの手順に絞って説明します。
作業するディレクトリは特に問いません。
セキュリティデーモンを構成する
手動プロビジョニング の手順で接続します。
-
構成ファイル
/etc/iotedge/config.yamlを編集するために、書き込み権限を追加します。
デフォルトでは読み取り権限のみが追加されており書き込み権限がありません。# 一般ユーザusernameの場合 username@ubuntu:~$ ls -l /etc/iotedge/ total 16 -r-------- 1 iotedge iotedge 12355 Sep 2 08:38 config.yaml以下のコマンドで構成ファイルに書き込み権限を追加します。
sudo chmod +w /etc/iotedge/config.yaml書き込み権限が追加されていることが確認できます。
# 一般ユーザusernameの場合 username@ubuntu:~$ ls -l /etc/iotedge/ total 16 -rw------- 1 iotedge iotedge 12355 Sep 2 08:38 config.yaml -
構成ファイルを編集し、接続文字列を入力します。
こちらでは例としてviを使用します。sudo vi /etc/iotedge/config.yamlスクロールしていくと
Manual provisioning configurationの設定項目があります。/etc/iotedge/config.yaml# Manual provisioning configuration provisioning: source: "manual" device_connection_string: "<ADD DEVICE CONNECTION STRING HERE>"device_connection_stringに続く<ADD DEVICE CONNECTION STRING HERE>を先ほどコピーした接続文字列と置き換えます。
置き換えたら保存してエディタを終了します。/etc/iotedge/config.yaml# Manual provisioning configuration provisioning: source: "manual" device_connection_string: "HostName=xxxxxxxxxxxxxxxxxxxxx ... " -
構成ファイルから書き込み権限を削除します。
sudo chmod -w /etc/iotedge/config.yaml -
設定内容を反映するためにデーモンを再起動します。
sudo systemctl restart iotedge
※デーモンと構成ファイルへのProxy設定が必要な場合の説明が補足セクションにあります。
環境変数へのProxy設定やsudoers設定が必要な場合は前回の記事の補足セクションをご参照ください。
接続を確認する
IoT Edgeデーモンの状態を確認し、正しくインストールできているか確かめます。
IoT Edgeデーモンの状態の確認
以下のコマンドで確認します。
sudo systemctl status iotedge
正常に動作していると Active の項目に active (running) と表示されます。
# 一般ユーザusernameの場合
username@ubuntu:~$ sudo systemctl status iotedge
* iotedge.service - Azure IoT Edge daemon
   Loaded: loaded (/lib/systemd/system/iotedge.service; enabled; vendor preset: enabled)
   Active: active (running) since Mon 2020-09-07 05:32:40 UTC; 29min ago
     Docs: man:iotedged(8)
 Main PID: 16834 (iotedged)
    Tasks: 9 (limit: 2366)
   CGroup: /system.slice/iotedge.service
           `-16834 /usr/bin/iotedged -c /etc/iotedge/config.yaml

Sep 07 06:01:39 ubuntu iotedged[16834]: 2020-09-07T06:01:39Z [INFO] - [mgmt] - - - [2020-09-07 06:01:39.372585833 UTC] "GET /modules?api-version=2019-11-05 HTTP/1.1" 200 OK 449 "-" "-" auth_id(-)
Sep 07 06:01:44 ubuntu iotedged[16834]: 2020-09-07T06:01:44Z [INFO] - [mgmt] - - - [2020-09-07 06:01:44.404822115 UTC] "GET /modules?api-version=2019-11-05 HTTP/1.1" 200 OK 449 "-" "-" auth_id(-)
Sep 07 06:01:49 ubuntu iotedged[16834]: 2020-09-07T06:01:49Z [INFO] - [mgmt] - - - [2020-09-07 06:01:49.436505431 UTC] "GET /modules?api-version=2019-11-05 HTTP/1.1" 200 OK 449 "-" "-" auth_id(-)
Sep 07 06:01:54 ubuntu iotedged[16834]: 2020-09-07T06:01:54Z [INFO] - [mgmt] - - - [2020-09-07 06:01:54.463977736 UTC] "GET /modules?api-version=2019-11-05 HTTP/1.1" 200 OK 449 "-" "-" auth_id(-)
Sep 07 06:01:59 ubuntu iotedged[16834]: 2020-09-07T06:01:59Z [INFO] - [mgmt] - - - [2020-09-07 06:01:59.496214001 UTC] "GET /modules?api-version=2019-11-05 HTTP/1.1" 200 OK 449 "-" "-" auth_id(-)
Sep 07 06:02:04 ubuntu iotedged[16834]: 2020-09-07T06:02:04Z [INFO] - [mgmt] - - - [2020-09-07 06:02:04.530633743 UTC] "GET /modules?api-version=2019-11-05 HTTP/1.1" 200 OK 449 "-" "-" auth_id(-)
Sep 07 06:02:09 ubuntu iotedged[16834]: 2020-09-07T06:02:09Z [INFO] - [mgmt] - - - [2020-09-07 06:02:09.557680677 UTC] "GET /modules?api-version=2019-11-05 HTTP/1.1" 200 OK 449 "-" "-" auth_id(-)
Sep 07 06:02:10 ubuntu iotedged[16834]: 2020-09-07T06:02:10Z [INFO] - Checking edge runtime status
Sep 07 06:02:10 ubuntu iotedged[16834]: 2020-09-07T06:02:10Z [INFO] - Edge runtime is running.
Sep 07 06:02:14 ubuntu iotedged[16834]: 2020-09-07T06:02:14Z [INFO] - [mgmt] - - - [2020-09-07 06:02:14.586868553 UTC] "GET /modules?api-version=2019-11-05 HTTP/1.1" 200 OK 449 "-" "-" auth_id(-)
デーモンのログの確認
さらに情報が必要な場合はデーモンのログを以下のコマンドで確認できます。
sudo journalctl -u iotedge --no-pager --no-full
例えば以下のようになり、もし異常がある場合は [ERR!] 表示が確認できます。
但し、/etc/iotedge/config.yaml にデバイス接続文字列を入力して設定反映をするまでは、 [ERR!] - The daemon could not start up successfully: Edge device information is required. のエラーが表示されます。
# 一般ユーザusernameの場合
username@ubuntu:~$ sudo journalctl -u iotedge --no-pager --no-full
-- Logs begin at Mon 2020-08-24 02:34:41 UTC, end at Mon 2020-09-07 06:36:19 UTC. --
Aug 24 07:51:18 ubuntu systemd[1]: Started Azure IoT Edge daemon.
Aug 24 07:51:18 ubuntu iotedged[902]: 2020-08-24T07:51:18Z [INFO] - Starting Azure IoT Edge Security Daemon
Aug 24 07:51:18 ubuntu iotedged[902]: 2020-08-24T07:51:18Z [INFO] - Version - 1.0.9.4
Aug 24 07:51:18 ubuntu iotedged[902]: 2020-08-24T07:51:18Z [ERR!] - The daemon could not start up successfully: Edge device information is required.
Aug 24 07:51:18 ubuntu iotedged[902]: Please update the config.yaml and provide the IoTHub connection information.
Aug 24 07:51:18 ubuntu iotedged[902]: See https://aka.ms/iot-edge-configure-linux for more details.

...

Sep 07 06:36:10 ubuntu iotedged[16834]: 2020-09-07T06:36:10Z [INFO] - Checking edge runtime status
Sep 07 06:36:10 ubuntu iotedged[16834]: 2020-09-07T06:36:10Z [INFO] - Edge runtime is running.
Sep 07 06:36:12 ubuntu iotedged[16834]: 2020-09-07T06:36:12Z [INFO] - [mgmt] - - - [2020-09-07 06:36:12.545009355 UTC] "GET /modules?api-version=2019-11-05 HTTP/1.1" 200 OK 449 "-" "-" auth_id(-)
Sep 07 06:36:17 ubuntu iotedged[16834]: 2020-09-07T06:36:17Z [INFO] - [mgmt] - - - [2020-09-07 06:36:17.572296329 UTC] "GET /modules?api-version=2019-11-05 HTTP/1.1" 200 OK 449 "-" "-" auth_id(-)
トラブルシューティング機能
iotedge コマンドには構成ファイルのフォーマットやネットワーク接続等が正しくできているかを確認するトラブルシューティング機能が用意されています。
以下のコマンドを実行すると各項目に対してエラーがないか確認し、結果を表示します。
確認される各項目の詳細がGitHubで公開されているのでご参照ください。
sudo iotedge check
※この段階では 「$edgeAgent」 モジュールのみが実行されているため、 production readiness: Edge Hub's storage directory is persisted on the host filesystem - Error が表示されます。
最初のIoT Edgeモジュールをデバイスにデプロイするとこのエラーは無くなるので、現段階では無視します。
※Connectivity checksの各項目がすべてエラーの場合は接続に関する設定を見直す必要があります。
Proxy設定も併せてご確認ください。
Azureポータルでの確認
AzureポータルのIoT Edgeのページで接続状況を確認します。
先述したIoT Edgeデバイスの追加の手順でデバイス自動管理カテゴリの「IoT Edge」を探してクリックし、エッジデバイスを接続したデバイスIDをクリックします。
デバイスの各種情報が表示されます。
IoT Hubへ接続していなかった時には「IoT Edgeランタイムの応答」や下部のモジュールの情報のステータスは「N/A」でしたが、正常に接続されていると以下のようになります。
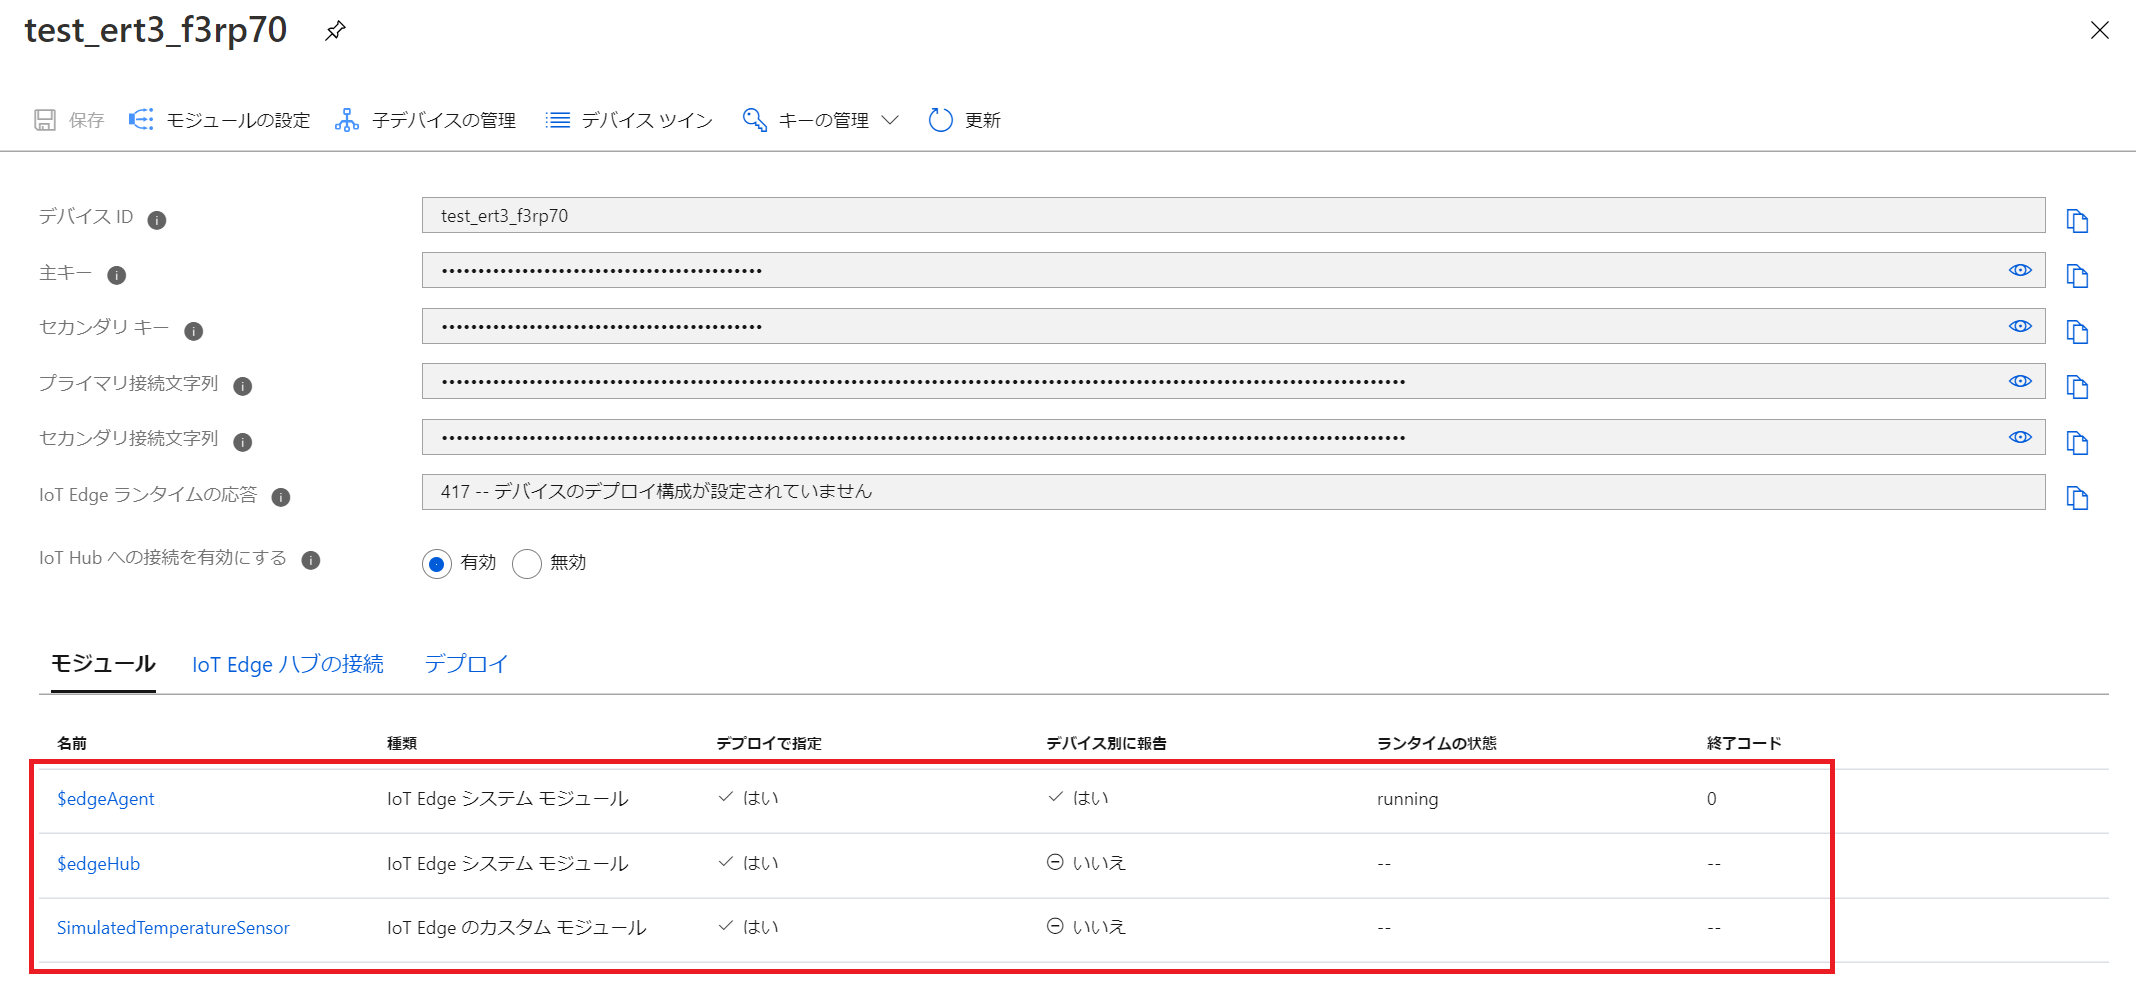
接続した直後は「IoT Edgeランタイムの応答」は「417 -- デバイスのデプロイ構成が設定されていません」となり、「$edgeAgent」モジュールのみが動作しています。
「$edgeHub」モジュールは最初のIoT Edgeモジュールをデプロイするときに一緒にデプロイされて動作を開始します。
サンプルモジュールのデプロイと動作確認
Microsoftが提供するサンプルモジュール「Simulated Temperature Sensor」をIoT Hubへ接続したデバイスにデプロイし、動作していることを確認します。
こちらでは、Azureポータルからの操作手順を紹介します。
サンプルモジュールのデプロイ
-
前項のAzureポータルでの確認で表示した、デバイスのページを開きます。
上部にある「モジュールの設定」ボタンをクリックします。 -
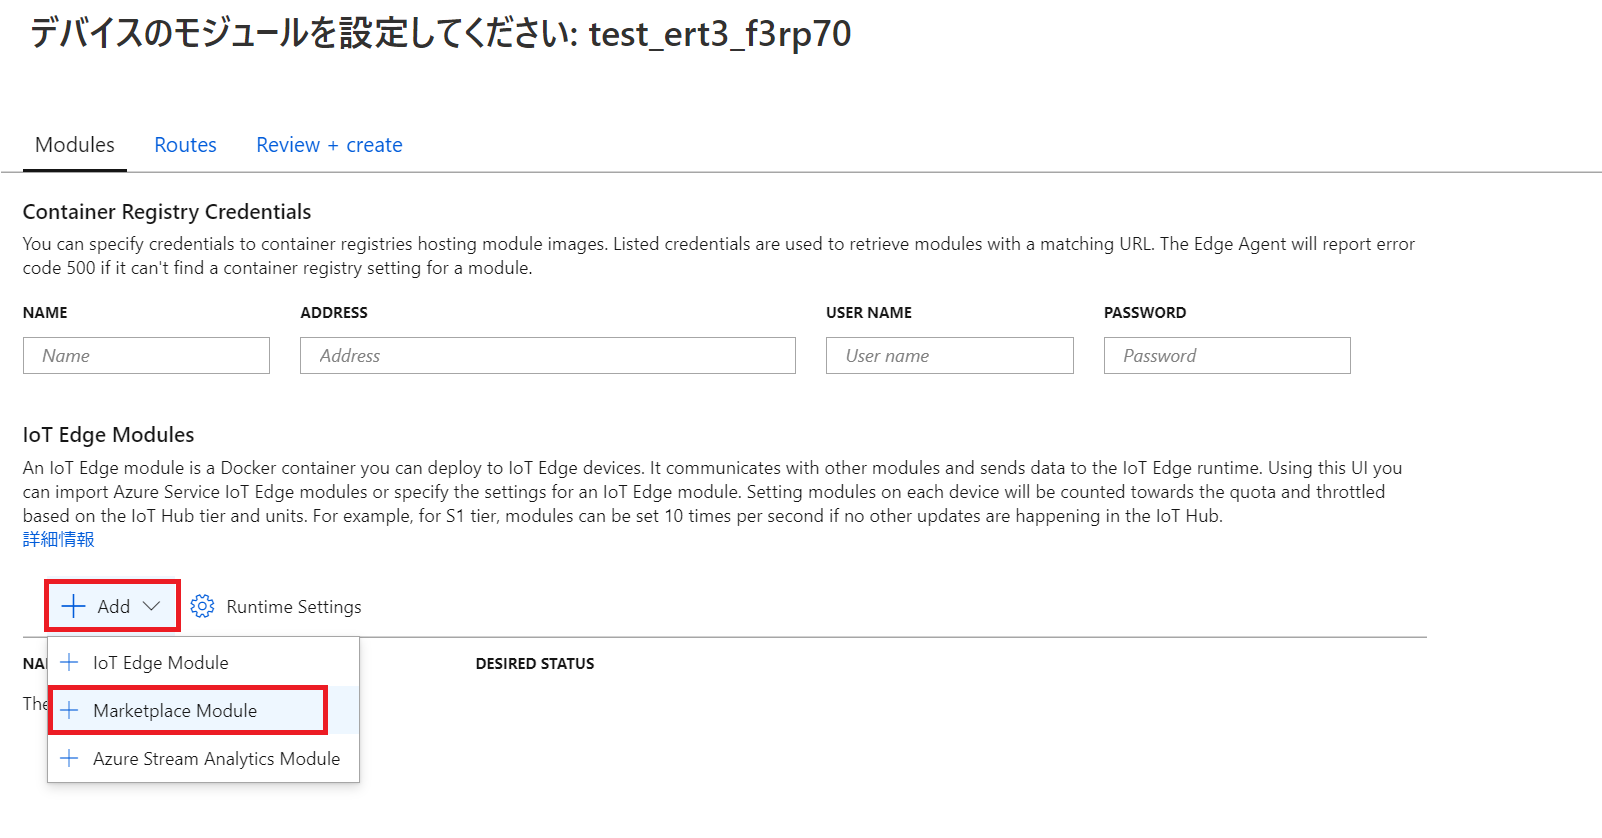
表示される画面ではデプロイするモジュールやランタイムモジュールの設定が行えます。
「+Add」ボタンをクリックし、表示されるドロップダウンリストから「+Marketplace Module」を選択します。 -
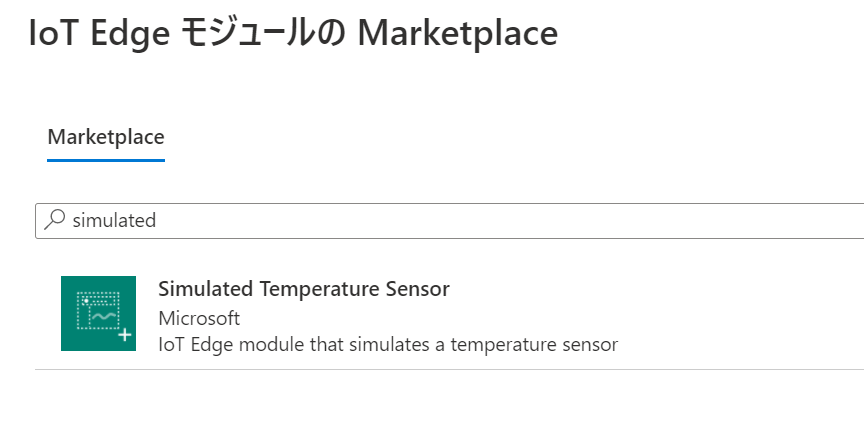
Marketplaceのモジュールの検索画面が表示されます。
検索欄に「simulated」と入力するとSimulated Temperature Sensorモジュールが検索できます。
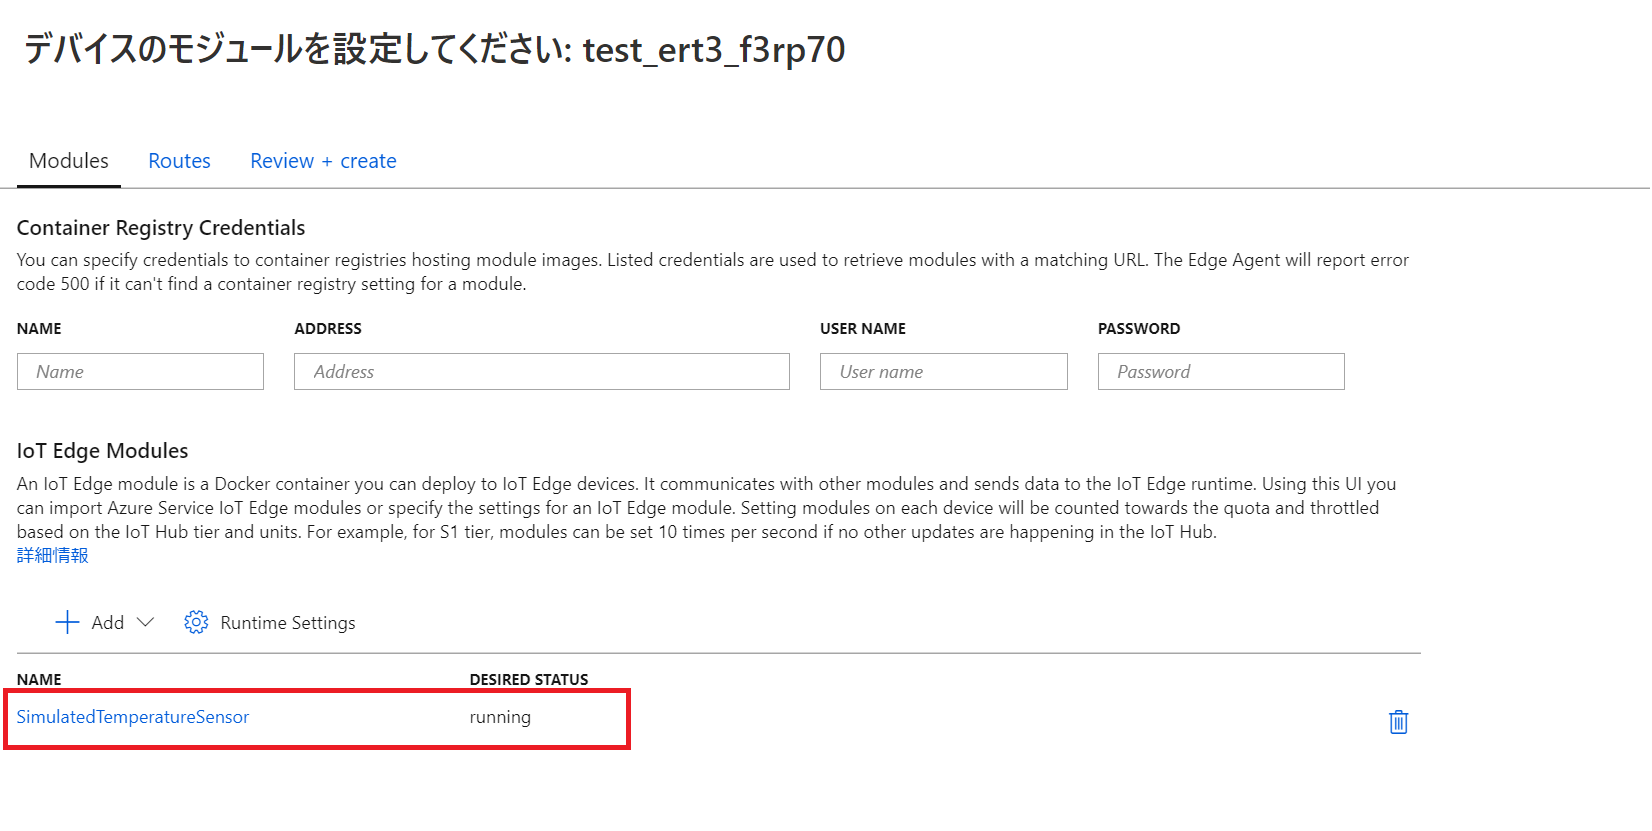
モジュール名をクリックして追加します。クリックすると設定画面に戻り、モジュールの追加を確認できます。
-
今回は設定を特に変えずそのままデプロイします。
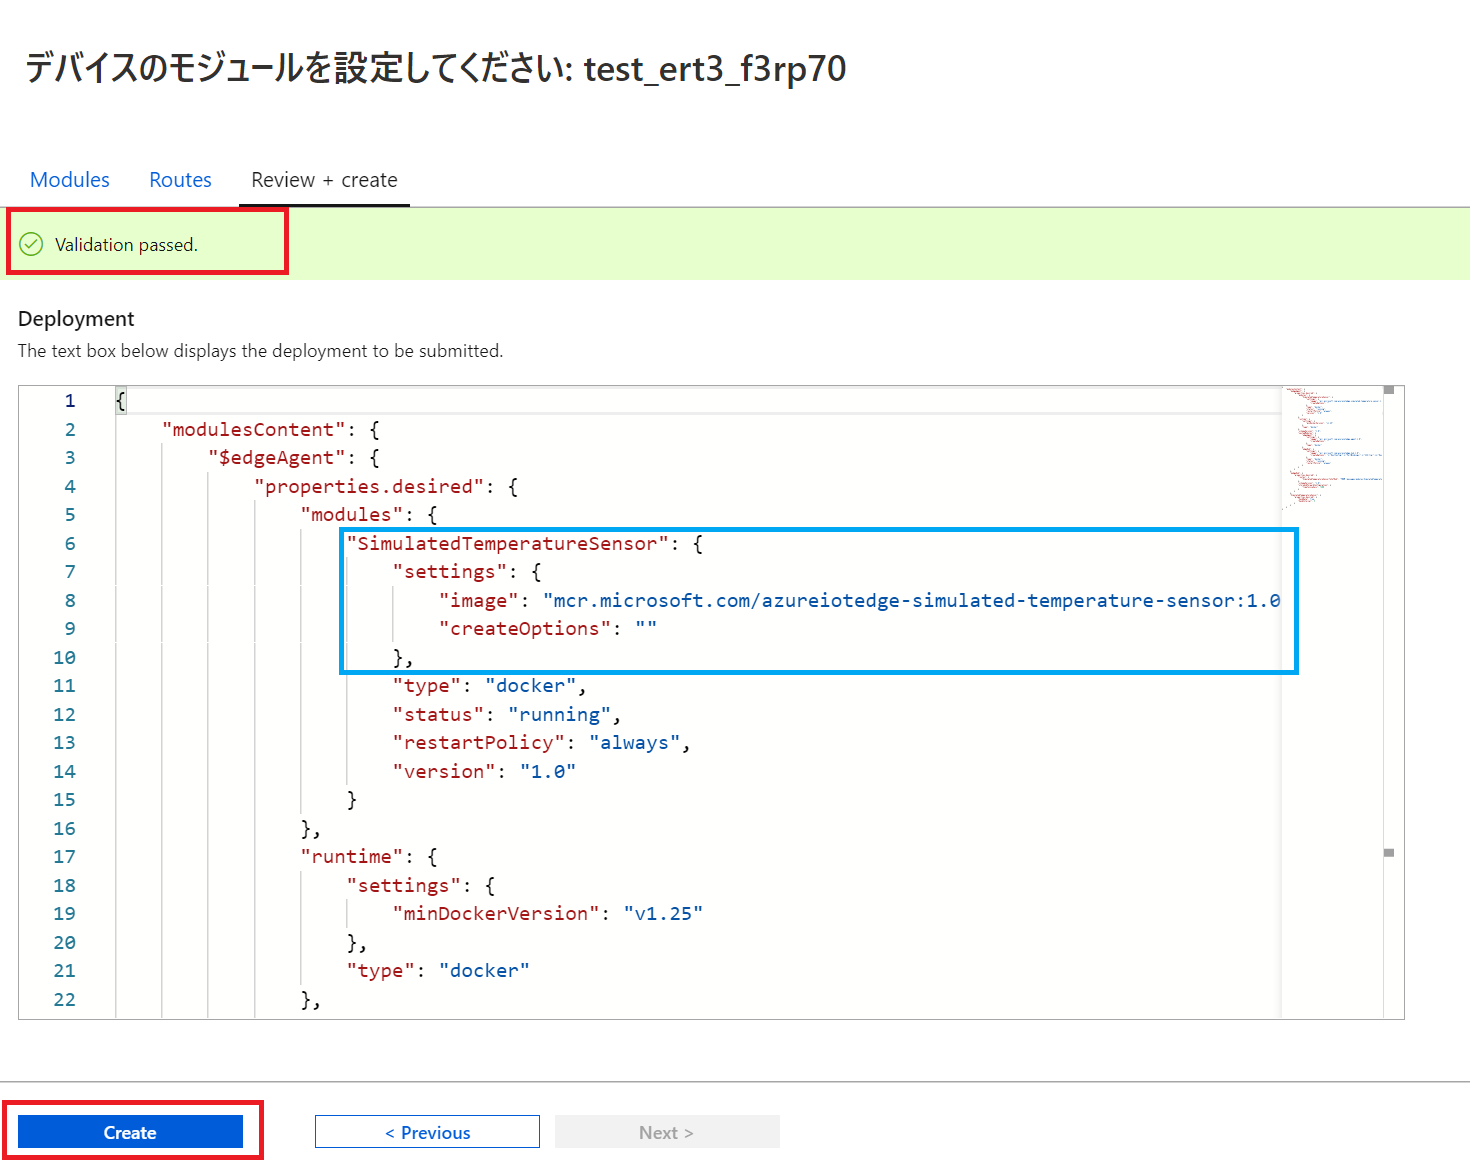
画面上部の「Review + create」タブか、画面下部の青い「Review + create」ボタンをクリックします。
すると、JSONフォーマットで書かれたデプロイ設定が表示されます。
図の青い四角で囲っている箇所にSimulated Temperature Sensorモジュールをデプロイするための設定が書かれています。
「Validation passed.」と表示されていることを確認し、画面下部の青い「Create」ボタンをクリックしてください。
これでサンプルモジュールがデプロイできます。
また、このとき一緒に「$edgeHub」モジュールもデプロイされます。※エッジデバイスがProxy環境下にある場合、モジュールが正常にデプロイ、動作していてもIoT Hubへ送信したテレメトリがブロックされて届かない場合があります。
このような場合$edgeHubモジュールへのProxy設定が必要であり、設定の手順が補足セクションにあります。
モジュールの動作確認
モジュールの動作確認はAzureポータルとコマンド操作のどちらでも可能です。
こちらではそれぞれの手順を紹介します。
###Azureポータルでの確認
先述した手順でモジュールをデプロイすると、その後自動的にデバイスのページに戻ります。
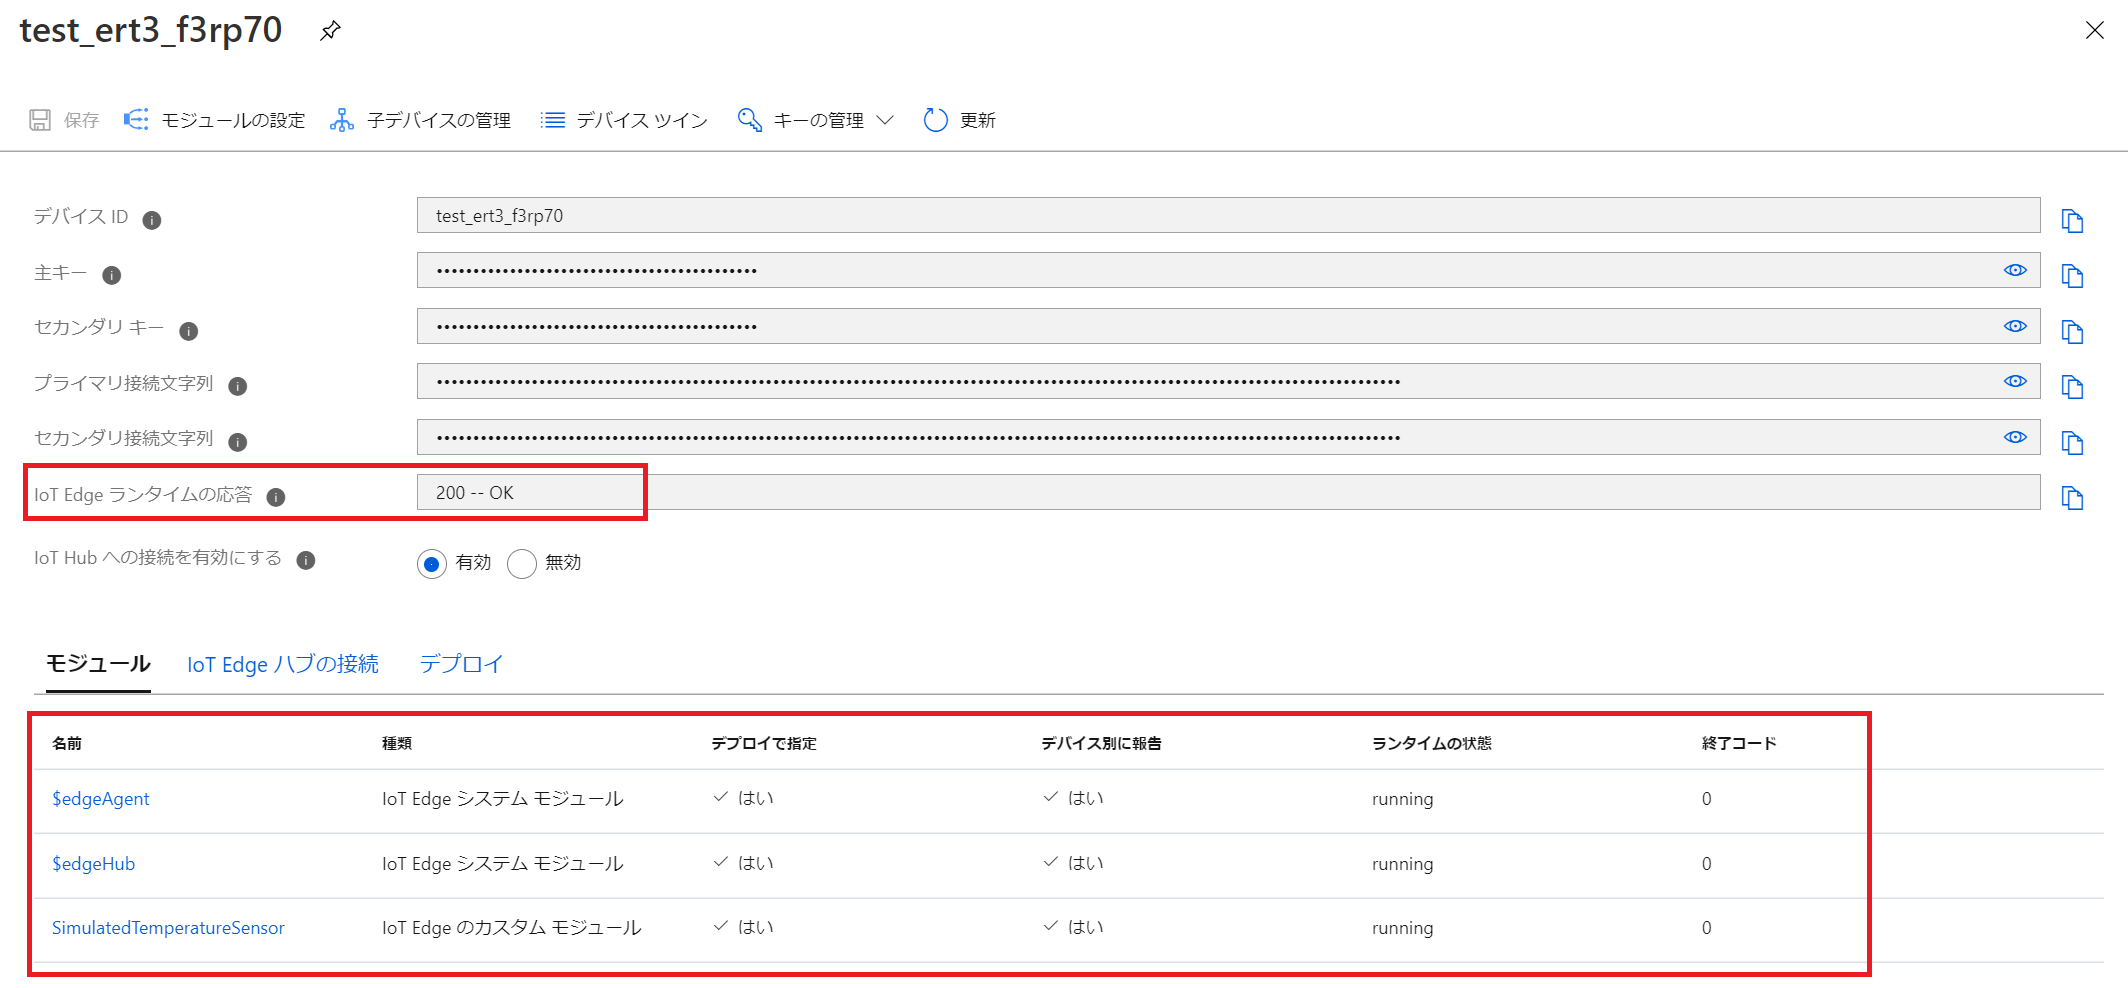
「\$edgeAgent」のデプロイで指定が「はい」に変わり、また「\$edgeHub」モジュールの各項目が「N/A」ではなくなり、「SimulatedTemperatureSensor」モジュールが追加されていることが確認できます。
デプロイした直後のモジュールは図のようにデバイス別に報告が「いいえ」、ランタイムの状態と終了コードが「--」となっています。
少し待ってから「更新」ボタンをクリックすると、正常にデプロイされた場合は「IoT Edgeランタイムの応答」が「200 -- OK」になり、追加されたモジュールのランタイムの状態が「running」になります。
コマンド操作での確認
以下のコマンドでIoT Edgeモジュールの一覧と状態の確認ができます。
sudo iotedge list
正常に動作している例は以下の通りです。
2つのランタイムモジュールと、デプロイしたSimulated Temperature Sensorモジュールが動作していることが確認できます。
# 一般ユーザusernameの場合
username@ubuntu:~$ sudo iotedge list
[sudo] password for username:
NAME                        STATUS           DESCRIPTION      CONFIG
SimulatedTemperatureSensor  running          Up 3 minutes     mcr.microsoft.com/azureiotedge-simulated-temperature-sensor:1.0    # デプロイしたモジュール
edgeAgent                   running          Up 3 minutes     mcr.microsoft.com/azureiotedge-agent:1.0
edgeHub                     running          Up 3 minutes     mcr.microsoft.com/azureiotedge-hub:1.0
また、モジュールが出力しているログやメッセージの内容も以下のコマンドで確認できます。
<Module name> をログやメッセージを確認したいモジュール名に置き換えてください。
モジュール名は上記の sudo iotedge list コマンドで確認できる「NAME」の列に表示されるものです。
sudo iotedge logs <Module name>
Simulated Temperature Sensorモジュールのログ、メッセージを確認してみます。
# 一般ユーザusernameの場合
username@ubuntu:~$ sudo iotedge logs SimulatedTemperatureSensor
[2020-09-10 07:46:35 +00:00]: Starting Module
SimulatedTemperatureSensor Main() started.
Initializing simulated temperature sensor to send 500 messages, at an interval of 5 seconds.
To change this, set the environment variable MessageCount to the number of messages that should be sent (set it to -1 to send unlimited messages).
Information: Trying to initialize module client using transport type [Amqp_Tcp_Only].
Information: Successfully initialized module client of transport type [Amqp_Tcp_Only].
        09/10/2020 07:47:00> Sending message: 1, Body: [{"machine":{"temperature":21.487580768408989,"pressure":1.0555471761478596},"ambient":{"temperature":21.08140049529327,"humidity":24},"timeCreated":"2020-09-10T07:47:00.0487473Z"}]
        09/10/2020 07:47:06> Sending message: 2, Body: [{"machine":{"temperature":21.373778843960622,"pressure":1.0425823999448809},"ambient":{"temperature":20.718048513037175,"humidity":26},"timeCreated":"2020-09-10T07:47:06.8055549Z"}]
        09/10/2020 07:47:11> Sending message: 3, Body: [{"machine":{"temperature":21.149009404191286,"pressure":1.016975754907868},"ambient":{"temperature":21.202152488148844,"humidity":26},"timeCreated":"2020-09-10T07:47:11.8391252Z"}]
        09/10/2020 07:47:16> Sending message: 4, Body: [{"machine":{"temperature":22.314816517203496,"pressure":1.1497892234788794},"ambient":{"temperature":21.301403149404287,"humidity":25},"timeCreated":"2020-09-10T07:47:16.8845487Z"}]

...
ダミーで生成された温度と湿度がタイムスタンプと一緒に送信されていることが分かります。
補足
Proxy設定
Proxy設定は公式ドキュメントのプロキシ サポートの構成4に従います。
使用環境によって必要な設定、不要な設定があります。
こちらでは、私が設定した内容を紹介します。
Mobyデーモン
Mobyデーモンのproxy設定を行います。
Dockerのオープンフレームワークによって構築されているため、設定する内容はDockerのドキュメント5に従います。
-
まずディレクトリを作成し、そのディレクトリ内にファイルを作成します。
sudo mkdir -p /etc/systemd/system/docker.service.d sudo vi /etc/systemd/system/docker.service.d/http-proxy.conf -
下記のフォーマットで
HTTP_PROXY、HTTPS_PROXYの環境変数をファイルに書き込み、保存します。
どちらか一方のみで良い場合やNO_PROXYの設定が必要な場合など、環境に合わせて適宜内容を変更してください。/etc/systemd/system/docker.service.d/http-proxy.conf[Service] Environment="HTTP_PROXY=http://username:password@example.com:port/" Environment="HTTPS_PROXY=http://username:password@example.com:port/" -
設定を反映するためにデーモンをリロードし、再起動します。
sudo systemctl daemon-reload sudo systemctl restart docker -
設定内容が反映されているか確認します。
# 一般ユーザusernameの場合
username@ubuntu:~$ sudo systemctl show --property=Environment docker
Environment=HTTP_PROXY=http://username:password@example.com:port/ HTTPS_PROXY=http://username:password@example.com:port/
IoT Edgeデーモン
IoT Edgeデーモンにも設定します。
-
systemctlコマンドで設定ファイルを編集します。sudo systemctl edit iotedge -
以下のフォーマットで
https_proxyに環境変数を設定し、ファイルを保存します。[Service] Environment="https_proxy=http://username:password@example.com:port/" -
設定を反映するためにデーモンをリロードし、再起動します。
sudo systemctl daemon-reload sudo systemctl restart iotedge -
設定内容が反映されているか確認します。
username@ubuntu:~$ systemctl show --property=Environment iotedge
Environment=https_proxy=http://username:password@example.com:port/
IoT Edgeエージェント
デバイス接続文字列を入力した構成ファイルにさらに設定を追加します。
-
ファイルに書き込み権限を追加し、編集します。
sudo chmod +w /etc/iotedge/config.yaml sudo vi /etc/iotedge/config.yaml -
ページをスクロールすると、
Edge Agent module specの設定項目があります。/etc/iotedge/config.yamlagent: name: "edgeAgent" type: "docker" env: {} config: image: "mcr.microsoft.com/azureiotedge-agent:1.0" auth: {}envに続く { } を消去し、https_proxyのProxy設定を下記のように記入します。
さらに、IoT Edgeは既定でAMQPを使用して通信するため、もしポートがブロックされている場合はWebSocket経由でAMQPを使用できるようにします。
https_proxy設定の次の行にUpstreamProtocol: "AmqpWs"を付け足します。/etc/iotedge/config.yamlagent: name: "edgeAgent" type: "docker" env: https_proxy: "http://username:password@example.com:port/" UpstreamProtocol: "AmqpWs" # AMQPポートがブロックされている場合はこの行も追加 config: image: "mcr.microsoft.com/azureiotedge-agent:1.0" auth: {} -
ファイルから書き込み権限を削除し、IoT Edgeを再起動します。
sudo chmod -w /etc/iotedge/config.yaml
sudo systemctl restart iotedge
$edgeHubモジュール
$edgeHubモジュールのデプロイ設定の環境変数にProxyの情報を追加します。
-
Azure Portalにアクセスし、先述したIoT Edgeデバイスの追加の手順でデバイス自動管理カテゴリの「IoT Edge」を探してクリックし、接続したエッジデバイスのデバイスIDをクリックします。
デバイスの各種情報が表示されるので、画面の上部の「モジュールの設定」をクリックします。 -
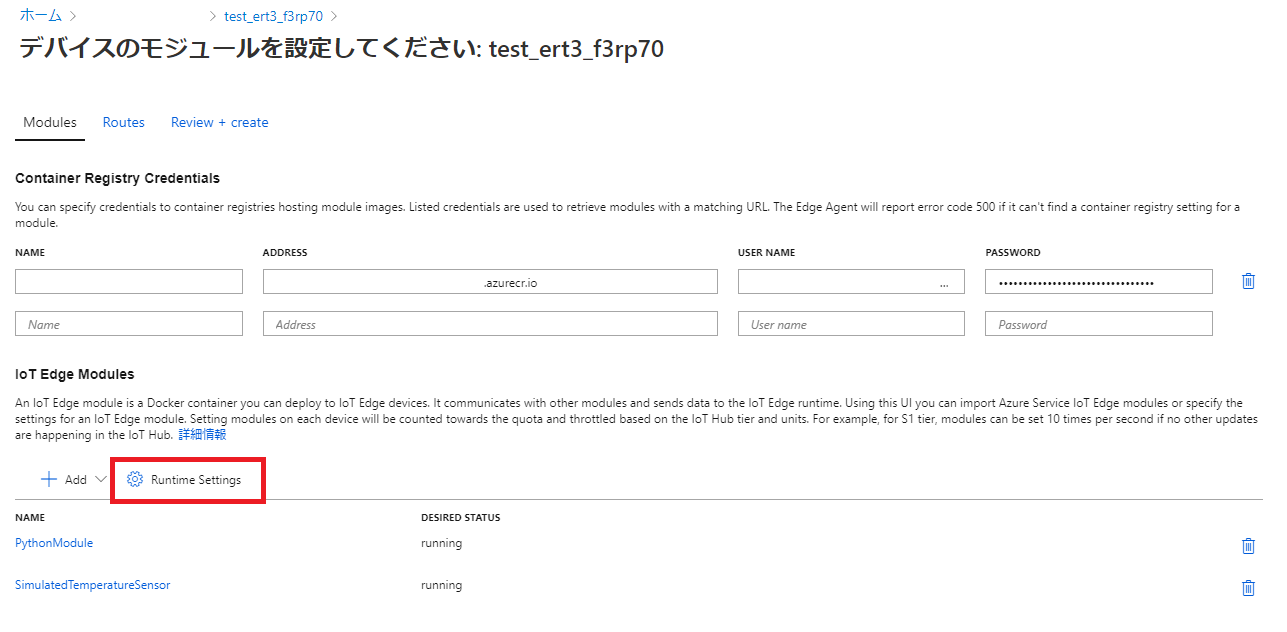
IoT Edge Modulesの設定項目から「Runtime Settings」をクリックします。
-
右側にランタイムの設定画面が表示され、上から順に「Edge Hub」($edgeHubモジュール)、「Edgeエージェント」($edgeAgentモジュール)に設定を追加することができます。
今回は「Edge Hub」の環境変数に以下のフォーマットでhttps_proxy設定を追加し、内容を保存します。名前 値 https_proxy http://username:password@example.com:port/ -
モジュールの設定画面に戻るので、下部の「Review + Create」ボタンをクリックし、設定内容を確認して「Create」ボタンをクリックしてください。
接続の確認
もしProxy設定前にConnectivity checksが全てErrorだった場合、上記の設定後に iotedge check コマンドで接続状況を確認するとWebsocket経由での接続ができるようになったことが分かります。
以下のように、Websocket経由の接続以外の項目がErrorの場合でもIoT Hubとの接続が可能になります。
# 一般ユーザusernameの場合
username@ubuntu:~$ sudo iotedge check
[sudo] password for username:    # usernameのパスワードを入力
Configuration checks
--------------------
√ config.yaml is well-formed - OK
√ config.yaml has well-formed connection string - OK

...


Connectivity checks
-------------------
× host can connect to and perform TLS handshake with IoT Hub AMQP port - Error
    Could not connect to c-iot-hub-standard.azure-devices.net:5671
× host can connect to and perform TLS handshake with IoT Hub HTTPS / WebSockets port - Error
    Could not connect to c-iot-hub-standard.azure-devices.net:443 : could not complete TLS handshake
× host can connect to and perform TLS handshake with IoT Hub MQTT port - Error
    Could not connect to c-iot-hub-standard.azure-devices.net:8883
× container on the default network can connect to IoT Hub AMQP port - Error
    Container on the default network could not connect to c-iot-hub-standard.azure-devices.net:5671
√ container on the default network can connect to IoT Hub HTTPS / WebSockets port - OK    # ここと
× container on the default network can connect to IoT Hub MQTT port - Error
    Container on the default network could not connect to c-iot-hub-standard.azure-devices.net:8883
× container on the IoT Edge module network can connect to IoT Hub AMQP port - Error
    Container on the azure-iot-edge network could not connect to c-iot-hub-standard.azure-devices.net:5671
√ container on the IoT Edge module network can connect to IoT Hub HTTPS / WebSockets port - OK    # ここがOKに変わる
× container on the IoT Edge module network can connect to IoT Hub MQTT port - Error
    Container on the azure-iot-edge network could not connect to c-iot-hub-standard.azure-devices.net:8883
次回
IoT Hubへの接続ができました。
次回はPythonを使用したチュートリアルを実施してみます。
→次回
