状態管理とは
Vueでは状態管理のために、vuexを使用するのが一般的なようですが、今回はvue3とpiniaを使用して状態管理をしてみました。個人的にはpiniaの方が分かりやすい印象を受けました。ぴーにゃといいます。
その前に状態管理とは何かから説明すると、
例えば、親と子のコンポーネントで共通で使用したいデータがある場合、propsやemitで親から子、子から親に渡す必要があります。
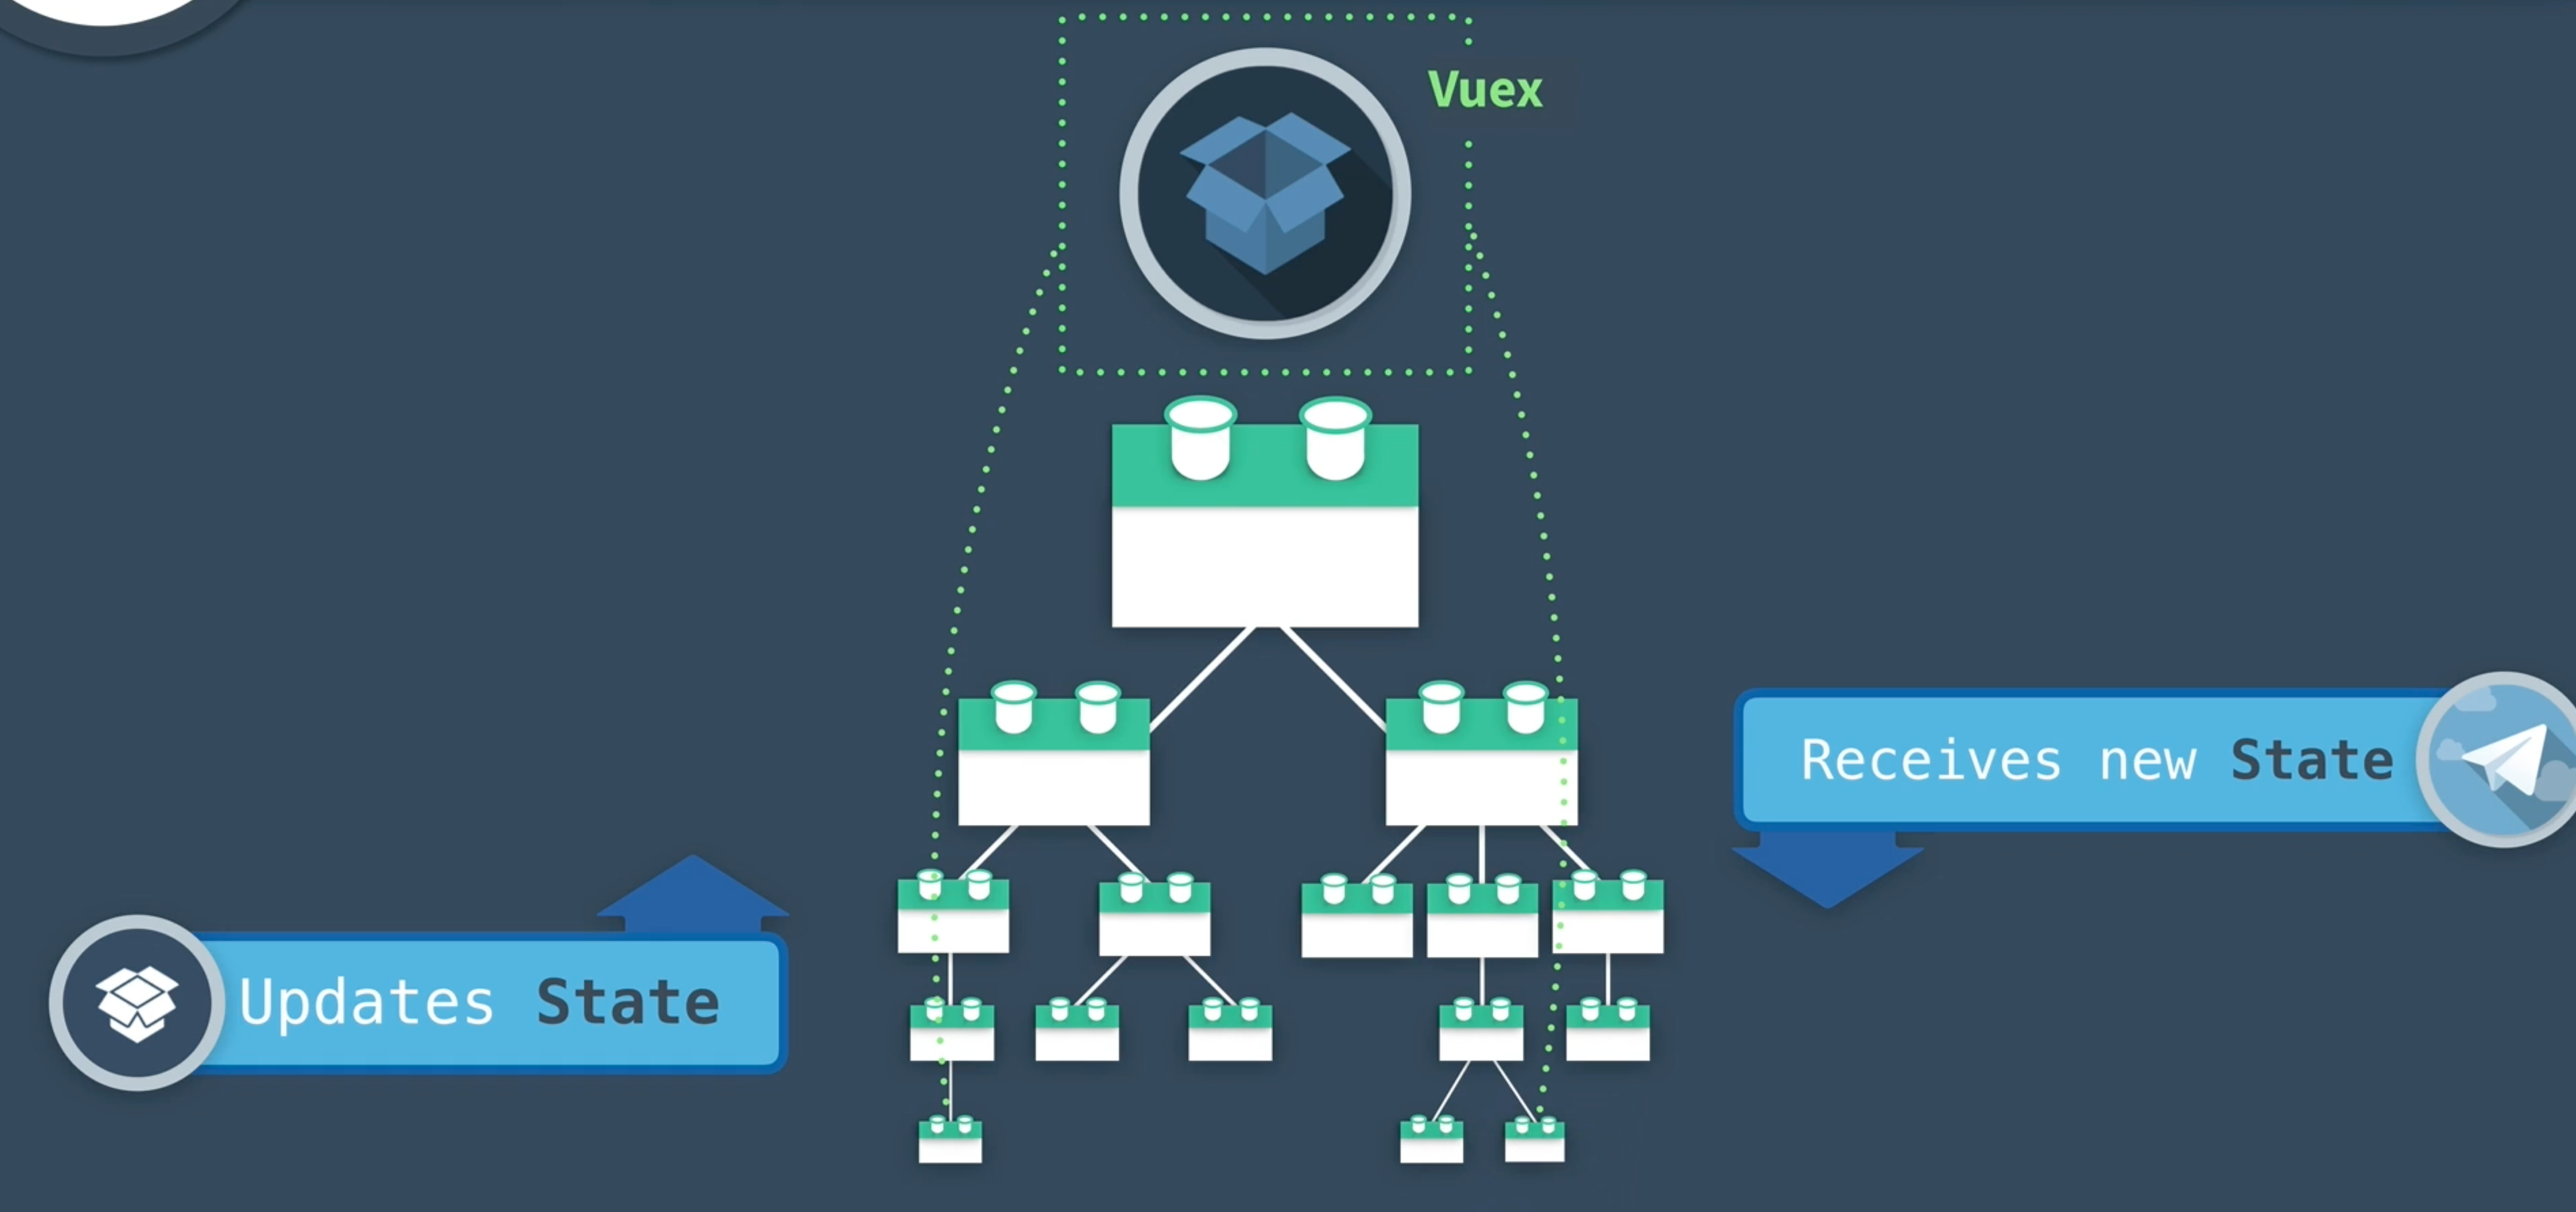
親と子ならまだいいのですが、これがさらに他の子や孫、ひ孫などが出てくると渡すのが複雑化つ超絶めんどくさくなってしまいます。以下のようなイメージです。
そこで、出てくるのが状態管理という話です。
これは一箇所に情報を保存(store)しておいて、みんなで共通して使おうねというやり方です。
そうすることで、わざわざデータの受け渡しをしなくて良くなるので、情報伝達から解放されます。データベース的な感じで使う感覚と考えればわかりやすいですね。
pinia
で、そこで状態管理をしてくれるライブラリであるpiniaがあり、今回はこれを使用して試してみました。
まずは、piniaをインストール
yarn add pinia
main.jsの修正
import { createApp } from 'vue'
import { createPinia } from 'pinia'
import App from './App.vue'

const pinia = createPinia()
const app = createApp(App)

app.use(pinia)
app.mount('#app')
storeディレクトリとevent.jsファイル
次にstoreディレクトリとevent.jsファイルを作成。
import axios from 'axios';
import { defineStore } from 'pinia';

const apiUrl = 'http://localhost:3000';
// 状態管理するデータを定義.今回の場合、eventsの配列に色々と情報を格納していく
export const useEventStore = defineStore("event", {
  // 初期状態
  state: () => ({
    events: []
  }),
  // 状態を取得
  getters: {
    getEvents() {
      return this.events
    },
  },
  // 状態を更新
  actions: {
    async fetchEvents() {
      const response = await axios.get(`${apiUrl}/events`);
      this.events = response.data
    },
  },
})
説明を加えると、
今回はrailsサーバーにapi通信をしたかったので、axiosでHTTPリクエストを送ります。
また、storeを定義するためにdefineStoreをインポートしました。
このstoreが情報を溜めていく重要な役割を果たします。
色々と書いていますが、これはこういう形なんだと思っておけば良いと思います。
まず、defineStoreの第一引数にidを指定します。
export const useEventStore = defineStore("event",
最初に、stateには初期状態を記述します。今回は受け取ったデータを配列に格納したいので、[]としています。
  // 初期状態
  state: () => ({
    events: []
  }),
次に、gettersでstateの状態を取得するための関数を記述をしています。
  // 状態を取得
  getters: {
    getEvents() {
      return this.events
    },
  },
で、最後にactionsで状態を更新する関数を記述しています。
ここでは、axiosでhttpリクエストをrailsサーバーに投げてeventの一覧データを取得して、それを配列であるstateに格納しています。
 // 状態を更新
  actions: {
    async fetchEvents() {
      const response = await axios.get(`${apiUrl}/events`);
      this.events = response.data
    },
余談ですが、vuexだとmutationsが出てきますが、piniaではなくなっています。不要だと判断されたみたいですね。
componentsの記述
次にコンポーネントの記述です。
まず、userEventStoreという先ほど定義した関数をインポートして、eventStoreという変数に入れています。
そして、eventStore.eventsやeventStore.fetchEvents()のように記述するだけで使用することができます。
で、ここで凄いのが、仮に別コンポーネントで同じように記述して、関数を呼び出すとどちらとも反映される点です!!!それが状態管理なのですがw
propsで渡すことがなくなるわけではないですが、かなり便利です。
<script setup>
import CalenderDetails from './CalenderDetails.vue'
import { useEventStore } from '../store/events.js'

const eventStore = useEventStore();

</script>

<template>
  <div>
    {{eventStore.events}}
    <button @click="eventStore.fetchEvents()">ボタン</button>
  </div>
</template>
さらに触ってみた
上に加えて、GET/POST/PUT/DELETEを試してみました。
vueは学習し始めたばかりなので、相当な数のとツッコミどころはあるのですが、とりあえず動きます。
雰囲気だけでも掴んでもらえると嬉しいです。(ファイル分割したい...)
import axios from 'axios';
import { defineStore } from 'pinia';

const apiUrl = 'http://localhost:3000';
// 状態管理するデータを定義.今回の場合、eventsの配列に色々と情報を格納していく
export const useEventStore = defineStore("event", {
  // 初期状態
  state: () => ({
    events: [],
    designedEvents: [],
  }),
  // 状態を取得
  getters: {
    getEvents() {
      this.designedEvents = this.events.map(e => {
        return {
          id: e.id,
          name: e.name,
        };
      })
    },

  },
  // 状態を更新
  actions: {
    async fetchEvents() {
      const response = await axios.get(`${apiUrl}/users`);
      this.events = response.data
    },
    async createEvent(newEvent) {
      await axios.post(`${apiUrl}/users`, newEvent);
    },
    async deleteEvent(id) {
      await axios.delete(`${apiUrl}/users/${id}`);
    },
    async updateEvent(id, updateContent) {
      await axios.put(`${apiUrl}/users/${id}`, updateContent);
    }
  },
});
<script setup>
import { useEventStore } from '../store/events.js'
import { ref } from 'vue'

const eventStore = useEventStore();

let eventName = ref('')

let isVisibleUpdate = ref(false);
let isVisibleInput = ref(false);

const openUpdateModal = () => {
  isVisibleUpdate.value = true;
    };

const closeUpdateModal = () => {
  isVisibleUpdate.value = false;
};

const openInputModal = () => {
  isVisibleInput.value = true;
    };

const closeInputModal = () => {
  isVisibleInput.value = false;
};

const createEvent = () => {
  const newEvent = {
        name: eventName.value
      };
  eventStore.createEvent(newEvent);
  closeInputModal()
}

const deleteEvent = (id) => {
  eventStore.deleteEvent(id);
}

const updateEvent = (id) => {
  const updateContent = {
    name: eventName.value
  }
  eventStore.updateEvent(id, updateContent);
  alert ("updated!!")
}

</script>

<template>
  <div>
    <div>
      <div v-for="event in eventStore.designedEvents" :key="event.id">
        <p :id="'event-' + event.id">{{ event.name }}</p>
        <button @click="deleteEvent(event.id)">予定を削除</button>
      </div>


      {{ eventStore.events }}

      <button @click="eventStore.getEvents">ボタン</button>
      <button @click="eventStore.fetchEvents">ボタン</button>
      <button @click="openInputModal">予定を追加</button>
      <button @click="openUpdateModal">予定を更新</button>


      <!-- 予定を追加するモーダル -->
      <div v-show="isVisibleInput" class="modal modal-content">
        <a class="modalClose" @click="closeInputModal">モーダルを閉じる</a>
        <input type="text" v-model="eventName">
        <button @click="createEvent">追加</button>
      </div>

      <!-- 予定を更新するモーダル -->
      <div v-show="isVisibleUpdate" class="modal modal-content">
        <a class="modalClose" @click="closeUpdateModal">モーダルを閉じる</a>
        <div v-for="event in eventStore.designedEvents" :key="event.id">
          name: {{ event.name }}
          <input type="text" v-model="eventName">
          <button @click="updateEvent(event.id)">更新</button>
        </div>
      </div>
    </div>
  </div>
</template>

<style>
/* モーダルのスタイル */
.modal {
  position: fixed;
  z-index: 1;
  left: 50%;
  top: 0;
  width: 100%;
  height: 50%;
  overflow: auto;
  background-color: rgba(0, 0, 0, 0.4); /* 背景を半透明にする */
}

.modal-content {
    background-color: #fefefe;
    margin: 0 auto; /* モーダルを中央に配置 */
    padding: 20px;
    border: 1px solid #888;
    width: 80%;
    max-width: 600px;
    box-shadow: 0 0 10px rgba(0, 0, 0, 0.3);
    border-radius: 5px;
    text-align: center;
  }
</style>

