初めての投稿です(そして最後になるかもしれない)
Python + tkinter でGUIアプリをコーディングしているときにハマりました。
参考書も読まず進めていて、おそらく超スーパー初歩な話なのですが、せっかくなので残しておこうと思います。
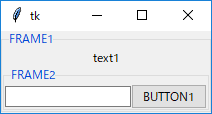
上図のように、LabelFrameを入れ子にして上1段、下2段にwidgetを配置したく、下記のようにすると、表示が崩れて困りました。
※記事ではフレーム名をウィンドウの見た目に示すためLabelFrameにしていますが、Frameでも同様です。編集リクエストをくださった方、ありがとうございました。
wrong.py
import tkinter as tk
from tkinter import ttk

root = tk.Tk()

frame1 = ttk.LabelFrame(root,text="FRAME1").grid(row=0,column=0)

label1 = ttk.Label(frame1,text="text1").grid(row=0,column=0)

frame2 = ttk.LabelFrame(frame1).grid(row=1,column=0)
entry1 = ttk.Entry(frame2).grid(row=0,column=0)
button1 = ttk.Button(frame2, text="BUTTON1").grid(row=0,column=1)

root.mainloop()
いろいろ調べてなんとなく学習したのですが、入れ子にするfLabelFrameを、順番に閉じてやらないといけないようで、つまりそれぞれ内包するwidgetを配置したあとで、gridなりpackなりするんですね。
そうなっていないソースも散見されるのですが、特に入れ子にする場合は、自分の環境では(?)うまくいきませんでした。
correct.py
import tkinter as tk
from tkinter import ttk

root = tk.Tk()

frame1 = ttk.LabelFrame(root,text="FRAME1")

label1 = ttk.Label(frame1,text="text1").grid(row=0,column=0)

frame2 = ttk.LabelFrame(frame1,text="FRAME2")
entry1 = ttk.Entry(frame2).grid(row=0,column=0)
button1 = ttk.Button(frame2, text="BUTTON1").grid(row=0,column=1)

frame2.grid(row=1,column=0)		#frame2を配置(綴じる)
frame1.grid(row=0,column=0)		#frame1を配置(綴じる)

root.mainloop()
私のようにスーパー初歩な方の参考になれば。

