はじめに
この記事では、TypeScript を JavaScript にコンパイルして実行する方法と ts-node を使って TypeScript を直接実行する方法について記載します。
開発環境
開発環境は以下の通りです。
- Windows11
- Node.js
- npm 10.8.2
- @types/node 20.14.10
- ts-node 10.9.2
- TypeScript 5.5.3
JavaScript にコンパイルして実行する方法
まずは JavaScript にコンパイルして実行する方法を記載します。
1. package.json の作成
package.json を作成します。
コマンド実行中の質問をスキップするため、-y をつけて実行します。
npm init -y
package.json が作成されます。
{
  "name": "node",
  "version": "1.0.0",
  "main": "index.js",
  "scripts": {
    "test": "echo \"Error: no test specified\" && exit 1"
  },
  "keywords": [],
  "author": "",
  "license": "ISC",
  "description": ""
}
2. TypeScript のインストールと設定
TypeScript と @types/node をインストールします。
npm install typescript @types/node --save-dev
package.json にインストールしたパッケージが表示されます。
{
  ...
  "devDependencies": {
    "@types/node": "^20.14.10",
    "typescript": "^5.5.3"
  }
}
次に TypeScirpt 設定ファイルを作成します。
npx tsc --init
tsconfig.json が作成されます。
デフォルトでは、CommonJS を利用する設定になっていますが、ES Modules (ECMA Script Modules) を利用したいので、設定を変更します。今回は Node.js 20 系を利用するので、20 系に対応した lib、module、target を指定します。
{
  "compilerOptions": {
    /* Language and Environment */
    "target": "ES2022" /* Set the JavaScript language version for emitted JavaScript and include compatible library declarations. */,
    "lib": [
      "ES2023"
    ] /* Specify a set of bundled library declaration files that describe the target runtime environment. */,

    /* Modules */
    "module": "node16" /* Specify what module code is generated. */,

    /* Interop Constraints */
    "esModuleInterop": true /* Emit additional JavaScript to ease support for importing CommonJS modules. This enables 'allowSyntheticDefaultImports' for type compatibility. */,
    "forceConsistentCasingInFileNames": true /* Ensure that casing is correct in imports. */,

    /* Type Checking */
    "strict": true /* Enable all strict type-checking options. */,

    /* Completeness */
    "skipLibCheck": true /* Skip type checking all .d.ts files. */
  }
}
加えて、TypeScript を JavaScript にコンパイルしたファイルの出力先を指定する設定を追加します。
{
  "compilerOptions": {
    ...
    /* Emit */
    "outDir": "./dist" /* Specify an output folder for all emitted files. */,
    ...
  },
  "include": ["src"]
}
3. アプリケーションコードの実装
src/index.ts ファイルを作成し、ログを出力するコードを実装します。
import http from "http";

const HOSTNAME = "0.0.0.0";
const PORT = 3000;

const server = http.createServer((req, res) => {
  res.statusCode = 200;
  res.setHeader("Content-Type", "text/plain");
  res.end("Hello World");
});

server.listen(PORT, HOSTNAME, () => {
  console.log(`Server running at http://${HOSTNAME}:${PORT}`);
});
4. エントリーポイントの変更とスクリプトの追加
package.json のエントリーポイントを変更します。加えて、TypeScript をビルド・実行するスクリプトを追加します。実行するファイルは、先ほどコンパイルされた JavaScirpt の出力先として指定した dist を指定します。
{
  ...
  "main": "dist/index.js",
  "scripts": {
    "build": "tsc",
    "start": "node dist/index.js",
    ...
  ...
}
5. 動作確認
スクリプトを実行して、動作確認します。
npm run build
dist/index.js が生成されます。
"use strict";
var __importDefault = (this && this.__importDefault) || function (mod) {
    return (mod && mod.__esModule) ? mod : { "default": mod };
};
Object.defineProperty(exports, "__esModule", { value: true });
const http_1 = __importDefault(require("http"));
const HOSTNAME = "0.0.0.0";
const PORT = 3000;
const server = http_1.default.createServer((req, res) => {
    res.statusCode = 200;
    res.setHeader("Content-Type", "text/plain");
    res.end("Hello World");
});
server.listen(PORT, HOSTNAME, () => {
    console.log(`Server running at http://${HOSTNAME}:${PORT}`);
});
生成されたファイルを実行します。
npm start
実装通りログが表示されることを確認します。

ts-node で実行する方法
次は ts-node で実行する方法を記載します。
1. package.json の作成 は全く同じ手順です。
2. TypeScript のインストールと設定
今回は ts-node も一緒にインストールします。
npm install typescript ts-node @types/node --save-dev
package.json にインストールしたパッケージが表示されます。
{
  ...
  "devDependencies": {
    "@types/node": "^20.14.10",
    "ts-node": "^10.9.2",
    "typescript": "^5.5.3"
  }
}
TypeScirpt 設定ファイルを作成します。
npx tsc --init
ES Modules (ECMA Script Modules) を利用する設定に変更します。
{
  "compilerOptions": {
    /* Language and Environment */
    "target": "ES2022" /* Set the JavaScript language version for emitted JavaScript and include compatible library declarations. */,
    "lib": [
      "ES2023"
    ] /* Specify a set of bundled library declaration files that describe the target runtime environment. */,

    /* Modules */
    "module": "node16" /* Specify what module code is generated. */,

    /* Interop Constraints */
    "esModuleInterop": true /* Emit additional JavaScript to ease support for importing CommonJS modules. This enables 'allowSyntheticDefaultImports' for type compatibility. */,
    "forceConsistentCasingInFileNames": true /* Ensure that casing is correct in imports. */,

    /* Type Checking */
    "strict": true /* Enable all strict type-checking options. */,

    /* Completeness */
    "skipLibCheck": true /* Skip type checking all .d.ts files. */
  }
}
3. アプリケーションコードの実装 は、先ほど実装したコードを利用します。
4. エントリーポイントの変更と実行スクリプトの追加
package.json のエントリーポイントを変更します。加えて、アプリケーションを実行するスクリプトを追加します。ts-node コマンドを使い、TypeScript ファイルを直接指定して実行します。
{
  ...
   "main": "src/index.ts",
  "scripts": {
    "start": "ts-node src/index.ts",
    ...
  ...
}
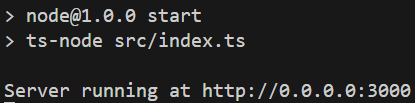
5. 動作確認
スクリプトを実行して、動作確認します。
npm start
実装通りログが表示されることを確認します。
ビルドせず、実行しているので、JavaScript ファイルは生成されません。