はじめに
PC Engines社製のAPU, APU2はVGA出力がなく、通常はルーター・サーバーなどの用途で使用するためキーボード・マウスも接続せずに、必要な場合はシリアルコンソール経由でアクセスしています。
いろいろ試す都度、OSを再インストールするのは大変なので、APU/APU2のiPXE機能を利用して作業を半自動化しています。
これまでUbuntu 16.04を利用していましたが、18.04がリリースされてしばらく経つので、構成を変更することにしました。
同社製のALIXを利用していた時にはdebootstrapを使ってCFカードにOSをインストールしていましたが、APU/APU2ではmSATAを装着して、今回作成するtftpサーバーに接続し、OSをインストールしています。
機器の構成
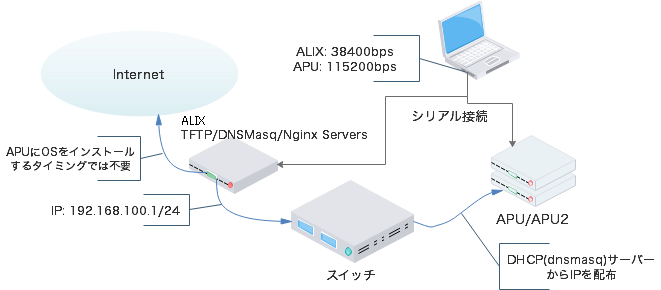
今回構築するインストールイメージを提供するtftpサーバーは以下のような構成です。
- Hardware: ALIX (CPU: AMD Geode LX800, Mem: 256MB, Disk: 8GB, NIC: 100Mbps x3)
- OS: Debian Jessie 8.11
- Software:
- TFTP, DHCPサーバー (dnsmasq)
- Webサーバー (nginx or apache2)
ALIXは100MbpsのEthernetポートを3つ持ち、dnsmasqによりDHCPdが稼動するため、スイッチを経由してIPを配布し、インターネットへの接続なしにAPUにUbuntu 18.04を導入することができます。
ALIXを利用しているのは、たまたま手元にあったからです。現在であればRaspberry PiのようなLinuxマシンでも良いでしょう。
APU/APU2の基本的な構成
SDカードは使用せずに、mSATA接続でSSDを使用しています。
機器構成の注意事項
2018/10/01時点では、dnsmasqを導入する際には、dns-root-dataパッケージをアンインストールする必要があります。
バグリポートは既に上がっていますが、dnsmasqパッケージで対応するべきかもしれません。
また、Jessieでは問題ありませんが、Ubuntuにdnsmasqを導入する際には、systemd-resolved.serviceが稼動していると53番ポートを占有されてdnsmasqが起動しない可能性があります。
サービスを一時的に停止するには次のように"systemctl stop"を使い、恒久的に起動しないようにするためには"systemctl disable"を使います。
$ sudo systemctl stop systemd-resolved.service
$ sudo systemctl disable systemd-resolved.service
必要なパッケージの導入
今回はWebサーバーとしてnginxを利用しています。
$ sudo apt-get install dnsmasq nginx
$ sudo apt-get remove dns-root-data
サーバー稼動の確認
あらかじめ必要なサービスが稼動することを確認しておきます。
$ sudo systemctl restart dnsmasq.service
$ sudo systemctl restart nginx.service
エラーが出力されなければ、この段階では問題ありません。
53番ポートが占有されているなどのメッセージが出た場合には前述のように関連サービスをアンインストールしたり、無効化するなどの対応をとってください。
ファイルの配置
ALIXにOSをインストールする場合には、CFカードを既に稼動しているLinuxマシンに接続するなどし、debootstrapでイメージをインストールします。
ここではALIXへのOSのインストールなどは省略し、既にシリアル接続や、SSH経由でTFTPサーバーとなるマシン(ALIX)にログインできる状態であるものとして進めます。ALIXではなくRaspberry Piなどを利用している場合は適宜、"ALIX"と書かれている箇所を読み替えてください。
まず、ALIX上にServer ISOと、このISOイメージから必要なファイルをコピーし、変更を加えます。
ISOイメージの取得とマウント
国内にミラーされているServer LIVE ISOイメージではPreseedが稼動しないため、Alternative downloadsからServer ISOイメージをダウンロードします。
ISOイメージは作業時点での18.04の最新版を取得してください。
【2020年11月追記】Ubuntu 20.04ではpreseedによるインストールは行なえなくなり、AutoInstallを利用することになります。AutoInstallによるOSインストールは別の記事にまとめていますが、移行にはそれなりの難しさがあるためiPXEを利用する場合は18.04をお勧めします。
また、ここではISOイメージをホームディレクトリに配置し、/mnt/isoにマウントするものとします。
$ wget http://cdimage.ubuntu.com/releases/18.04/release/ubuntu-18.04.5-server-amd64.iso
$ sudo mkdir /mnt/iso
$ sudo mount –o loop,ro ubuntu-18.04.5-server-amd64.iso /mnt/iso
TFTPサーバー用ファイルの配置
今回は /app/tftp_root/ をTFTPサーバーのトップディレクトリとします。
変更する場合は適宜変更し、以下の指示を読み替えてください。
ベースファイルの展開
ISOイメージからnetboot用のファイルを展開します。
$ sudo mkdir -p /app/tftp_root
$ cd /app/tftp_root
$ sudo rsync -av /mnt/iso/install/netboot/. .
$ sudo ln -s ubuntu-installer/amd64/linux .
defaultファイルの編集
自動的にインストールが進行するように、最下行でタイムアウト値(timeout)に"1"を設定します。
$ vi pxelinux.cfg/default
$ grep timeout pxelinux.cfg/default
## 次のような1行が出力される事を確認する
timeout 1
txt.cfgファイルの編集
checksumを使っているので、後からsedで置換するための変数としてPRESEEDCHECKSUMを埋め込んでいます。
$ vi ubuntu-installer/amd64/boot-screens/txt.cfg
append行は少し長いですが、1行で入力してください。
default install
label install
        menu label ^Install
        menu default
        kernel linux
        append vga=none initrd=ubuntu-installer/amd64/initrd.gz auto=true hostname=ubuntu locale=en_US.UTF-8 console-setup/charmap=UTF-8 console-setup/layoutcode=us console-setup/ask_detect=false pkgsel/language-pack-patterns=pkgsel/install-language-support=false netcfg/choose_interface=auto preseed/url=http://192.168.100.1/ubuntu/preseed.cfg preseed/url/checksum=PRESEEDCHECKSUM --- quiet console=ttyS0,115200n8
Webサーバー用のファイルを準備する
ここではnginxを使っていますが、特別な設定は行なっていないため、apache2でも稼動します。
トップディレクトリにubuntu/を作成し、ISOイメージから4つのディレクトリをコピーして使用します。
$ sudo mkdir /var/www/html/ubuntu
$ cd /var/www/html/ubuntu
$ sudo rsync -av /mnt/iso/{dists,install,pool,.disk} .
このdists,installなどのディレクトリと同じ場所に、preseed.cfgを作成します。
/var/www/html/ubuntu以下で編集するファイルは、このpressed.cfgのみです。
- ユーザーID,パスワードは適宜変更してください。
- mirror/http/hostnameにはALIXの内部向けポートに設定されているIPアドレスを設定してください。既にインターネットに接続するために内部ネットワークを192.168.100.0/24で構築している場合は、適切なIPアドレスに変更してください。(機器の構成にある図を参照)
- (2.)のIPアドレスを変更した場合には、preseed/late_commandに書かれているIPアドレスも同時に変更すること
d-i debian-installer/add-kernel-opts string video=off elevator=deadline console=ttyS0,115200n8
d-i debian-installer/locale string en_US
d-i debian-installer/keymap string us
d-i keyboard-configuration/xkb-keymap select us
d-i keyboard-configuration/toggle select No toggling
d-i netcfg/choose_interface select auto
d-i netcfg/get_hostname string unassigned-hostname
d-i netcfg/get_domain string unassigned-domain
d-i netcfg/wireless_wep string
d-i mirror/protocol string http
d-i mirror/country string manual
d-i mirror/http/hostname string 192.168.100.1
d-i mirror/http/directory string /ubuntu
d-i mirror/http/proxy string
d-i mirror/suite string bionic
d-i passwd/user-fullname string Debian User
d-i passwd/username string debian
d-i passwd/user-password password temppwd
d-i passwd/user-password-again password temppwd
d-i user-setup/allow-password-weak boolean true
d-i user-setup/encrypt-home boolean false
d-i clock-setup/utc boolean false
d-i time/zone string Asia/Tokyo
d-i clock-setup/ntp boolean true
d-i clock-setup/ntp-server string ntp.nict.jp
d-i partman-auto/method string regular
d-i partman-lvm/device_remove_lvm boolean true
d-i partman-md/device_remove_md boolean true
d-i partman-lvm/confirm boolean true
d-i partman-lvm/confirm_nooverwrite boolean true
d-i partman-auto/choose_recipe select atomic
d-i partman-partitioning/confirm_write_new_label boolean true
d-i partman/choose_partition select finish
d-i partman/confirm boolean true
d-i partman/confirm_nooverwrite boolean true
d-i partman-md/confirm boolean true
d-i partman-partitioning/confirm_write_new_label boolean true
d-i partman/choose_partition select finish
d-i partman/confirm boolean true
d-i partman/confirm_nooverwrite boolean true
d-i partman/mount_style select uuid
d-i live-installer/net-image string /ubuntu/install/filesystem.squashfs
d-i base-installer/install-recommends boolean true
d-i base-installer/kernel/image string linux-generic
d-i apt-setup/use_mirror boolean false
d-i apt-setup/restricted boolean true
d-i apt-setup/universe boolean true
d-i apt-setup/backports boolean true
d-i apt-setup/services-select multiselect security
d-i apt-setup/security_host string security.ubuntu.com
d-i apt-setup/security_path string /ubuntu
d-i debian-installer/allow_unauthenticated boolean true
tasksel tasksel/first multiselect none
d-i pkgsel/include string openssh-server
d-i pkgsel/upgrade select full-upgrade
popularity-contest popularity-contest/participate boolean false
d-i pkgsel/update-policy select none
d-i pkgsel/install-language-support boolean true
d-i grub-installer/only_debian boolean true
d-i grub-installer/with_other_os boolean true
d-i grub-installer/bootdev  string default
d-i finish-install/reboot_in_progress note
d-i preseed/late_command string \
        in-target /bin/sed -ie 's/192.168.100.1/jp.archive.ubuntu.com/g' /etc/apt/sources.list
この構成は最低限にしています。Ansibleを利用したい場合は、late_commandで、authorized_keysを配置して、SSHのパスワードログインを拒否する設定にするなどの変更をすると便利でしょう。
18.04から d-i live-installer/net-image string /ubuntu/install/filesystem.squashfsの設定を加えています。これは、Webサーバーでサブディレクトリにファイルを展開したために必要になりました。
また、一番最後ではmirrorに設定したWebサーバーのIPアドレスを国内のミラーサイトに変更しています。
違うミラーサイトを指定する場合には、ディレクトリ構造の違いも吸収する必要があるかもしれません。
preseed.cfg と txt.cfg ファイルの関係性
txt.cfgにchecksumを埋め込んでいるため、/var/www/html/ubuntu/preseed.cfgを編集する度にtxt.cfgを書き換える必要があります。
$ i="$(md5sum /var/www/html/ubuntu/preseed.cfg|cut -d' ' -f1)"
$ sudo sed -e "s/checksum=[0-z]\+/checksum=${i}/" /app/tftp_root/ubuntu-installer/amd64/boot-screens/txt.cfg
定型的な作業はMakefileなどでタスクにまとめておくと便利でしょう。
dnsmasqの基本的な構成
参考までに設定ファイルを転機しておきます。
dnsmasq
APU/APU2にIPを振るためにdhcpdをeth1で稼動させています。
log-queries
no-negcache

domain-needed
bogus-priv
expand-hosts
domain=ipxe.example.com

interface=eth1
no-dhcp-interface=eth0
dhcp-range=192.168.100.200,192.168.100.240,2m
dhcp-leasefile=/var/tmp/dnsmasq.leases
APU/Apu2にインストールイメージを配布するために、TFTPサーバーを構成している例です。
enable-tftp
tftp-root=/app/tftp_root
dhcp-boot=pxelinux.0
プロセスの再起動
ファイルを配置したらdnsmasqをリスタートします。
$ suso systemctl restart dnsmasq.service
APU/APU2でのiPXEによるインストール
端末側で速度などを調整してから、APUにシリアルケーブルを接続し、電源を接続するとBIOSが起動します。
ここで入力待ちになるため、C-b (Controlキーと'b'キーの同時押し)を入力するとiPXEブートのプロンプトが表示されます。
iPXE> dhcp net0
iPXE> chain tftp://192.168.100.1/pxelinux.0
ここから先の処理はpreseed.cfgの記述に問題がなければ自動的にインストールが進み、再起動され、Ubuntu 18.04のログインプロンプトが表示されて完了します。
デバッグ作業について
preseed.cfgの記述は成功するまで、止まった理由を確認し、書き直して、また実行という作業になります。
シリアル端末側で一切の入力ができないまま停止する場合もあれば、APU/APU2側でShellが実行できる場合もあります。
TFTP, Webサーバー側での確認事項
/var/log/syslog, /var/log/nginx/access.log を確認し、”not found", " 404 " などで検索をします。
$ grep 'not found' /var/log/syslog
Oct  1 13:32:24 localhost dnsmasq-tftp[2948]: file /app/tftp_root/linux not found

$ grep ' 404 ' /var/log/nginx/access.log
192.168.100.201 - - [01/Oct/2018:16:17:18 +0900] "GET /ubuntu/dists/bionic/InRelease HTTP/1.1" 404 168 "-" "Debian APT-HTTP/1.3 (1.6.3)"
APU/APU2側での確認事項
インストーラーが何かしらエラーを出力し、処理をマニュアルで進められるようであれば、一度Shellを実行し、/var/log/syslog の内容を確認します。
遭遇した課題
squashfsイメージを取得するところの事は前述したので、それ以外で気になった点について残しておきます。
- 使用するISOイメージのタイミングによって、構成するデバイス名が /dev/sda だったり、/dev/sdb になったりする点
- 前回のUbuntu 16.04(build:20101020ubuntu451)では /dev/sda でしたが、今回は内部ドライブは /dev/sdb に見えている点
対応のため、partmanでディスクの指定を削除し、bootdevをdefaultに設定しています。
APU/APU2のfirmwareのバージョンによっても挙動が異なるかもしれず、これらの現象に遭遇しない可能性もあります。
以上
