先日のApple Eventでも Mac Studio や iPad Air(第5世代) が発表され、いよいよ Apple M1チップ がデファクトスタンダードになったなあと感じています。自分もこれまで、業務用PCとしてMacBook Pro 2017を使っていたのですが、悪名高いバタフライキーボードの破損をきっかけに MacBook Air(M1) を購入してもらいました。
さっそく業務で使用していくためにセットアップをしたのですが、やはりIntelチップとの違いに戸惑ったので備忘録としてまとめます。この記事は元々社内のナレッジに書く予定だったのですが、自分自身QiitaやZennの記事にかなり助けられました。この記事も今後M1 Macをセットアップする人の役に立てばと思っています。
MacOSの基本的な設定を使いやすく変更する
購入したばかりのMacはDockに大量のアプリが登録されていたり、カーソルやマウスポインタの移動が遅かったり、トラックパッドが使いづらかったりいろいろ不便な状態です。それらの設定をいい感じに変更する必要があります。
もともとIntel Mac用に設定をいい感じに変更するスクリプトファイルを書いていたのですが、M1 Macだと上手く動作しませんでした。以下の記事に書かれているスクリプトがいい感じに動作してくれたので、これをそのまま実行しました。
Rosetta2のインストール
M1 Macが登場して1年以上経過しRosetta2なしで動くツールが大半なのですが、まだ一部のアプリは動作しない状況のためRosetta2を入れておきます。
sudo softwareupdate --install-rosetta
後に判明するのですが、ARMだとRuby on Railsを使って開発しているアプリの bundle install が通らないという問題が発生したこともあり、当面はRosetta2の併用は必須だと感じました。
Homebrewおよび各種ツールのインストール
旧PCでもMacBookを修理に出して初期化を強いられることがあったので、ある程度のセットアップスクリプトを用意してありました。このスクリプトを実行することで、Homebrewおよび各種ツールをインストールします。
# HomeBrewのインストール
if [ ! -x "`which brew`" ]; then
  /usr/bin/ruby -e "$(curl -fsSL https://raw.githubusercontent.com/Homebrew/install/master/install)"
  brew update
fi

# mas-cliのインストール
if [ ! -x "`which mas`" ]; then
  brew install mas
fi

mas install 539883307  # LINE
mas install 803453959  # Slack
mas install 406056744  # Evernote
mas install 425955336  # Skitch
mas install 1176895641 # Spark
mas install 1278508951 # Trello
mas install 414855915  # WinArchiver Lite

brew install google-japanese-ime --cask
brew install google-chrome       --cask
brew install firefox             --cask
brew install dropbox             --cask
brew install skype               --cask
brew install cheatsheet          --cask
brew install visual-studio-code  --cask
brew install docker              --cask
brew install iterm2              --cask
brew install macdown             --cask
brew install authy               --cask
brew install notable             --cask
brew install postico             --cask
brew install arduino             --cask
brew install sequel-pro          --cask
brew install brooklyn            --cask
brew install insomnia            --cask
brew install discord             --cask
brew install wireshark           --cask
brew install toggl-track         --cask

brew tap aws/tap
brew install git
brew install wget
brew install asdf
brew install nvm
brew install postgresql
brew install mysql
brew install peco
brew install z
brew install ghq
brew install starship
brew install docker-compose
brew install yarn
brew install hub
brew install hey
brew install imagemagick
brew install stoplight-studio
brew install awscli
brew install aws-sam-cli
brew install openssh
brew install gh
Rosetta2で起動するiTerm2を作る
残念ながらRosetta2を使うことを避けられないため、Rosetta2で起動するiTerm2および.zshrcを準備します。以下記事を参考にしました。
M1 MacでARMとIntelのターミナルを切り替えて使う (Homebrew 3以降の場合)
.zshrc の冒頭に以下のような処理を書くことで、Rosetta2の有無に応じてbrewとasdfを切り替えられるようにしておきます。
if [ "$(uname -m)" = "arm64" ]; then
  eval "$(/opt/homebrew/bin/brew shellenv)"
  export PATH="/opt/homebrew/bin:$PATH"

  . /opt/homebrew/opt/asdf/libexec/asdf.sh
else
  eval "$(/usr/local/bin/brew shellenv)"

  export ASDF_DATA_DIR=~/.asdf_x86
  . /usr/local/opt/asdf/libexec/asdf.sh
fi
asdfによる言語環境のインストール
asdfを使って開発で使用する言語やツールをインストールします。以前はanyenvを使っていたのですが、zshの起動が重く感じたのとC#やTerraformのバージョンを切り替える必要が出たタイミングでasdfに乗り換えました。
以下のように主要な言語やツールのプラグインを追加して、必要なバージョンの言語環境をインストールします。
asdf plugin add ruby https://github.com/asdf-vm/asdf-ruby.git
asdf plugin add python
asdf plugin add nodejs https://github.com/asdf-vm/asdf-nodejs.git
asdf plugin add golang https://github.com/kennyp/asdf-golang.git
asdf plugin add terraform
asdf plugin add dotnet-core https://github.com/emersonsoares/asdf-dotnet-core.git

asdf install ruby 3.0.2
asdf install nodejs 15.14.0
asdf install python 3.8.11
asdf install golang 1.16.7
# その他必要に応じてインストール
Vimの設定
メインエディタはVS Codeなので、不自由なくVimが使えるようにしておきます。 .vimrc をいい感じに生成してくれるサイトを同僚に教えてもらったのでそれを使って生成しておきました。
Your configuration generator for NeoVim and Vim - Vim Bootstrap
zshの設定・プラグインを整備
まず見た目をいい感じにするためにstarshipを有効化しておきます。ついでに補完も有効化します。
eval "$(starship init zsh)"

bindkey -v
autoload -U compinit
compinit -u
zshのコマンド履歴を有効化します。
export HISTFILE=${HOME}/.zsh_history
export HISTSIZE=1000
export SAVEHIST=100000
setopt extended_history
よく使うaliasを定義しておきます。
alias ls='ls -G'
alias be='bundle exec'
alias get_idf='. $HOME/esp/esp-idf/export.sh'
alias arm64e='arch -arm64e zsh'
alias x86_64='arch -x86_64 zsh'
今回のセットアップを機にzshのプラグインを積極的に利用することにしました。zshのプラグイン管理として Oh My Zsh が第1候補に挙がったのですが、同僚から「動作が重い」という話を聞いていたので、今回は zinit を使うことにしました。昨年末にリポジトリが消えるという事件があったようですが、有志の方がリポジトリを復活させてくれているので、そこを参考にインストールします。
zdharma-continuum/zinit: 🌻 Flexible and fast ZSH plugin manager
以下のようなプラグインを入れています。
-
johnhamelink/env-zsh
-
.envを自動的にロードしてくれるプラグイン。
-
-
scmbreeze/scm_breeze
- Gitを便利にしてくれるプラグイン。Gitコマンドのaliasが充実している。
-
zsh-users/zsh-autosuggestions
- fishのようにコマンドラインのサジェストをしてくれるプラグイン。
-
zdharma/fast-syntax-highlighting
- コマンドラインのシンタックスハイライト。
-
mollifier/anyframe
- pecoとかfzfによるあいまい検索の機能を提供してくれるプラグイン。
特に mollifier/anyframe がとても便利です。これまでpecoを使うために .zshrc に書いていた大量の関数が不要となり、 .zshrc がスッキリしました。
最終的な .zshrc は以下のようになりました。
if [ "$(uname -m)" = "arm64" ]; then
  eval "$(/opt/homebrew/bin/brew shellenv)"
  export PATH="/opt/homebrew/bin:$PATH"

  . /opt/homebrew/opt/asdf/libexec/asdf.sh
else
  eval "$(/usr/local/bin/brew shellenv)"

  export ASDF_DATA_DIR=~/.asdf_x86
  . /usr/local/opt/asdf/libexec/asdf.sh
fi

eval "$(starship init zsh)"

bindkey -v
autoload -U compinit
compinit -u

export HISTFILE=${HOME}/.zsh_history
export HISTSIZE=1000
export SAVEHIST=100000
setopt extended_history

alias ls='ls -G'
alias be='bundle exec'
alias get_idf='. $HOME/esp/esp-idf/export.sh'
alias arm64e='arch -arm64e zsh'
alias x86_64='arch -x86_64 zsh'

### Added by Zinit's installer
if [[ ! -f $HOME/.local/share/zinit/zinit.git/zinit.zsh ]]; then
  print -P "%F{33} %F{220}Installing %F{33}ZDHARMA-CONTINUUM%F{220} Initiative Plugin Manager (%F{33}zdharma-continuum/zinit%F{220})…%f"
  command mkdir -p "$HOME/.local/share/zinit" && command chmod g-rwX "$HOME/.local/share/zinit"
  command git clone https://github.com/zdharma-continuum/zinit "$HOME/.local/share/zinit/zinit.git" && \
    print -P "%F{33} %F{34}Installation successful.%f%b" || \
    print -P "%F{160} The clone has failed.%f%b"
fi

source "$HOME/.local/share/zinit/zinit.git/zinit.zsh"
autoload -Uz _zinit
(( ${+_comps} )) && _comps[zinit]=_zinit
### End of Zinit's installer chunk

zinit light johnhamelink/env-zsh
zinit light scmbreeze/scm_breeze
zinit light zsh-users/zsh-autosuggestions
zinit light zdharma/fast-syntax-highlighting
zinit light mollifier/anyframe

bindkey '^f' anyframe-widget-cdr
autoload -Uz chpwd_recent_dirs cdr add-zsh-hook
add-zsh-hook chpwd chpwd_recent_dirs
bindkey '^r' anyframe-widget-execute-history
bindkey '^b' anyframe-widget-checkout-git-branch
bindkey '^g' anyframe-widget-cd-ghq-repository
bindkey '^k' anyframe-widget-kill
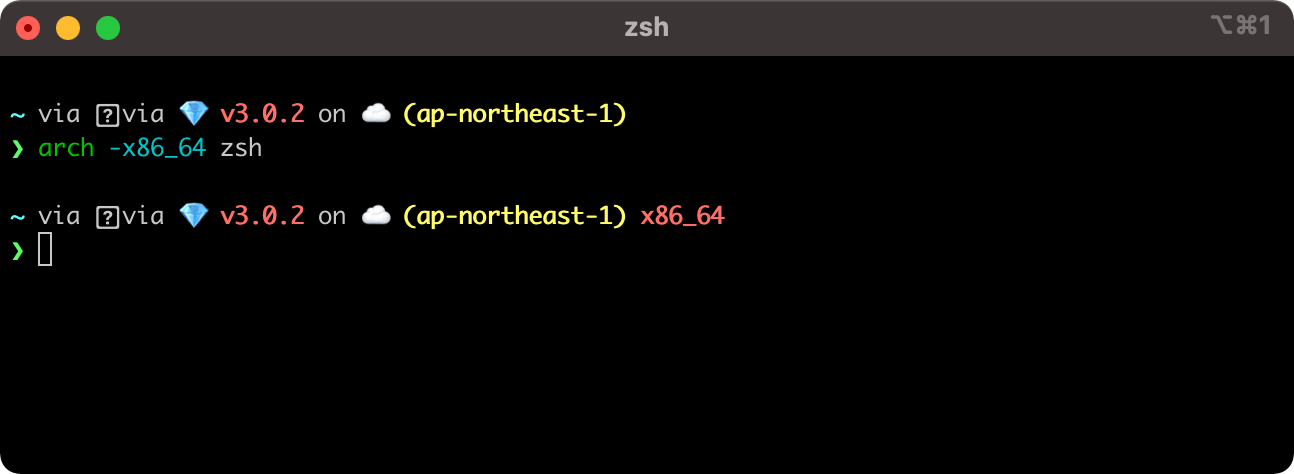
iTerm2がRosetta2で動作しているかひと目で区別できるようにする
最後に、今起動しているiTerm2が x86_64 or arm64e のどちらなのか、ひと目で分かる仕組みを入れておきます。以下記事を参考にStarshipのconfigを編集します。
Starship で Rosetta 経由でシェルを起動しているかをプロンプトに表示する
command_timeout = 2000

[custom.arch]
command = "uname -m"
when = """ test $(uname -m) = "x86_64" """
style = "bold red"
format = "[$output]($style) "
このように、 x86_64 で動作しているときのみそのように表示してくれるようになります。
まとめ
ここまでに記載していないブラウザや各種ツールの設定は、大抵はログインすると自動的に引き継がれるようになっていて、数年前に比べてPCのセットアップが本当に楽になったなあと実感しました。
Rosetta2周りはちょっと厄介だなと思いましたが、起動や動作は前のPCよりも爆速になったので、これからはこのPCでガシガシ開発していく所存です。