本記事ではフロントエンドに Nuxt.js(Vue.js)、バックエンドに Ruby on Rails 、APIに GraphQL を採用したアプリケーションに、JWTトークンによる認証 を追加する方法についてまとめます。
題材
サンプルとして以下チュートリアルで作成したToDoリストを使用します。
Nuxt.js + GraphQL + Ruby on Railsで作るToDoアプリチュートリアル(前編)
Nuxt.js + GraphQL + Ruby on Railsで作るToDoアプリチュートリアル(後編)
JWTでの認証フロー
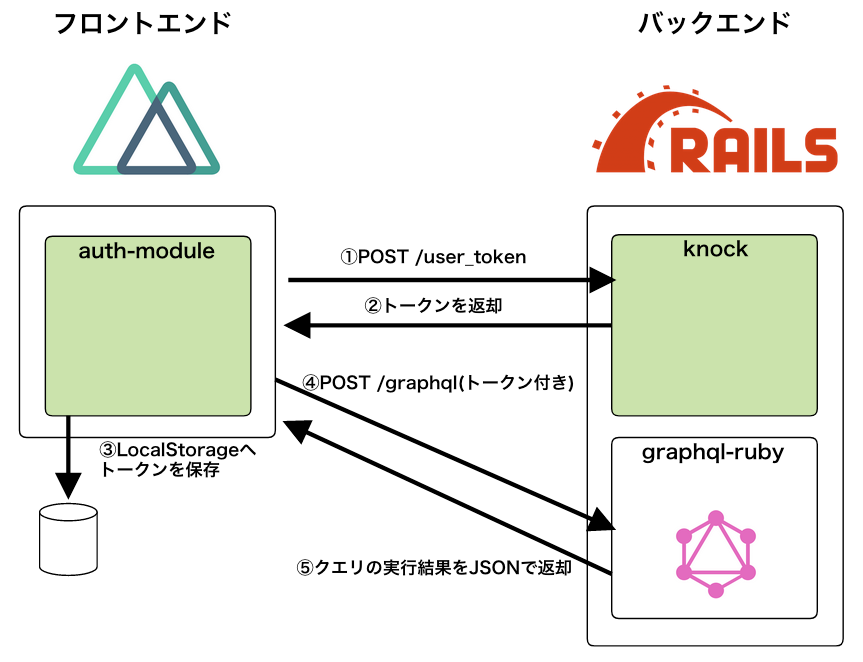
今回実装するJWTでの認証フローを図にまとめました。
トークンの発行・保存・付与・検証がめんどくさそうに見えるかもしれませんが、フロントエンド側はAuth Moduleが、バックエンド側はknockがトークンをいい感じに処理してくれるので、安心してください。
実装(バックエンド)
ユーザモデルを定義する
認証単位となるモデル(User)を生成します。
$ bundle exec rails g model user email:string password_digest:string
$ bundle exec rails db:migrate
Userはパスワードをハッシュ化して管理するので、モデルに has_secure_password を宣言します。
class User < ApplicationRecord
  has_secure_password
end
また、Gemfileの bcrypt のコメントを外します。
# ・・・中略・・・

# Use Active Model has_secure_password
gem 'bcrypt', '~> 3.1.7

# ・・・中略・・・
テスト用のUserを seed.rb に追記します。
# ・・・中略・・・

User.create(
  email: 'test@example.com',
  password: 'xxxxxxxx',
  password_confirmation: 'xxxxxxxx'
)
$ bundle exec rails db:seed
knockをインストールする
Gemfileにknockを追加し、インストールします。
gem 'rack-cors'
gem 'graphql'
gem 'knock' # ★追加
$ bundle install
Rails6だとknockのautoloadに失敗するのでinitializerで明示的にrequireします。
require 'knock/version'
require 'knock/authenticable'
ジェネレータを実行します。
$ rails generate knock:install
ログイン/ログアウトのエンドポイントを準備
ジェネレータでControllerを生成します。
$ rails generate knock:token_controller user
各Controllerにて認証処理を行えるようにするため、 ApplicationController にてmoduleをincludeします。
class ApplicationController < ActionController::API
  include Knock::Authenticable
end
GraphqlController のbefore_actionとして認証処理を追加します。
class GraphqlController < ApplicationController
  before_action :authenticate_user

  # ・・・中略・・・
end
今回、セッションは使わないのとCORS設定済みであることを考慮して、CSRF対策を解除します。
# ・・・中略・・・

module RailsNuxtGrapshqlTodoapp
  class Application < Rails::Application
    config.load_defaults 6.0
    config.api_only = true
    config.action_controller.default_protect_from_forgery = false
  end
end
動作確認(バックエンド)
サーバ起動してInsomniaを使ってリクエストを送信してみます。
$ bundle exec rails s
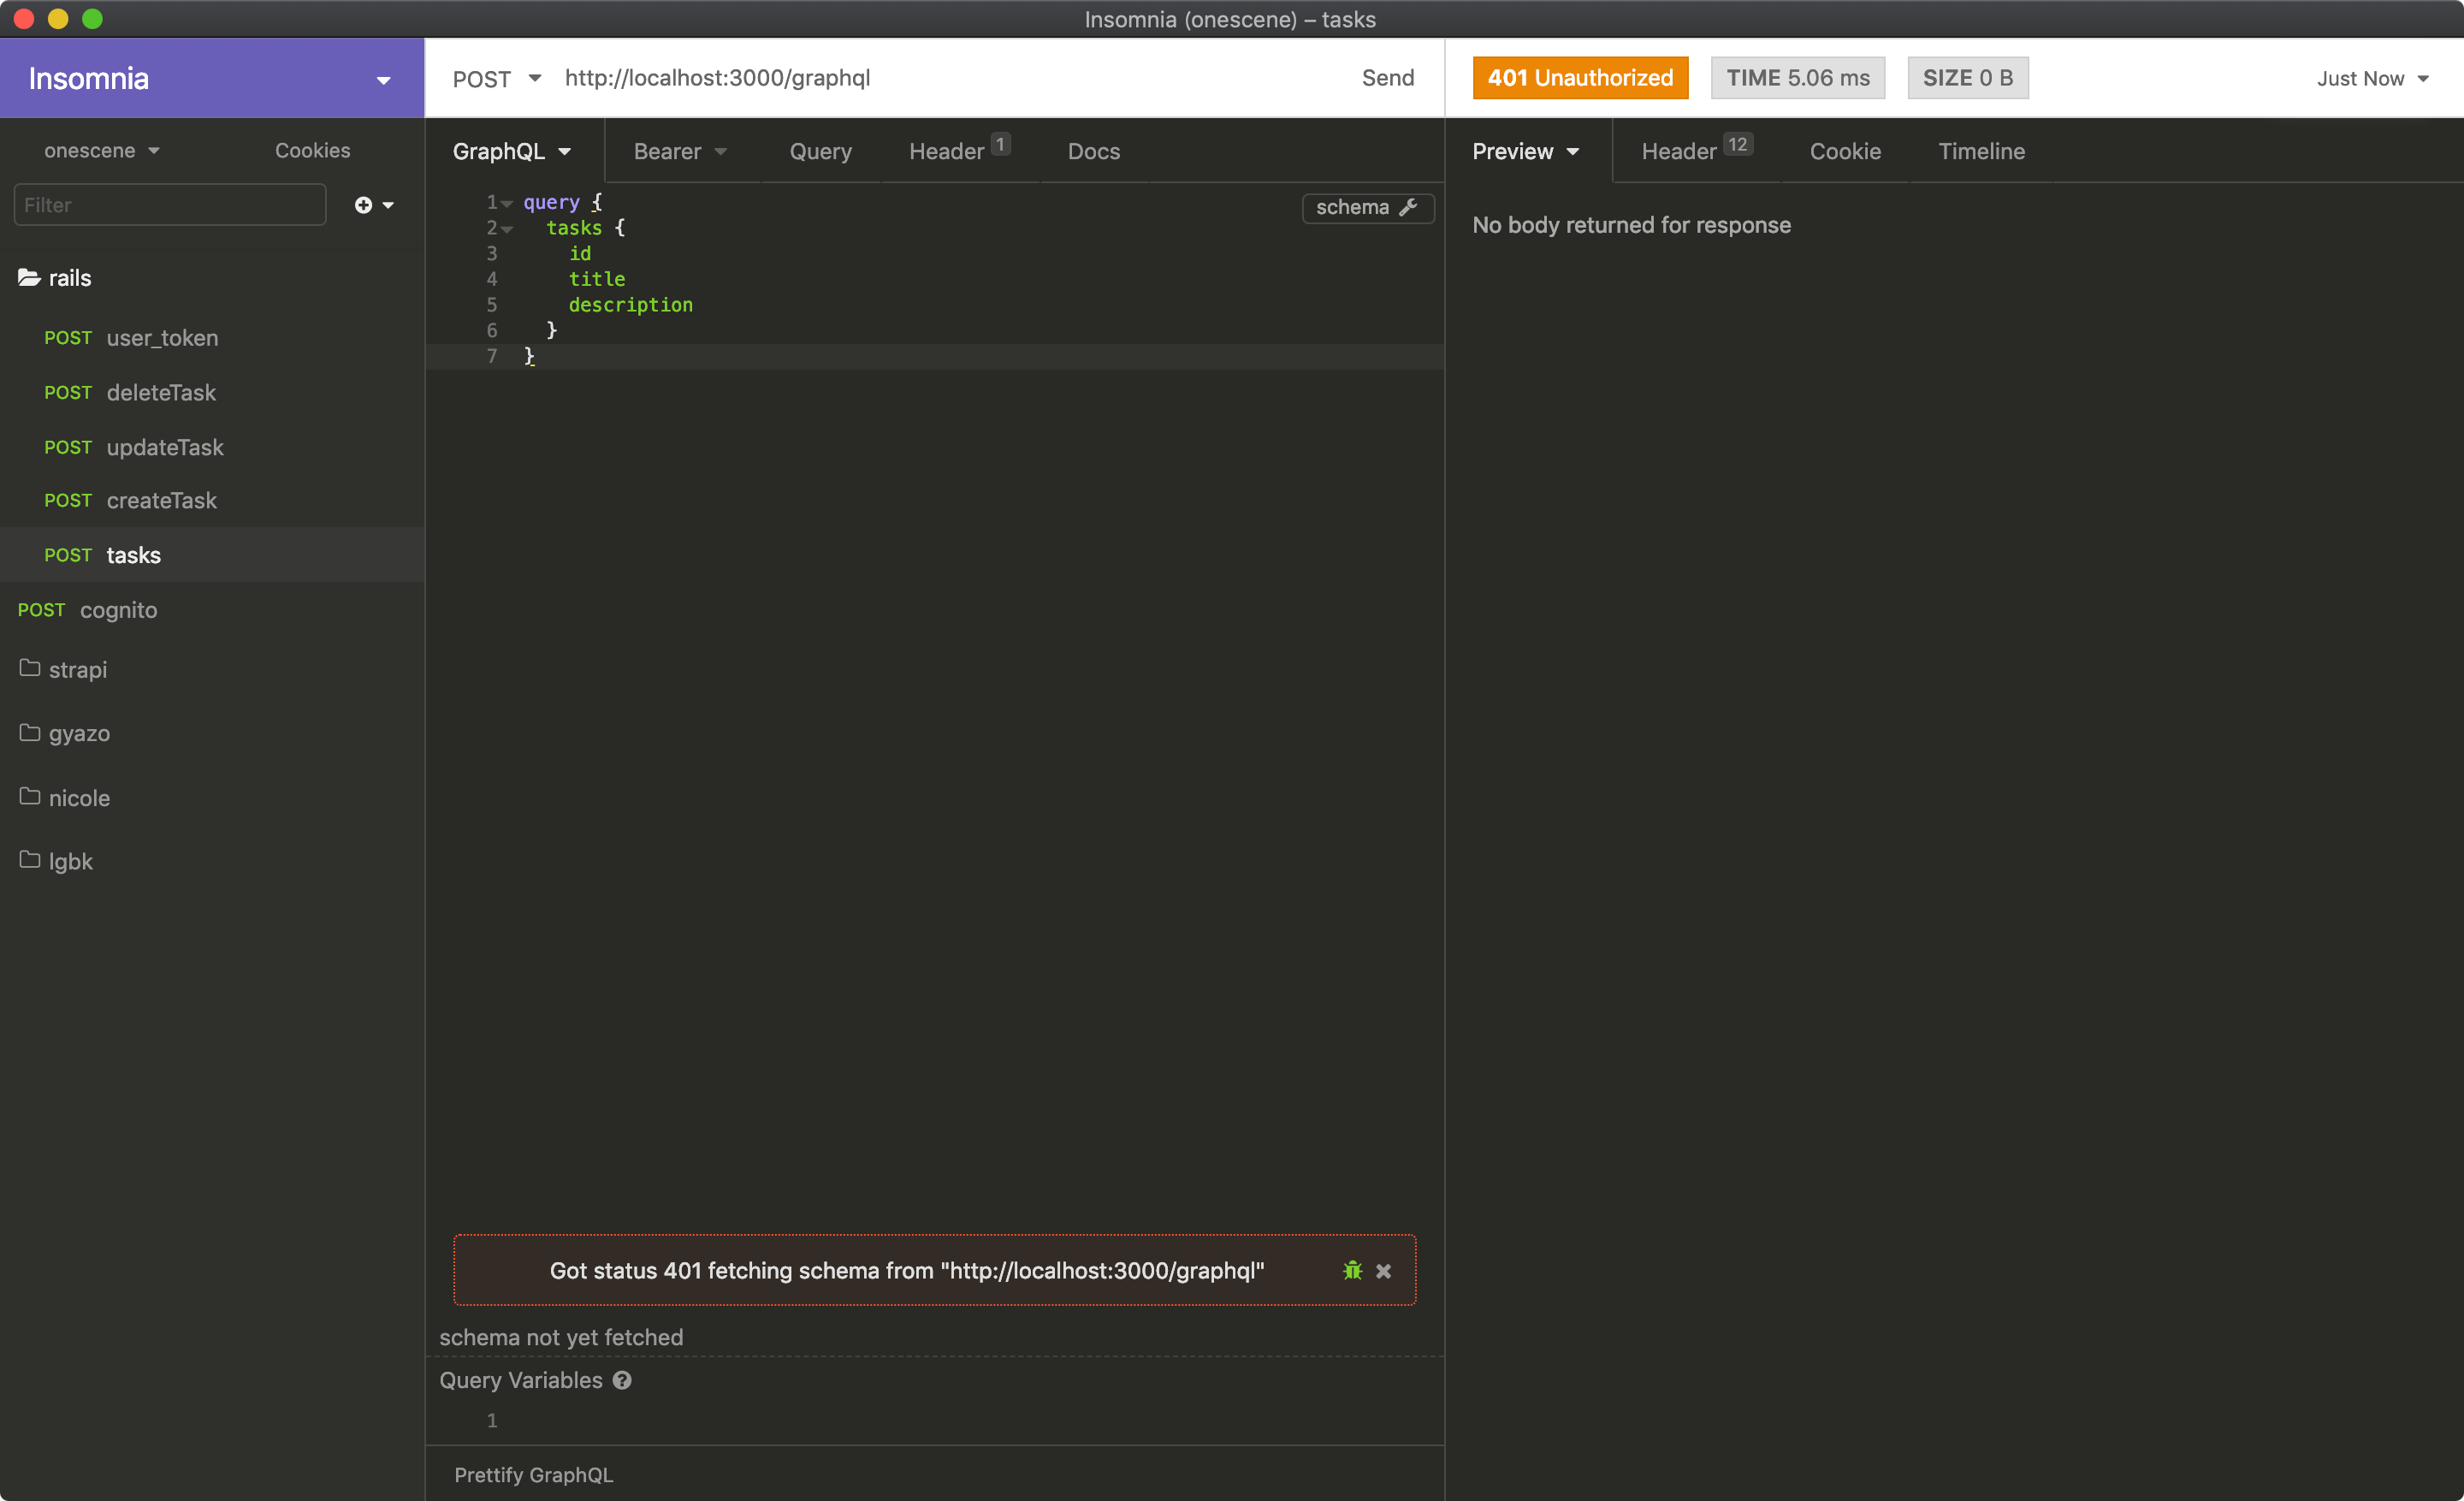
未認証の状態でGraphQL Queryを送信しても、401 が返ってきます。

/user_token へリクエストすると、JWTトークンが返ってきます。

Bearerの設定でTOKEN欄に上記JWTトークンを記載します。

この状態で再度GraphQL Queryを送信すると、 200 が返ってきました。
JWT認証が機能していますね。

実装(フロントエンド)
Auth Moduleをインストールする
npmでインストールします。
Auth Moduleは store/index.js が存在していないとエラーを出すので、空のファイルを作成しておきます。
$ npm install @nuxtjs/auth @nuxtjs/axios
$ touch store/index.js
nuxt.config.js の modules, axios, auth, apollo を追記します。
  // ・・・中略・・・
  modules: [
    '@nuxtjs/vuetify',
    '@nuxtjs/pwa',
    '@nuxtjs/eslint-module',
    '@nuxtjs/apollo',
    '@nuxtjs/axios',
    '@nuxtjs/auth'
  ],
  axios: {
    baseURL: 'http://localhost:3000/'
  },
  auth: {
    strategies: {
      local: {
        endpoints: {
          login: { url: 'user_token', method: 'post', propertyName: 'jwt' },
          user: false,
          logout: false
        }
      }
    }
  },
  // ・・・中略・・・
  apollo: {
    clientConfigs: {
      default: {
        httpEndpoint: 'http://localhost:3000/graphql',
        getAuth: () => ''
      }
    }
  }
  // ・・・中略・・・
ログイン画面を準備

/login に相当する画面およびログイン処理を実装します。
<template>
  <v-container>
    <v-row>
      <v-col cols="6" offset="3">
        <v-card>
          <v-card-title>Login</v-card-title>
          <v-card-text>
            <v-form>
              <v-container>
                <v-row>
                  <v-col cols="6">
                    <v-text-field v-model="email" label="Email" required />
                  </v-col>
                </v-row>
                <v-row>
                  <v-col cols="6">
                    <v-text-field v-model="password" type="password" label="Password" required />
                  </v-col>
                </v-row>
                <v-row>
                  <v-col>
                    <v-btn @click="login()">
                      Login
                    </v-btn>
                  </v-col>
                </v-row>
              </v-container>
            </v-form>
          </v-card-text>
        </v-card>
      </v-col>
    </v-row>
  </v-container>
</template>

<script>
export default {
  middleware({ store, redirect }) {
    window.console.log(store.state.auth.loggedIn)
    if (store.state.auth.loggedIn) {
      return redirect('/')
    }
  },
  data() {
    return {
      email: '',
      password: ''
    }
  },
  methods: {
    async login() {
      try {
        await this.$auth.loginWith('local', {
          data: {
            auth: {
              email: this.email,
              password: this.password
            }
          }
        })
        await this.$apolloHelpers.onLogin(this.$auth.getToken('local').match(/^Bearer[ ]+([^ ]+)[ ]*$/i)[1])
        this.$router.push('/')
      } catch (e) {
        window.console.log(e)
      }
    }
  }
}
</script>
無名middlewareを用いることで、既にlogin済みの状態でこのページを開くと、'/' でリダイレクトするようにしています。
methodsの login() がLOGINボタンを押したときの処理です。
Auth Moduleでログインをした後で、Apollo ModuleへJWTトークンをセットしています。
ログアウトボタンを追加

ログイン中の場合のみ、メニューバーにログアウトボタンを表示します。
<template>
<v-app>
<v-app-bar app>
<v-toolbar-title v-text="title" />
<div class="flex-grow-1" />
<span v-if="loggedIn" @click="logout()">Logout</span>
</v-app-bar>
<v-content>
<nuxt />
</v-content>
<v-footer center>
<v-layout justify-center>
<span>© 2019 Yuhei Okazaki. All Rights Reserved.</span>
</v-layout>
</v-footer>
</v-app>
</template>
<script>
export default {
data() {
return {
title: 'Tasks'
}
},
computed: {
loggedIn() {
return this.$auth.loggedIn
}
},
methods: {
async logout() {
try {
await this.$auth.logout()
await this.$apolloHelpers.onLogout()
this.$router.push('/login')
} catch (e) {
window.console.log(e)
}
}
}
}
</script>
methodsの logout() がLOGOUTを押したときの処理です。
Auth Moduleでログアウトをした後で、Apollo Moduleもログアウトしています。
未認証時のリダイレクトを追加
このままだと、ログインしていない状態でもタスク一覧画面を開けてしまうので、ログインしていないときには /login へ飛ばすようmiddlewareを設定します。
// 中略
export default {
  middleware: 'auth'
  // 中略
}
動作確認(全体)
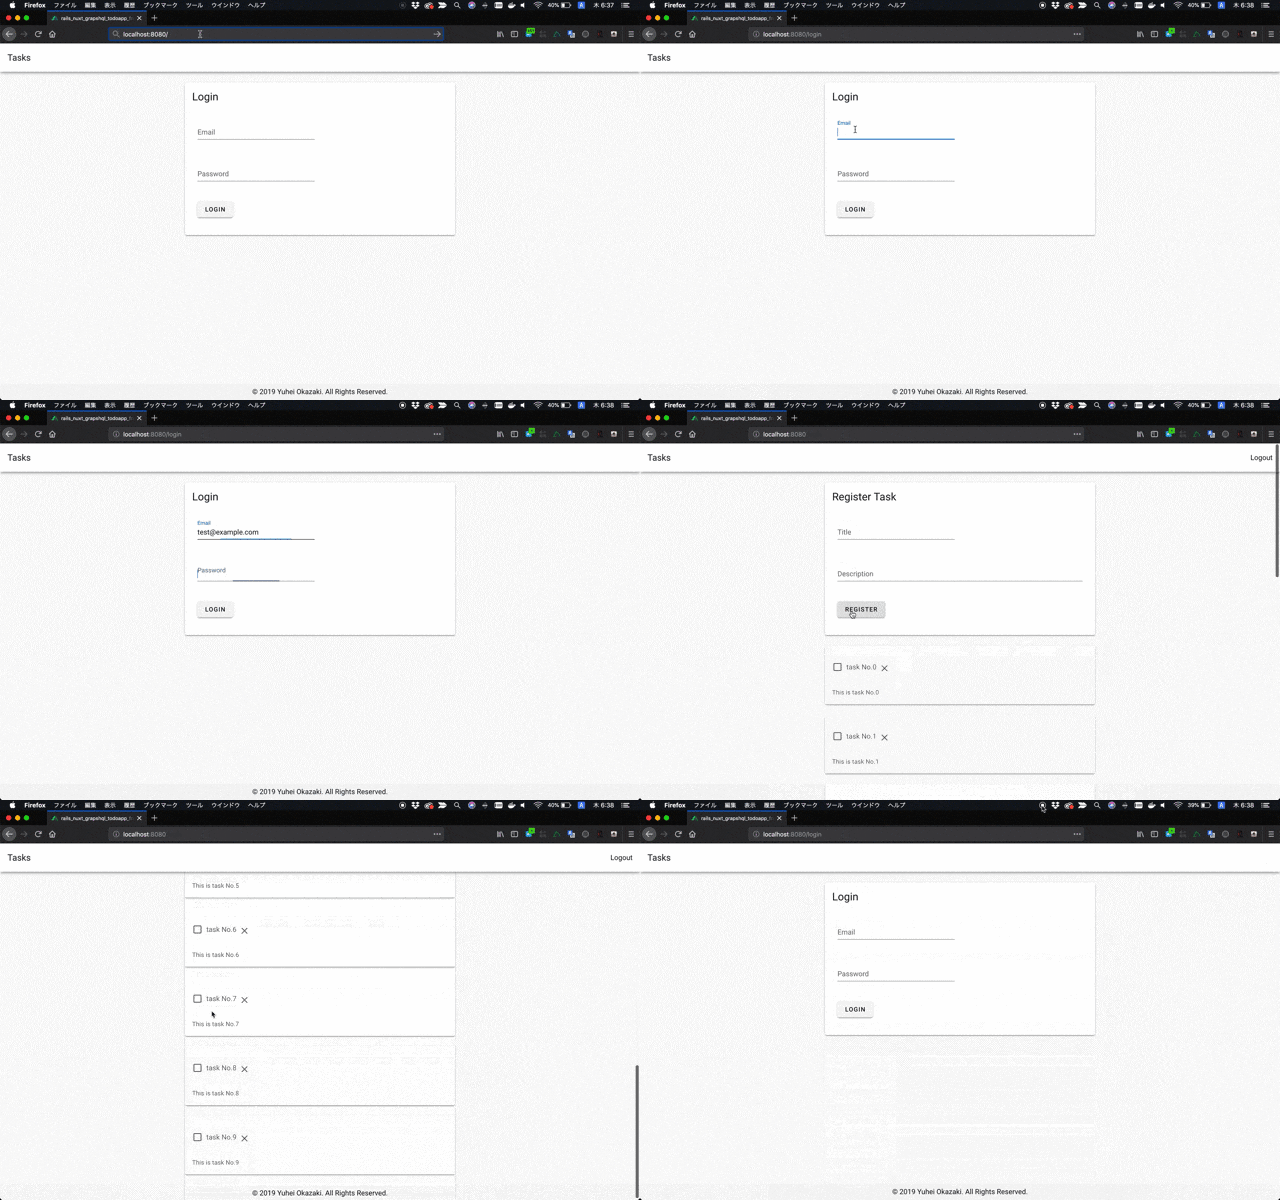
冒頭の画像のように、ログインしたときのみタスク一覧が表示されます。
まとめ
本記事ではバックエンドにRuby on Rails、フロントエンドにNuxt.js、APIにGraphQLを採用したアプリケーションにJWT認証を追加しました。
新規登録画面やタスクとユーザの紐付け等、未実装の処理は多数あるものの、認証というアプリケーションを実装するときの最初の壁は越えられたかと思います。
knockやAuth Module、Apollo Moduleを用いたことで、トークン操作を意識せず簡単に認証追加できたので、ぜひお試しください。


