概要
こんにちは。とあるIT企業の新入社員です。
訳あって人に説明するべく急いで書きました。
簡単なプログラムを簡単にメモしておきたいと思います。
今回は、chainerでニューラルネットワークにおける分類モデルの学習について書かせていただきます。データは公開されている*"iris.csv"*を使用します。
使用するモジュール(グラフなど)についてもメモしていきます。
何かご指摘・質問等ございましたら、ご遠慮なくコメント欄にお願い致します。
コード全体(GitHub)
コードはGitHubで公開しています。
https://github.com/kazu-ojisan/NN-chainer_Classify
始める前に
今回は以前書いたニューラルネット回帰モデルの学習プログラムを見た前提で書かせていただきます。
無論、重複するようなメモは省かせていただきます。
今更、丁寧にsin波をchainerで学習させてみる(自分メモ)
回帰との違い
- 教師の与え方(label番号が格納された1次元配列)
- 出力層の活性化関数(Sotmax関数)
- 誤差の算出(交差エントロピー誤差の使用)
環境(バージョン等)
MacOS 10.14.2
Anaconda3-4.4.0
python3.5.5
chainer4.0.0
学習の詳細
- 学習回数:$1000$
- バッチサイズ:$10$ (ミニバッチ法)
- データ数:$150$
- テストデータレート:$0.2$
モデル構造
- 中間層:2層(ユニット数:10)
- 中間層の活性化関数:Sigmoid
実装
使用モジュール
回帰と同様。
今更、丁寧にsin波をchainerで学習させてみる(自分メモ)
データセット
データはiris.csvを読み込んで使用する。
このデータの詳細はこちらからダウンロード可能。
今回は、そのcsvデータの5列目にラベル番号を付与している。
構造としては
- 1〜4列 : 入力
- 5列 : 教師
- 6列 : ラベル名
def get_data(test_rate):
    data = np.genfromtxt("iris.csv", dtype=float, delimiter=",",skip_header=1,usecols = (0,1,2,3,4))

    x = data[:,0:4]
    t = data[:,4]

    x_test = x[:int(0.2*x.shape[0])]
    x_train = x[int(0.2*x.shape[0]):]
    t_test = t[:int(0.2*t.shape[0])]
    t_train = t[int(0.2*t.shape[0]):]

    return x_train, t_train, x_test, t_test
Neural Network構造・順伝播等
Neural Net Classを作成。(IRISクラス)
モデルに関する処理はなるべく、IRISに記述する。
ラベル数は3なので、出力層のユニット数は3である。またテストのみをする場合、回帰と違って、出力層の活性化関数はSotmax関数を使用する。(F.softmax)
しかしここでは、テスト時のコードは書いていない。さらに、Cross Entropy Errorを算出するための関数F.softmax_cross_entropyが、Sotmax関数を兼ねているため、"def forward"中の出力層に活性化関数は何もかかっていない。
class IRIS(Chain):
    def __init__(self, h_units, act):
        super(IRIS, self).__init__()
        with self.init_scope():
            self.l1=L.Linear(4, h_units[0])
            self.l2=L.Linear(h_units[0], h_units[1])
            self.l3=L.Linear(h_units[1], 3)

            if act == "relu":
                self.act = F.relu
            elif act == "sig":
                self.act = F.sigmoid

    def __call__(self, x, t):
        x = Variable(x.astype(np.float32).reshape(x.shape[0],4))
        t = Variable(t.astype("i"))
        y = self.forward(x)
        return F.softmax_cross_entropy(y, t), F.accuracy(y,t)

    def forward(self, x):
        h = self.act(self.l1(x))
        h = self.act(self.l2(h))
        h = self.l3(h)
        return h
基本的に分類問題の場合、誤差の算出には、Cross Entropy Error(交差エントロピー誤差)を使用する。また、精度($正解数/全データ数$)を評価することが多い。(F.accuracy)
        # Cross Entropy (交差エントロピー)
        return F.softmax_cross_entropy(y, t), F.accuracy(y,t)
学習
学習の処理も関数化しているが、これは後々、中間層のユニット数や活性化関数等の変更を簡略化するためである。比較のためにのちに変更する可能性があるものを引数に設定しておく。
実は、回帰のプログラムとほぼ変わらない。
評価方法として精度(正解数/データ数)が追加されている程度。
# 学習(学習パラメータを設定しやすくするために関数化)
def training(test_rate, bs, n_epoch, h_units, act):


    x_train, t_train, x_test, t_test = get_data(test_rate)
    N = x_train.shape[0]

    # モデルのセットアップ
    model = IRIS(h_units, act)
    optimizer = optimizers.Adam()
    optimizer.setup(model)

    # loss/accuracy格納配列
    tr_loss = []
    te_loss = []
    tr_acc = []
    te_acc = []


    # 時間を測定
    start_time = time.time()
    print("START")

    # 学習ループ
    for epoch in range(1, n_epoch + 1):
        perm = np.random.permutation(N)
        sum_loss = 0
        sum_acc = []
        for i in range(0, N, bs):
            x_batch = x_train[perm[i:i + bs]]
            t_batch = t_train[perm[i:i + bs]]

            model.cleargrads()
            loss, acc = model(x_batch,t_batch)
            loss.backward()
            optimizer.update()
            sum_loss += loss.data * bs
            sum_acc.append(acc.data)

        # 学習誤差/精度の平均を計算
        ave_loss = sum_loss / N
        tr_loss.append(ave_loss)
        tr_acc.append(sum(sum_acc)/len(sum_acc))

        # テスト誤差
        loss, acc = model(x_test,t_test)
        te_loss.append(loss.data)
        te_acc.append(acc.data)

        # 学習過程を出力
        if epoch % 100 == 1:
            print("Ep/MaxEp     tr_loss     te_loss")

        if epoch % 10 == 0:
            print("{:4}/{}  {:10.5}   {:10.5}".format(epoch, n_epoch, ave_loss, float(loss.data)))

            # 誤差をリアルタイムにグラフ表示
            plt.plot(tr_loss, label = "training")
            plt.plot(te_loss, label = "test")
            plt.yscale('log')
            plt.legend()
            plt.grid(True)
            plt.xlabel("epoch")
            plt.ylabel("loss (Cross Entropy)")
            plt.pause(0.1)  # このコードによりリアルタイムにグラフが表示されたように見える
            plt.clf()


    print("END")

    # 経過時間
    total_time = int(time.time() - start_time)
    print("Time : {} [s]".format(total_time))

    # 誤差のグラフ作成
    plt.figure(figsize=(4, 3))
    plt.plot(tr_loss, label = "training")
    plt.plot(te_loss, label = "test")
    plt.yscale('log')
    plt.legend()
    plt.grid(True)
    plt.xlabel("epoch")
    plt.ylabel("loss (Cross Entropy)")
    plt.savefig("Results/loss_history.png")
    plt.clf()
    plt.close()

    # 精度のグラフ作成
    plt.figure(figsize=(4, 3))
    plt.plot(tr_acc, label = "training")
    plt.plot(te_acc, label = "test")
    plt.legend()
    plt.grid(True)
    plt.xlabel("epoch")
    plt.ylabel("acc (Cross Entropy)")
    plt.savefig("Results/acc_history.png")
    plt.clf()
    plt.close()

    # 学習済みモデルの保存
    serializers.save_npz("Results/Model.model",model)
if __name__ == "__main__":

    # 設定
    test_rate = 0.2
    bs = 10             # バッチサイズ
    n_epoch = 1000       # 学習回数
    h_units = [10, 10]  # ユニット数 [中間層1 中間層2]
    act = "sig"        # 活性化関数

    training(test_rate, bs, n_epoch, h_units, act)
結果
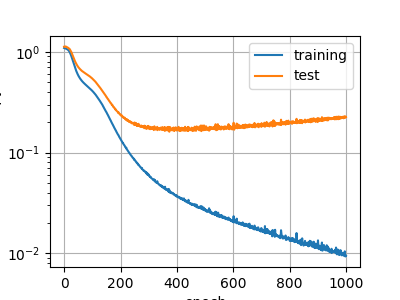
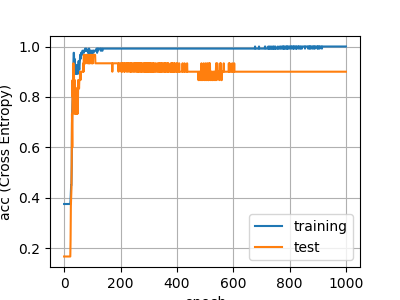
今回は完全に過学習していますが、おそらくデータが少ないことと正規化していないことが大きな原因だと思います。
誤差グラフ
精度グラフ
終わりに
実際に記事を書いてみると、まだまだわかってないことがあることに気づきます。
また気づきがあれば、追加していきます。
コード全体(GitHub)
GitHubで公開しています。
https://github.com/kazu-ojisan/NN-chainer_Classify

