目次
- はじめに
- 1. PythonとCUDAのバージョン確認をする。
- 2. GPU版のpytorchを導入する。
- 3. 任意の場所にフォルダ作成し、仮想環境を構築する。
- 4. 実際に字幕ファイルの生成をしてみる
- AviUtlをご利用の場合(srtからexoへ変換)
- 参考YouTube動画
はじめに
Open AI社の提供しているwhisperを使えば無料で自動字幕生成と聞いたので試しに使ってみたときに残した個人的なメモ書きとなります。
1. PythonとCUDAのバージョン確認をする。
2024年2月27日時点での私の環境下でのバージョンは以下の通り、参考までに記載。
> python -V
Python 3.10.11
> nvcc -V
nvcc: NVIDIA (R) Cuda compiler driver
Copyright (c) 2005-2023 NVIDIA Corporation
Built on Wed_Feb__8_05:53:42_Coordinated_Universal_Time_2023
Cuda compilation tools, release 12.1, V12.1.66
Build cuda_12.1.r12.1/compiler.32415258_0
利用しているGPUはRTX 3060 12GBとなっています。
whisperのページによるとlarge modelあたりになってくるとVRAM 10GB程度必要とのこと。
2. GPU版のpytorchを導入する。
2-1. pip listでpytorchのインストールを確認する。
必要に応じてCPU版のpytorchをアンインストールする。
pip uninstall torch
pip uninstall torchaudio
pip uninstall torchvision
2-2. GPU版のpytorchを導入する。
PyTorchの公式サイトからインストールのためのコマンドを確認できる。
CUDA 12.1の場合は以下のコマンドでGPU版のpytorchをインストールする。
pip3 install torch torchvision torchaudio --index-url https://download.pytorch.org/whl/cu121
2-3. GPU版のpytorchが導入出来たかを確認する。
pip listで導入が出来たかを確認する。
torch                     2.2.1+cu121
torchaudio                2.2.1+cu121
torchvision               0.17.1+cu121
+cu121を確認する。
以下の内容でcheckGPUpytorch.pyを作成する。
import torch
# Check GPU recognization True or False
print(torch.cuda.is_available())
# Check default how many GPU devices and GPU number
print(torch.cuda.device_count())
print(torch.cuda.current_device())
# Check GPU device name
print(torch.cuda.get_device_name())
以下をWindows Terminalにて実行する。
今回は"D:\whisper"に環境構築したため、必要に応じて変更。
cd D:\whisper
py checkGPUpytorch.py
以下の結果が得られれば完了。
"NVIDIA GeForce RTX 3060"の部分に関しては自身のPC環境を確認する。
True
1
0
NVIDIA GeForce RTX 3060
3. 任意の場所にフォルダ作成し、仮想環境を構築する。
今回は"D:\whisper"を作成した。
以下の内容でRunInitialSetup.batを作成し実行する。
python -m venv venv
./venv/scripts/activate
pip install torch torchvision torchaudio --index-url https://download.pytorch.org/whl/cu118
pip install git+https://github.com/openai/whisper.git
4. 実際に字幕ファイルの生成をしてみる
拝借元YouTube動画
以下、コマンド入力一例。
./venv/scripts/activate
whisper --model tiny --output_format srt --language Japanese "D:\whisper\バキバキ童貞になったと気づいた日_shorts.mp4"
4-1. 動画のファイルパスをコピーする
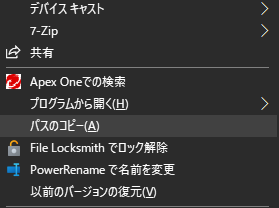
動画ファイルのパス取得はWindows 10の場合、
Shift+右クリックで「パスのコピー(A)」を選択するとできる。
4-2. スクリプトの作成と実行
簡単なスクリプト作成した。
コピーしたパスをそのまま貼ってそれ以降はEnterを連打するればダウンロードフォルダに字幕ファイルが保存される。
以下Powershellのスクリプト一例。
プログラマーではない上に普段Powershellでスクリプトを書く機会がないのでこの書き方が適切かは微妙なため、必要に応じて内容を修正等して頂くと幸いです。
# Run update
pip install --upgrade --no-deps --force-reinstall git+https://github.com/openai/whisper.git

# Activate virtual environment
./venv/scripts/activate

# Create filedialog
[void][System.Reflection.Assembly]::LoadWithPartialName("System.windows.forms")
$dialog = New-Object System.Windows.Forms.OpenFileDialog
$shellapp = New-Object -ComObject Shell.Application
$dialog.InitialDirectory = $shellapp.Namespace("shell:Downloads").Self.Path

# Select video file
Write-Host 'Please select video file'
if($dialog.ShowDialog() -eq [System.Windows.Forms.DialogResult]::OK){
	$PATH = $dialog.FileName
	Write-Host 'File selected'
}

$MODEL = Read-Host 'Enter model (MAX large-v3, DEFAULT base)'
if([string]::IsNullOrEmpty($format)){
	# Set default file model
	$MODEL = 'base'
}

$LANGUAGE = Read-Host 'Enter language (DEFAULT Japanese)'
if([string]::IsNullOrEmpty($format)){
	# Set default file language
	$LANGUAGE = 'Japanese'
}

$FORMAT = Read-Host 'Enter format to save (DEFAULT srt)'
if([string]::IsNullOrEmpty($FORMAT)){
	# Set default file format
	$FORMAT = 'srt'
}

$OUTPUT_DIR = Read-Host 'Enter save file location (DEFAULT download folder)'
if([string]::IsNullOrEmpty($location)){
    # Default file location
	$shellapp = New-Object -ComObject Shell.Application
	$OUTPUT_DIR = $shellapp.Namespace("shell:Downloads").Self.Path
}

$trasnlate_question = Read-Host 'Do you want to translate to English? (yes/no)'
if($trasnlate_question -in 'yes', 'y'){
	# Run whisper with English translate
	whisper --model $MODEL --output_dir $OUTPUT_DIR --output_format $FORMAT --language $LANGUAGE --task translate $PATH
} else {
	# Run whisper without English translate
	whisper --model $MODEL --output_dir $OUTPUT_DIR --output_format $FORMAT --language $LANGUAGE $PATH
}

Write-Host 'DONE'
Write-Host 'Press any key to close...'
$host.UI.RawUI.ReadKey()
4-3. 修正版スクリプト
ファイルダイアログを利用して指定するようにするようにスクリプトを修正した。
# Activate virtual environment
./venv/scripts/activate
# Create filedialog
[void][System.Reflection.Assembly]::LoadWithPartialName("System.windows.forms")
$dialog = New-Object System.Windows.Forms.OpenFileDialog
$shellapp = New-Object -ComObject Shell.Application
$dialog.InitialDirectory = $shellapp.Namespace("shell:Downloads").Self.Path
# Select video file
Write-Host 'Please select video file'
if($dialog.ShowDialog() -eq [System.Windows.Forms.DialogResult]::OK){
	$PATH = $dialog.FileName
	Write-Host 'File selected'
}
# Enter model
$MODEL = Read-Host 'Enter model (MAX large-v3, DEFAULT large-v3)'
if([string]::IsNullOrEmpty($MODEL)){
	# Set default file model
	$MODEL = 'large-v3'
}
# Select language
$LANGUAGE = Read-Host 'Enter language (DEFAULT Japanese)'
if([string]::IsNullOrEmpty($LANGUAGE)){
	# Set default file language
	$LANGUAGE = 'Japanese'
}
# Select format
$FORMAT = Read-Host 'Enter format to save (DEFAULT srt)'
if([string]::IsNullOrEmpty($FORMAT)){
	# Set default file format
	$FORMAT = 'srt'
}
# Select save file directory
$dialog = New-Object System.Windows.Forms.FolderBrowserDialog
$shellapp = New-Object -ComObject Shell.Application
$dialog.SelectedPath = $shellapp.Namespace("shell:Downloads").Self.Path
if($dialog.ShowDialog() -eq [System.Windows.Forms.DialogResult]::OK){
    $OUTPUT_DIR = $dialog.SelectedPath
}
# Translate question
$trasnlate_question = Read-Host 'Do you want to translate to English? (yes/no)'
if($trasnlate_question -in 'yes', 'y'){
	# Run whisper with English translate
	whisper --model $MODEL --output_dir $OUTPUT_DIR --output_format $FORMAT --language $LANGUAGE --task translate $PATH
} else {
	# Run whisper without English translate
	whisper --model $MODEL --output_dir $OUTPUT_DIR --output_format $FORMAT --language $LANGUAGE $PATH
}
# Pause
Write-Host 'DONE'
Write-Host 'Press any key to close...'
$host.UI.RawUI.ReadKey()
4-4. スクリプトの呼び出しに関して
RunScript.batファイルを作成した。
powershell -NoProfile -ExecutionPolicy Bypass .\<SCRIPT NAME>.ps1
このbatファイルのショートカット作成して任意の場所(例えば、C:\ProgramData\Microsoft\Windows\Start Menu\Programs)に保存する。
ショートカット名をwhisper OpenAIなどに変更して、
Windowsキー-->whisperと入力-->Enter
で簡単に呼び出せるようにしている。
AviUtlをご利用の場合(srtからexoへ変換)
一般的な動画編集ソフトであれば、字幕はsrtファイルに対応しているが、動画編集ソフトAviUtlに関してはどうやら標準ではsrtファイルに対応していないらしい。
AviUtlはアプリケーションとしては古く、更新もないがネット上ではまだ利用者が多いと聞く。そのため、少し調べて見つけた字幕ファイルの変換スクリプトのダウンロード先を一応記載する。
私自身はAviUtlを利用していないので、記載したWebページにあるexoファイルへの変換するためのスクリプトの利用に関しては自己責任でお願いします。
参照したYouTube動画

