はじめに
本記事はredux公式のtutorialのファイル構造が難しくてよく分からなかった人に向けた記事です。
公式tutorialはちょっと難しい、、、
けど、他の簡単なtutorialは1ファイルで完結していてreduxの構造がよく分からない、、
そんな痒いところに手が届いたらいいなぁ、、って温度感で書きました。
※この記事はReduxのファイル構成と処理の流れをメインとした記事になっております。
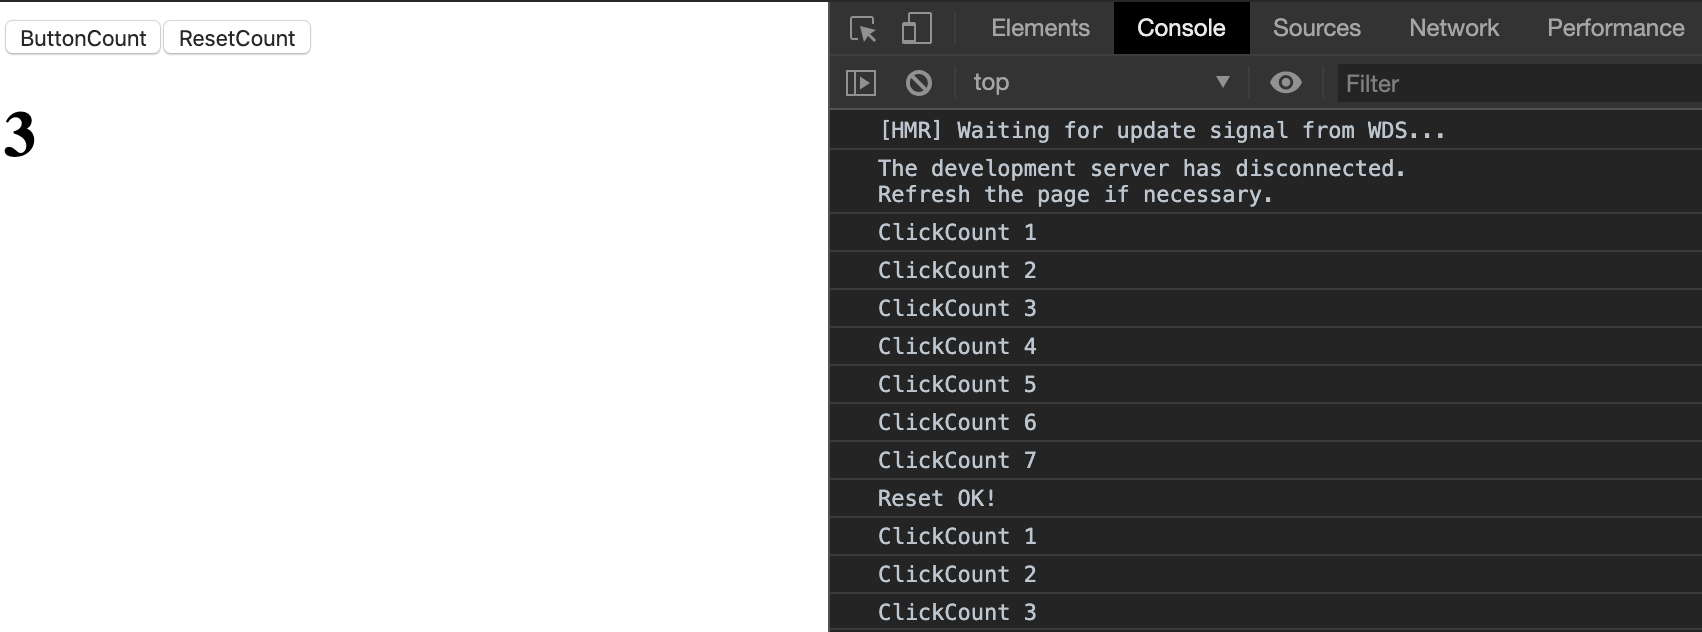
本記事での最終成果物は以下の画像のようになります。
ButtonCountを押下するとClickCountが1つずつ加算されていき、ResetCountを押下すると「Reset OK!」というログが出力され、表示されているClickCountが0になる仕組みです。

Redux
まず軽くReduxについて概要を説明します。
ReduxとはFluxの概念を継承し、より扱いやすく設計されたアプリの状態を管理するためのJavaScriptのフレームワークです。
UIを構築するための使用され、ライブラリの中ではReactと最も相性がいいです。
ひな形を作っていく
まず最初に以下のコマンドを打ちます。
create-react-appは、Reactアプリのひな形を作成してくれるツールです。
簡単に言うと、これを使えばwebpackやbabelやEslintの設定を自分で書かずに済みます。
(最初のうちはこれで十分だと思います。)
$ npx create-react-app sample
これでsampleという名前のディレクトリが作成され、必要なものがインストールされたアプリが完成しました。
次にreduxを使うのに不可欠な以下のパッケージをインストールします。
作成したsampleディレクトリに移動して以下のコマンドを打ちます。
$ cd sample
npm install --save-dev redux
npm install --save-dev react-redux
ここまで準備できたらサーバを起動してみましょう。以下のコマンドを打つとブラウザが開きます。
$ npm start
以下の画像がブラウザに表示されたら成功です。
動作を確認したら一度サーバを止めておきましょう。

sampleアプリ書き換え
さて、ようやく本題に入ります。
必要なファイルはこれから作っていくので以下のファイルは全て消してしまいましょう。
- public配下の階層index.html以外全てのファイルを削除。
- src配下の階層ファイル全て削除
次に残したindex.htmlを以下のように書き換えていきます。
<!DOCTYPE html>
<html lang="en">
  <head>
    <meta charset="UTF-8">
    <meta name="viewport" content="width=device-width, initial-scale=1.0">
    <meta http-equiv="X-UA-Compatible" content="ie=edge">
    <title>Document</title>
  </head>
  <body>
    <div id="root">
  </body>
</html>
次にsrc配下に最上位コンポーネントになるindex.jsxを作っていきます。
src/index.jsx
import React from "react";
import ReactDOM from "react-dom";
import { createStore } from "redux";
import { Provider } from "react-redux";
import Container from "./Container/app"
import reducer from "./redux/reducer"

const initialState = {
  clickCount: 0,
  resetClickCount: 0
};

const App = () => {
  const store = createStore(reducer, initialState);
  return (
    <Provider store={store}>
      <Container />
    </Provider>
  );
};
ReactDOM.render(<App />, document.getElementById("root"));
Store
storeにはreduxのstate(状態)、即ちreducerに対応したstateが入っています。
上記の場合、initialStateの中身が初期値stateとして入っています。
基本的にコードを直接記述することはないので状態が保管されている場所という理解でOKです。
Provider
storeを使うために必要なものです。
ルート階層のコンポーネントをラップして、ラップした以下のコンポーネントでstoreを使えるようにしています。
Reduxロジック作成
Reduxの3原則
Single source of truth(信頼できる1つの情報源)
アプリケーション全体の「stateはツリーの形で1つのオブジェクトで作られ、1つのstoreに保存される。
State is read-only(状態は読み取り専用)
stateを変更する手段は、変更内容を持ったactionオブジェクトを発行して実行する
- Viewやコールバックが状態を直接変更させることはできない
- 変更は1つずつ順番に行われる
- actionはオブジェクトなので、保存可能でありテストしやすい
Mutations are written as pure functions(変更はすべて純粋な関数で書かれる)
actionがどのようにstateを変更するかを「reducer」で行う。
- 「reducer」はstateとactionを受け取って、新しいstateを返す関数である。
- 現在のstateを変更することはせずに、新しいstateを作って返すというのがポイント
stateの変更flow
stateの変更flowは以下のようになっています。
- actionを発行。
- reducerで現在のstateとactionを参照し、新たなstateを作成。
- 変更されたstateを反映。
また、reduxのロジックを構成していく際は上記のflowに沿って
action type → action → reducer
という順序で構成していくのが良いです。
action type
src配下にreduxという名前のディレクトリを作り、その中にaction.jsファイルを作ります。
作成したaction.jsファイルにaction typeを以下のように記述していきます。
src/redux/action
export const SET_COUNT = "SET_COUNT";
export const RESET_COUNT = "RESET_COUNT";
action
次にaction typeの下にaction creatorを定義していきます。
action creatorとはaction type(処理内容)payload(引数)を含むactionオブジェクトを返す関数のことを指します。
また、actionは純粋関数でなくてはいけません。これもreduxお作法の一つなので覚えておきましょう。
// action type

export const setCount = (count) => {
  return {
    type: SET_COUNT,
    payload: count
  };
}

export const setDefaultCount = (reset) => {
    return {
      type: RESET_COUNT,
      payload: reset
    };
  }
reducer
次にaction creatorを元に新たにstateを作成する関数reducerを定義していきます。
どのstateを変更していくかaction typeで条件分岐して決めます。
以下の階層にreducerファイルを作って記述していきます。
src/redux/reducer
import { SET_COUNT, RESET_COUNT } from "./action"

const reducer = (state, action) => {
    switch (action.type) {
        case SET_COUNT:
        console.log("ClickCount " +   action.payload);
            return {
                ...state,
                clickCount: action.payload
            };
        case RESET_COUNT:
        console.log("Reset OK!");
            return {
                ...state,
                clickCount: action.payload
            }
        default: return state;
    }
  }

  export default reducer;
上記のように定義したaction creatorをインポートしてきてcaseで条件分岐していきます。
...state ← なんだこれ? って思った方も多いかと思いますので説明していきます。
...stateという表現は,Reduxでの特別な記述方ではなく、ES6から採用されたスプレッドオペレータという演算子で、オブジェクトや配列の中身を展開します。
ここでindex.jsxで記述したstateの初期値が出てきます。
sampleアプリの場合 ...stateの中身はstoreに渡した、initialStateの値が該当します。
このstateとpayloadを受け取って新たなstateを返す。という仕組みです。
Container
最後に以下の構造になるようにContainerディレクトリとapp.jsファイルを作ります。
src/Container/app.js
作成したapp.jsの中身を書いていきます。
import React from "react"
import { connect } from "react-redux"
import { setCount, setDefaultCount } from "../redux/action"

class Container extends React.Component {
    constructor(props) {
      super(props);
      this.handleClick = this.handleClick.bind(this);
      this.resetCount = this.resetCount.bind(this);
    }

    handleClick() {
      this.props.actions.setCount(this.props.clickCount + 1);
    }

    resetCount() {
        this.props.actions.setDefaultCount(this.props.resetClickCount);
    }
  }

  const mapStateToProps = (state) => {
    return {
        clickCount: state.clickCount,
        resetClickCount: state.resetClickCount
     };
  }

  const mapDispatchToProps = (dispatch) => {
    return {
      actions: {
        setCount: function(count) {
          dispatch(setCount(count));
        },
        setDefaultCount: function(reset) {
            dispatch(setDefaultCount(reset))
        }
      }
    };

    render() {
      return (
        <div>
            <button onClick={this.handleClick}>ButtonCount </button>
            <button onClick={this.resetCount}>ResetCount</button>
            <h1>{this.props.clickCount}</h1>
        </div>
      );
    }
  }

  export default Container = connect(mapStateToProps, mapDispatchToProps)(Container);
app.jsの中身を説明していきます。
mapStateToProps
コンポーネントのpropsにstateの変更操作プロパティを定義して返す関数を定義しています。
この定義した関数名は慣習的にaction creatorと同じ名前を使用していますが、あくまで慣習での話なので別物でも大丈夫です。
mapDispatchToProps
action creatorで生成したオブジェクトをdispatch関数でreduxに渡しています。
reduxは渡ってきたオブジェクトをreducerに引き渡し、変更を反映させています。
※ mapStateToPropsとmapDispatchToPropsは理解するのが難しい箇所かと思いますが、
簡単に噛み砕くとpropsとして使えるようにしているということです。
Connect
connect呼び出すことでreduxのstoreと繋ぐことができます。
引数には、stateとstateを更新するCallback関数を渡します。
記述できたら実際にブラウザを見てみましょう。冒頭で載せた最終成果物と同じように表示され動くと思います。
おわりに
この記事のは私が躓いた箇所をできるだけ分かりやすくお伝えしたいという思いで書きました。
今回の例ではあまりreduxを利用するメリットを感じられなかったかもしれません。
reduxは複数のTreeにまたがるcomponentを用意があるプロジェクトでの利用で真価を発揮するかと思います。