今回やること
アンドロイドで写真を撮って保存しその写真の表示と画像分類を行い、分類結果を表示する簡単な画像認識アプリを作る。
これ↓
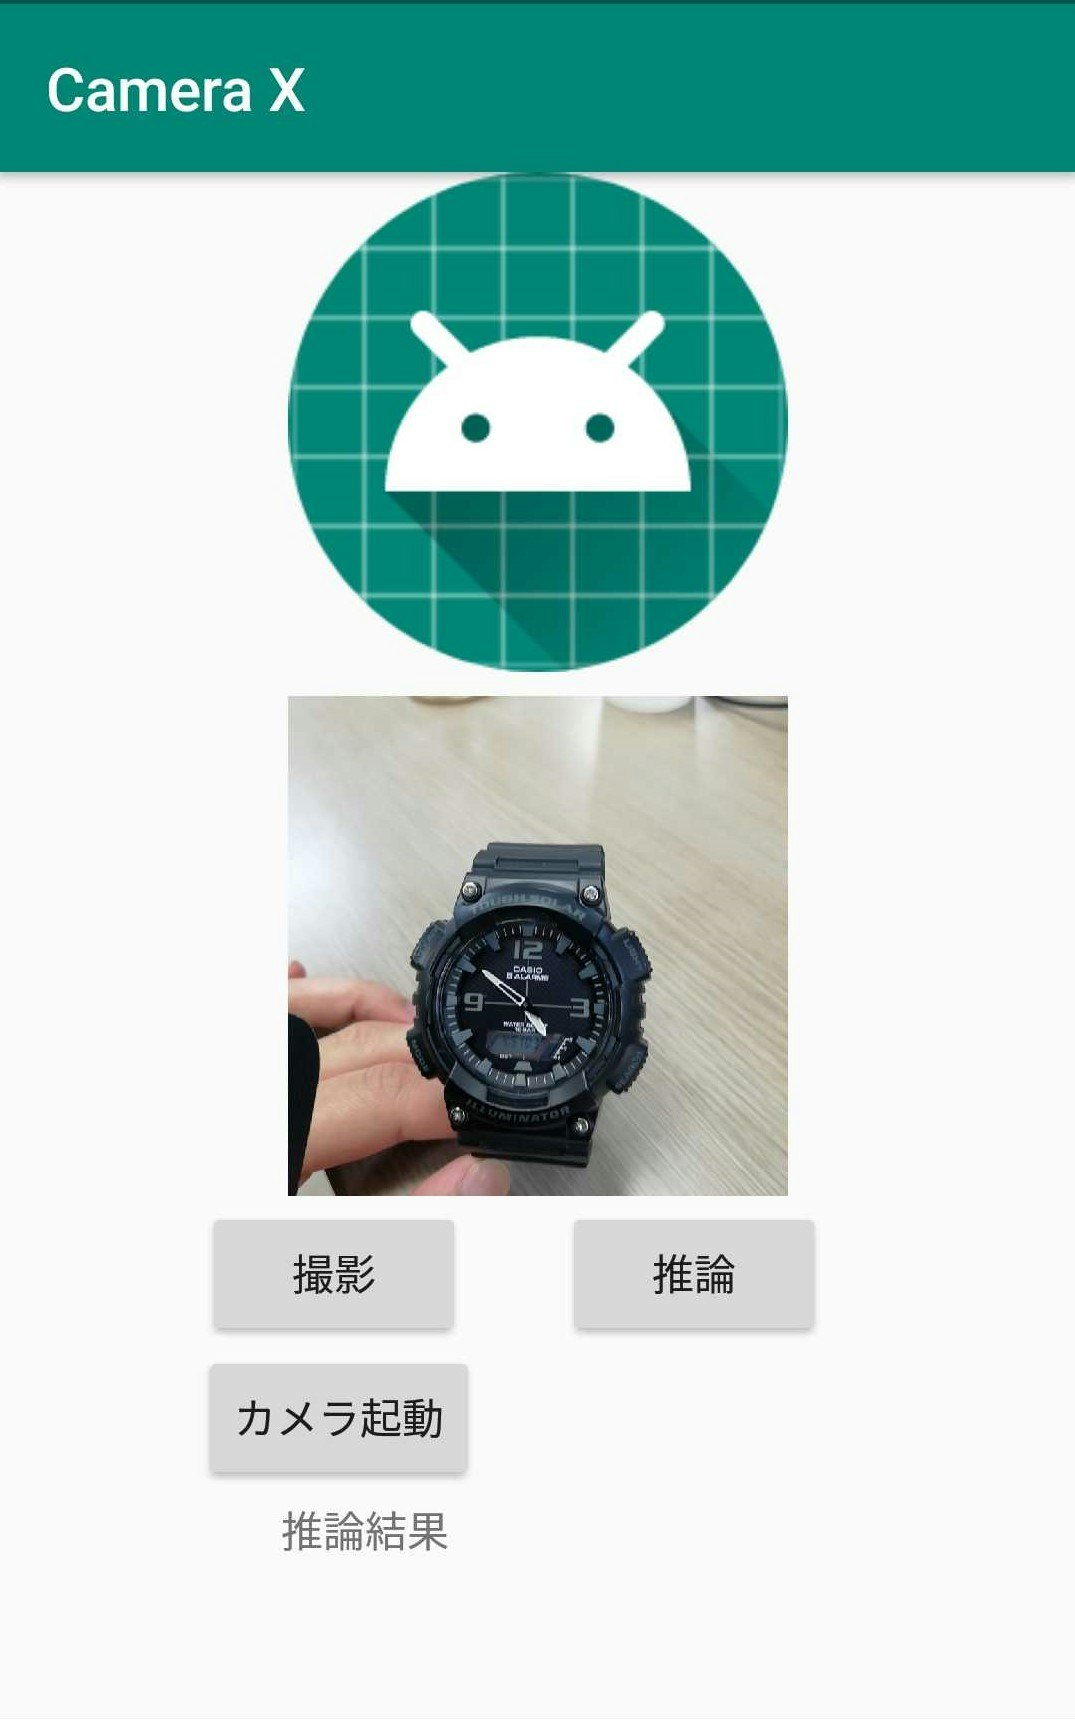
カメラを起動し撮影し、
撮った写真を画面に表示して
撮った写真を画像認識する
今回使うライブラリとかキーワード等
・ Python PyTorch Mobile
・ Android Camera X
・ resnet18
・ kotlin
去年出たものばっか...
依存関係
まずは依存関係(dependencies)を追加(2020年2月時点)
camera x と pytorch mobile
  def camerax_version = '1.0.0-alpha06'
    implementation "androidx.camera:camera-core:${camerax_version}"
    implementation "androidx.camera:camera-camera2:${camerax_version}"
    implementation 'org.pytorch:pytorch_android:1.4.0'
    implementation 'org.pytorch:pytorch_android_torchvision:1.4.0'
上の方の**android{}**ってあるところの一番最後に以下を追加
    compileOptions {
        sourceCompatibility JavaVersion.VERSION_1_8
        targetCompatibility JavaVersion.VERSION_1_8
    }
Camera Xの実装
依存関係を追加したら続いてCamera Xというアンドロイドで簡単にカメラを扱いやすくなるライブラリを利用して写真を撮る機能を実装する。
以下、公式のCamera Xのチュートリアルを実装していく。詳細は他の記事でも上がっていたりするので省略してコードのみ。
マニフェスト
パーミッションの許可
<uses-permission android:name="android.permission.CAMERA" />
カメラで写真を撮る機能を実装
カメラで写真を撮って保存する機能を付ける。チュートリアルに沿ってカメラのプレビュー、カメラのキャプチャーまで。
チュートリアルの内容とほぼ同じなのでコードのみ載せておきます。
レイアウト
 撮った写真を表示する場所、カメラのプレビュー表示場所、カメラ起動ボタン、キャプチャーボタン、推論ボタンを適当に設置する。
<androidx.constraintlayout.widget.ConstraintLayout xmlns:android="http://schemas.android.com/apk/res/android"
    xmlns:app="http://schemas.android.com/apk/res-auto"
    xmlns:tools="http://schemas.android.com/tools"
    android:layout_width="match_parent"
    android:layout_height="match_parent"
    tools:context=".MainActivity">

    <Button
        android:id="@+id/capture_button"
        android:layout_width="wrap_content"
        android:layout_height="wrap_content"
        android:layout_marginTop="2dp"
        android:text="撮影"
        app:layout_constraintEnd_toEndOf="parent"
        app:layout_constraintHorizontal_bias="0.25"
        app:layout_constraintStart_toStartOf="parent"
        app:layout_constraintTop_toBottomOf="@+id/frameLayout" />

    <Button
        android:id="@+id/activateCamera"
        android:layout_width="wrap_content"
        android:layout_height="wrap_content"
        android:text="カメラ起動"
        app:layout_constraintEnd_toEndOf="parent"
        app:layout_constraintHorizontal_bias="0.25"
        app:layout_constraintStart_toStartOf="parent"
        app:layout_constraintTop_toBottomOf="@+id/capture_button" />

    <ImageView
        android:id="@+id/capturedImg"
        android:layout_width="500px"
        android:layout_height="500px"
        app:layout_constraintEnd_toEndOf="parent"
        app:layout_constraintStart_toStartOf="parent"
        app:layout_constraintTop_toTopOf="parent"
        app:srcCompat="@mipmap/ic_launcher_round" />

    <FrameLayout
        android:id="@+id/frameLayout"
        android:layout_width="wrap_content"
        android:layout_height="wrap_content"
        android:layout_marginTop="8dp"
        android:background="@android:color/holo_blue_bright"
        app:layout_constraintEnd_toEndOf="parent"
        app:layout_constraintStart_toStartOf="parent"
        app:layout_constraintTop_toBottomOf="@+id/capturedImg">

        <TextureView
            android:id="@+id/view_finder"
            android:layout_width="500px"
            android:layout_height="500px" />
    </FrameLayout>

    <Button
        android:id="@+id/inferBtn"
        android:layout_width="wrap_content"
        android:layout_height="wrap_content"
        android:layout_marginStart="32dp"
        android:text="推論"
        app:layout_constraintBottom_toBottomOf="@+id/capture_button"
        app:layout_constraintStart_toEndOf="@+id/capture_button"
        app:layout_constraintTop_toTopOf="@+id/capture_button" />

    <TextView
        android:id="@+id/resultText"
        android:layout_width="wrap_content"
        android:layout_height="wrap_content"
        android:layout_marginTop="4dp"
        android:text="推論結果"
        app:layout_constraintEnd_toEndOf="parent"
        app:layout_constraintHorizontal_bias="0.31"
        app:layout_constraintStart_toStartOf="parent"
        app:layout_constraintTop_toBottomOf="@+id/activateCamera" />

</androidx.constraintlayout.widget.ConstraintLayout>
MainActivity
private const val REQUEST_CODE_PERMISSIONS = 10
private val REQUIRED_PERMISSIONS = arrayOf(Manifest.permission.CAMERA)

class MainActivity : AppCompatActivity(), LifecycleOwner {

    private var imgData: Bitmap? = null   // 保存した画像データ格納変数

    override fun onCreate(savedInstanceState: Bundle?) {
        super.onCreate(savedInstanceState)
        setContentView(R.layout.activity_main)
        viewFinder = findViewById(R.id.view_finder)

        // カメラ起動
        activateCamera.setOnClickListener {
            if (allPermissionsGranted()) {
                viewFinder.post { startCamera() }
            } else {
                ActivityCompat.requestPermissions(
                    this, REQUIRED_PERMISSIONS,REQUEST_CODE_PERMISSIONS
                )
            }
        }

        viewFinder.addOnLayoutChangeListener { _, _, _, _, _, _, _, _, _ ->
            updateTransform()
        }
        /**あとで画像分類するコードをここに追加**/
    }

    private val executor = Executors.newSingleThreadExecutor()
    private lateinit var viewFinder: TextureView

    private fun startCamera() {
        // プレビューuse case 作成
        val previewConfig = PreviewConfig.Builder().apply {
            setTargetResolution(Size(viewFinder.width, viewFinder.height)) // 680, 480
        }.build()

        val preview = Preview(previewConfig)

        preview.setOnPreviewOutputUpdateListener {
            val parent = viewFinder.parent as ViewGroup
            parent.removeView(viewFinder)
            parent.addView(viewFinder, 0)

            viewFinder.surfaceTexture = it.surfaceTexture
            updateTransform()
        }

        //キャプチャーuse case作成
        val imageCaptureConfig = ImageCaptureConfig.Builder()
            .apply {
                setCaptureMode(ImageCapture.CaptureMode.MIN_LATENCY)
            }.build()

        val imageCapture = ImageCapture(imageCaptureConfig)

        // 写真撮影
        capture_button.setOnClickListener {
            val file = File(
                externalMediaDirs.first(),
                "${System.currentTimeMillis()}.jpg"
            )

            imageCapture.takePicture(file, executor,
                object : ImageCapture.OnImageSavedListener {
                    override fun onError(
                        imageCaptureError: ImageCapture.ImageCaptureError,
                        message: String,
                        exc: Throwable?
                    ) {
                        val msg = "Photo capture failed: $message"
                        Log.e("CameraXApp", msg, exc)
                        viewFinder.post {
                            Toast.makeText(baseContext, msg, Toast.LENGTH_SHORT).show()
                        }
                    }

                    override fun onImageSaved(file: File) {
                        // 保存したファイルデータをビットマップとして取得
                        // ()Matrix を使って90度回転させて表示
                        val inputStream = FileInputStream(file)
                        val bitmap = BitmapFactory.decodeStream(inputStream)
                        val bitmapWidth = bitmap.width
                        val bitmapHeight = bitmap.height
                        val matrix = Matrix()
                        matrix.setRotate(90F, bitmapWidth / 2F, bitmapHeight / 2F)
                        val rotatedBitmap = Bitmap.createBitmap(
                            bitmap,
                            0,
                            0,
                            bitmapWidth,
                            bitmapHeight,
                            matrix,
                            true
                        )

                        imgData = rotatedBitmap  // 推論用に画像を格納
                        // 撮影した写真を表示
                        //メインスレッド以外からviewの変更
                        viewFinder.post {
                            capturedImg.setImageBitmap(rotatedBitmap)
                        }
                        val msg = "Photo capture succeeded: ${file.absolutePath}"
                        viewFinder.post {
                            Toast.makeText(baseContext, msg, Toast.LENGTH_SHORT).show()
                        }

                    }
                })
        }
        // プレビューとキャプチャーuse case
        CameraX.bindToLifecycle(this, preview, imageCapture)
    }

    private fun updateTransform() {
        val matrix = Matrix()

        val centerX = viewFinder.width / 2f
        val centerY = viewFinder.height / 2f

        val rotationDegrees = when (viewFinder.display.rotation) {
            Surface.ROTATION_0 -> 0
            Surface.ROTATION_90 -> 90
            Surface.ROTATION_180 -> 180
            Surface.ROTATION_270 -> 270
            else -> return
        }
        matrix.postRotate(-rotationDegrees.toFloat(), centerX, centerY)

        viewFinder.setTransform(matrix)
    }

    override fun onRequestPermissionsResult(
        requestCode: Int, permissions: Array<String>, grantResults: IntArray
    ) {
        if (requestCode == REQUEST_CODE_PERMISSIONS) {
            if (allPermissionsGranted()) {
                viewFinder.post { startCamera() }
            } else {
                Toast.makeText(
                    this,
                    "Permissions not granted by the user.",
                    Toast.LENGTH_SHORT
                ).show()
                finish()
            }
        }
    }

    private fun allPermissionsGranted() = REQUIRED_PERMISSIONS.all {
        ContextCompat.checkSelfPermission(
            baseContext, it
        ) == PackageManager.PERMISSION_GRANTED
    }
}
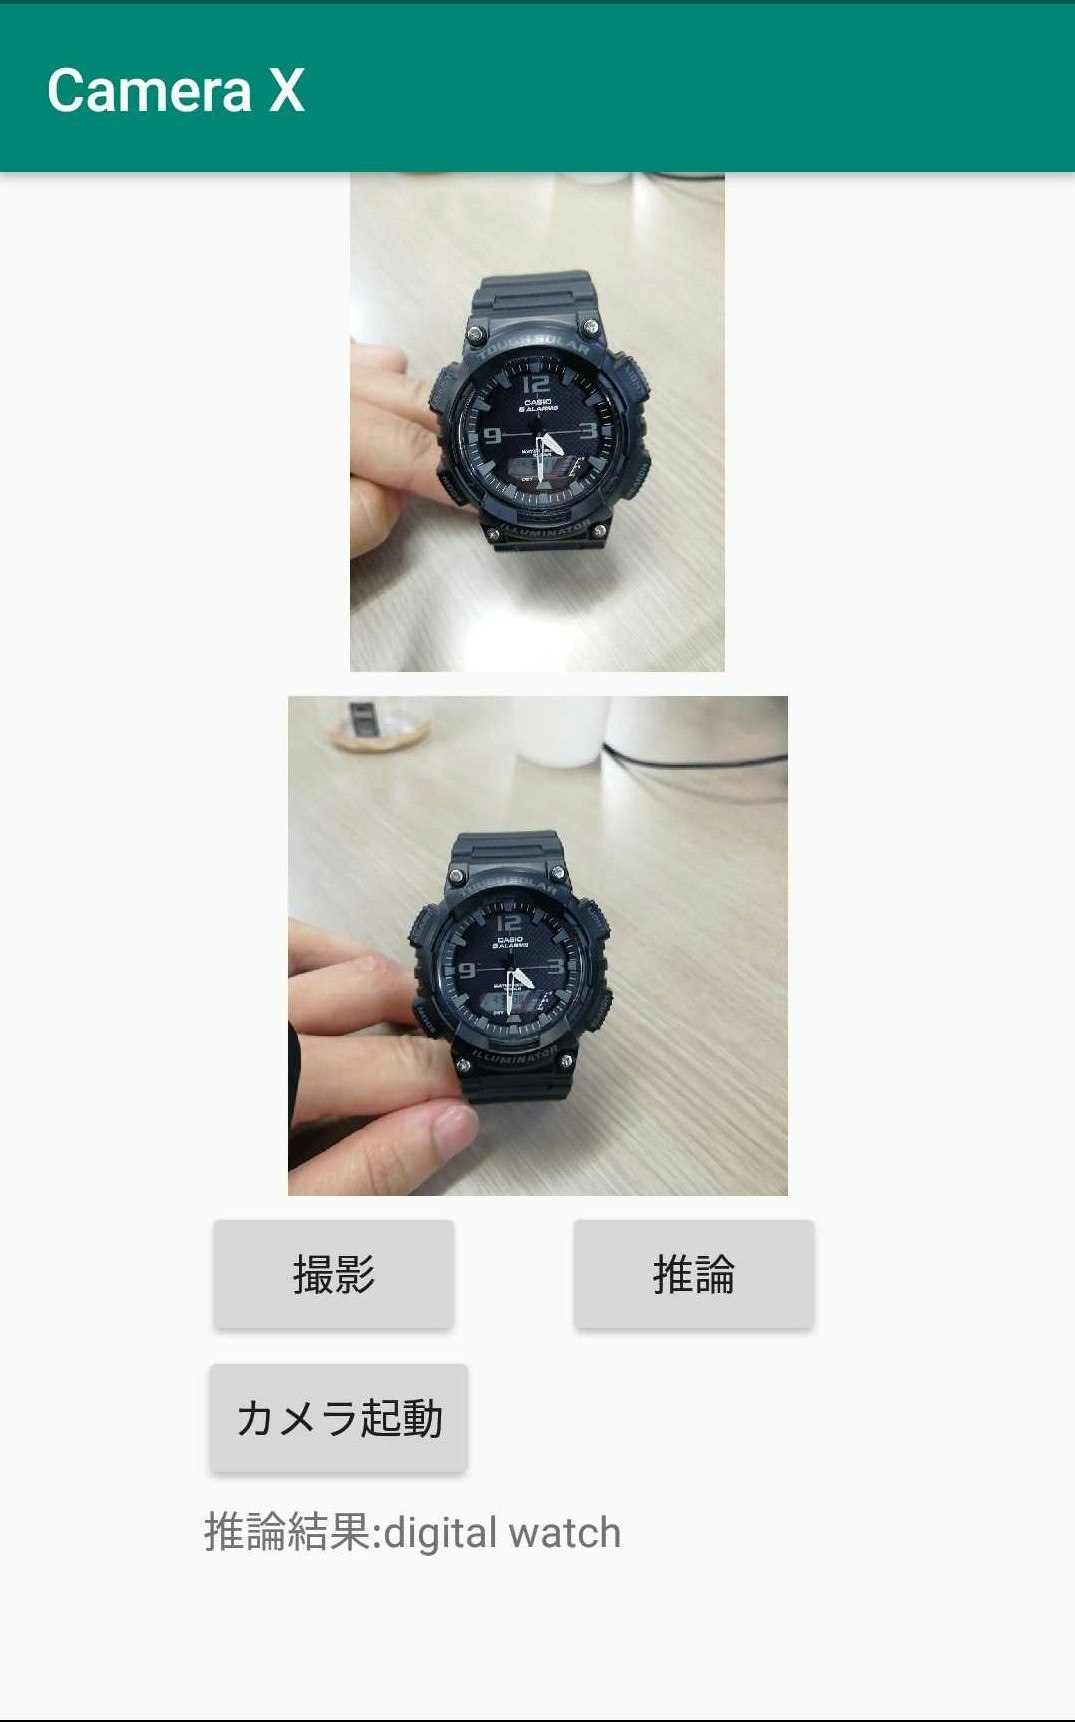
ここまで出来たら写真を撮って、その写真を画面に表示させることができるはず。
(自分の環境のせいなのかコードが悪いせいなのか分からないけど、写真撮ってから撮った写真が表示されるまで結構ラグがあります。)
公式からはCamera Xの use caseとしてプレビュー、キャプチャー、画像解析の3つのuse caseが提供されているが、今回はプレビューとキャプチャーの組み合わせを使う。
ちなみにuse case のサポートされている組み合わせは以下の通り。(公式ドキュメント)

画像認識の実装
モデルをダウンロードする
今回は学習済みのモデルを使って推論する。
※python,PyTorchの環境がない方は自分のgithubからresnet.ptをダウンロードしてここを読み飛ばしてください。
python PyTorchの環境がある方は以下を自分の環境で実行してモデルをダウンロードしてください。
import torch
import torchvision

model = torchvision.models.resnet18(pretrained=True)
model.eval()
example = torch.rand(1, 3, 224, 224)
traced_script_module = torch.jit.trace(model, example)
traced_script_module.save("resnet.pt")
うまく実行できると同じ階層にresnet.ptというファイルが生成される。(後でこれをandroid studioのフォルダに入れる)
この学習済みresnet18を使って画像認識していく。
モデルを使って推論する
assetフォルダ
まずは先ほどダウンロードしたモデルをandroid studioのフォルダに放り込む。
放り込む場所はassetフォルダ (デフォルトでは存在しないのでresフォルダとかを右クリック->新規->フォルダ-> Assetフォルダで作れる)
次にassetフォルダからパスを取得する関数を作る
以下をMainActivity.ktの一番下とかに加える
 //assetファイルのパス取得
    private fun getAssetFilePath(context: Context, assetName: String): String {
        val file = File(context.filesDir, assetName)
        if (file.exists() && file.length() > 0) {
            return file.absolutePath
        }
        context.assets.open(assetName).use { inputStream ->
            FileOutputStream(file).use { outputStream ->
                val buffer = ByteArray(4 * 1024)
                var read: Int
                while (inputStream.read(buffer).also { read = it } != -1) {
                    outputStream.write(buffer, 0, read)
                }
                outputStream.flush()
            }
            return file.absolutePath
        }
    }
推論
画像分類するクラスを取得できるようにImage Netの1000クラスを参照できるようにしておく。
新しくImageNetCategory.ktとかを作ってそこにクラス名を書く。(長すぎるのでgithubからコピペしてください)
class ImageNetCategory {
    var IMAGENET_CLASSES = arrayOf(
        "tench, Tinca tinca",
        "goldfish, Carassius auratus",

          //略(githubからコピペしてください)

        "ear, spike, capitulum",
        "toilet tissue, toilet paper, bathroom tissue"
    )
}
つづいてメインの推論の部分を実装する。
MainActivity.ktのonCreateの最後の部分に以下を追加する。
  // ネットワークモデルのロード
        val resnet = Module.load(getAssetFilePath(this, "resnet.pt"))

        /**推論**/
        inferBtn.setOnClickListener {
            //撮影した写真を224×224にリサイズする
            val imgDataResized = Bitmap.createScaledBitmap(imgData!!, 224, 224, true)
            // ビットマップからテンソルに変換
            val inputTensor = TensorImageUtils.bitmapToFloat32Tensor(
                imgDataResized,
                TensorImageUtils.TORCHVISION_NORM_MEAN_RGB,
                TensorImageUtils.TORCHVISION_NORM_STD_RGB
            )

            //フォワードプロパゲーション
            val outputTensor = resnet.forward(IValue.from(inputTensor)).toTensor()
            val scores = outputTensor.dataAsFloatArray

            var maxScore = 0F
            var maxScoreIdx = 0
            for (i in scores.indices) {
                if (scores[i] > maxScore) {
                    maxScore = scores[i]
                    maxScoreIdx = i
                }
            }

            // 推論結果のインデックスからカテゴリー名に変換
            val inferCategory = ImageNetCategory().IMAGENET_CLASSES[maxScoreIdx]
            resultText.text = "推論結果:${inferCategory}"
        }
これだけで画像認識ができる。
いろんな写真撮ったりモデルを交換してみて遊んでみてください。
おわり
今回のコードはgithubに挙げていますので適宜参照してください。
本当はVGG-16とか載せようとしたんだけどout of memoryとかになってめんどそうだと思ったから断念。いろいろ転移学習させたモデルを載せても面白そう。
あと、Camera Xを使えば簡単にカメラの機能を使えて便利だなって思った。