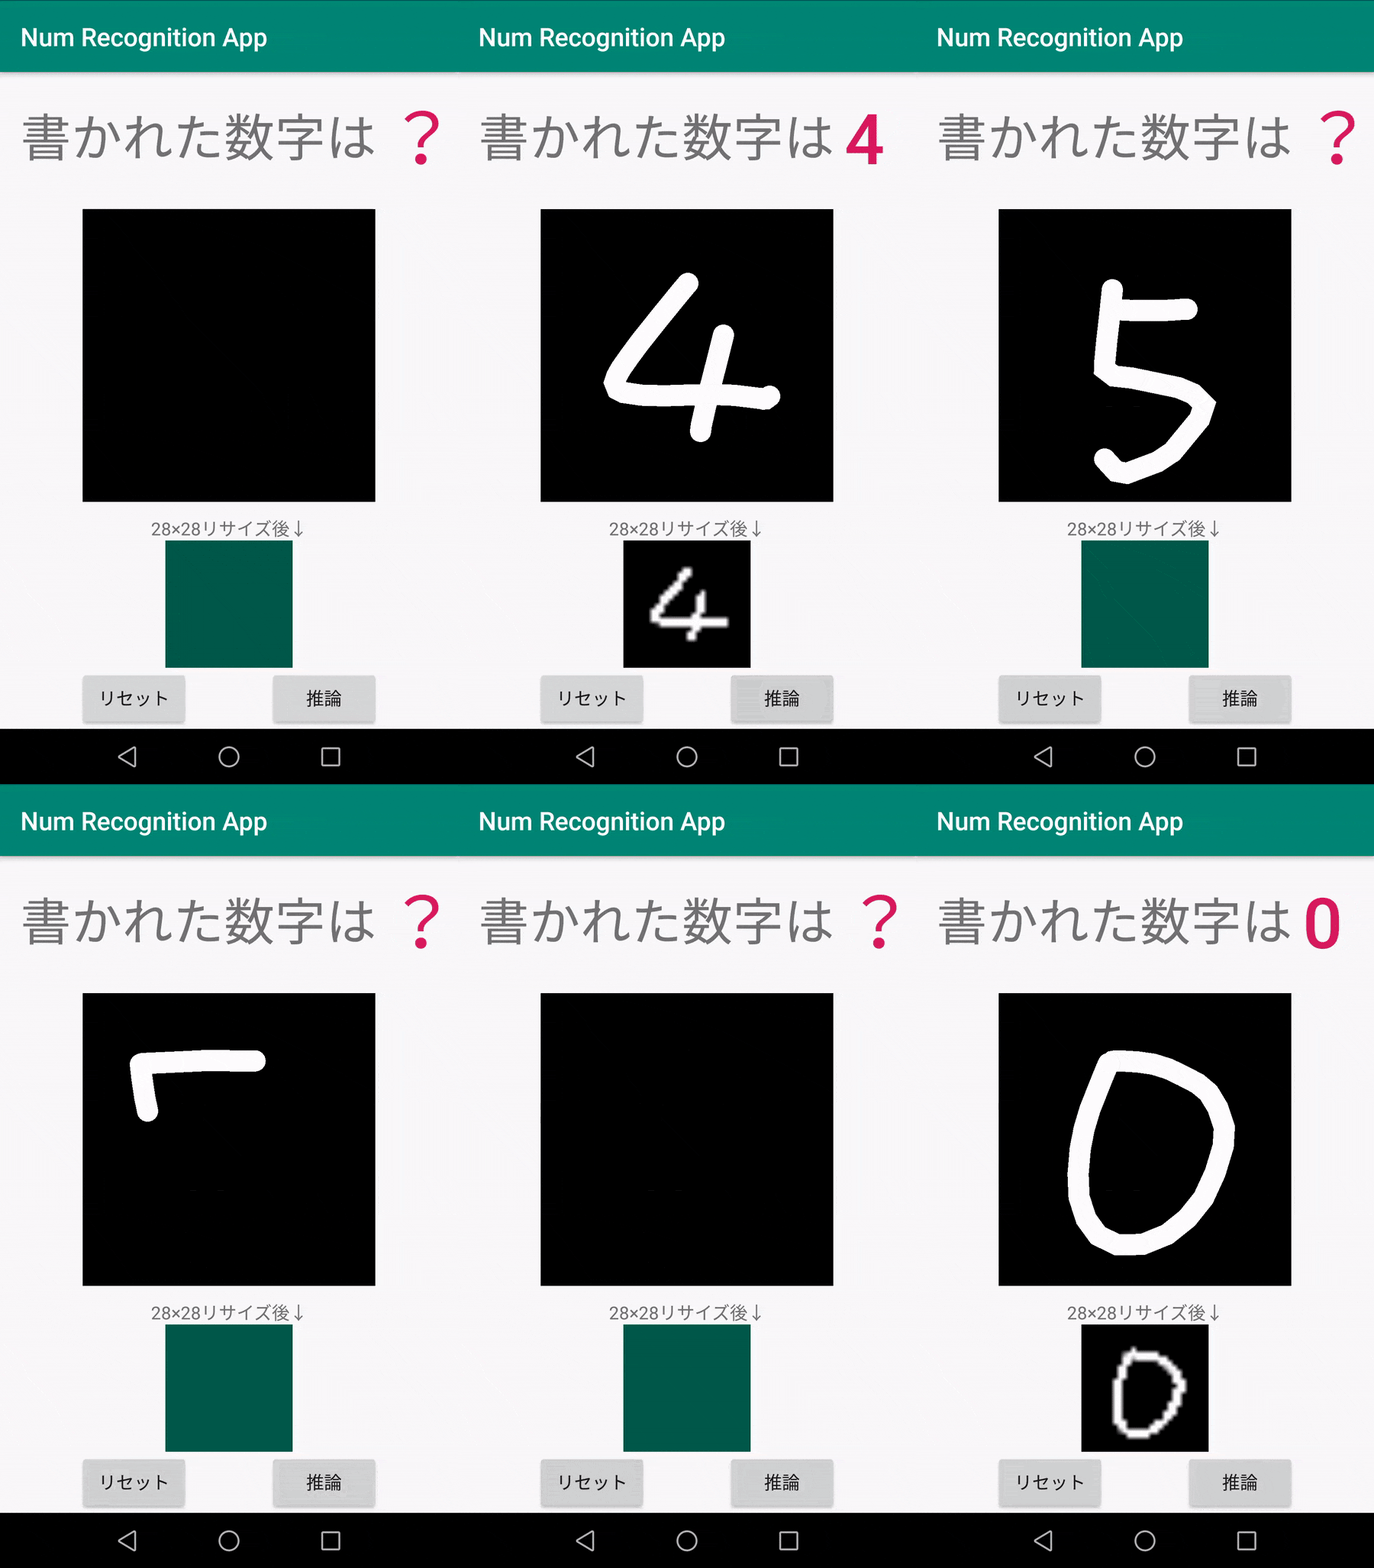
今回作成するアプリ
画面に書いた数字を認識する画像認識アプリをPytorch Mobileとkotlinで作る。
画像認識用のモデルとアンドロイドの機能を1から全部作る。
**モデル作成編(Python)とアンドロイド実装編(kotlin)**の全2回に分けます。
今回のandroid studio のプロジェクト Github : https://github.com/SY-BETA/NumberRecognitionApp/tree/master
まだpythonでモデルを作ってない方はアンドロイドで画面に書いた数字を判別する画像認識アプリを作る(PyTorch Mobile)[ネットワーク作成編]で作ってください。
もしくはpythonの環境がないアンドロイドエンジニアの方やモデル作るのがめんどいという方は学習済みモデルを挙げているので、
Github: https://github.com/SY-BETA/CNN_PyTorch/blob/master/CNNModel.pt から学習済みモデルをダウンロードしてください。
作成の流れ
1.MNISTをダウンロードする (※チャネル数を3チャネルに直す必要あり)
2. 簡単なCNNモデルをpython(PyTorch)で作成
3. モデルを学習させる
4. モデルを保存
5. アンドロイドで絵を描ける機能を実装
6. アンドロイドにモデルを実装してforwardプロパゲーションする
この回でやること
5と6をやる
モデルの作成が完了したので、それをpytorch mobileを使ってアンドロイドで推論できるようにする、また画面に数字を書く機能を実装する。
依存関係
gradleに以下を追加(2020年1月25日時点)
dependencies {
    implementation 'org.pytorch:pytorch_android:1.4.0'
    implementation 'org.pytorch:pytorch_android_torchvision:1.4.0'
}
レイアウトを作成
xmlファイル↓
<androidx.constraintlayout.widget.ConstraintLayout
    xmlns:android="http://schemas.android.com/apk/res/android"
    xmlns:app="http://schemas.android.com/apk/res-auto"
    xmlns:tools="http://schemas.android.com/tools"
    android:layout_width="match_parent"
    android:layout_height="match_parent"
    tools:context=".MainActivity">

    <FrameLayout
        android:id="@+id/frameLayout"
        android:layout_width="230dp"
        android:layout_height="230dp"
        android:layout_marginStart="24dp"
        android:layout_marginTop="24dp"
        android:layout_marginEnd="24dp"
        android:layout_marginBottom="24dp"
        android:background="@android:color/darker_gray"
        app:layout_constraintBottom_toTopOf="@+id/sampleImg"
        app:layout_constraintEnd_toEndOf="parent"
        app:layout_constraintStart_toStartOf="parent"
        app:layout_constraintTop_toBottomOf="@+id/text1">

        <SurfaceView
            android:id="@+id/surfaceView"
            android:layout_width="match_parent"
            android:layout_height="match_parent" />
    </FrameLayout>

    <Button
        android:id="@+id/resetBtn"
        android:layout_width="wrap_content"
        android:layout_height="wrap_content"
        android:text="リセット"
        app:layout_constraintBottom_toBottomOf="parent"
        app:layout_constraintEnd_toStartOf="@+id/inferBtn"
        app:layout_constraintHorizontal_bias="0.5"
        app:layout_constraintStart_toStartOf="parent" />

    <Button
        android:id="@+id/inferBtn"
        android:layout_width="wrap_content"
        android:layout_height="wrap_content"
        android:text="推論"
        app:layout_constraintBottom_toBottomOf="parent"
        app:layout_constraintEnd_toEndOf="parent"
        app:layout_constraintHorizontal_bias="0.5"
        app:layout_constraintStart_toEndOf="@+id/resetBtn" />

    <TextView
        android:id="@+id/text1"
        android:layout_width="wrap_content"
        android:layout_height="wrap_content"
        android:layout_marginStart="16dp"
        android:layout_marginTop="24dp"
        android:text="書かれた数字は"
        android:textSize="40sp"
        app:layout_constraintStart_toStartOf="parent"
        app:layout_constraintTop_toTopOf="parent" />

    <TextView
        android:id="@+id/resultNum"
        android:layout_width="wrap_content"
        android:layout_height="wrap_content"
        android:layout_marginStart="8dp"
        android:text="?"
        android:textAppearance="@style/TextAppearance.AppCompat.Body2"
        android:textColor="@color/colorAccent"
        android:textSize="55sp"
        app:layout_constraintBottom_toBottomOf="@+id/text1"
        app:layout_constraintStart_toEndOf="@+id/text1"
        app:layout_constraintTop_toTopOf="@+id/text1" />

    <ImageView
        android:id="@+id/sampleImg"
        android:layout_width="100dp"
        android:layout_height="100dp"
        app:layout_constraintBottom_toTopOf="@+id/resetBtn"
        app:layout_constraintEnd_toEndOf="parent"
        app:layout_constraintStart_toStartOf="parent"
        app:srcCompat="@mipmap/ic_launcher_round" />

    <TextView
        android:id="@+id/textView"
        android:layout_width="wrap_content"
        android:layout_height="wrap_content"
        android:text="28×28リサイズ後↓"
        app:layout_constraintBottom_toTopOf="@+id/sampleImg"
        app:layout_constraintEnd_toEndOf="@+id/sampleImg"
        app:layout_constraintStart_toStartOf="@+id/sampleImg" />
</androidx.constraintlayout.widget.ConstraintLayout>
CustomSurfaceViewを作る
描画用にsurfaceViewを使う。そのためにSurfaceView, SurfaceHolder.Callbackを継承してsurfaceViewを制御するクラスを作成。
モデルの学習したデータであるMNISTは黒背景に白線だったので、その色で描けるようにする。
コンストラクタ
各種状態を保持する変数。適当にコピペでok
class DrawSurfaceView : SurfaceView, SurfaceHolder.Callback {

    private var surfaceHolder: SurfaceHolder? = null
    private var paint: Paint? = null
    private var path: Path? = null
    var color: Int? = null
    var prevBitmap: Bitmap? = null  /** 書いた画像を保持するビットマップ **/
    private var prevCanvas: Canvas? = null
    private var canvas: Canvas? = null

    var width: Int? = null
    var height: Int? = null

    constructor(context: Context, surfaceView: SurfaceView, surfaceWidth: Int, surfaceHeight: Int) : super(context) {
        // surfaceHolder
        surfaceHolder = surfaceView.holder

        /// surfaceViewのサイズ
        width = surfaceWidth
        height = surfaceHeight

        /// コールバック
        surfaceHolder!!.addCallback(this)

        /// ペイントの設定
        paint = Paint()
        color = Color.WHITE  // 白の線で書く
        paint!!.color = color as Int
        paint!!.style = Paint.Style.STROKE
        paint!!.strokeCap = Paint.Cap.ROUND
        paint!!.isAntiAlias = false
        paint!!.strokeWidth = 50F
    }
}
MainActivityでこのインスタンスを作成するときにレイアウトファイルのsurfaceViewの横と高さを入れるようにする。
データクラス
描画する際のpathと色を保存するデータクラスを作る。
    //// pathクラスの情報とそのpathの色情報を保存する
    data class pathInfo(
        var path: Path,
        var color: Int
    )
インターフェースの実装と初期化メソッド
implementと、canvasとbitmapを初期化するメソッドを作る
override fun surfaceCreated(holder: SurfaceHolder?) {
        /// bitmap,canvas初期化
        initializeBitmap()
    }

    override fun surfaceChanged(holder: SurfaceHolder?, format: Int, width: Int, height: Int) {
    }

    override fun surfaceDestroyed(holder: SurfaceHolder?) {
        /// bitmapをリサイクル(メモリーリーク防止)
        prevBitmap!!.recycle()
    }

    /// bitmapとcanvasの初期化
    private fun initializeBitmap() {
        if (prevBitmap == null) {
            prevBitmap = Bitmap.createBitmap(width!!, height!!, Bitmap.Config.ARGB_8888)
        }

        if (prevCanvas == null) {
            prevCanvas = Canvas(prevBitmap!!)
        }
        //背景黒に
        prevCanvas!!.drawColor(Color.BLACK)
    }
今回BitmapはsurfaceViewがdestroyされたときにリサイクルする。bitmapはそのままにしておくとメモリーリークが発生する危険があるので使わなくなったらリサイクルしておく。
描画メソッド
キャンパスに描画する関数を作成
 ///// 描画する関数
    private fun draw(pathInfo: pathInfo) {
        /// ロックしてキャンバスを取得
        canvas = Canvas()
        canvas = surfaceHolder!!.lockCanvas()

        //// キャンバスのクリア
        canvas!!.drawColor(0, PorterDuff.Mode.CLEAR)

        /// 前回のビットマップをキャンバスに描画
        canvas!!.drawBitmap(prevBitmap!!, 0F, 0F, null)

        //// pathを描画
        paint!!.color = pathInfo.color
        canvas!!.drawPath(pathInfo.path, paint!!)

        /// ロックを解除
        surfaceHolder!!.unlockCanvasAndPost(canvas)
    }

    /// 画面をタッチしたときにアクションごとに関数を呼び出す
    fun onTouch(event: MotionEvent): Boolean {
        when (event.action) {
            MotionEvent.ACTION_DOWN -> touchDown(event.x, event.y)
            MotionEvent.ACTION_MOVE -> touchMove(event.x, event.y)
            MotionEvent.ACTION_UP -> touchUp(event.x, event.y)
        }
        return true
    }

    ///// path クラスで描画するポイントを保持
    ///    ACTION_DOWN 時の処理
    private fun touchDown(x: Float, y: Float) {
        path = Path()
        path!!.moveTo(x, y)
    }

    ///    ACTION_MOVE 時の処理
    private fun touchMove(x: Float, y: Float) {
        path!!.lineTo(x, y)
        draw(pathInfo(path!!, color!!))
    }

    ///    ACTION_UP 時の処理
    private fun touchUp(x: Float, y: Float) {
        path!!.lineTo(x, y)
        draw(pathInfo(path!!, color!!))
        prevCanvas!!.drawPath(path!!, paint!!)
    }
キャンバスリセット機能
描画されたビットマップを初期化するメソッド
    /// resetメソッド
    fun reset() {
        ///初期化とキャンバスクリア
        initializeBitmap()
        canvas = surfaceHolder!!.lockCanvas()
        canvas?.drawColor(0, PorterDuff.Mode.CLEAR)
        surfaceHolder!!.unlockCanvasAndPost(canvas)
    }
これでDrawSurfaceView完成。これをMainActivity.ktで実装すれば絵を描ける機能を実装できる。
作ったDrawSurfaceView.ktを実装
レイアウトのdrawSurfaceViewのサイズを取得し、DrawSurfaceViewのインスタンスを作成し、実装する。
また、リセットボタンのメソッドも呼び出せるようにする。
class MainActivity : AppCompatActivity() {

    var surfaceViewWidth: Int? = null
    var surfaceViewHeight: Int? = null
    var drawSurfaceView:DrawSurfaceView? = null

    /// 拡張関数
    // ViewTreeObserverを使ってViewが作成されてからsurfaceViewのサイズ取得
    private inline fun <T : View> T.afterMeasure(crossinline f: T.() -> Unit) {
        viewTreeObserver.addOnGlobalLayoutListener(object :
            ViewTreeObserver.OnGlobalLayoutListener {
            override fun onGlobalLayout() {
                if (width > 0 && height > 0) {
                    viewTreeObserver.removeOnGlobalLayoutListener(this)
                    f()
                }
            }
        })
    }

    override fun onCreate(savedInstanceState: Bundle?) {
        super.onCreate(savedInstanceState)
        setContentView(R.layout.activity_main)


        /// ViewTreeObserberを使用
        /// surfaceViewが生成し終わってからsurfaceViewのサイズを取得
        surfaceView.afterMeasure {
            surfaceViewWidth = surfaceView.width
            surfaceViewHeight = surfaceView.height
            //// DrawrSurfaceViewのセットとインスタンス生成
            drawSurfaceView = DrawSurfaceView(
                applicationContext,
                surfaceView,
                surfaceViewWidth!!,
                surfaceViewHeight!!
            )
            /// リスナーのセット
            surfaceView.setOnTouchListener { v, event -> drawSurfaceView!!.onTouch(event) }
        }

        /// リセットボタン
        resetBtn.setOnClickListener {
            drawSurfaceView!!.reset()   /// bitmap初期化メソッドを呼び出す
            sampleImg.setImageResource(R.color.colorPrimaryDark)
            resultNum.text = "?"
        }
    }
}
ここまでうまくできたら画面に絵を描けるようになってるはず。
なんか、うまくいかねぇって方はもうGithubから全部コピペしてみてください。Github: https://github.com/SY-BETA/NumberRecognitionApp/tree/master
次からやっと PyTorch Mobile を使っていきます。
PyTorch Mobileで画像認識を実装
学習済みモデルをロードする
プロジェクトにassetsフォルダを作成する。(「UI左のapp右クリック-> 新規 -> フォルダ -> assetsフォルダ」 でできる)
その中にアンドロイドで画面に書いた数字を判別する画像認識アプリを作る(PyTorch Mobile)[ネットワーク作成編]で作った、もしくは冒頭でダウンロードした学習済みモデルを放り込む。
そのassetフォルダからパスを取得できるようにする。
MainActivity.ktのonCreateに以下を追加する。
//// assetファイルからパスを取得する関数
        fun assetFilePath(context: Context, assetName: String): String {
            val file = File(context.filesDir, assetName)
            if (file.exists() && file.length() > 0) {
                return file.absolutePath
            }
            context.assets.open(assetName).use { inputStream ->
                FileOutputStream(file).use { outputStream ->
                    val buffer = ByteArray(4 * 1024)
                    var read: Int
                    while (inputStream.read(buffer).also { read = it } != -1) {
                        outputStream.write(buffer, 0, read)
                    }
                    outputStream.flush()
                }
                return file.absolutePath
            }
        }

        /// 学習済みモデルをロード
        val module = Module.load(assetFilePath(this, "CNNModel.pt"))
assetsフォルダから画像やモデルをロードするのは結構面倒な書き方をするので注意
推論
ロードした学習済みモデルで推論ボタン押下時にフォワードプロパゲーションを行う。
またその結果を取得して表示する。
MainActivity.ktのonCreateに以下を追加する。
         // 推論ボタンクリック
        inferBtn.setOnClickListener {
            //描いた画像(bitmapを取得)
            val bitmap = drawSurfaceView!!.prevBitmap!!
            // 作成した学習済みモデルの入力サイズにリサイズ
            val bitmapResized    = Bitmap.createScaledBitmap(bitmap,28, 28, true)

            /// テンソル変換と標準化
            val inputTensor = TensorImageUtils.bitmapToFloat32Tensor(
                bitmapResized,
                TensorImageUtils.TORCHVISION_NORM_MEAN_RGB, TensorImageUtils.TORCHVISION_NORM_STD_RGB
            )

            /// 推論とその結果
            /// フォワードプロパゲーション
            val outputTensor = module.forward(IValue.from(inputTensor)).toTensor()
            val scores = outputTensor.dataAsFloatArray

            // リサイズした画像を表示
            sampleImg.setImageBitmap(bitmapResized)

            /// scoreを格納する変数
            // スコアMAXのインデックス = 画像認識で予測した数字 (モデルの作り方から)
            var maxScore: Float = 0F
            var maxScoreIdx = -1
            for (i in scores.indices) {
                Log.d("scores", scores[i].toString()) // スコア一覧をログに出力(どの数字に近いか見てみると面白い)
                if (scores[i] > maxScore) {
                    maxScore = scores[i]
                    maxScoreIdx = i
                }
            }

            // 推論結果を表示
            resultNum.text = "$maxScoreIdx"
        }
inputTensorのサイズは**(1, 3, 28, 28)** このサイズが入力となるようにモデルを作成する必要がある。
ここまでできたら冒頭のアプリができているはず!!
数字を書いて予測し、遊んでみてね
おわり
全体的にみてネットワーク作成でのチャネル数の変更とかネットワークの入力サイズを合わせるのに苦労した。アンドロイドでの実装はフォワードプロパゲーションするだけなのでネットワークの作成ができるかどうかでいろいろ変わってくるなと思った。
あと、PyTorch Mobileは出たばかりだが、2週間くらいでバージョンアップしてておどろいた。
画面に書いた数字を認識できるのはやってて楽しい。今回はMNISTで手書き数字だったけど、なんか他のも転移学習とかさせたら面白そう。
今回のコードはGithubに挙げてます。
Github: https://github.com/SY-BETA/NumberRecognitionApp/tree/master
学習済みCNN モデル
Github: https://github.com/SY-BETA/CNN_PyTorch/blob/master/CNNModel.pt

