Ruby on Rails チュートリアルについて
Ruby on Railsを勉強したいというと、まず紹介される有名なRailsのチュートリアル。
内容はハードですが、無料でRailsによるWebアプリケーション開発を楽しく学べます。
Ruby on Rails チュートリアル
https://railstutorial.jp/
Sample Appの拡張
チュートリアルの最後には、作成したSampleAppの拡張機能についていくつかのヒントが記載されています。
その中の以下の機能を順に実装していきます(途中で挫折するかも。。。)。
1. ユーザー検索
2. マイクロポスト検索
3. フォロワーの通知
4. 返信機能
5. メッセージ機能
フォロワーの通知
今回は、3つ目のフォロワーの通知の実装を行います。
フォロワーの通知では、新しく誰かがフォロワーした時とフォロワーの誰かがフォローを解除した時に、対象のユーザーにメールで通知するようにします。
また、ユーザーごとに通知設定を変更できるようにします。
前回(マイクロポスト検索)はこちら
環境と準備
今回は、特に新たにインストールする必要のあるモジュールはありません。
| モジュール | バージョン |
|---|---|
| Rails | 5.1.2 |
| Ruby | 2.3.1 |
実装
まずフォロー時、フォロー解除時のメール通知機能を追加し、その後で通知設定の変更を実装します。
フォロー/フォロー解除時のメールの送信ということで、まずRelationship用のMailerを作成します。
コマンドラインで以下のコマンドを実行します。
rails g mailer RelationshipMailer
すると、railsが色々作ってくれるので、まずはMailer、次にメールの本文の作成という順番でいじってきます。
RelationshipMailerには、フォロー/フォロー解除時のメールを送るメソッドを作成します。
class RelationshipMailer < ApplicationMailer

  def follow_notification(user, follower)
    @user = user
    @follower = follower
    mail to: user.email, subject: "#{@follower.name} started following you"
  end

  def unfollow_notification(user, follower)
    @user = user
    @follower = follower
    mail to: user.email, subject: "#{@follower.name} unfollowed you"
  end
end
送信先アドレスとメールの題名を指定しています。
次に、メールの本文を作成します。
本文を記載するファイルは、app/views/relationship_mailerの下に作成します。
html形式とtext形式の両方を作成しましたが、今回はhtml形式のもののみご紹介します。
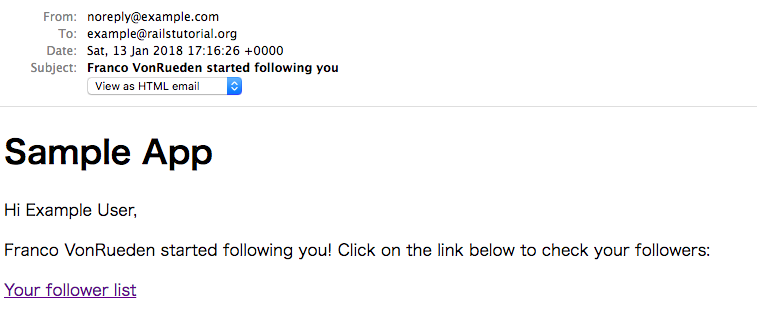
<h1>Sample App</h1>

<p>Hi <%= @user.name %>,</p>

<p>
  <%= @follower.name %> started following you!
  Click on the link below to check your followers:
</p>

<%= link_to "Your follower list",
      followers_user_url(@user) %>
<h1>Sample App</h1>

<p>Hi <%= @user.name %>,</p>

<p>
  <%= @follower.name %> unfollowed you.
  Click on the link below to check your followers:
</p>

<%= link_to "Your follower list",
      followers_user_url(@user) %>
メールができあがったので、プレビューファイルを更新して、ブラウザでメールの文面を確認できるようにします。
class RelationshipMailerPreview < ActionMailer::Preview

  def follow_notification
    user = User.first
    follower = User.second
    RelationshipMailer.follow_notification(user, follower)
  end

  def unfollow_notification
    user = User.first
    follower = User.second
    RelationshipMailer.unfollow_notification(user, follower)
  end
end
プレビュー結果

メールの文面の確認ができたので、実際にメールを送信する処理をRelationshipクラスに追加します。
~
省略
~
def Relationship.send_follow_email(user, follower)
  RelationshipMailer.follow_notification(user, follower).deliver_now
end

def Relationship.send_unfollow_email(user, follower)
  RelationshipMailer.unfollow_notification(user, follower).deliver_now
end
~
省略
~
そして、最後にフォローとフォロー解除時の処理(follow/unfollow)から上記の処理をコールするようにして、メール通知機能は完了です。
def follow(other_user)
  active_relationships.create(followed_id: other_user.id)
  Relationship.send_follow_email(other_user, self)
end

def unfollow(other_user)
  active_relationships.find_by(followed_id: other_user.id).destroy
  Relationship.send_unfollow_email(other_user, self)
end
次に、通知設定の切り替えを実装します。
まず、下記のコマンドでusersテーブルに通知設定のON/OFFを設定するためのカラムを追加します。
rails g migration add_follow_notification_to_users follow_notification:boolean
migraionファイルを確認すると、以下のようになっています。
class AddFollowNotificationToUser < ActiveRecord::Migration[5.1]
  def change
    add_column :users, :follow_notification, :boolean
  end
end
デフォルトで値をfalseにしたいので、add_columnの行に以下のようにdefault属性を追加します。
add_column :users, :follow_notification, :boolean, default:false
そして、dbにマイグレート/リセットし、シードファイルを再度読み込みます。
rails db:migrate:reset
rails db:seed
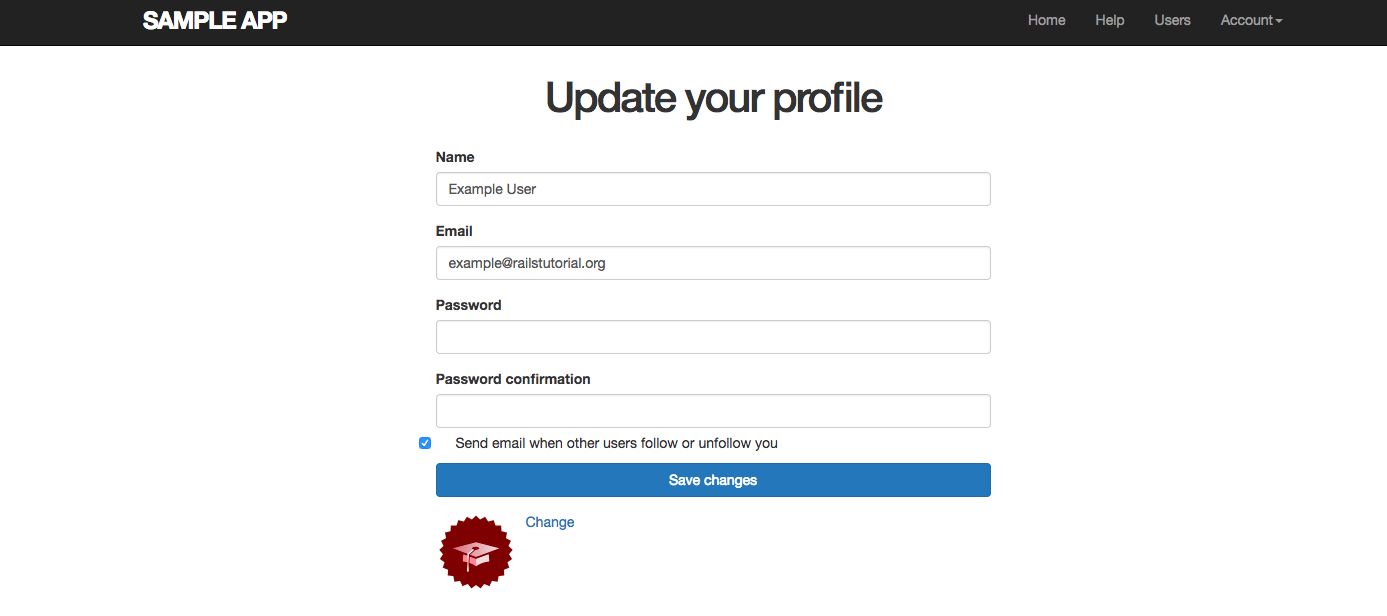
次に、viewの実装をします。
通知設定をユーザーが行う場合、新規ユーザー登録とプロフィール編集時に行えるようにすべきです。
今回は、_form.html.erbを両者からrenderするようにしていたため、修正は一箇所のみです。
~
省略
~
<%= f.label :follow_notification, class:"checkbox inline" do %>
    <%= f.check_box :follow_notification %>
    <span>Send email when other users follow or unfollow you</span>
<% end %>

<%= f.submit yield(:button_text), class: "btn btn-primary" %>
見た目はこんな感じになります。
次にUsersControllerのuser_paramメソッドを以下のように変更します。
def user_params
  params.require(:user).permit(:name, :email,
                               :password, :password_confirmation,
                               :follow_notification)
end
これは、通知の設定/変更を許可するためです。
最後の最後に、Userクラスのfollow/unfollowメソッドを書き直して完成です。
def follow(other_user)
  active_relationships.create(followed_id: other_user.id)
  if other_user.follow_notification
    Relationship.send_follow_email(other_user, self)
  end
end

def unfollow(other_user)
  active_relationships.find_by(followed_id: other_user.id).destroy
  if other_user.follow_notification
    Relationship.send_unfollow_email(other_user, self)
  end
end
テスト
最後にテストについて記載します。
今回は、メールの内容と通知設定の両方をテストします。
まずメールの内容ですが、題名、送信先、送信元、フォローした/フォローされたユーザーのユーザー名をチェックします。
テストは、relationship_mailer.rb作成時に自動作成された、relationship_mailer_test.rbに記載します。
class RelationshipMailerTest < ActionMailer::TestCase
  test "follow_notification" do
    user = users(:hoge)
    follower = users(:fuga)
    mail = RelationshipMailer.follow_notification(user, follower)
    assert_equal "#{follower.name} started following you", mail.subject
    assert_equal [user.email], mail.to
    assert_equal ["noreply@example.com"], mail.from
    assert_match user.name, mail.body.encoded
    assert_match follower.name, mail.body.encoded
  end

  test "unfollow_notification" do
    user = users(:hoge)
    follower = users(:fuga)
    mail = RelationshipMailer.unfollow_notification(user, follower)
    assert_equal "#{follower.name} unfollowed you", mail.subject
    assert_equal [user.email], mail.to
    assert_equal ["noreply@example.com"], mail.from
    assert_match user.name, mail.body.encoded
    assert_match follower.name, mail.body.encoded
  end
end
次の通知設定は、通知する設定の際にメールが送信されること、通知しない設定の際にメールが送信されないことをチェックします。
テストは、チュートリアル内で作成した、following_test.rbに追記します。
~
省略
~
test "should send follow notification email" do
    post relationships_path, params: {followed_id: @other.id}
    assert_equal 1, ActionMailer::Base.deliveries.size
  end

  test "should not send follow notification email" do
    not_notify = users(:hogehoge)
    post relationships_path, params: {followed_id: not_notify.id}
    assert_equal 0, ActionMailer::Base.deliveries.size
  end

  test "should send unfollow notification email" do
    @user.follow(@other)
    relationship = @user.active_relationships.find_by(followed_id: @other.id)
    delete relationship_path(relationship)
    assert_equal 2, ActionMailer::Base.deliveries.size # follow email and unfollow email
  end

  test "should not send unfollow notification email" do
    not_notify = users(:hogehoge)
    @user.follow(not_notify)
    relationship = @user.active_relationships.find_by(followed_id: not_notify.id)
    delete relationship_path(relationship)
    assert_equal 0, ActionMailer::Base.deliveries.size
  end
~
省略
~
上記のテストでは、fixtureで@other のみ通知設定ONにし、setupにActionMailer::Base.deliveries.clearを追記し、毎回送信メール数を初期化しています。
両方のテストが通ったことを確認して終了です。
最後に
私はまだRails歴2週間ほどであり、以上の実装/テストも私の環境で動いたということに過ぎません。
修正点や指摘等ございましたら、ぜひコメントお願いいたします。
参考記事
フォロワーの通知では、下記のページを参考にさせていただきました。
Action Mailerの基礎
https://railsguides.jp/action_mailer_basics.html