ARKitのARGeoTrackingConfigurationとlocationManagerを使って特定の緯度と経度に3Dオブジェクトを配置する方法を解説していきます。
完成形

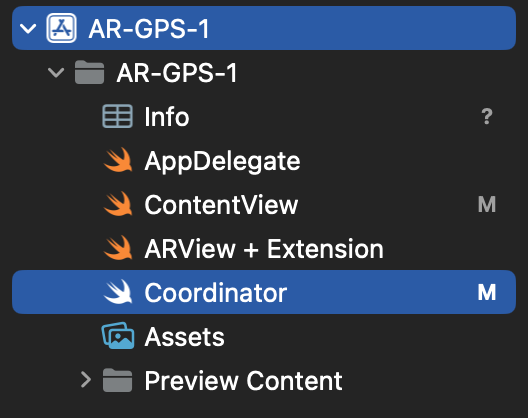
ファイル構成
コード
import SwiftUI
import RealityKit
import ARKit

struct ContentView : View {
    var body: some View {
        ARViewContainer().edgesIgnoringSafeArea(.all)
    }
}

struct ARViewContainer: UIViewRepresentable {

    func makeUIView(context: Context) -> ARView {

        let arView = ARView(frame: .zero)
        let session = arView.session
        let config = ARGeoTrackingConfiguration()
        config.planeDetection = .horizontal
        session.run(config)

        //ARの処理をcoordinatorで行うのでcoordinatorに情報を渡します
        context.coordinator.arView = arView
        //arviewにCoachingOvelayViewを追加する(setUpCoachingOverLay() はARView+Extensionファイルにあります)
        arView.setupCoachingOverlay(context.coordinator)

        return arView

    }

    func updateUIView(_ uiView: ARView, context: Context) {}
    //Coordinatorを作成
    func makeCoordinator() -> Coordinator {
        Coordinator()
    }


}

#if DEBUG
struct ContentView_Previews : PreviewProvider {
    static var previews: some View {
        ContentView()
    }
}
#endif
import Foundation
import RealityKit
import ARKit

extension ARView {

    func setupCoachingOverlay(_ delegate: Coordinator) {
        let coachingOverlay = ARCoachingOverlayView()
        coachingOverlay.autoresizingMask = [.flexibleWidth, .flexibleHeight]
        coachingOverlay.session = self.session
        coachingOverlay.goal = .geoTracking
        coachingOverlay.delegate = delegate

        self.addSubview(coachingOverlay)

    }

}
import Foundation
import RealityKit
import ARKit
import CoreLocation

class Coordinator: NSObject, CLLocationManagerDelegate ,ARCoachingOverlayViewDelegate{
    var arView: ARView?
    let locationManager = CLLocationManager()
    var currentLocaion: CLLocation?

    override init(){
        super.init()
        locationManager.delegate = self
        locationManager.distanceFilter = kCLDistanceFilterNone
        locationManager.requestLocation()
        locationManager.startUpdatingLocation()

    }

    //ユーザーのデバイスの位置情報を更新します
    func locationManager(_ manager: CLLocationManager, didUpdateLocations locations: [CLLocation]) {
        self.currentLocaion = locations.first
    }
    //エラーが出た場合
    func locationManager(_ manager: CLLocationManager, didFailWithError error: Error) {
        print(error)
    }

    func coachingOverlayViewDidDeactivate(_ coachingOverlayView: ARCoachingOverlayView) {
        //下のコードに物を表示したい場所の緯度と経度を入力してください
        let coordinate = CLLocationCoordinate2D(latitude: 35.58800969819105, longitude:139.7042739537916)
        let geoAnchor = ARGeoAnchor(coordinate: coordinate)
        let anchorEntity = AnchorEntity(anchor: geoAnchor)
        let modelEntity = ModelEntity(mesh: MeshResource.generateBox(size: 0.3))
        anchorEntity.addChild(modelEntity)

        arView?.session.add(anchor: geoAnchor)
        arView?.scene.addAnchor(anchorEntity)

    }

}
位置情報の利用許可(プロパティリストの設置)
CoordinatoorファイルでCoreLocationという位置情報フレームワークを使っているのでユーザーに位置情報の使用許可を得る必要があります(設定しないと位置情報が取得できずエラーになります)
プロパティリストに以下の二つを追加してください
・Privacy - Locatin when in use Usage description
・Privacy - Location Always and When in Use Usage Description

ARGeoTrackingConfigurationについて
ARGeoTrackingConfigurationを使用すると、カメラを使用して周囲の環境をスキャンし、その情報を使用してデバイスの位置と方向を特定し、仮想オブジェクトを現実世界の中に配置できます。ただしこの機能を使えるのには以下の条件が必要です
・対応したiphoneを使用していること
・対応している都市で使用していること
・Appleがその場所のストリートビューの情報を収集してあること
CoreLocationで位置情報を取得する
CoreLocationは、デバイスのGPSやコンパスなどのセンサーを使用して位置情報を提供するフレームワークです。この機能は、ユーザーの現在の位置情報を取得し、位置情報を使用するアプリケーションを作成するために使用されます。またARGeoTrackingConfigurationと組み合わせることでより正確にオブジェクトを配置することができます!
CoachingOverlayViewについて
CoachingOverlayViewはユーザーに平面などを検出するようにデバイスを動かす指示を出すために使います。
coachingOverlay.goal はcoachingOverlayViewが終了するためのゴール(条件)を指定します。coachingOverlay.goal = .geotracking は周りの景色の情報から現在地を特定できた時にcoachingOverlayViewを終了します。
終了したらfunc coachingOverlayViewDidDeactivateメソッドが呼び出されます。
