はじめに
前回は、callback/delegate/RxSwiftとパターン別でカウンターアプリを作って見ましたが、RxSwiftはまだまだしっくりきません。これは数打つしかなさそうなので(泣)、引き続き、サンプルアプリを作り続けます。
環境
Xcode10.3
Swift5.0.1
RxSwift 5.0.0
RxCocoa 5.0.0
RxOptional 4.0.0
RxWebKit 1.0.0
作るもの
WebViewアプリ
前回に引き続き、
「比較して学ぶRxSwift入門」
こちらの書籍から、WebViewを作っていきます。
開発フロー
1.WKWebView+KVOを使ったWebViewアプリを作成
2.WKWebView+RxSwiftに書き換える
準備
1.プロジェクト作成
-Xcodeを起動
-Create a new Xcode project
>Single View App
>Product Name:WebViewApp
>完了。すぐにプロジェクトを閉じます。
2.ターミナルを起動して、ディレクトリに移動
$ cd WebViewApp
3.Podfile作成/編集
$ pod init
$ vi Podfile
今回は、バージョンを表記せず、自動選択にてライブラリを導入してみます
# platform :ios, '9.0'

target 'WebViewApp' do
  use_frameworks!

  pod 'RxSwift'
  pod 'RxCocoa'
  pod 'RxOptional'
end
4.ライブラリのインストール
$ pod install
5.プロジェクトを開く
必ずWebViewApp.xcworkspaceから起動する(.xcodeprojから起動した場合、導入したライブラリーが使えません)
Storyboardを削除
1.Main.storyboardの削除
/WebViewApp/Main.storyboardをDelete > Move to Trash
2.Info.plist
Info.plistを開く > Main storyboard file base nameの項目を削除(マイナスボタン)
3.AppDelegateの修正
func application(_ application: UIApplication, didFinishLaunchingWithOptions launchOptions: [UIApplication.LaunchOptionsKey: Any]?) -> Bool {

    /* 追加 ここから */
    self.window = UIWindow(frame: UIScreen.main.bounds)
    let navigationController = UINavigationController(rootViewController: WKWebViewController())
    self.window?.rootViewController = navigationController
    self.window?.makeKeyAndVisible()
    /* 追加 ここまで */

    return true
}
4.WKWebViewController.xibの作成
- New File > View > Save As: WKWebViewController.xib > Create
- WKWebViewController.xibを開く
- Placeholders > File's Ownerを選択
- ClassにViewControllerを指定
- OutletのviewとXibのViewを接続
- ViewController.swiftをWKWebViewController.swiftに変更
- WKWebViewController.swiftを開いて、class WKWebViewController に変更
- Build & Run > 成功でOK
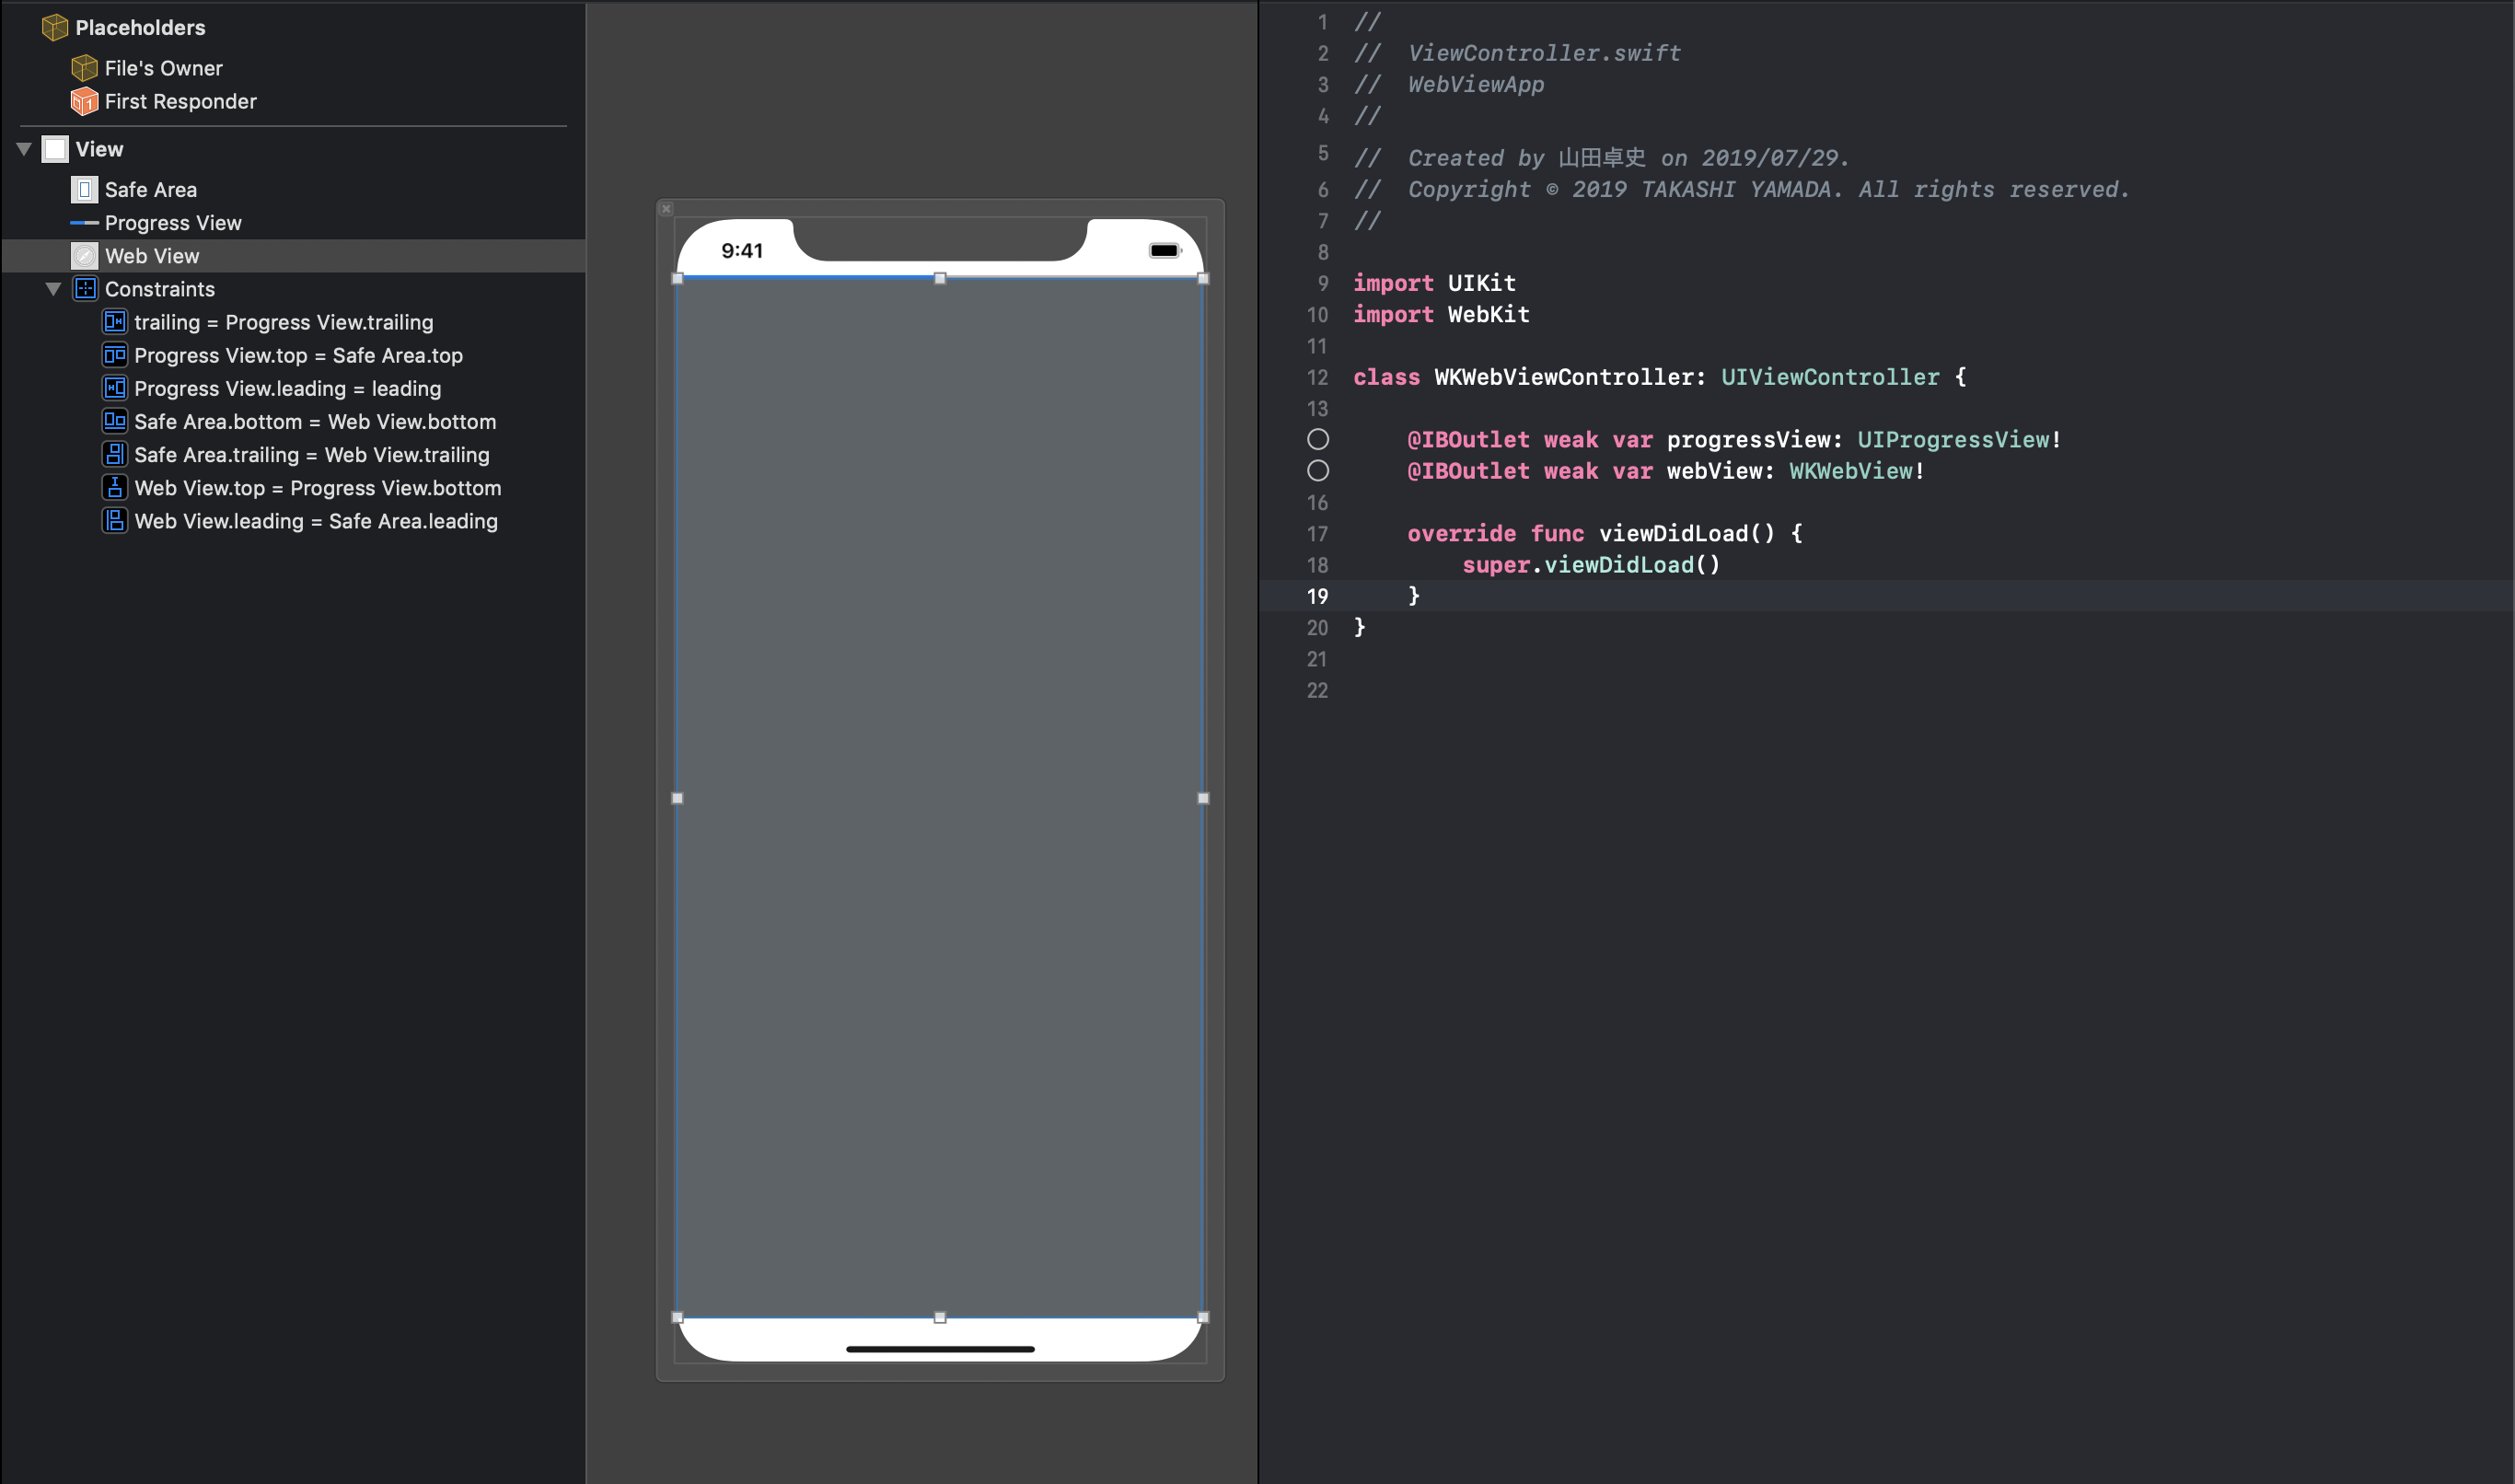
レイアウト
WKWebViewController.xibを開いて、
- WebKit View (WKWebView)
- Progress View (ステータスバーの位置に設置、自動でSafeAreaTopの制約がつきます)
を配置します。
配置後、各パーツをAdd New Constraintsにて、
- WebView
・Top:0
・Leading(左端):0
・Trailing(右端):0
・Bottom:0
-ProgressView
・Top:0
・Leading(左端):0
・Trailing(右端):0
で、Add Constraintsで追加します。

WKWebViewController.swiftにIBOutletで、接続します
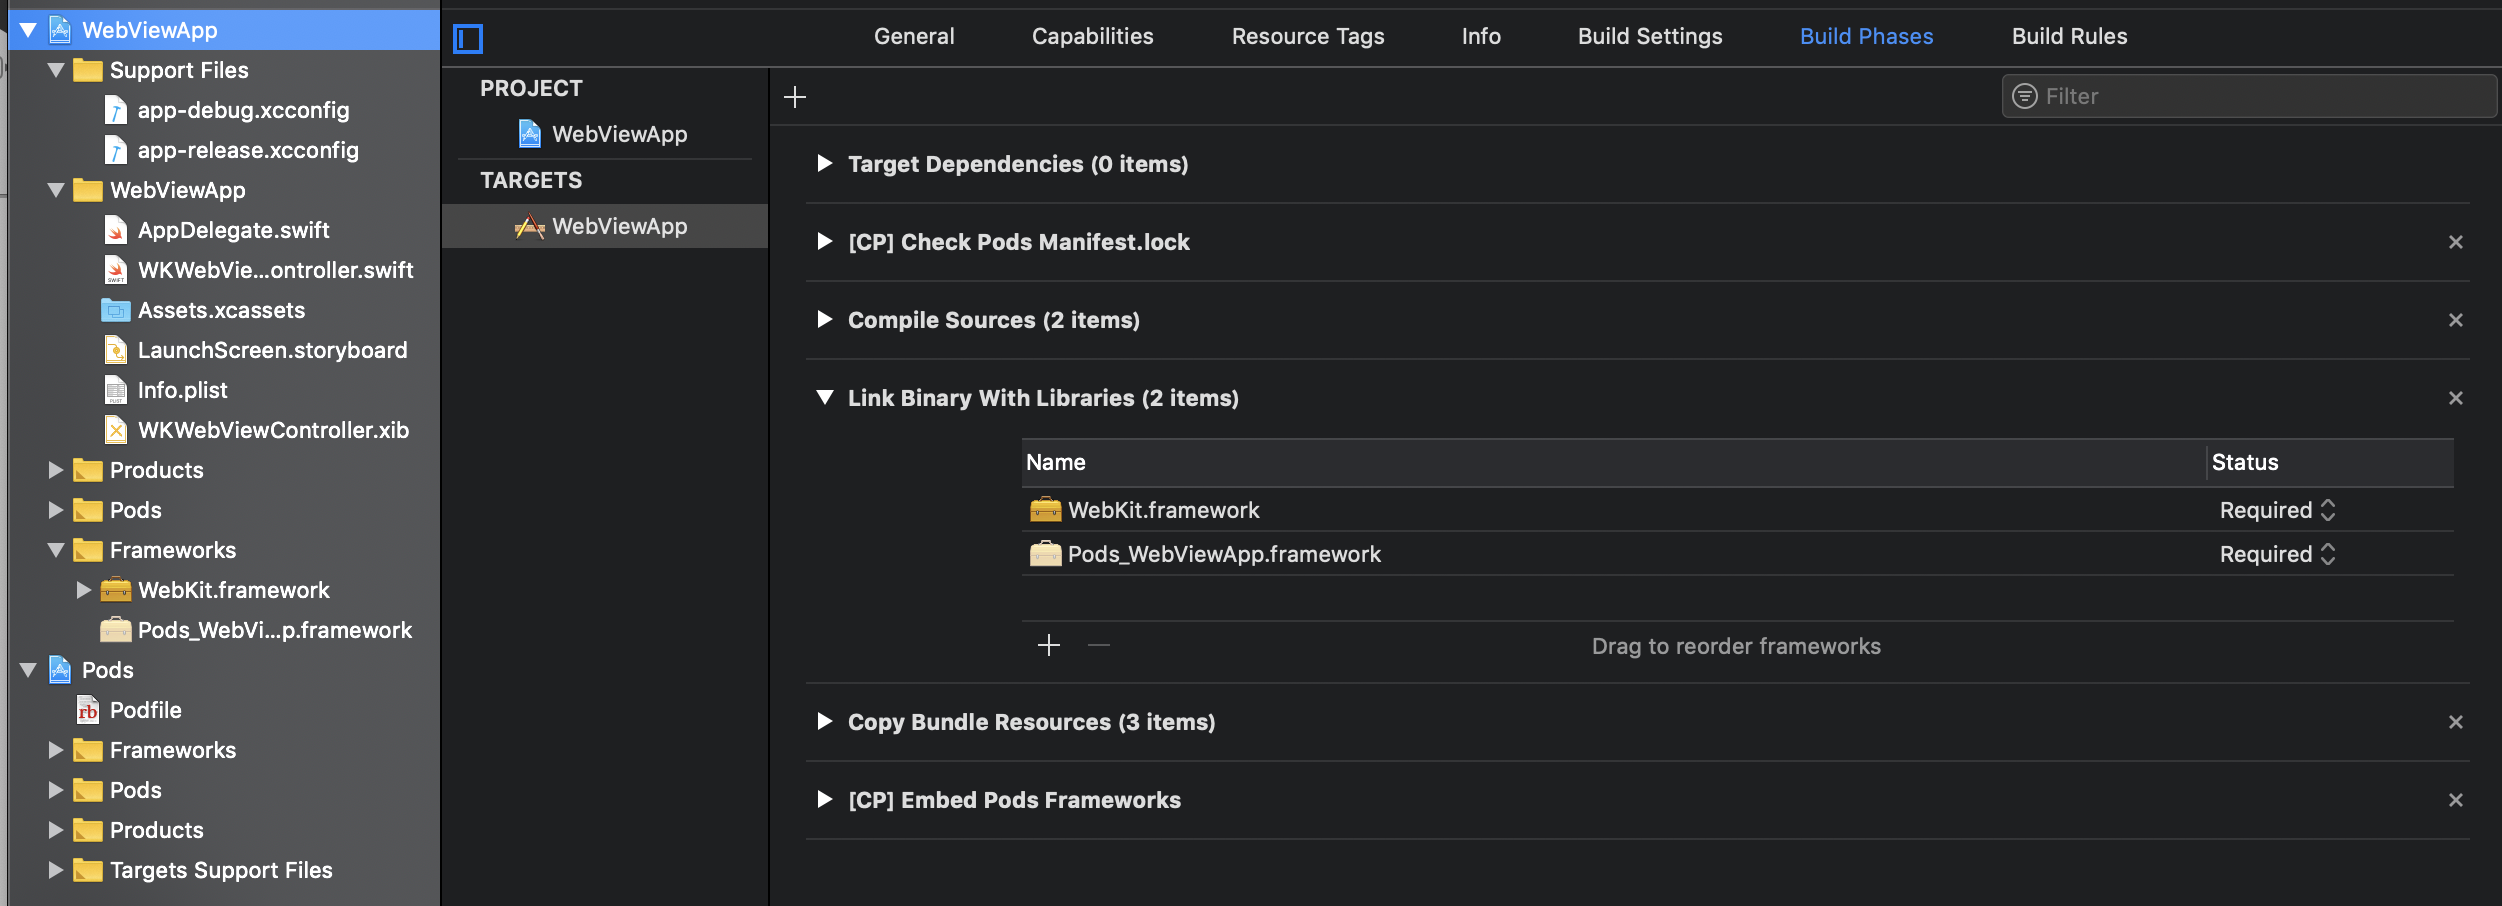
WKWebViewController.swiftのにimport WebKitを記述します
WebKit.frameworkもインポートしましょう
まずはKVOで実装する
import UIKit
import WebKit

class WKWebViewController: UIViewController {

    @IBOutlet weak var progressView: UIProgressView!
    @IBOutlet weak var webView: WKWebView!

    override func viewDidLoad() {
        super.viewDidLoad()
        setupWebView()
    }

    private func setupWebView() {
        //webView.isLoadingの値の変化を監視
        webView.addObserver(self, forKeyPath: "loading", options: .new, context: nil)

        //webView.estimatedProgressの値の変化を監視
        webView.addObserver(self, forKeyPath: "estimatedProgress", options: .new, context: nil)

        let url = URL(string: "https://www.google.com/")
        let urlRequest = URLRequest(url: url!)
        webView.load(urlRequest)
        progressView.setProgress(0.1, animated: true)
    }

    deinit {
        //監視を解除
        webView?.removeObserver(self, forKeyPath: "loading")
        webView?.removeObserver(self, forKeyPath: "estimatedProgress")
    }

    //addObserverで渡したプロパティ("loading",  "estimatedProgress"の値が変化した時に呼ばれる)
    override func observeValue(forKeyPath keyPath: String?, of object: Any?, change: [NSKeyValueChangeKey : Any]?, context: UnsafeMutableRawPointer?) {

        if keyPath == "loading" {
           UIApplication.shared.isNetworkActivityIndicatorVisible = webView.isLoading

            if !webView.isLoading {
                //ロード完了時にProgressViewの進捗を0.0(非表示)にする
                progressView.setProgress(0.0, animated: false)

                //ロード完了時にNavigationTitleに読み込んだページのタイトルをセット
                navigationItem.title = webView.title
            }
        }

        if keyPath == "estimatedProgress" {
            //ProgressViewの進捗状況を更新
            progressView.setProgress(Float(webView.estimatedProgress), animated: true)
        }
    }
}
検索フォームで検索すると、プログレスバーが動き、検索結果のページをタップするとページに遷移し、ページタイトルまで表示できれば成功です。
KVOをSwiftで実装した場合、以下のようなデメリットがあるようです。
(デメリット)
- すべての値の変化をobserveValue()で受け取るため、肥大化の恐れがある
- KVOはObjective-Cのメカニズムであるため、型の安全性が考慮されていない
- addObserverした場合に、deinit時にremoveObserverを呼ばないと、メモリーリークを引き起こす可能性がある
RxSwiftで実装
まずは、最低限必要なコード以外はすべて削除します。ついでに、ライブラリもインポートしておきます。
import UIKit
import WebKit
import RxSwift
import RxCocoa
import RxOptional

class WKWebViewController: UIViewController {

    @IBOutlet weak var progressView: UIProgressView!
    @IBOutlet weak var webView: WKWebView!

    override func viewDidLoad() {
        super.viewDidLoad()
        setupWebView()
    }

    private func setupWebView() {

    }
}
続いて実装です。
import UIKit
import WebKit
import RxSwift
import RxCocoa
import RxOptional

class WKWebViewController: UIViewController {

    @IBOutlet weak var progressView: UIProgressView!
    @IBOutlet weak var webView: WKWebView!

    private let disposeBag = DisposeBag()

    override func viewDidLoad() {
        super.viewDidLoad()
        setupWebView()
    }

    private func setupWebView() {
        //プログレスバーの表示制御、ゲージ制御、アクティビティーインジゲーター表示制御で使うため、一旦オブザーバーを定義
        let loadingObservable = webView.rx.observe(Bool.self, "loading") //ColdなObservable
            .filterNil()
            .share()    //ColdなObservableを以下3回subcribe(bind)しているので、3個のストリームが生成するのを防ぐために、share()でHotなObservableに変換してストリームが1回で済むようにしている


        //プログレスバーの表示・非表示
        loadingObservable
            .map { return !$0}
            .bind(to: progressView.rx.isHidden)
            .disposed(by: disposeBag)

        //iPhoneの上部の時計のところのバーの(名称不明)アクティビティーインジゲーター表示制御
        loadingObservable
            .bind(to: UIApplication.shared.rx.isNetworkActivityIndicatorVisible)
            .disposed(by: disposeBag)

        //NavigationControllerのタイトル表示
        loadingObservable
            .map { [weak self] _ in return self?.webView.title  }
            .bind(to: navigationItem.rx.title)
            .disposed(by: disposeBag)

        //プログレスバーのゲージ制御
        webView.rx.observe(Double.self, "estimatedProgress")
            .filterNil()
            .map { return Float($0)}
            .bind(to: progressView.rx.progress)
            .disposed(by: disposeBag)

        let url = URL(string: "https://www.google.com/")
        let urlRequest = URLRequest(url: url!)
        webView.load(urlRequest)
    }
}
以下、RxWebKitを利用した場合
import UIKit
import WebKit
import RxSwift
import RxCocoa
import RxOptional
import RxWebKit

class WKWebViewController: UIViewController {

    @IBOutlet weak var progressView: UIProgressView!
    @IBOutlet weak var webView: WKWebView!

    private let disposeBag = DisposeBag()

    override func viewDidLoad() {
        super.viewDidLoad()
        setupWebView()
    }

    private func setupWebView() {
        //プログレスバーの表示制御、ゲージ制御、アクティビティーインジゲーター表示制御で使うため、一旦オブザーバーを定義
        let loadingObservable = webView.rx.loading.share()

        //プログレスバーの表示・非表示
        loadingObservable
            .map { return !$0}
            .observeOn(MainScheduler.instance)
            .bind(to: progressView.rx.isHidden)
            .disposed(by: disposeBag)

        //iPhoneの上部の時計のところのバーの(名称不明)アクティビティーインジゲーター表示制御
        loadingObservable
            .bind(to: UIApplication.shared.rx.isNetworkActivityIndicatorVisible)
            .disposed(by: disposeBag)

        //NavigationControllerのタイトル表示
        webView.rx.title
            .filterNil()
            .observeOn(MainScheduler.instance)
            .bind(to: navigationItem.rx.title)
            .disposed(by: disposeBag)

        //プログレスバーのゲージ制御
        webView.rx.estimatedProgress
            .map { return Float($0)}
            .observeOn(MainScheduler.instance)
            .bind(to: progressView.rx.progress)
            .disposed(by: disposeBag)

        let url = URL(string: "https://www.google.com/")
        let urlRequest = URLRequest(url: url!)
        webView.load(urlRequest)
    }
}
もはや、置き換えた部分の説明の仕方が分かりませんが、
- webView.rx.loading.share()
- webView.rx.title
- webView.rx.estimatedProgress
など、ベタ書きしていた部分や、プロパティが明確になり分かりやすくなりました、としか言えません。
(今後、理解が深まったら、改めて解説したいと思います。)
最後に
少しずつ、RxSwiftに慣れてきた感はあります。rxというプロパティが、様々なオブジェクトに付与されて、そこにメソッドチェーンのようにバインドしていくような感じなんですね(汗)。
次回は、よく使うRxSwift系ライブラリー、のお勉強です。