こんにちはこんばんは!
株式会社情創 技術開発局
梅雨のじめじめにも負けず食欲旺盛で焼肉が食べたい@YAKINIKUです!
今回はThymeleafについて解説していきます!
Thymeleafとは
javaのテンプレートエンジンライブラリです。
Thymeleafの特徴は殆どHTMLと同じように記述できることで、
WEBサーバーを起動していなくてもHTMLドキュメントとしてブラウザ上に表示できます。
WEBサーバーから受け取った値を表示する際も、他のテンプレートエンジン(JSP等)より
簡略化されていて簡単に記述できます。
Thymeleafの設定
build.gradle
まずbuild.gradleに以下の2行を記述します。
// ライブラリの組み込み
compile("org.springframework.boot:spring-boot-starter-thymeleaf:${springBootVersion}")
// nekohtmlを追加
compile("net.sourceforge.nekohtml:nekohtml:1.9.22")
nekohtml
nekohtmlとはオープンソースのhtmlサーバーで、
複雑な構造のテキストを解析しプログラムで扱える形に変換してくれます。
後述のLEGACYHTML5にテンプレートモードを設定する場合はこのnekohtmlが必須となります。
application.properties
次はapplication.propertiesです。
spring.thymeleaf.prefix=classpath:/templates/
spring.thymeleaf.suffix=.html
spring.thymeleaf.mode=LEGACYHTML5
spring.thymeleaf.encoding=UTF-8
spring.thymeleaf.content-type=text/html
prefix、suffix
prefixにはresourceの下にあるディレクトリを、
suffixにはファイル形式を記述してください。
prefixで指定されたフォルダ内にあるsuffixで指定された形式のファイルを呼び出すことが可能になります。
mode
Thymeleafで使用する言語の設定を行う項目です。
今回は記述にHTML5を使用するのですが、modeをHTML5にしてしまうと
xhtmlとして正しい記述がされていないとエラーが発生してしまうので、
xhtml方式ではなくhtml方式で記述できるように設定されるLEGACYHTML5に変更します。
encoding
テンプレートを読み込む際のエンコーディングの設定を行う項目です。
今回はUTF-8を指定しています。
content-type
どのようなデータを送るのかを設定する項目です。
上記suffixで指定してあるようにHTMLファイルを使用するのでtext/htmlと記述します。
cache
application.properties本体には記述されていませんが、
テンプレートのキャッシュを設定する項目です。
これをオフにしておくことでキャッシュが無効化されて、
テンプレートを変更した際に、再度読み込みを行います。
開発環境ではオフに
spring.thymeleaf.cache=false
本番環境ではオンに設定しましょう。
spring.thymeleaf.cache=true
Thymeleafの実装例
第12回で作成したものを使用して実装例を作成します。
DB接続について等は第12回をご参照ください。
Controllerの作成
まず第12回で作成したControllerの内容を変更します。
package com.qiita.demo.web.controller;

import java.util.List;

import org.springframework.beans.factory.annotation.Autowired;
import org.springframework.stereotype.Controller;
import org.springframework.ui.Model;
import org.springframework.web.bind.annotation.RequestMapping;

import com.qiita.demo.domain.tbl.TestBean;
import com.qiita.demo.service.test.TestService;


@Controller
public class TestController {
  @Autowired
  private TestService testService;

  @RequestMapping("/test")
  public String home(Model model) {
      List<TestBean> list = testService.selectAll();
      model.addAttribute("beans", list);
      return "test";
  }
}
DBから習得した値をListに格納します。
使用するテーブルは前に使ったものと同じで以下のものとなります。
| id | name |
|---|---|
| 1 | aaa |
| 2 | bbb |
| 3 | ccc |
引数のModelインスタンスにaddAttributeを使用して
addAttribute("beans", list)
とセットします。
こうすることでセットしたリストをテンプレート側で、
**${beans}**と記述して取り出すことができるようになります。
returnには次に作成するhtmlのファイル名を指定しましょう。
html
次に画面に出力されるhtmlファイルを作成します。
application.propertiesに記述したprefixで指定した場所に作成しましょう。

指定した場所以外に作成するとエラーになってしまうので気を付けてください。
<html xmlns:th="http://www.thymeleaf.org">
<head>
    <meta charset="UTF-8" />
    <title>test</title>
</head>
<body>
        <table class="table">
                <thead class="sunflower">
                    <tr>
                        <td>ID</td>
                        <td>NAME</td>
                    </tr>
                </thead>
                <tbody th:each="list : ${beans}">
                    <tr>
                        <td class="text-str" th:text="${list.id}"></td>
                        <td class="text-str" th:text="${list.name}"></td>
                    </tr>
                </tbody>
            </table>
</body>
</html>
画面上に表を出力するために必要な最低限の記述です。
Thymeleafを使用する際にはhtmlタグ内に
xmlns:th="http://www.thymeleaf.org"
と記述してThymeleafの名前空間を指定します。
属性
Thymeleafで使用する属性には、先頭にth:と付いています。
今回はth:textとth:eachを使用しました。
th:textは変数の値をタグのテキストとして表示するものです。
listに格納してあるidとnameを表示するように記述しています。
th:eachは繰り返し処理を行う属性で、変数のサイズ分だけループします。
今回使用したものはサイズが3だったので3回繰り返しました。
実践
それでは実践して動作を確認しましょう。
プロジェクトを右クリック→Gradleからすべてリフレッシュを行い、
bootRunで実行します。
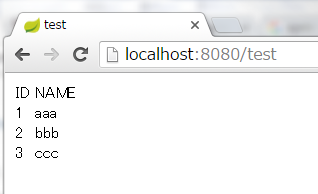
実行後、http://localhost:8080/test/ にアクセスしてみましょう。
以下の画像のように出力されていれば成功です。
では今回はこの辺で終わりにします。
最後まで読んでいただきありがとうございました。
それではみなさんまた会いましょう!
参考URL
Spring Bootで自分用テンプレートプロジェクトを作ってみた
thymeleafの基本的な記法を覚える その1
Tutorial: Using Thymeleaf (ja)