ScalarDBとは
scalar社が公開しているライブラリで、非ACIDな分散データベース/ストレージをACID準拠にすることができ、Cassandraなどの分散データベースを利用することで、線形のスケーラビリティや高い可用性を実現してくれます。
最大の特長は、強い一貫性のあるACIDトランザクション機能を使用可能という点です。
詳しくはScalarDB docsをご確認ください。
ScalarDBの構成
ScalarDBは主に以下の3層から構成されています。
- マスターレスなトランザクションを管理するマネージャ層
- データストレージとして利用する分散データベースの違いを吸収する、ストレージ抽象化層
- ストレージ固有のアダプター(現在はCassandraに対応)
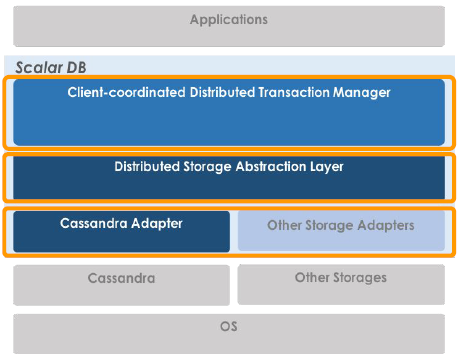
ScalarDBの階層図
ScalarDBのデータモデルはKeyValue形式をベースとした多次元マップモデルで、レコードはPartition Key,Clustering Keyと値セットで構成されている。
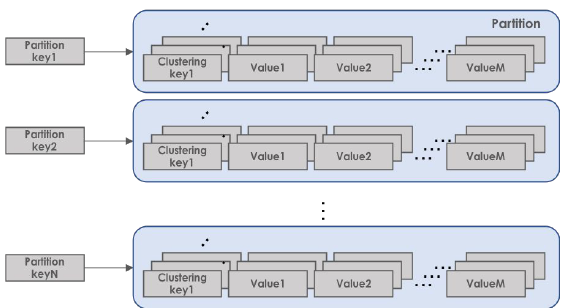
ScalarDBのデータモデルイメージ図
各値はPartition Key,Clustering Keyと値の名称によって構成されるPrimary Keyによって一意にマッピングされる。
Cassandraについて
CassandraはNoSQL Databaseの一種で、以下の特長を持っています。
・単一障害点のない、高度なスケーラビリティと可用性
・SQLライクな問い合わせ言語、セカンダリー・インデックスによる検索のサポート
・柔軟なスキーマ
ただし、以下の制約も持っています。
・トランザクションもJOINもサポートされない
・外部キーはサポートされず、キーは不変
・キーは一意でなければならない
・検索が複雑
データモデルは以下の要素からなり、データの一貫性を一部犠牲にしてデータを分散させている。
-
Keyspace
トップレベルの名前空間 -
Column Family(Table)
RDBMSのテーブルに相当する、列コレクションのコンテナ -
Partition key
ノードごとにデータを分散させるキー -
Values
Partiton Key, Clustering Key以外の列データ
環境構築
ここからが本題で、このScalarDBをローカルの、Windows10にインストールしたUbuntu16.04上で動かしてみようと思います。
必要なコンポーネントは以下の通りです。
・Oracle JDK 8(OpenJDK 8)以上
・Casssandra 3.11.x(執筆時点での最新の安定版)
・Golang Ver.1.10以上
・Gradle Ver.4.10以上
早速インストールしていきましょう。
Oracle JDK 8(OpenJDK 8)
(参考:http://cassandra.apache.org/)
Ubuntuの初期状態では、java8の実行環境はあるが開発環境はないらしい
パッケージリストの更新
$ sudo apt update
java8開発環境のインストール
$ sudo apt install openjdk-8-jdk
Casssandra 3.11.x
-
CassandoraのApacheリポジトリの追加(バージョン3.11の場合)
$ echo "deb http://www.apache.org/dist/cassandra/debian 311x main" | sudo tee -a /etc/apt/sources.list.d/cassandra.sources.list -
Apache Cassandraリポジトリキーを追加
$ curl https://www.apache.org/dist/cassandra/KEYS | sudo apt-key add - -
リポジトリを更新
$ sudo apt-get update -
Cassandraをインストール
$ sudo apt-get install cassandra -
Cassandraの起動
$ sudo service cassandra start -
Cassandraの起動確認
$ cqlsh
ただし、起動に時間がかかるため、少し待ってから実行すること。
以下のようになればOK

※3.で以下のエラーが発生する場合
GPG error: http://www.apache.org 311x InRelease: The following signatures couldn't be verified because the public key is not available: NO_PUBKEY A278B781FE4B2BDA
公開鍵の追加
$ sudo apt-key adv --keyserver pool.sks-keyservers.net --recv-key A278B781FE4B2BDA
もう一度リポジトリの更新
$ sudo apt-get update
golang
-
golangのアーカイブをダウンロード
$ curl -L https://dl.google.com/go/go1.10.5.linux-amd64.tar.gz > go1.10.5.linux-amd64.tar.gz -
ダウンロードしたアーカイブを解凍する
$ sudo tar -C /usr/local -xzf go1.10.5.linux-amd64.tar.gz -
GOパスを設定
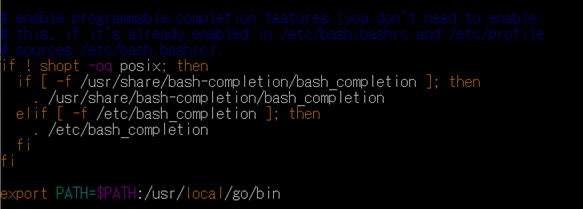
$ vi ~/.bashrc
.bashrcの本文に以下の行を追記する
export PATH=$PATH:/usr/local/go/bin
-
パス設定を反映させる
$ source ~/.bashrc
Gradle
GradleのインストールのためにはSDKManをインストールする必要があるが、SDKManをインストールするにはzip,unzipをそれぞれインストールする必要がある。
-
zip,unzipのインストール
$ sudo apt install zip unzip -
SDKManのインストール
$ curl -s "https://get.sdkman.io" | bash
詳細はこちら -
SDKManの初期設定
$ source "/home/(自分のユーザ名)/.sdkman/bin/sdkman-init.sh" -
SDKManのインストールを確認
$ sdk version
sdkman 5.0.0+51のような表示がされればOK -
Gradleのインストール
$ sdk install gradle 4.10.2
詳細はこちら -
Gradleのバージョン確認
$ gradle --version
Gradle 4.10.2のような表示がされればOK
ScalarDBの設定
1.設定ファイル(database.properties)の作成
$ sudo mkdir /etc/scalar/
$ sudo vi /etc/scalar/database.properties
# Comma separated contact points
scalar.database.contact_points=localhost
# Port number for all the contact points. Default port number for each database is used if empty.
# scalar.database.contact_port=
# Credential information to access the database
scalar.database.username=cassandra
scalar.database.password=cassandra
※localhostのところには接続する端末のIPアドレスを記述する。複数接続する場合はカンマ区切りで記述する。
2.Casssandra用のデータディレクトリの作成
$ sudo mkdir -p /data/cassandra/data
$ sudo mkdir -p /data/cassandra/commitlog
$ sudo mkdir -p /data/cassandra/hints
$ sudo mkdir -p /data/cassandra/saved_caches
/data/cassandraフォルダの所有者を変更
$ sudo chown -R cassandra:cassandra /data/cassandra
※サンプルのため同一インスタンス上に作成しているが、本番環境ではAWSやNFSに作成することを想定しています。
3.Cassandraの設定ファイルを編集
Cassandraの設定ファイルのバックアップを作成してから編集する
$ sudo cp /etc/cassandra/cassandra.yaml /etc/cassandra/cassandra.yaml.copy
$ sudo vi /etc/cassandra/cassandra.yaml
commitlog_directoryの設定を変更(196行目)
 変更前
# commit log.  when running on magnetic HDD, this should be a
# separate spindle than the data directories.
# If not set, the default directory is $CASSANDRA_HOME/data/commitlog.
commitlog_directory: /var/lib/cassandra/commitlog

 変更後
# commit log.  when running on magnetic HDD, this should be a
# separate spindle than the data directories.
# If not set, the default directory is $CASSANDRA_HOME/data/commitlog.
commitlog_directory: /data/cassandra/commitlog


data_file_directoriesの設定を変更(191行目)
 変更前
# Directories where Cassandra should store data on disk.  Cassandra
# will spread data evenly across them, subject to the granularity of
# the configured compaction strategy.
# If not set, the default directory is $CASSANDRA_HOME/data/data.
data_file_directories: /var/lib/cassandra/data

 変更後
# Directories where Cassandra should store data on disk.  Cassandra
# will spread data evenly across them, subject to the granularity of
# the configured compaction strategy.
# If not set, the default directory is $CASSANDRA_HOME/data/data.
data_file_directories: /data/cassandra/data


hints_directoryの設定を変更(71行目)
 変更前
# Directory where Cassandra should store hints.
# If not set, the default directory is $CASSANDRA_HOME/data/hints.
hints_directory: /var/lib/cassandra/hints

 変更後
# Directory where Cassandra should store hints.
# If not set, the default directory is $CASSANDRA_HOME/data/hints.
hints_directory: /data/cassandra/hints


saved_caches_directoryの設定を変更(368行目)
 変更前
# saved caches
# If not set, the default directory is $CASSANDRA_HOME/data/saved_caches.
saved_caches_directory: /var/lib/cassandra/saved_caches

 変更後
# saved caches
# If not set, the default directory is $CASSANDRA_HOME/data/saved_caches.
saved_caches_directory: /data/cassandra/saved_caches


設定のコメントアウトを切り替える(379,380,385,386行目)
 変更前
# commitlog_sync_batch_window_in_ms milliseconds between fsyncs.
# This window should be kept short because the writer threads will
# be unable to do extra work while waiting.  (You may need to increase
# concurrent_writes for the same reason.)
#
# commitlog_sync: batch
# commitlog_sync_batch_window_in_ms: 2
#
# the other option is "periodic" where writes may be acked immediately
# and the CommitLog is simply synced every commitlog_sync_period_in_ms
# milliseconds.
commitlog_sync: periodic
commitlog_sync_period_in_ms: 10000

 変更後
# commitlog_sync_batch_window_in_ms milliseconds between fsyncs.
# This window should be kept short because the writer threads will
# be unable to do extra work while waiting.  (You may need to increase
# concurrent_writes for the same reason.)
#
commitlog_sync: batch
commitlog_sync_batch_window_in_ms: 2
#
# the other option is "periodic" where writes may be acked immediately
# and the CommitLog is simply synced every commitlog_sync_period_in_ms
# milliseconds.
# commitlog_sync: periodic
# commitlog_sync_period_in_ms: 10000
4.Cassandraを再起動してログイン確認
$ sudo service cassandra restart
$ cqlsh
Cassandra Consoleにログインできたら起動成功
$ sudo service cassandra status
* Cassandra is runningと表示されたら成功
ScalarDB Schema Tool
このツールは、ScalarDB用のデータベースのスキーマを生成・ロードしてくれるツールです。
generatorとloaderの2つがあり、generatorはストレージ実装(例:Casssandra)固有のスキーマ定義ファイルとメタデータ定義を作成し、loaderはgeneratorを利用してスキーマファイルを取得し、ストレージにスキーマ定義を作成することができます。
これによって、アプリケーションのデータをモデル化するときにストレージ固有のスキーマを考慮する必要がなくなります。
1.ツールのダウンロード
ScalarDBのgithubリポジトリをcloneする
$ cd ~/
$ git clone https://github.com/scalar-labs/scalardb.git
2.gradleでScalarDB環境をセットアップ
変数を使ってパスを設定
$ SCALARDB_HOME=/home/(自身の環境のユーザ名)/scalardb
$ cd $SCALARDB_HOME
ビルドを実行
$ sudo ./gradlew installDist
BUILD SUCCESSFULと表示されればOK
3.golangでmake
Schema Toolsディレクトリに移動してmakeを実行
$ cd tools/schema
$ sudo make
4.サンプルファイル作成
$ sudo vi emoney-storage.sdbql
REPLICATION FACTOR 1;
CREATE NAMESPACE emoney;
CREATE TABLE emoney.account (
  id TEXT PARTITIONKEY,
  balance INT,
);
5.実行テスト
generatorを起動してみる。
$ sudo ./generator emoney-storage.sdbql emoney-storage.cql
emoney-storage.cqlが作成されていることを確認する。
サンプルアプリ作成編へ
環境構築編はここまでとなります。サンプルアプリ作成編では実際にサンプルアプリを作成し、ScalarDBアプリケーションの動作を確認したいと思います。