iOS Advent Calendar 2015 11日目の記事です。
概要
会社の出退勤をよく忘れるので、iBeaconを使って忘れず出勤できるようなものを作りました。
どんな問題を解決して、どうやって作ったかを紹介します。
問題点
僕が働く会社の勤怠は、ロッカールームにあるカードリーダーにカードをかざして打刻するとても便利な仕組みになっています。
しかし、僕はロッカールームに用が無いので、打刻を忘れてバックオフィスチームに迷惑を書けてしまうことがよくありました。
解決策
出勤アプリを作りました。
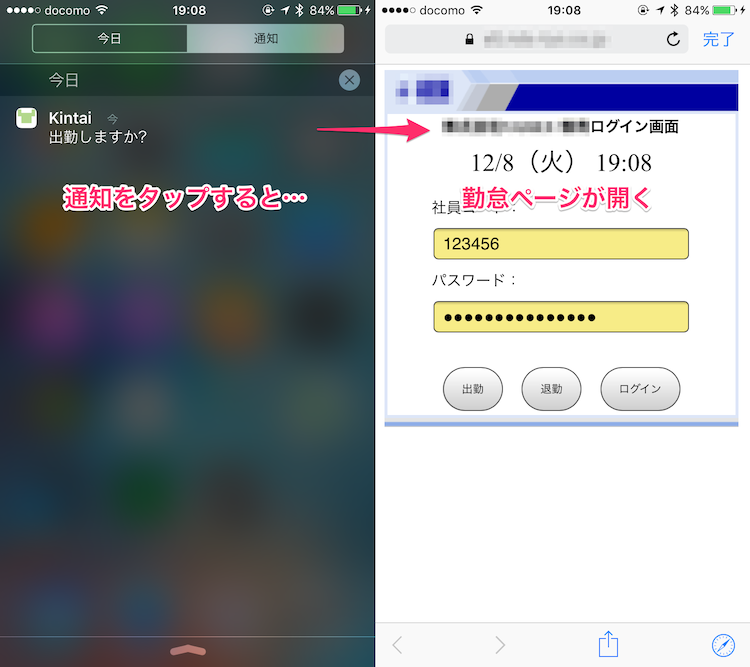
出退勤時、オフィスの出入口を通ったらiPhoneに通知が来て、通知からアプリを開いた先の勤怠画面で出勤します。

仕組み
幸い会社の出勤管理システムにスマホ最適化されたURLがあったので、これを使って何かできないか考えました。
- (毎朝必ず通る)オフィスの入り口にある受付のiPadをiBeaconのペリフェラル(発信端末)にする。
- 手持ちのiPhoneにiBeaconのセントラル(受信端末)にする。
- ペリフェラルに近づいたり離れたりするとUILocalNotificationの通知が届く。
- 通知をタップすると勤怠ページが開きます。
作ったもの
-
iBeaconのペリフェラル (発信側)
https://github.com/WorldDownTown/BeaconPeripheral -
iBeaconのセントラル (受信側)
https://github.com/WorldDownTown/Kintai
※どちらもiOS9以降にしか対応していません。
どうやっているか?
ペリフェラル App
ペリフェラルのアプリを実装するにはCoreBluetooth.framework, CoreLocation.framework を使います。
// AppDelegate.swift

func application(application: UIApplication, didFinishLaunchingWithOptions launchOptions: [NSObject: AnyObject]?) -> Bool {

    PeripheralManager.startAdvertising()

    return true
}
// PeripheralManager.swift

import CoreBluetooth
import CoreLocation

class PeripheralManager: CBPeripheralManager, CBPeripheralManagerDelegate {

    private static let sharedInstance = PeripheralManager()

    /**
     ペリフェラルとしてアドバタイジングを開始する
     */
    static func startAdvertising() {
        // delegateに代入すると CBPeripheralManagerDelegate のメソッドが呼び出される
        sharedInstance.delegate = sharedInstance
    }

    // CBPeripheralManagerDelegate
    func peripheralManagerDidUpdateState(peripheral: CBPeripheralManager) {
        if peripheral.state == .PoweredOn {
            let beaconRegion = CLBeaconRegion(proximityUUID: NSUUID(UUIDString: "UUID文字列")!, identifier: "ビーコンのID")
            let beaconPeripheralData: NSDictionary = beaconRegion.peripheralDataWithMeasuredPower(nil)
            peripheral.startAdvertising(beaconPeripheralData as? [String: AnyObject])
        }
    }
}
これだけで、ペリフェラルとして識別情報を発信します。
AppDelegateにダラダラ書きたくなかったので、CBPeripheralManager, CBPeripheralManagerDelegate両方の機能を一つのシングルトンクラスにまとめています。
オフィスの入口にあるiPadには受付のアプリが常に動いているので、このアプリにペリフェラルの機能を追加しました。
今回は都合よくオフィスの入口に常時起動しているアプリがあったのでこれを使いました。
ですが、ペリフェラルはiOS端末である必要はなく、estimoteに代表されるiBeacon端末で構いません。
セントラル App
セントラルのアプリを実装するには、CoreLocation.frameworkを使います。
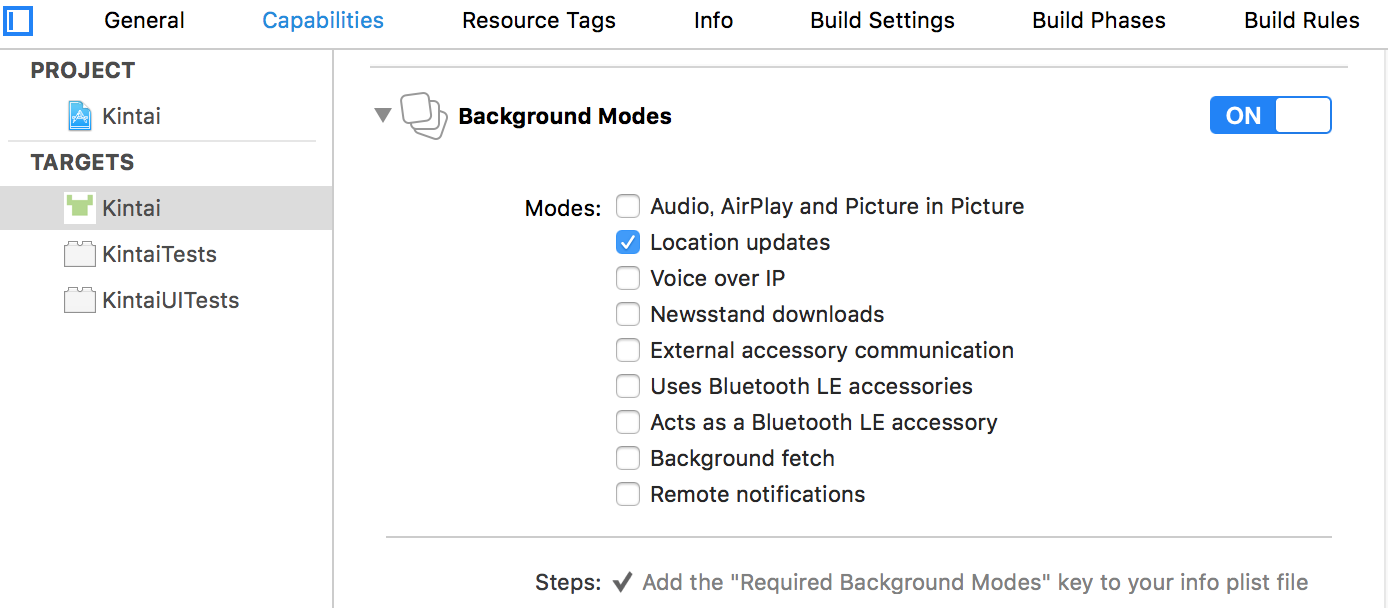
バックグラウンドでの検知をするための設定
Projectファイル→TARGETSのApp→Capabilities→Backround ModesをON→Location updatesにチェック

トップページ
// ViewController.swift

override func viewDidAppear(animated: Bool) {
    super.viewDidAppear(animated)

    let urlString = "勤怠ページのURL"
    let encodedUrlString = urlString.stringByAddingPercentEncodingWithAllowedCharacters(NSCharacterSet.URLQueryAllowedCharacterSet())

    if let encodedUrlString = encodedUrlString, url = NSURL(string: encodedUrlString) {
        let safariVC = SFSafariViewController(URL: url)
        presentViewController(safariVC, animated: false, completion: nil)
    }
}
UILocalNotificationの通知からアプリを開くと、この勤怠のWebページが表示されます。
SFSafariViewController を表示しているだけです。
SFSafariViewControllerであれば、Safariとパスワードを共有できるので、アプリ側にアカウントとパスワードを持たずに入力を省略できます。
通知処理
// NotificationManager.swift

struct NotificationManager {

    /**
     通知の許可を確認する
     */
    static func registerUserNotificationSettings() {
        let application = UIApplication.sharedApplication()
        let settings = UIUserNotificationSettings(forTypes: [.Alert, .Sound], categories: nil)
        application.registerUserNotificationSettings(settings)
    }

    /**
     前回の通知から一定時間以上経過していればローカル通知を飛ばす

     - parameter message:  表示メッセージ
     */
    static func postLocalNotificationIfNeeded(message message: String) {
        if !shouldNotifyWithMessage(message) {
            return
        }

        print(message)

        let application = UIApplication.sharedApplication()
        application.cancelAllLocalNotifications()

        let notification = UILocalNotification()
        notification.alertBody = message
        notification.soundName = UILocalNotificationDefaultSoundName
        application.presentLocalNotificationNow(notification)
    }

    /**
     通知可否を返す。
     前回の通知から一定時間経過していれば通知可

     - parameter message: 表示メッセージ

     - returns: true:通知可/false:通知不可
     */
    private static func shouldNotifyWithMessage(message: String) -> Bool {
        let defaults = NSUserDefaults.standardUserDefaults()
        let key = message
        let now = NSDate()
        let date = defaults.objectForKey(key)

        defaults.setObject(now, forKey: key)
        defaults.synchronize()

        if let date = date as? NSDate {
            let remainder = now.timeIntervalSinceDate(date)
            let threshold: NSTimeInterval = 60.0 * 60.0 * 2.0   // 2時間
            return (remainder > threshold)
        }

        return true
    }
}
通知許可のダイアログ表示と、通知送信処理をまとめています。
業務時間中であってもランチの時などオフィスを出入りすることがあります。
こういう時に毎回通知が来るのは邪魔なので、前回の通知から2時間は通知を出さないようにしています。
iBeaconのセントラルとしての検知処理
import CoreLocation

class LocationManager: CLLocationManager {

    private static let sharedInstance = LocationManager()

    /**
     位置情報取得の許可を確認
     */
    static func requestAlwaysAuthorization() {
        // バックグラウンドでも位置情報更新をチェックする
        sharedInstance.allowsBackgroundLocationUpdates = true
        sharedInstance.delegate = sharedInstance
        sharedInstance.requestAlwaysAuthorization()
    }
}


// MARK: CLLocationManagerDelegate

extension LocationManager: CLLocationManagerDelegate {

    func locationManager(manager: CLLocationManager, didStartMonitoringForRegion region: CLRegion) {
        print("Start monitoring for region")
        manager.requestStateForRegion(region)
    }

    func locationManager(manager: CLLocationManager, didChangeAuthorizationStatus status: CLAuthorizationStatus) {

        if status == .AuthorizedAlways || status == .AuthorizedWhenInUse {
            if CLLocationManager.isMonitoringAvailableForClass(CLBeaconRegion) {

                let beaconRegion = CLBeaconRegion(proximityUUID: NSUUID(UUIDString: "UUID文字列")!, identifier: "ビーコンのID")
                beaconRegion.notifyEntryStateOnDisplay = true   // ディスプレイ表示中も通知する
                manager.startMonitoringForRegion(beaconRegion)
            }
        }
    }

    func locationManager(manager: CLLocationManager, didDetermineState state: CLRegionState, forRegion region: CLRegion) {
        if state == .Inside {
            NotificationManager.postLocalNotificationIfNeeded(message: "出勤しますか?")
        }
    }

    func locationManager(manager: CLLocationManager, didEnterRegion region: CLRegion) {
        NotificationManager.postLocalNotificationIfNeeded(message: "出勤しますか?")
    }

    func locationManager(manager: CLLocationManager, didExitRegion region: CLRegion) {
        NotificationManager.postLocalNotificationIfNeeded(message: "退勤しますか?")
    }
}
ここでもAppDelegateをすっきりさせるために、CLLocationManagerManager, CLLocationManagerDelegate 両方の機能を一つのシングルトンクラスにまとめています。
CLLocationManagerDelegateのlocationManager:didEnterRegion:で領域内に入ったことを検知し、出勤を通知します。
locationManager:didExitRegion:で領域から出たことを検知し、退勤を通知します。
CLLocationManagerDelegateのlocationManager:didRangeBeacons:inRegion:メソッドで、ペリフェラルとの距離を測って、近くなった時に通知を送ることもできますが、バッテリー消費を考えて実装しませんでした。
AppDelegate
// AppDelegate.swift

func application(application: UIApplication, didFinishLaunchingWithOptions launchOptions: [NSObject: AnyObject]?) -> Bool {

    // 通知の許可
    NotificationManager.registerUserNotificationSettings()

    // 検知の開始
    LocationManager.requestAlwaysAuthorization()

    return true
}
アプリ起動時に通知の許可と検知開始処理を呼び出すだけ。
一週間使ってみた
効果
一週間使ってみたところ、打刻忘れがすっかりなくなりました。
特に退勤時、仕事が終わって気が抜けて打刻のことなんか忘れている時に、通知で気付くので助かっています。
バッテリー
常時位置情報の取得を許可しているため、バッテリーの使用量が気になります。
ですが、一週間使ってみたところ、設定のバッテリー使用状況のリストに今回作成したアプリは含まれていませんでした。
まとめ
- iOS端末をペリフェラルとして使うことができます。
- セントラルでは、領域に入った or 出たことを検出して通知を出しました。
- 勤怠ページを
SFSafariViewControllerを使って表示することで、パスワードを管理しないで済みます。
とりたてて新しい技術ではありませんでしたが、余っているiOS端末があれば簡単に遊べて楽しかったです。
コードは公開してあるので、オフィス環境に合わせて自由にいじってみてください。