はじめに
今回は、React Flowを使用してバックエンドシステムのジョブの実行状態を表示します。
ReactFlow
React Flowは、ノードベースのアプリケーションを構築するためのライブラリです。これには、シンプルな静的なダイアグラムからデータの視覚化、複雑なビジュアルエディタまで、さまざまなものが含まれます。
Job
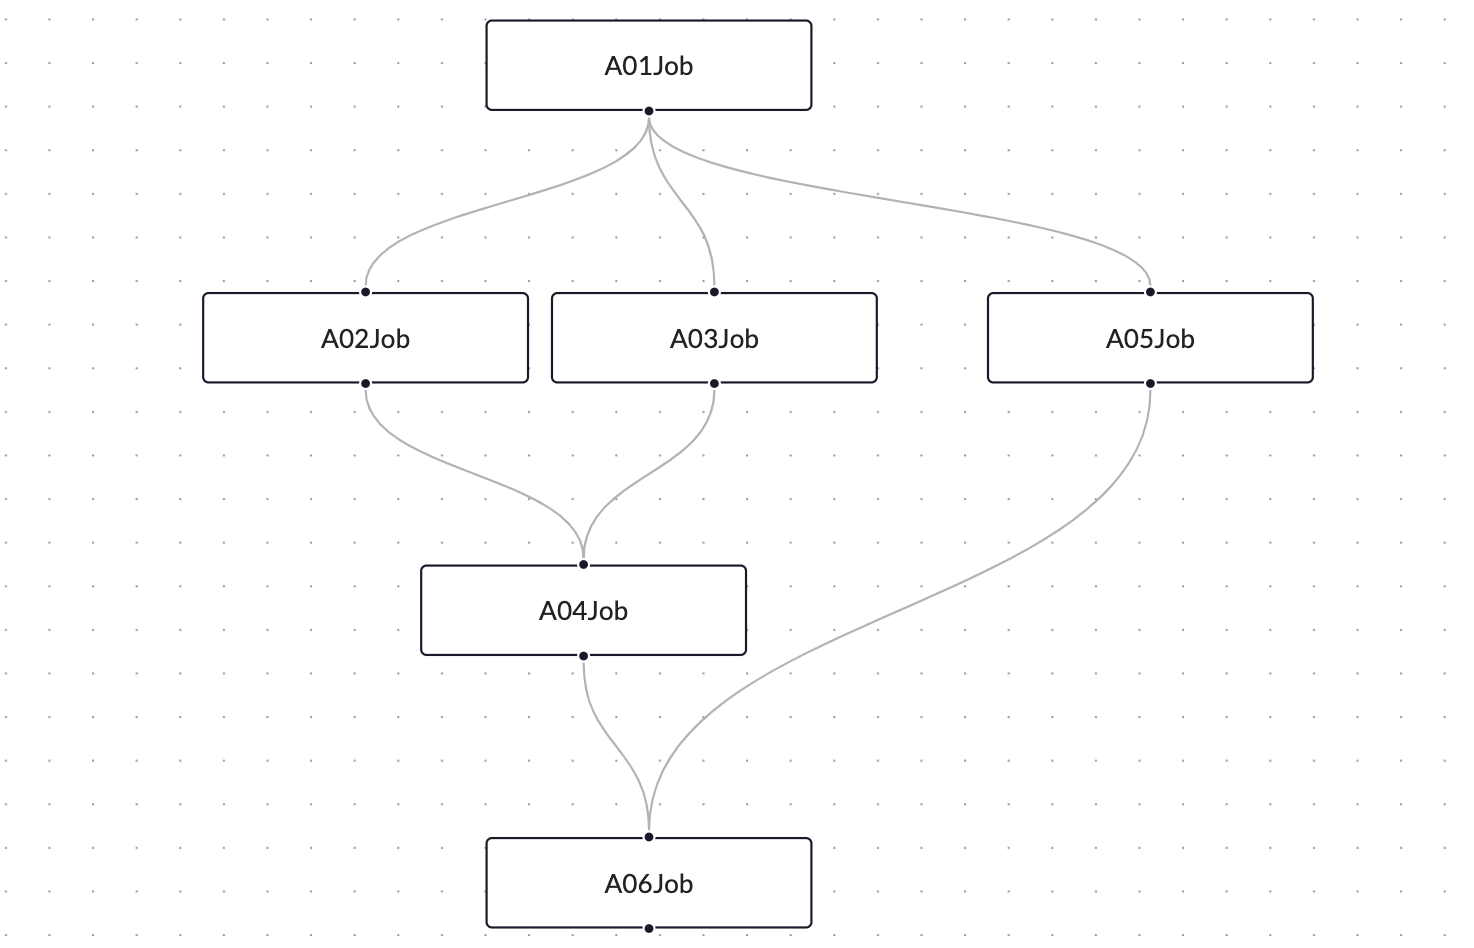
銀行や保険のITシステムでは、バッチジョブの実行が一般的です。ジョブ同士には、実行順序や依存関係があります。このような複雑な関連性を表現するために、DAG(有向非巡回グラフ)を使用できます。
DAG
DAG(Directed Acyclic Graph)は、ノードとエッジから構成されるデータ構造です。DAGは、ノードが順方向に結ばれた非循環グラフであり、ノード間には一方向の関係があります。これにより、データフロー、依存関係、および実行順序を効率的に表現できます。DAGは、ソフトウェア開発やデータ処理などのさまざまな分野で広く使用されており、特にジョブスケジューリングやワークフロー管理などで重要な役割を果たしています。
実装
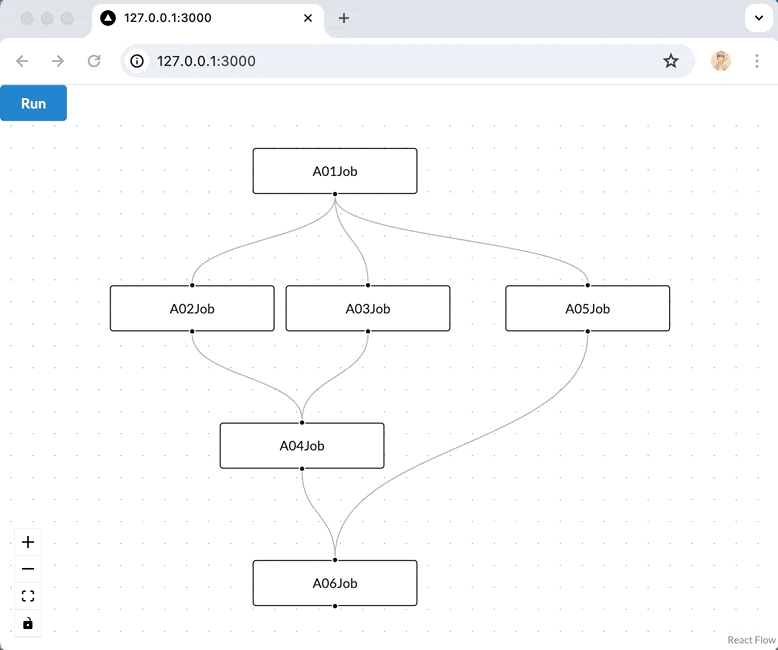
最終的な実装は以下のようになります。アニメーション効果があります。
フロントエンド
フロントエンドのプロジェクトは、frontendフォルダに配置されています。
npx create-next-app
cd frontend
npm install reactflow
npm install semantic-ui-react semantic-ui-css
 % npm list
frontend@0.1.0 ~/job_diagram/frontend
├── @types/node@20.12.7
├── @types/react@18.2.79
├── eslint-config-next@14.2.2
├── eslint@8.57.0
├── next@14.2.2
├── postcss@8.4.38
├── react-dom@18.2.0
├── react@18.2.0
├── reactflow@11.11.1
├── semantic-ui-css@2.5.0
├── semantic-ui-react@2.1.5
└── tailwindcss@3.4.3
全体のUIは以下の通りです。特筆すべき点として、Containerの高さを明示的に指定する必要があります。そうしないと、ReactFlowが正しく表示されません。
return (
    <>
      <Container fluid style={{height:40}}>
        <Button primary onClick={runDag}>Run</Button>
      </Container>
      <Container fluid style={{height:windowHeight-40}}>
        <ReactFlowProvider>
          <ReactFlow
            nodes={nodes}
            edges={edges}
            fitView
          >
            <Background />
            <Controls />
          </ReactFlow>
        </ReactFlowProvider>
      </Container>
    </>
);
高さを計算するために、以下の方法を使用します。
const [windowHeight, setWindowHeight] = useState(0);
useEffect(() => {
    setWindowHeight(window.innerHeight);

    const handleResize = () => {
      setWindowHeight(window.innerHeight);
    };

    window.addEventListener('resize', handleResize);

    return () => {
      window.removeEventListener('resize', handleResize);
    };
}, []);
バックエンドAPIを1秒ごとに呼び出して、グラフをリフレッシュします。
useEffect(() => {
    fetch("http://127.0.0.1:8080/dag", {
      method:"GET",
      headers:{
        Accept:"application/json",
        "Content-Type": "application/json"
      }
    }).then((res) => res.json())
      .then((json) => {
        setNodes(json.nodes)
        setEdges(json.edges)
      })
    const timeout = setTimeout(() => {
      setCount(count + 1);
    }, 1000);

    return () => {
      clearTimeout(timeout);
    };
}, [count]);
ボタンを追加し、バックエンドのジョブ実行をトリガーします。
const runDag = () => {
  fetch("http://127.0.0.1:8080/run", {
      method:"GET",
      headers:{
        Accept:"application/json",
        "Content-Type": "application/json"
      }
  })
}
バックエンド
次に、バックエンドの2つのAPIを実装します。
@GetMapping("/run")
public ResponseEntity<String> run() {
    jobService.runDag();
    return ResponseEntity.ok("ok");
}

@GetMapping("/dag")
public ResponseEntity<Dag> dag() {
    return ResponseEntity.ok(jobService.getStatus());
}
ジョブの親クラスが完成したら、さらに6つの簡単なジョブを実装します。
public abstract class Job {
    public String name() {
        return this.getClass().getSimpleName();
    }

    public void execute() {
        try {
            Thread.sleep((int)(Math.random() * 3000));
        } catch (InterruptedException e) {
            throw new RuntimeException(e);
        }

        doBusiness();
    }

    public abstract void doBusiness();
}
@Component
public class A01Job extends Job {
    @Override
    public void doBusiness() {
        System.out.println(name() + " invoked...");
    }
}
JobService内で、単純にJSONを使用してDagを構築し、6つのジョブを自動的にMapに組み立てます。
public JobService(List<Job> jobList) throws IOException {
    jobMap = jobList.stream().collect(Collectors.toMap(Job::name, x -> x));
    dag = new ObjectMapper().readValue(this.getClass().getResourceAsStream("/dag.json"), Dag.class);
}
再帰呼び出しを使用して、各ノードにアクセスします。
public void visit(Node node) {
    String jobId = node.getData().get("jobId");
    if (canRun(node)) {
        node.setStatus(1);
        jobMap.get(jobId).execute();
        node.setStatus(2);
    }

    dag.getEdges().stream().filter(o -> node.getId().equals(o.getSource())).forEach(o -> {
        o.setAnimated(true);
        dag.getNodes().stream().filter(n -> o.getTarget().equals(n.getId())).forEach(
                s -> visit(s)
        );
        o.setAnimated(false);
    });
}
JSON内のjobIdとjobのクラス名は同じであり、これによって関連付けが行われます。
{
  "id": "2",
  "data": {
    "jobId": "A02Job",
    "label": "A02Job"
  },
  "position": {
    "x": 70,
    "y": 125
  }
}
最後に、実行可能なジョブかどうかを判断し、それが前のジョブすべてが完了しているかどうかによって決まります。
private boolean canRun(Node node) {
    List<String> sourceNodeIdList = dag.getEdges().stream().filter(
            o -> node.getId().equals(o.getTarget())
    ).map(
            o -> o.getSource()
    ).collect(Collectors.toList());

    List<Node> nodes = sourceNodeIdList.stream().map(
            id ->  dag.getNodes().stream().filter(n -> n.getId().equals(id)).findAny().get()
    ).collect(Collectors.toList());

    return !nodes.stream().filter(o -> o.getStatus() != 2).findAny().isPresent();
}
実行中、「0」は待機状態を示し、「1」は実行中を示し、オレンジ色に設定されます。「2」は実行完了を示し、緑色に設定されます。
public void setStatus(int status) {
    this.status = status;
    String [] color = new String[] {
            "black",
            "white",
            "white",
    };

    String [] bgColor = new String[] {
            "#FFFFFF",
            "#FC5C30",
            "#13A52E",
    };

    style.put("color", color[status]);
    style.put("backgroundColor", bgColor[status]);
}
実行後、バックエンドで以下の出力が表示されます。
A01Job invoked...
A02Job invoked...
A03Job invoked...
A04Job invoked...
A05Job invoked...
A06Job invoked...
バックエンドでは、ジョブの並行実行も可能であり、効率を向上させることができます。
Source Code
終わり
最後まで読んでいただきありがとうございました。何かご提案やご質問がありましたら、コメントをお待ちしています。