OpenAPIとは
OpenAPI(旧称Swagger)は、RESTful APIの定義とドキュメント化のための仕様です。この仕様を使用して、APIのエンドポイントやリクエスト・レスポンスのフォーマットをJSONまたはYAMLで記述します。OpenAPIを用いることで、開発者はAPIの仕様をチーム内でスムーズに共有することができ、さらにツールを利用することで型定義などのコードを自動生成することができます。
OpenAPIでAPIの仕様を記述した例
openapi: 3.0.3
info:
  title: Sample API
  version: 1.0.0

servers:
  - url: "http://localhost:8080"
    description: "ローカル環境"
  - url: "http://sample.com"
    description: "本番環境"

tags:
  - name: "greeting"
    description: "挨拶エンドポイント"

paths:
  /hello:
    get:
      tags: ["greeting"]
      summary: Returns a greeting message.
      responses:
        '200':
          description: Successful response
          content:
            application/json:
              schema:
                $ref: '#/components/schemas/hello'

components:
  schemas:
    hello:
      type: object
      properties:
        message:
          type: string
OpenAPIを使ってAPIの仕様を記述すると何が良いのか?
OpenAPIを使用してAPIの仕様を記述することにより、標準化されたフォーマットでAPIの詳細を明確にすることができます。これにより、開発者間のコミュニケーションが容易となり、誤解やミスを減少させます。また、OpenAPIドキュメントから自動的にドキュメントやクライアントライブラリを生成するツールが利用できるため、開発やテストの効率が向上します。
ざっくりまとめると以下のようになります。
OpenAPIのメリット
- OpenAPIから自動的にドキュメントを生成できる
- OpenAPIからツールを利用してコードを自動生成できる
- OpenAPIからモックサーバーを構築することでサーバー側の開発を待たず開発ができる
このAPIってどんなレスポンスだっけ...?
いちいち環境構築してコード確認するまでじゃないのに...
といったような仕様調査時の悩みや
APIの仕様変更に伴う、データ型の記述ミスや同じ用なコードを手動で書くのが面倒...
フロントエンドはTypeScript, バックエンドはGoだから型定義をその都度書き直さないといけない...
バックエンドの開発が終わるまでフロント側の実装できず効率が悪い...
といった、開発生産性に関わる問題を解決できるようになるのです。
スキーマ駆動開発とは
スキーマ駆動開発(Schema-Driven Development)は、システムやアプリケーション開発プロセスにおいて、スキーマや仕様を中心として設計・開発を進める手法です。特にAPIの領域で強調されるこのアプローチは、APIのスキーマ(例: GraphQLのスキーマやOpenAPIの仕様書)を最初に定義し、その後の開発がそのスキーマに従って行われる形を取ります。
スキーマ駆動開発の何が良いのか?
スキーマ駆動開発のメリットは、明確な仕様に基づいて開発を進められること、バックエンドとフロントエンドが同じスキーマを基に連携しやすくなること、そして未来の変更や拡張が容易になることが挙げられます。また、スキーマから自動的にドキュメントやモックサーバーを生成できるツールも存在し、開発の効率化にも貢献します。
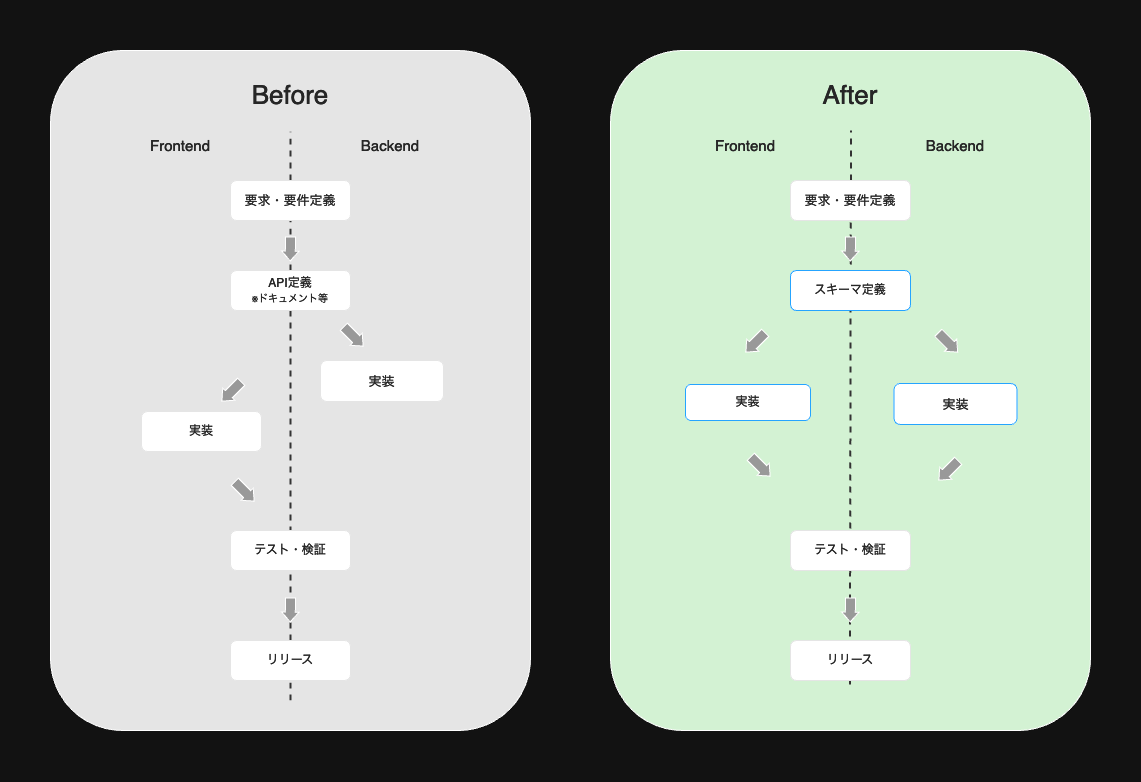
スキーマ駆動開発とそうではない場合の開発フローの一部を図にまとめてみると以下になります。
左側のスキーマ駆動開発ではない場合(Before)、フロントエンドはバックエンドの開発を待つ必要があります。また、開発が進んだ後にバックエンド側のAPIで仕様変更やデータ型の変更が発生すると、フロントエンドでも変更を余儀なくされてしまいます。
その一方、スキーマ駆動開発の場合(Before)、OpenAPIのスキーマファイルさえ作成されていれば、あとはモックサーバーを用いることで開発を先行して進めることができます。バックエンド・フロントエンド双方でも、型定義などのファイルはツールを用いて自動生成されるため、都度手動で書き直す必要もありません。
スキーマ駆動開発を体験してみる
以下のサンプルアプリはバックエンドはGo、フロントエンドはNext.jsを用いて作られています。また、OpenAPIで記述されたスキーマファイルを元にコードを自動生成するツールとしては、それぞれ以下を利用します。
| ロール | ツール名 | 公式GitHub |
|---|---|---|
| バックエンド | oapi-codegen | https://github.com/deepmap/oapi-codegen |
| フロントエンド | openapi-typescript | https://github.com/drwpow/openapi-typescript |
環境構築は以下のREADEME.mdをご確認ください。
本記事で用いるサンプルアプリケーションは、非常にシンプルな内容になります。http://localhost:3000にアクセスする以下の画面が表示され、こんにちは・さようならを押下するとhttp://localhost:8080に対してリクエストを投げ、その後レスポンスに含まれる、それぞれ対応する英文字が表示されます。

APIスキーマ定義
OpenAPIでは、まず設定ファイルに.yamlの形式でAPIの仕様を記述しています。本記事では具体的な記述方法は割愛いたしますが、以下の記事が分かりやすいのでおすすめです。
openapi: 3.0.3
info:
  title: Sample API
  version: 1.0.0

servers:
  - url: "http://localhost:8080"
    description: "ローカル環境"
  - url: "http://sample.com"
    description: "本番環境"

tags:
  - name: "greeting"
    description: "挨拶エンドポイント"

paths:
  /hello:
    get:
      tags: ["greeting"]
      summary: Returns a greeting message.
      responses:
        '200':
          description: Successful response
          content:
            application/json:
              schema:
                $ref: '#/components/schemas/hello'
  /goodbye:
    get:
      tags: ["greeting"]
      summary: Returns a goodbye message.
      responses:
        '200':
          description: Successful response
          content:
            application/json:
              schema:
                $ref: '#/components/schemas/goodbye'
components:
  schemas:
    hello:
      type: object
      properties:
        message:
          type: string
    goodbye:
      type: object
      properties:
        message:
          type: string
上記のようにOpenAPIの仕様に則ってスキーマを記述すると、例えば以下のようなドキュメントを自動的に生成することができます。VSCodeやJetBrains社製など有名どころのIDEは基本的にデフォルト設定、あるいはプラグインのインストールのみで、ドキュメントを生成することができます。
コード自動生成
スキーマ駆動開発は上述の画像の通り、スキーマ(openapi.yaml)を更新→コード自動→ビジネスロジックの実装。という流れで進めていきます。開発の中で、スキーマ自体が変更になったとしても、自動生成コマンドを実行するだけでデータ型や雛形のコードを手動で修正する必要がありません。
フロントエンド開発
それでは、まずフロントアプリケーションを上記のスキーマファイルを(openapi.yaml)ベースに構築していきます。
npx openapi-typescript spec/openapi.yaml --output front/generated.d.ts
上記を実行すると、スキーマファイルをベースにデータ型を始めとした以下の型定義ファイルが自動生成されます。
自動生成される型定義ファイル
/**
 * This file was auto-generated by openapi-typescript.
 * Do not make direct changes to the file.
 */


export interface paths {
  "/hello": {
    /** Returns a greeting message. */
    get: {
      responses: {
        /** @description Successful response */
        200: {
          content: {
            "application/json": components["schemas"]["hello"];
          };
        };
      };
    };
  };
  "/goodbye": {
    /** Returns a goodbye message. */
    get: {
      responses: {
        /** @description Successful response */
        200: {
          content: {
            "application/json": components["schemas"]["goodbye"];
          };
        };
      };
    };
  };
}

export type webhooks = Record<string, never>;

export interface components {
  schemas: {
    hello: {
      message?: string;
    };
    goodbye: {
      message?: string;
    };
  };
  responses: never;
  parameters: never;
  requestBodies: never;
  headers: never;
  pathItems: never;
}

export type $defs = Record<string, never>;

export type external = Record<string, never>;

export type operations = Record<string, never>;
上記で生成されたコードをもとにコンポーネントを以下のように記述します。APIを呼び出す箇所では、手動でレスポンスのデータ型を定義する必要なくシンプルに呼び出すことができています。
'use client';
import { useState } from 'react';
import { components } from '@/generated';

export default function Client() {
    const [message, setMessage] = useState<string>("");

    const fetchHello = async () => {
        try {
            const res = await fetch('http://localhost:8080/hello');
            // APIエンドポイント`/hello`のレスポンスの型を指定
            const data: components["schemas"]["hello"] = await res.json();
            if (data.message) {
                setMessage(data.message);
            }
        } catch (error) {
            console.error("Error fetching hello:", error);
        }
    };

    const fetchGoodbye = async () => {
        try {
            const res = await fetch('http://localhost:8080/goodbye');
            // APIエンドポイント`goodbye`のレスポンスの型を指定
            const data: components["schemas"]["goodbye"] = await res.json();
            if (data.message) {
                setMessage(data.message);
            }
        } catch (error) {
            console.error("Error fetching goodbye:", error);
        }
    };

    return (
        <div>
            <button onClick={fetchHello}>こんにちは</button>
            <br></br>
            <button onClick={fetchGoodbye}>さようなら</button>
            <p>{message}</p>
        </div>
    );
}
モックサーバーの活用
OpenAPIを用いたスキーマ駆動開発を実施することで、スキーマを元にモックサーバーを起動することができます。これは非常に大きなメリットであり、例えば、「バックエンドのAPIが構築されないとフロントエンドが構築できない」といった悩みが解決されます。
本アプリケーションでは、Prismaというツールを用いてモックサーバーを構築していきます。バックエンド側が一切構築されていないにも関わらず、ダミーレスポンスが返却されています。
# set up mock server
docker run --init --rm -v $(pwd)/spec/openapi.yaml:/openapi.yaml -p 4010:4010 stoplight/prism:4 mock -h 0.0.0.0 /openapi.yaml

[10:45:27 PM] › [CLI] …  awaiting  Starting Prism…
[10:45:35 PM] › [CLI] ✔  success   GET        http://0.0.0.0:4010/hello
[10:45:35 PM] › [CLI] ✔  success   GET        http://0.0.0.0:4010/goodbye
[10:45:35 PM] › [CLI] ✔  success   Prism is listening on http://0.0.0.0:4010

# request
❯ curl  http://0.0.0.0:4010/hello

{"message":"string"}
バックエンド開発
続いてバックエンド側での開発を進めます。以下のコマンドを実行することでコードの自動生成を行います。上述の通り、本アプリケーションのバックエンドはGo(Echo)で記述されており、OpenAPIを用いたコード生成のツールとしてはoapi-codegenを使っています。
# install oapi-codegen at host machine
go install github.com/deepmap/oapi-codegen/cmd/oapi-codegen@latest

# generate generated.go
oapi-codegen \
  -package petstore \
  -generate echo-server \
  -o ./api/v1/generated.go \
  ./spec/openapi.yaml
上記を実行すると以下のような型定義をはじめ、Echoフレームワークで用いるhandlerを登録するためのメソッドが自動生成されます。
自動生成される型定義ファイル・ルーティング
// Package petstore provides primitives to interact with the openapi HTTP API.
//
// Code generated by github.com/deepmap/oapi-codegen version v1.13.4 DO NOT EDIT.
package petstore

import (
	"github.com/labstack/echo/v4"
)

// ServerInterface represents all server handlers.
type ServerInterface interface {
	// Returns a goodbye message.
	// (GET /goodbye)
	GetGoodbye(ctx echo.Context) error
	// Returns a greeting message.
	// (GET /hello)
	GetHello(ctx echo.Context) error
}

// ServerInterfaceWrapper converts echo contexts to parameters.
type ServerInterfaceWrapper struct {
	Handler ServerInterface
}

// GetGoodbye converts echo context to params.
func (w *ServerInterfaceWrapper) GetGoodbye(ctx echo.Context) error {
	var err error

	// Invoke the callback with all the unmarshaled arguments
	err = w.Handler.GetGoodbye(ctx)
	return err
}

// GetHello converts echo context to params.
func (w *ServerInterfaceWrapper) GetHello(ctx echo.Context) error {
	var err error

	// Invoke the callback with all the unmarshaled arguments
	err = w.Handler.GetHello(ctx)
	return err
}

// This is a simple interface which specifies echo.Route addition functions which
// are present on both echo.Echo and echo.Group, since we want to allow using
// either of them for path registration
type EchoRouter interface {
	CONNECT(path string, h echo.HandlerFunc, m ...echo.MiddlewareFunc) *echo.Route
	DELETE(path string, h echo.HandlerFunc, m ...echo.MiddlewareFunc) *echo.Route
	GET(path string, h echo.HandlerFunc, m ...echo.MiddlewareFunc) *echo.Route
	HEAD(path string, h echo.HandlerFunc, m ...echo.MiddlewareFunc) *echo.Route
	OPTIONS(path string, h echo.HandlerFunc, m ...echo.MiddlewareFunc) *echo.Route
	PATCH(path string, h echo.HandlerFunc, m ...echo.MiddlewareFunc) *echo.Route
	POST(path string, h echo.HandlerFunc, m ...echo.MiddlewareFunc) *echo.Route
	PUT(path string, h echo.HandlerFunc, m ...echo.MiddlewareFunc) *echo.Route
	TRACE(path string, h echo.HandlerFunc, m ...echo.MiddlewareFunc) *echo.Route
}

// RegisterHandlers adds each server route to the EchoRouter.
func RegisterHandlers(router EchoRouter, si ServerInterface) {
	RegisterHandlersWithBaseURL(router, si, "")
}

// Registers handlers, and prepends BaseURL to the paths, so that the paths
// can be served under a prefix.
func RegisterHandlersWithBaseURL(router EchoRouter, si ServerInterface, baseURL string) {

	wrapper := ServerInterfaceWrapper{
		Handler: si,
	}

	router.GET(baseURL+"/goodbye", wrapper.GetGoodbye)
	router.GET(baseURL+"/hello", wrapper.GetHello)

}
上記で自動生成されたコードを用いてAPIを実装していきます。
package main

import (
	petstore "github.com/WebEngrChild/go-openAPI/api/v1"
	"github.com/labstack/echo/v4"
	"github.com/labstack/echo/v4/middleware"
	"net/http"
)

// Greeting は返信メッセージを表す構造体です
type Greeting struct {
	Message string `json:"message"`
}

// ServerImpl は generated.go で定義されたインターフェイスを実装する構造体です
type ServerImpl struct{}

// GetHello GetGreeting は /hello エンドポイントのハンドラー関数です
func (s *ServerImpl) GetHello(ctx echo.Context) error {
	return ctx.JSON(http.StatusOK, Greeting{Message: "Hello, World!"})
}

// GetGoodbye は /goodbye エンドポイントのハンドラー関数です
func (s *ServerImpl) GetGoodbye(ctx echo.Context) error {
	return ctx.JSON(http.StatusOK, Greeting{Message: "Goodbye, World!"})
}

func main() {
	e := echo.New()

	// ミドルウェアを追加
	e.Use(middleware.Logger())
	e.Use(middleware.Recover())

	// CORS対応を追加
	e.Use(middleware.CORSWithConfig(middleware.CORSConfig{
		AllowOrigins: []string{"http://localhost:3000"},
		AllowMethods: []string{echo.GET, echo.PUT, echo.POST, echo.DELETE},
	}))

	// サーバーの実装インスタンスを作成
	server := &ServerImpl{}

	// generated.go で定義された RegisterHandlers 関数を使用してルートをセットアップ
	petstore.RegisterHandlers(e, server)

	_ = e.Start(":8080")
}
次のステップへ
OpenAPIでAPI設計とスキーマ駆動開発の基礎を理解された方はGraphQLを学んでみると良いかもしれません。
GraphQLはデータの柔軟な取得と最適化が可能です。クライアントは必要なデータフィールドだけを指定し、不要なデータのオーバーフェッチを防げます。また、複数のリソースを一つのクエリで取得できるため、APIのリクエスト数が減り、パフォーマンスが向上します。これにより、フロントエンドとバックエンドの連携がスムーズになります。
以下のハンズオンではGo×Next×AWSのフルスタックアプリケーションのハンズオン記事になります。Go編とNext編ではGraphQLを用いたスキーマ駆動開発を実践できる形になっています。

