Azure管理ディスク(Managed Disks)は、ストレージアカウントに代わる仮想マシン用のディスクとして、昨年 (2017年) GAした機能です。"Managed"の名称通り、ユーザ側で実施していた作業を Azure側でいい感じに管理 してくれるようになっています。
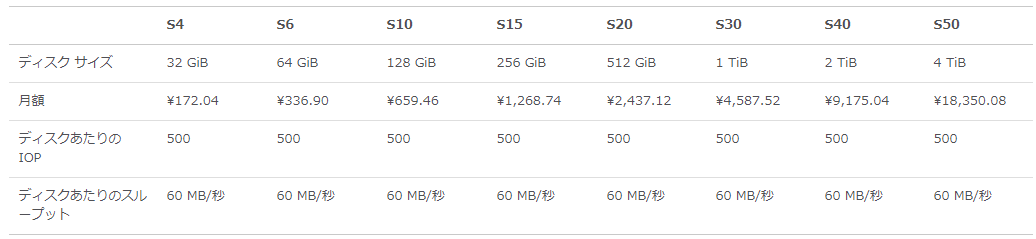
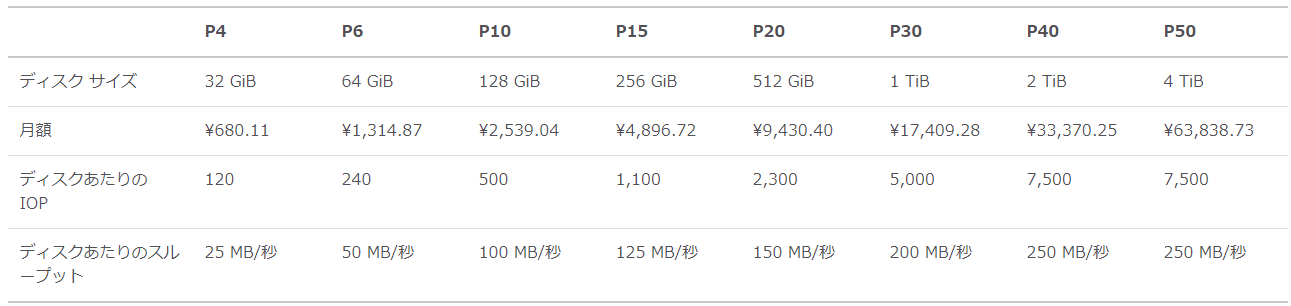
管理ディスクは下記表( 2018.08.31 のManaged Disks の定価のスクリーンショットです ) の通り、P4~P50 のプランが用意されています。プランごとにサイズと性能が決まっています。
Linux VMを作成してみる
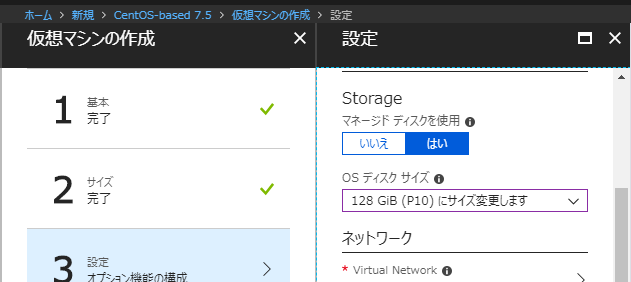
管理ディスクを使用したLinux VM(今回はCentOS 7.5)を作成してみます。
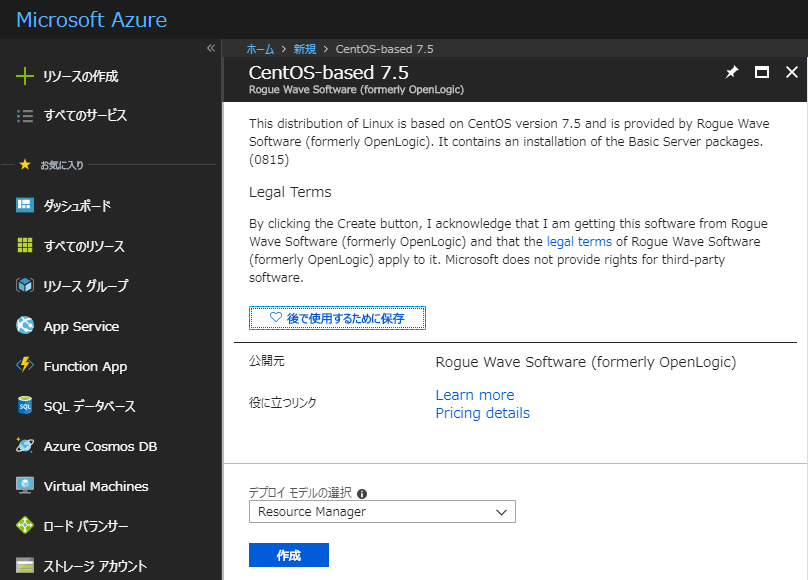
ストレージは管理ディスクのP10(128GB)を指定してみます。
VM作成後、ログインしてみると・・・
$ df -k
Filesystem     1K-blocks    Used Available Use% Mounted on
/dev/sda2       30929148 1248420  29680728   5% /
devtmpfs         3550412       0   3550412   0% /dev
tmpfs            3562556       0   3562556   0% /dev/shm
tmpfs            3562556    9144   3553412   1% /run
tmpfs            3562556       0   3562556   0% /sys/fs/cgroup
/dev/sda1         508580   82188    426392  17% /boot
/dev/sdb1      294020992   65564 278996940   1% /mnt/resource
tmpfs             712512       0    712512   0% /run/user/1000
P10(128GB)を指定したのに意外と少ない、というか "/" が30GBしかありません・・・(/mnt/resource は一時ディスク)
どういうことか
現在、AzureのLinux 仮想マシンでは、OSディスクは30GBで作成されます。管理ディスクの容量一杯に設定してくれる訳ではありません。
# fdisk -l /dev/sda

Disk /dev/sda: 128.8 GB, 128849018880 bytes, 251658240 sectors
Units = sectors of 1 * 512 = 512 bytes
Sector size (logical/physical): 512 bytes / 512 bytes
I/O size (minimum/optimal): 512 bytes / 512 bytes
Disk label type: dos
Disk identifier: 0x000ecbd2

   Device Boot      Start         End      Blocks   Id  System
/dev/sda1   *        2048     1026047      512000   83  Linux
/dev/sda2         1026048    62914559    30944256   83  Linux
fdiskコマンドで確認してみると、確かに 128GB のディスクが使用されており、未割り当て領域が残っている事が確認できます。
パーティション追加してみる
普通にディスクの空き領域がある状態のようなので、fdiskコマンドでパーティション追加してみます。
# fdisk /dev/sda
Welcome to fdisk (util-linux 2.23.2).

Changes will remain in memory only, until you decide to write them.
Be careful before using the write command.

Command (m for help): p     // p:現在のパーティション情報を表示

Disk /dev/sda: 128.8 GB, 128849018880 bytes, 251658240 sectors
Units = sectors of 1 * 512 = 512 bytes
Sector size (logical/physical): 512 bytes / 512 bytes
I/O size (minimum/optimal): 512 bytes / 512 bytes
Disk label type: dos
Disk identifier: 0x000ecbd2

   Device Boot      Start         End      Blocks   Id  System
/dev/sda1   *        2048     1026047      512000   83  Linux
/dev/sda2         1026048    62914559    30944256   83  Linux

Command (m for help): n     // n:新しいパーティションを作成
Partition type:
   p   primary (2 primary, 0 extended, 2 free)
   e   extended
Select (default p): p     // p:プライマリパーティションを選択
Partition number (3,4, default 3):     // Enter(デフォルトで3を選択)
First sector (62914560-251658239, default 62914560):     // Enter(デフォルト値を選択)
Using default value 62914560
Last sector, +sectors or +size{K,M,G} (62914560-251658239, default 251658239):     // Enter(デフォルト値を選択)
Using default value 251658239
Partition 3 of type Linux and of size 90 GiB is set

Command (m for help): w     // w:パーティション情報を保存
The partition table has been altered!

Calling ioctl() to re-read partition table.

WARNING: Re-reading the partition table failed with error 16: Device or resource busy.
The kernel still uses the old table. The new table will be used at
the next reboot or after you run partprobe(8) or kpartx(8)
Syncing disks.
# fdisk -l /dev/sda

Disk /dev/sda: 128.8 GB, 128849018880 bytes, 251658240 sectors
Units = sectors of 1 * 512 = 512 bytes
Sector size (logical/physical): 512 bytes / 512 bytes
I/O size (minimum/optimal): 512 bytes / 512 bytes
Disk label type: dos
Disk identifier: 0x000ecbd2

   Device Boot      Start         End      Blocks   Id  System
/dev/sda1   *        2048     1026047      512000   83  Linux
/dev/sda2         1026048    62914559    30944256   83  Linux
/dev/sda3        62914560   251658239    94371840   83  Linux
あとはパーティションをフォーマットしてマウントします。
# partprobe                 // パーティションの更新情報を反映
# mkfs -t ext4 /dev/sda3                 // パーティションをフォーマット
mke2fs 1.42.9 (28-Dec-2013)
Filesystem label=
OS type: Linux
Block size=4096 (log=2)
Fragment size=4096 (log=2)
Stride=0 blocks, Stripe width=0 blocks
5898240 inodes, 23592960 blocks
1179648 blocks (5.00%) reserved for the super user
First data block=0
Maximum filesystem blocks=2172649472
720 block groups
32768 blocks per group, 32768 fragments per group
8192 inodes per group
Superblock backups stored on blocks:
        32768, 98304, 163840, 229376, 294912, 819200, 884736, 1605632, 2654208,
        4096000, 7962624, 11239424, 20480000

Allocating group tables: done
Writing inode tables: done
Creating journal (32768 blocks): done
Writing superblocks and filesystem accounting information: done
# mount /dev/sda3 /mnt/temp                 // マウント
# df -k
Filesystem     1K-blocks    Used Available Use% Mounted on
/dev/sda2       30929148 1248420  29680728   5% /
devtmpfs         3550412       0   3550412   0% /dev
tmpfs            3562556       0   3562556   0% /dev/shm
tmpfs            3562556    9148   3553408   1% /run
tmpfs            3562556       0   3562556   0% /sys/fs/cgroup
/dev/sda1         508580   82188    426392  17% /boot
/dev/sdb1      294020992   65564 278996940   1% /mnt/resource
tmpfs             712512       0    712512   0% /run/user/1000
/dev/sda3       92759720   57368  87967376   1% /mnt/temp
これで管理ディスクの容量を全て使うことができました。
(以降、起動時の自動マウント設定も通常のディスクと同様に行うことができます。)
管理ディスクのプランを変更してみる
サイズ変更後、管理ディスクのプランを変更できるか確認してみました。まず、下のプランへの変更を試みてみましたが...
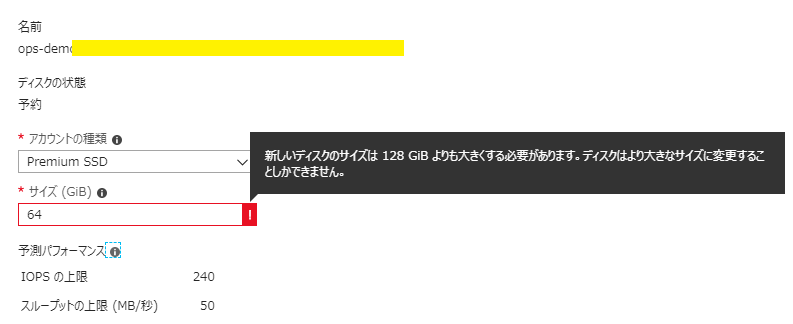
減らすことはできないようです。( → これは30GBしか割り当てられていない元の状態でも同じで、管理ディスクはスケールダウンできませんでした。)
次にStandard HDDに変更してみましたが、こちらは変更することができました。
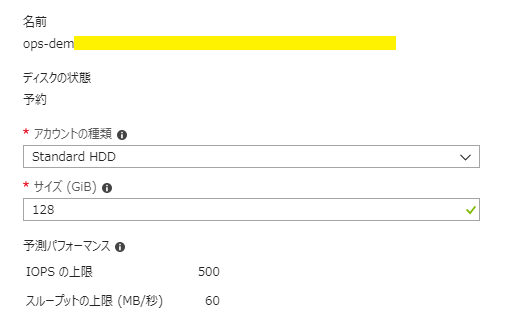
Standard HDDの価格はこちら( 上と同じくManaged Disks の定価のスクリーンショット) なので、開発用のVMなどは、停止中はプランを変更しておけば、差額を節約することができます。