はじめに
この記事では、Looking Glass Factoryから発売されているホログラフィックディスプレイ製品Looking GlassをRealSense T265と組み合わせる事によって、自由視点3Dビューアーとして用いる方法について説明します。
基本的な実装方針は、Looking Glassのディスプレイの方向及び位置(6 DoF)情報を取得し、その情報をリアルタイムにUnityアプリケーション内に反映させる事によって、自由視点3Dビューアーとしての機能を実現します。
事前準備
用意する物
- Looking Glass Small or Large model
- Intel RealSense T265
- Windows PC (Unity installed)
H/Wの準備
- 通常のLooking GlassのWindows PCとの接続設定を行います。具体的には、Looking Glassに付属のHDMIケーブル及びUSB 3.0ケーブルをWindows PCと接続します。
- 次の画像のようにLooking Glassの背面にRealSense T265を両面テープで貼り付けます。
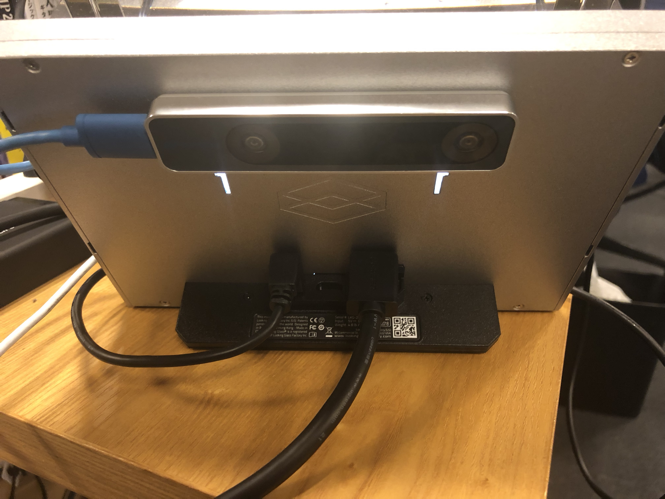
3. RealSense T265とWindows PCを付属のUSB 3.0ケーブルで接続します。
S/Wの準備
- Windows PCにUnityをインストール
- 最新版のRealSense SDK 2.0一式をダウンロード
- 最新版のHoloPlaySDKをダウンロード
Unityを用いた自由視点ビューアーの実装方法
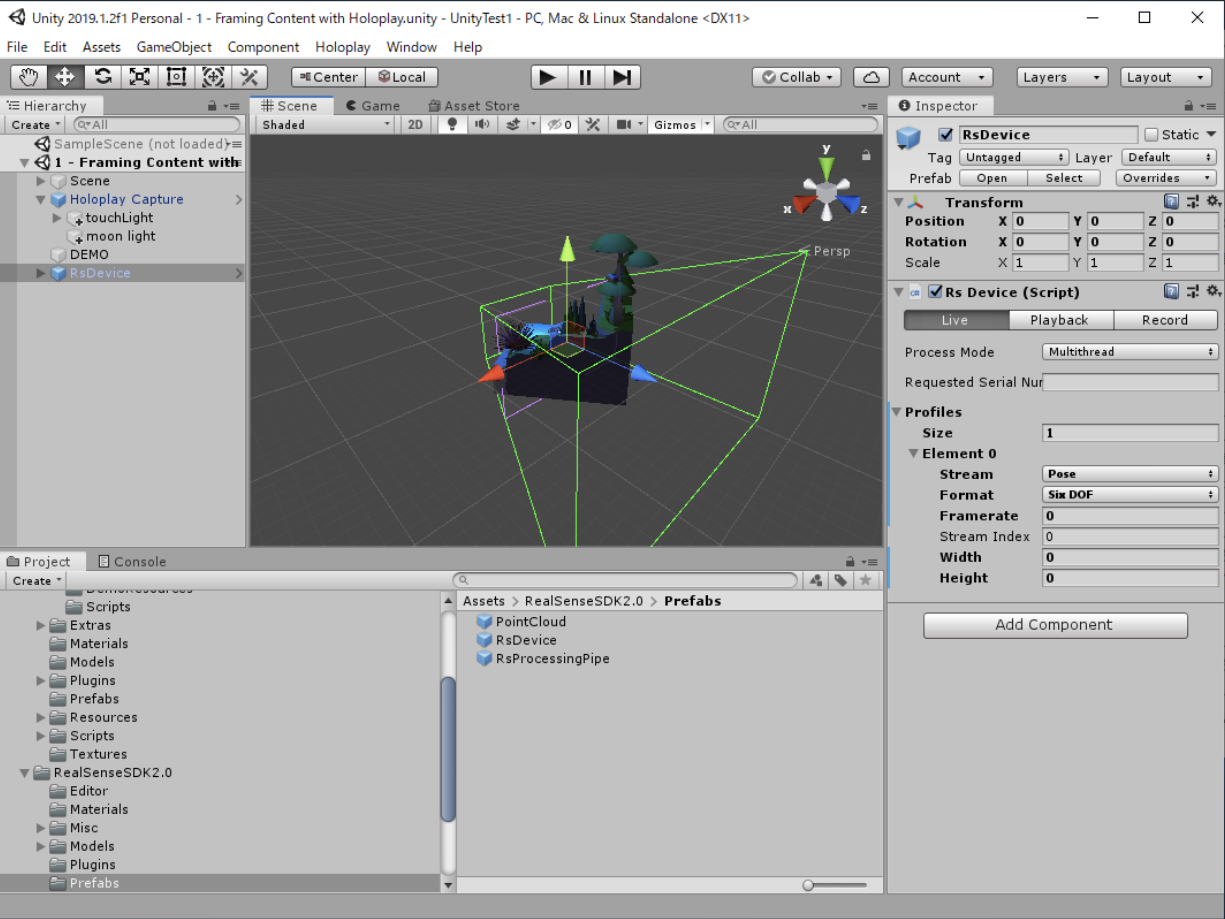
以下の例では、HoloPlay SDKに付属するScene( Assets/Holoplay/Examples/1 - Framing Content with Holopay)を例として自由視点ビューアーの作成方法を説明します。
- HoloPlay SDKのUnity packageをインポート
- SDKのUnity package(Intel.Realsense.unitypackage)をインポート
- RsDevice(Prefab)をシーンに配置、Profilesを1にしてStream=Pose, Format=Six DOFに設定
-
Holoplay Captureに”Rs Pose Stream Transformer Script(RsPoseStreamTransformer.cs)をアタッチし、SourceをRsDeviceに設定 - 必要に応じて微調整(次節で説明します)
-
Holoplay Captureの"Toggle Preview Ctrl + E"を押下 - Unity PlayerのPlayボタンを押してアプリケーションを実行
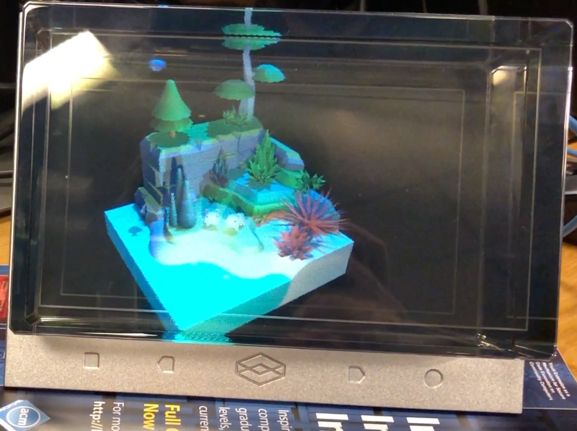
- おもむろにLooking Glassを持ち上げる、Looking Glass内に表示されている3D Objectの映像が変化する事を確認
微調整方法の詳細
スケール調整の調整方法
'RsPoseStreamTransformer.cs`に以下のように修正を加えます。
RsPoseStreamTransformer.cs
    void Update()
    {
        // 途中省略
        var t = pose.translation;
        float s = 50.0f; // 倍率
        t.Set(t.x * s, t.y * s, -t.z * s);
        var e = pose.rotation.eulerAngles;
        var r = Quaternion.Euler(-e.x, -e.y, e.z);
        // 途中省略
    }
今回の実装の経験値として50倍程度で、自然な動作になりました。
Far Clip/Fov等を調整
'Holoplay Capture'のInspectorタブで"Advanced Camera Settings"を開くと、Fov、Near Clip Factor、Far Clip Factorを入力する画面が現れます。
実際に動作を確認しながら、自然な動作になるように値を調整してください。
最後に
以上説明した内容を実行する事で、Looking Glassを仮想世界の3D Objectを色々な視点から観察するためのビューアーとして利用する事が可能になります。
以下の動画は、実際のその動作を撮影した動画になります。
