最初に
dockerについて勉強しているですが、そこで学んだ事を記事にしていこうと思う。
今回はAWSでGPUインスタンスを借りるので少し課金が必要になる。小まめにインスタンスを停止しておけば学習する際に課金した値段は$1.41ドルで済んだ。日本円で200円いないになる。
AWSにGPUインスタンスを立てる
GPUのインスタンスを立てて処理が重い計算をコンテナにさせてみる。
p2.xrage を使用するリクエストを申請する。
これを使用するには1時間あたり約100円かかる。Tesla k80 というGPUを積んでいる。
制限 > vCPU 制限の計算 のページに行き p2.xrage を選択して オンデマンド制限の引き上げをリクエストをクリックする。リージョンはオレゴン(メジャーらしい)を選択する。 そして New limit value を 4 にする。そしてあとは制限解除したいです等のメッセージを Use case description に書いて送信する。自分の場合は数時間で申請が降りて、その日のうちに使用可能になった。申請が降りたら vCPU 制限計算のページで現在の制限の欄を確認すると4つになっている。リージョンがオレゴン以外になっていると0のままであるので注意する必要がある。
GPUインスタンスを立てる
インスタンス > インスタンスの起動 > ubuntuを選択 > p2.xlarge > インスタンスの設定(デフォルト)> ストレージの追加で20GBにする > タグはなし > セキュリティグループ(全てのトラフィック) > 起動 > 新しいキーの作成(mygpukeyと名前を付ける) > キーをダウンロードして ( chmod 400 mygpukey )制限をかける。
Docker と GPUドライバの設定をする
ここからDockerをインストールして使えるようにしていく。
Docker インストール
sudo apt-get update
sudo apt-get install docker.io
sudo gpasswd -a ubuntu docker
docker --version

# 実行結果
Docker version 20.10.2, build 20.10.2-0ubuntu1~20.04.2
NVIDIAのドライバインストールする
公式のドライバーページに行ってインストールに必要なコマンドを実行していく。
sudo apt-get install linux-headers-$(uname -r)

# 環境変数の設定
distribution=$(. /etc/os-release;echo $ID$VERSION_ID | sed -e 's/\.//g')

# ファイルをダウンロード
wget https://developer.download.nvidia.com/compute/cuda/repos/$distribution/x86_64/cuda-$distribution.pin

# 移動させる
sudo mv cuda-$distribution.pin /etc/apt/preferences.d/cuda-repository-pin-600

# keyをダンロードする
sudo apt-key adv --fetch-keys https://developer.download.nvidia.com/compute/cuda/repos/$distribution/x86_64/7fa2af80.pub

# 新しいレポジトリを追加している
echo "deb http://developer.download.nvidia.com/compute/cuda/repos/$distribution/x86_64 /" | sudo tee /etc/apt/sources.list.d/cuda.list

# レポジトリを更新する
sudo apt-get update

# ドライバーをインストールする
sudo apt-get -y install cuda-drivers

# ドライバーがインストールされたか確認する
nvidia-smi

# 実行結果

Thu Jul 15 04:20:46 2021
+-----------------------------------------------------------------------------+
| NVIDIA-SMI 470.42.01    Driver Version: 470.42.01    CUDA Version: 11.4     |
|-------------------------------+----------------------+----------------------+
| GPU  Name        Persistence-M| Bus-Id        Disp.A | Volatile Uncorr. ECC |
| Fan  Temp  Perf  Pwr:Usage/Cap|         Memory-Usage | GPU-Util  Compute M. |
|                               |                      |               MIG M. |
|===============================+======================+======================|
|   0  Tesla K80           Off  | 00000000:00:1E.0 Off |                    0 |
| N/A   33C    P0    72W / 149W |      0MiB / 11441MiB |     99%      Default |
|                               |                      |                  N/A |
+-------------------------------+----------------------+----------------------+

+-----------------------------------------------------------------------------+
| Processes:                                                                  |
|  GPU   GI   CI        PID   Type   Process name                  GPU Memory |
|        ID   ID                                                   Usage      |
|=============================================================================|
|  No running processes found                                                 |
+-----------------------------------------------------------------------------+
上記の用に表示されたらインストール完了したことになる。
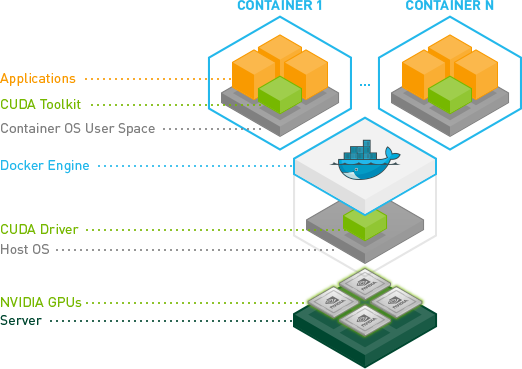
画像引用:https://github.com/NVIDIA/nvidia-docker/blob/master/README.md
先ほどインストールしたのが CUDA Driver これをインストールするとOSがNVIDIAのGPUにアクセスできるようになる。これから立てるコンテナには CUDA Toolkit が入る。Dockerを使用しない場合はこれをホスト側に持たなければならない。
nvidia-container-toolkitをインストールしていく。
dockerのバージョンが19.03より前にバージョンの場合は nvidia-docker2 が追加で必要になる。
# 環境変数とリポジトリを設定する
distribution=$(. /etc/os-release;echo $ID$VERSION_ID) \
   && curl -s -L https://nvidia.github.io/nvidia-docker/gpgkey | sudo apt-key add - \
   && curl -s -L https://nvidia.github.io/nvidia-docker/$distribution/nvidia-docker.list | sudo tee /etc/apt/sources.list.d/nvidia-docker.list

# リポジトリをアップデート
sudo apt-get update

# nvidia-docker2をインストールする
sudo apt-get install -y nvidia-docker2

# dockerを再起動する
sudo systemctl restart docker

# 最後にdockerの nvidia/cudaイメージをダウンロードしてコンテナを実行しnvidia-smi コマンドを実行できるか確認する。
docker run --gpus all nvidia/cuda:10.0-base nvidia-smi

# 実行結果

+-----------------------------------------------------------------------------+
| NVIDIA-SMI 470.42.01    Driver Version: 470.42.01    CUDA Version: 11.4     |
|-------------------------------+----------------------+----------------------+
| GPU  Name        Persistence-M| Bus-Id        Disp.A | Volatile Uncorr. ECC |
| Fan  Temp  Perf  Pwr:Usage/Cap|         Memory-Usage | GPU-Util  Compute M. |
|                               |                      |               MIG M. |
|===============================+======================+======================|
|   0  Tesla K80           On   | 00000000:00:1E.0 Off |                    0 |
| N/A   29C    P8    26W / 149W |      0MiB / 11441MiB |      0%      Default |
|                               |                      |                  N/A |
+-------------------------------+----------------------+----------------------+

+-----------------------------------------------------------------------------+
| Processes:                                                                  |
|  GPU   GI   CI        PID   Type   Process name                  GPU Memory |
|        ID   ID                                                   Usage      |
|=============================================================================|
|  No running processes found                                                 |
+-----------------------------------------------------------------------------+
深層学習用のDockerを作成する
最初はインストールしたanacondaをそのまま使用しようと思ったが、Pythonのバージョンが3.6以降だと tensorflow-gpu==2.1 がインストール出来ないのでコンテナ上に立てたanacondaにPython3.6の仮想環境を立てそこにpipでインストールする方法を使う。
※kerasとtensorflowのバージョンは互換性を保つために動作するバージョンを合わせる必要があるため指定してある。
なのでコンテナ起動時に複数のコマンドを実行する必要があり、シェルスクリプトも書いた。
※ CMDインストラクションでは一つのコマンドしか実行出来ないため。
Dockerfile
FROM nvidia/cuda:10.1-cudnn7-runtime-ubuntu18.04
RUN apt-get update && apt-get install -y \
  sudo \
  wget \
  vim

WORKDIR /opt
RUN wget https://repo.continuum.io/archive/Anaconda3-2021.05-Linux-x86_64.sh && \
  sh Anaconda3-2021.05-Linux-x86_64.sh -b -p /opt/anaconda3 && \
  rm -f Anaconda3-2021.05-Linux-x86_64.sh

ENV PATH /opt/anaconda3/bin:$PATH
RUN conda init bash \
    && . ~/.bashrc \
    && conda create -n deeplearning python=3.6\
    && conda activate deeplearning\
    && pip install --upgrade pip && pip install \
      jupyterlab \
      keras==2.3 \
      scipy==1.4.1 \
      tensorflow-gpu==2.1 \
      matplotlib

WORKDIR /
CMD ["/startup.sh"]
シェルスクリプトファイルはそのままでは実行権限が -rw-r--r-- と実行権限がなかったため、 chmod 775 startup.sh とその他以外では読み書き実行可能な権限を与えた。
startup.sh
#!/bin/bash
source activate deeplearning
jupyter lab --ip=0.0.0.0 --allow-root --LabApp.token=''
これを ds_env フォルダに2つとも sftp コマンドを使用して作成したGPUインスタンスに put する。そして ds_env 内に移動して docker build . を実行する。そしてイメージが出来たら下記のコマンドでコンテナを実行する。すると jupyter lab にブラウザでアクセスできるようになる。
docker run --gpus all -v ~:/work -p 8888:8888 imageID
コンテナの実行に成功したら下記のサンプルコードを実行して、動作するか確認する。実行は python notebookを開いてサンプルをコピペして shift + Enter で実行すると学習が始まる。
数字を学習させて推論するコードのサンプル
'''Trains a simple convnet on the MNIST dataset.
Gets to 99.25% test accuracy after 12 epochs
(there is still a lot of margin for parameter tuning).
16 seconds per epoch on a GRID K520 GPU.
'''

from __future__ import print_function
import keras
from keras.datasets import mnist
from keras.models import Sequential
from keras.layers import Dense, Dropout, Flatten
from keras.layers import Conv2D, MaxPooling2D
from keras import backend as K

batch_size = 128
num_classes = 10
epochs = 12

# input image dimensions
img_rows, img_cols = 28, 28

# the data, split between train and test sets
(x_train, y_train), (x_test, y_test) = mnist.load_data()

if K.image_data_format() == 'channels_first':
    x_train = x_train.reshape(x_train.shape[0], 1, img_rows, img_cols)
    x_test = x_test.reshape(x_test.shape[0], 1, img_rows, img_cols)
    input_shape = (1, img_rows, img_cols)
else:
    x_train = x_train.reshape(x_train.shape[0], img_rows, img_cols, 1)
    x_test = x_test.reshape(x_test.shape[0], img_rows, img_cols, 1)
    input_shape = (img_rows, img_cols, 1)

x_train = x_train.astype('float32')
x_test = x_test.astype('float32')
x_train /= 255
x_test /= 255
print('x_train shape:', x_train.shape)
print(x_train.shape[0], 'train samples')
print(x_test.shape[0], 'test samples')

# convert class vectors to binary class matrices
y_train = keras.utils.to_categorical(y_train, num_classes)
y_test = keras.utils.to_categorical(y_test, num_classes)

model = Sequential()
model.add(Conv2D(32, kernel_size=(3, 3),
                 activation='relu',
                 input_shape=input_shape))
model.add(Conv2D(64, (3, 3), activation='relu'))
model.add(MaxPooling2D(pool_size=(2, 2)))
model.add(Dropout(0.25))
model.add(Flatten())
model.add(Dense(128, activation='relu'))
model.add(Dropout(0.5))
model.add(Dense(num_classes, activation='softmax'))

model.compile(loss=keras.losses.categorical_crossentropy,
              optimizer=keras.optimizers.Adadelta(),
              metrics=['accuracy'])

model.fit(x_train, y_train,
          batch_size=batch_size,
          epochs=epochs,
          verbose=1,
          validation_data=(x_test, y_test))
score = model.evaluate(x_test, y_test, verbose=0)
print('Test loss:', score[0])
print('Test accuracy:', score[1])
引用:https://github.com/awslabs/keras-apache-mxnet/blob/master/examples/mnist_cnn.py
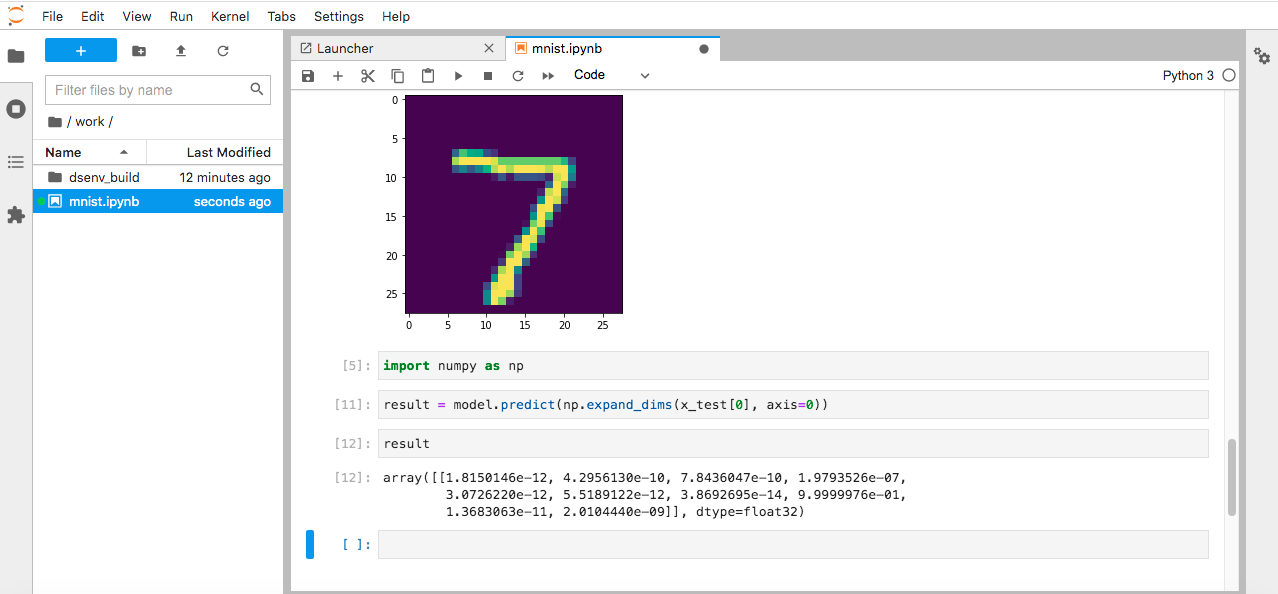
学習が終わったら下記のスクリプトを実行して推論できるようになったか確認してみる。
import matplotlib.pyplot as plt
%matplotlib inline
plt.imshow(x_test[0][:, :, 0])

import numpy as np
result = model.predict(np.expand_dims(x_test[0], axis=0))
result

# 実行結果
7風の画像がでる。
array([[1.8150146e-12, 4.2956130e-10, 7.8436047e-10, 1.9793526e-07,
        3.0726220e-12, 5.5189122e-12, 3.8692695e-14, 9.9999976e-01,
        1.3683063e-11, 2.0104440e-09]], dtype=float32)
実行結果の配列は0~9まであって各数字である確率を推論している。今回の場合は 7が99%と予想している。
これでAWSのGPUインスタンスに深層学習用の環境を構築することが出来た。
最後に
参照
とても分かりやすくおすすめの講座です。
米国AI開発者がゼロから教えるDocker講座
cuda-driversをubuntuにインストールする。
NVIDIA Driver Installation Quickstart Guide
anacondaの仮想環境内でも --user を使用せずに pip インストールを実行すると表示される。
仮想環境内に juypyter lab をインストールしてないと rootの juypyter lab の方に探しに行ってそちらを起動するから import keras がインストールされてないとなった。
Anaconda の Jupyter Notebook で ModuleNotFoundError が発生した場合のトラブルシュート |
docker entrypoint running bash script gets "permission denied"
初心者向けシェルスクリプトの基本コマンドの紹介 - Qiita
記事に関するコメント等は
🕊:Twitter
📺:Youtube
📸:Instagram
👨🏻💻:Github
😥:Stackoverflow
でも受け付けています。どこかにはいます。