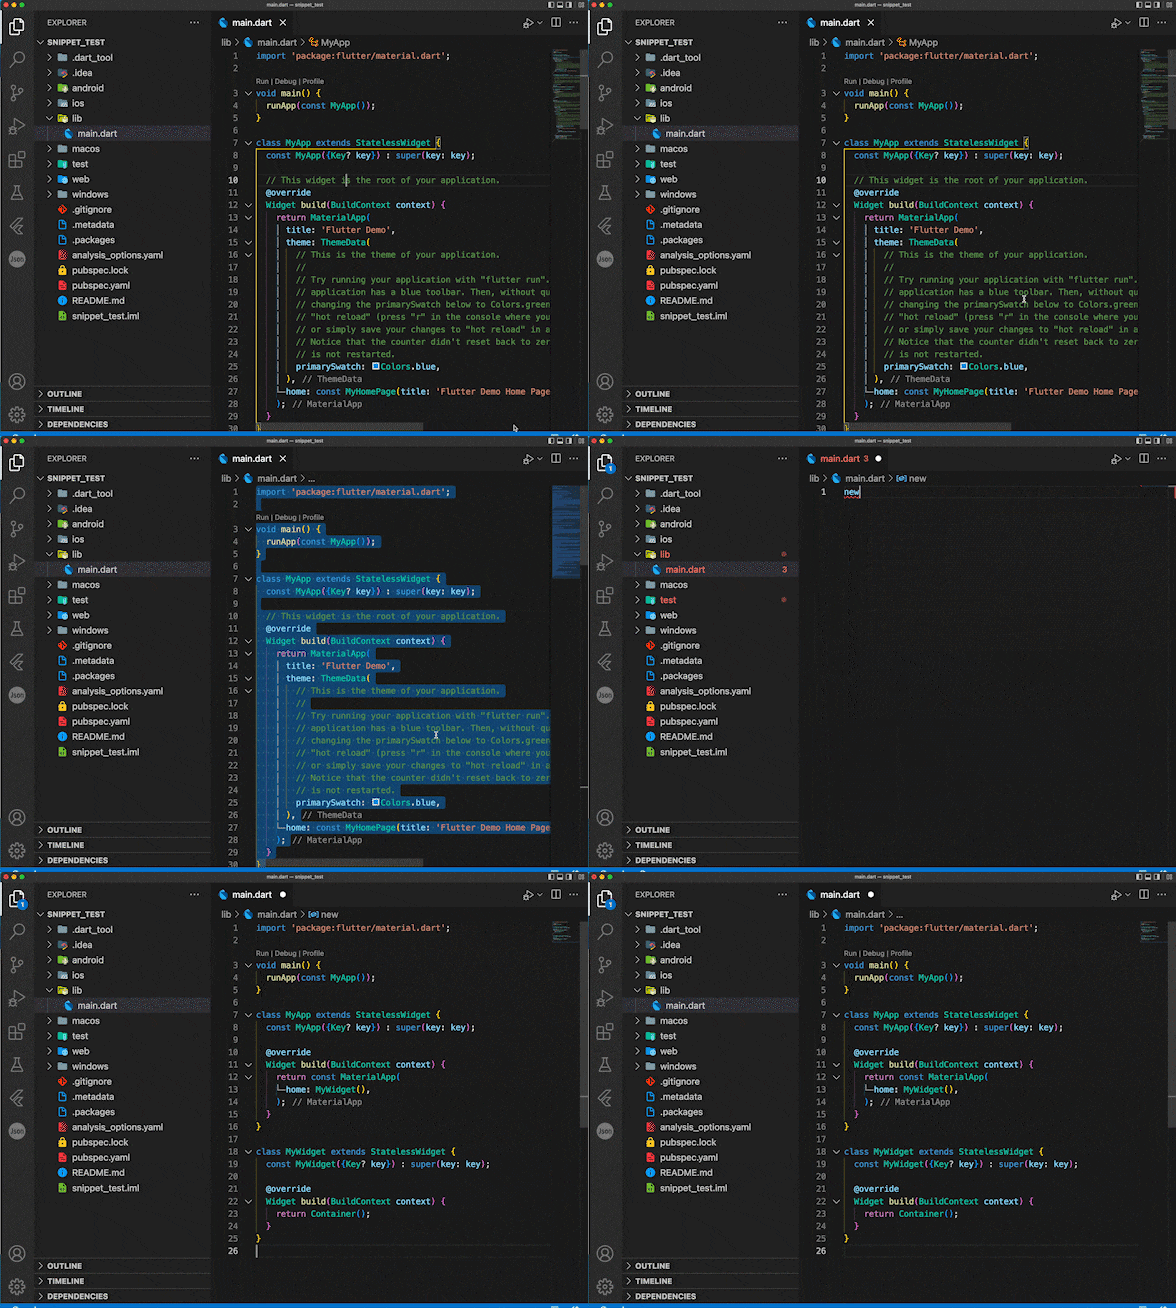
「Flutter プロジェクト立ち上げた際のmain.dartの書き換えがめんどくさい!」
そう思われる方、多いかと思います。
この問題を解決するため、VSCode使用者向けにSnippet(スニペット)を作成しました。
本記事ではこれの紹介を行います。
要点
作成したSnippets
{
	"New Flutter Project": {
		"prefix": "New Flutter Project",
		"body": [
			"import 'package:flutter/material.dart';",
			"",
			"void main() {",
			"  runApp(const MyApp());",
			"}",
			"",
			"class MyApp extends StatelessWidget {",
			"  const MyApp({Key? key}) : super(key: key);",
			"",
			"  @override",
			"  Widget build(BuildContext context) {",
			"    return const MaterialApp(",
			"      home: MyWidget(),",
			"    );",
			"  }",
			"}",
			"",
			"class MyWidget extends StatelessWidget {",
			"  const MyWidget({Key? key}) : super(key: key);",
			"",
			"  @override",
			"  Widget build(BuildContext context) {",
			"    return Container();",
			"  }",
			"}",
			"",
		],
		"description": "New Flutter Project"
	}
}
実行結果
import 'package:flutter/material.dart';

void main() {
  runApp(const MyApp());
}

class MyApp extends StatelessWidget {
  const MyApp({Key? key}) : super(key: key);

  @override
  Widget build(BuildContext context) {
    return const MaterialApp(
      home: MyWidget(),
    );
  }
}

class MyWidget extends StatelessWidget {
  const MyWidget({Key? key}) : super(key: key);

  @override
  Widget build(BuildContext context) {
    return Container();
  }
}
導入方法
導入方法を詳細に解説していきます。
VSCode を開き、 [ ⌘ + Shift + P ] (Windowsの場合は [Ctrl + Shift + P]) を押します。
コマンドパレットが開かれるので、「snippets」と入力し、"Configure User Snippets"を選択します。
どのSnippets設定ファイルを開くか問われるので、「dart」と入力し、"dart.json"を開きます。
開いた"dart.json"ファイルに、以下のSnippets(再掲)をコピペすれば導入完了です。
{
	"New Flutter Project": {
		"prefix": "New Flutter Project",
		"body": [
			"import 'package:flutter/material.dart';",
			"",
			"void main() {",
			"  runApp(const MyApp());",
			"}",
			"",
			"class MyApp extends StatelessWidget {",
			"  const MyApp({Key? key}) : super(key: key);",
			"",
			"  @override",
			"  Widget build(BuildContext context) {",
			"    return const MaterialApp(",
			"      home: MyWidget(),",
			"    );",
			"  }",
			"}",
			"",
			"class MyWidget extends StatelessWidget {",
			"  const MyWidget({Key? key}) : super(key: key);",
			"",
			"  @override",
			"  Widget build(BuildContext context) {",
			"    return Container();",
			"  }",
			"}",
			"",
		],
		"description": "New Flutter Project"
	}
}
既に設定しているSnippetsがある方は、上記コードの一番外側の波括弧{}は無視し、
中身だけを追記してください。
以上が導入方法となります。
使い方
-
flutter create ~で作成したプロジェクトの"main.dart"ファイルをVSCodeで開いてください。 -
[⌘ + A] (Windows の場合は[Ctrl + A])で全選択し、「new」と入力してください。
-
"New Flutter Project"を選択すれば、Snippetsで設定したコードに書き換わります。
とても簡単に書き換えられました!
コメントを削除したり、カウンターアプリのStatefulWidgetを削除したりの手間が省けますね!
まとめと宣伝
Flutter プロジェクトを新規で立ち上げた際の、main.dart の書き換え方として、
Snippetsを導入して書き換える方法を紹介しました。
Flutter プロジェクトを立ち上げる回数の多い方は、このSnippetsでかなり楽ができるかと思います。
ぜひ使って見てください!
週刊Flutter大学というブログにて記事を投稿しています。
前週に紹介されたFlutterに関する情報をまとめた、Flutterニュース、という記事や、
Flutterに関する技術記事を中心に投稿しています。
こちらも併せて読んでみてください!


