マイクロソフトの「Hello World Windows ドライバー」のページを見ながら、環境を設定し、デバックまで行き着いた記録です。元の文章が英語の直訳なのか、よくわからないところもあり、あれこれ探りながら進めています。
このページだけでは無く、下のページを参照しています。
- KDNET ネットワーク カーネル デバッグの手動設定
- KDNET ネットワーク カーネル デバッグの自動設定
- Visual Studio を使って実行時にドライバーをテストする方法
- ドライバーの展開およびテストのためのコンピューターのプロビジョニング (WDK 10)
環境・準備
パソコンを2台準備します。1台をホスト、もう一台をターゲットとします。2台のマシンは同じOSで無いとややこしいので、同じOSとします。私の環境はWindows10 32bitのマシンを使いました。
ホスト
ホスト側ではドライバーのコンパイルと、デバックのホストの役割を持ちます。
- Visual Studio Community をインストールします。
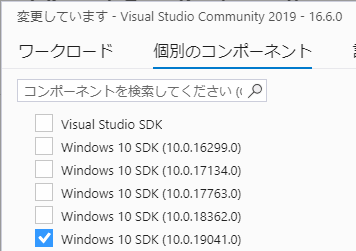
- Windows SDK をVisual Studioに追加します。Windows SDKは、Visual Studio Installerからでもインストールできます。
-
Windows Driver Kit (WDK) をインストールします。
- デバックツールのパスを環境変数PATHに追加しておくと便利です。
c:\Program Files\Windows Kits\10\Debuggers\x86
ターゲット
ターゲットでは実際にドライバーを動作させます。以下インストールするSDKとWDKはマスター側と同じです。
-
Windows 10 SDKをインストールします。
-
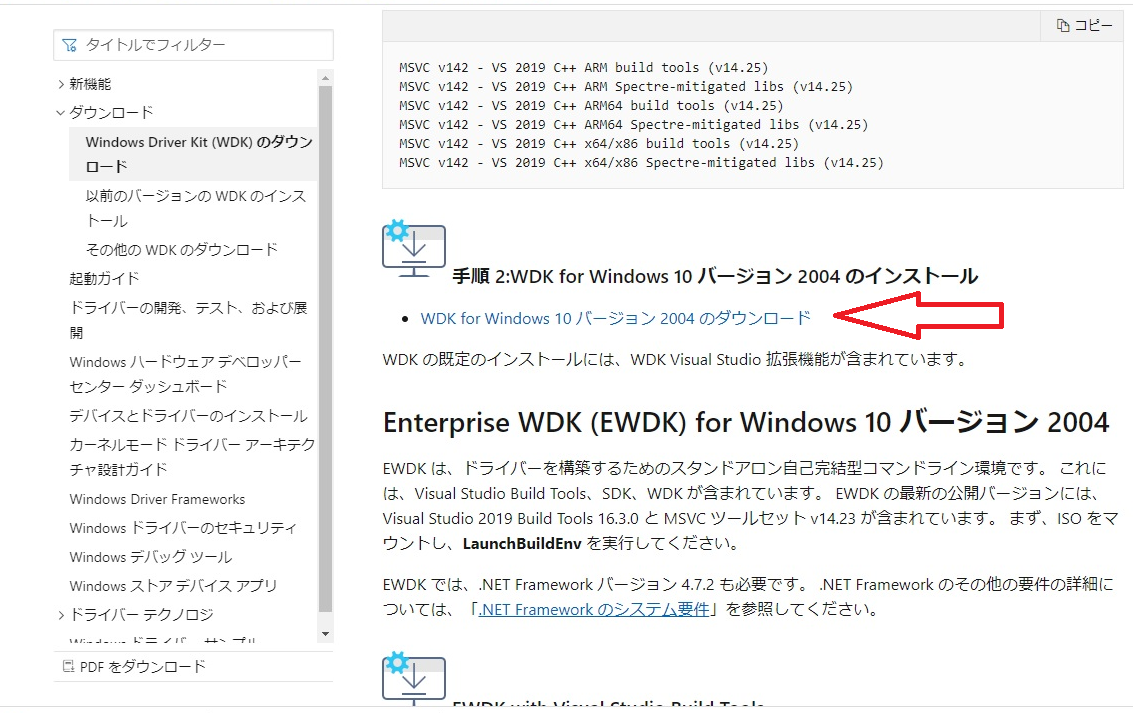
WDK for Windows 10をインストールします。
-
デバックツールのパスを環境変数PATHに追加しておくと便利です。
c:\Program Files\Windows Kits\10\Debuggers\x86
c:\Program Files\Windows Kits\10\Tools\x86
ネットワークデバッグ
- kdnet.exeコマンドを使って、コンピューターにサポートされているネットワークアダプターがあることを確認します。コマンドウィンドウを開きます。下記のディレクトリへチェンジディレクトリを行わないとエラーになります。
> cd C:\Program Files\Windows Kits\10\Debuggers\x86
> kdnet

Network debugging is supported on the following NICs:
busparams=3.0.0, Realtek PCIe GbE Family Controller, Not plugged in.
- 以下はエラーの例です。エラーの出るマシンはホスト、ターゲットのいずれにも使えません。(使う手があるのかもしれませんがわかりませんでした。)
Network debugging is not supported on any of the NICs in this machine.
KDNET supports NICs from Intel, Broadcom, Realtek, Atheros, Emulex, Mellanox
and Cisco.

KDNET initialization failed.  Status = 0xC000000E.
NIC hardware initialization failed.
NIC hardware ID = 0x0.
- ホスト、ターゲットのipを調べます。
>ipconfig

Windows IP 構成

イーサネット アダプター イーサネット 2:

   接続固有の DNS サフィックス . . . . .:
   リンクローカル IPv6 アドレス. . . . .: xxxx::xxxx:xxxx:xxxx:xxxx%YY
   IPv4 アドレス . . . . . . . . . . . .: 192.168.XX.YY
   サブネット マスク . . . . . . . . . .: 255.255.255.0
   デフォルト ゲートウェイ . . . . . . .: 192.168.XX.1
- ホスト側にIPv4を 192.168.XX.YY, ターゲット側を 192.168.AA.BB とします。
- ホストとターゲットの間でpingを通してみます。
> ping 192.168.AA.BB

192.168.AA.BB に ping を送信しています 32 バイトのデータ:
192.168.AA.BB からの応答: バイト数 =32 時間 =46ms TTL=128
192.168.AA.BB からの応答: バイト数 =32 時間 =1ms TTL=128
192.168.AA.BB からの応答: バイト数 =32 時間 =1ms TTL=128
192.168.AA.BB からの応答: バイト数 =32 時間 =1ms TTL=128

192.168.AA.BB の ping 統計:
    パケット数: 送信 = 4、受信 = 4、損失 = 0 (0% の損失)、
ラウンド トリップの概算時間 (ミリ秒):
    最小 = 1ms、最大 = 46ms、平均 = 12ms
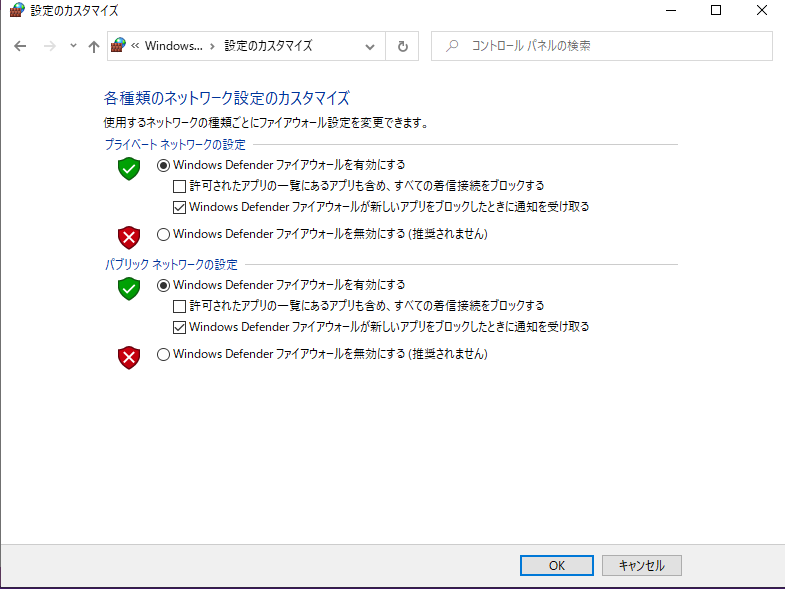
- pingが通らない場合があります。その時には、ファイアーウォールの設定を見直します。
- コントロール パネル > システムとセキュリティ > Windows Defender ファイアウォール > 設定のカスタマイズ
プログラム
― ホスト側でプログラムを作成します。
- プログラムは、「Hello World Windows ドライバー」に書かれているものと同じです。
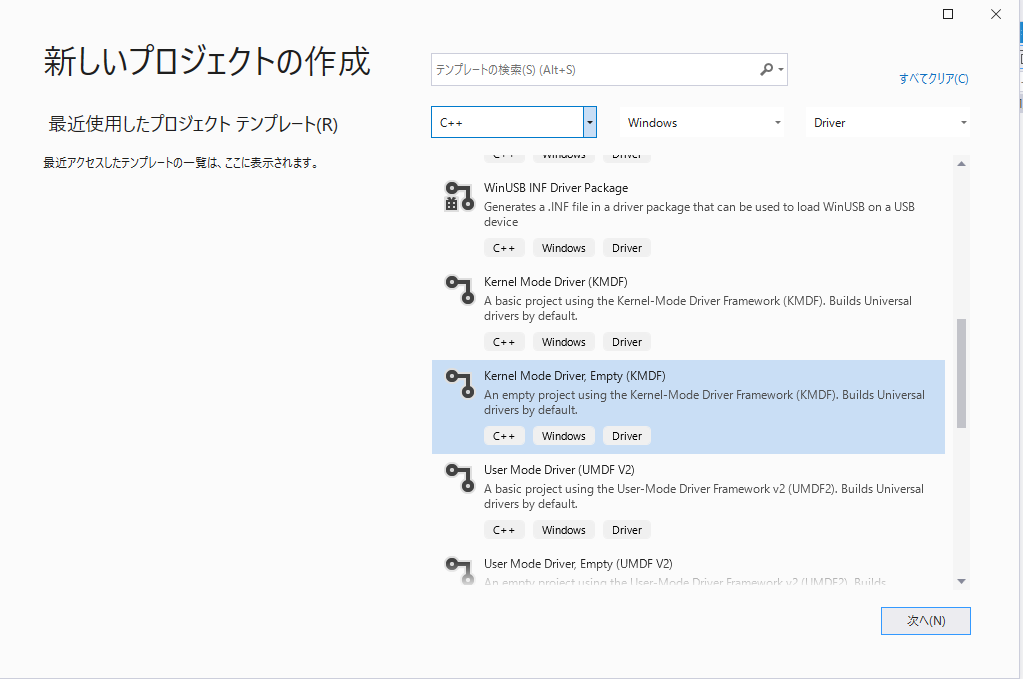
- Visual Studio 2019を立ち上げ、新しいプロジェクトの作成 > C++ > Windows > Drivers > Kernal Mode Driver,Empty(KMDF)を選びます。
- 「新しいプロジェクトを構成します」のページで「ソリューションのディレクトリを作成」のチェックボックスをオンにします。

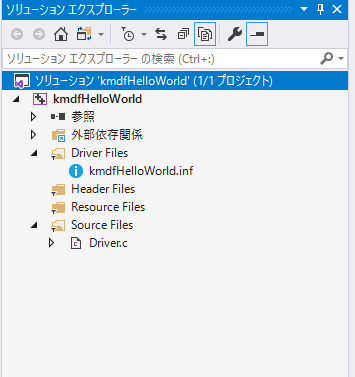
― ソリューションエクスプローラでkmdfHelloWorldを右クリックし、「新しい項目の追加 > C++ファイル」で「名前」をDriver.cなるソースファイルを作成します。ファイルの拡張子は.cです。内容は以下の通りです。
# include <ntddk.h>
# include <wdf.h>
DRIVER_INITIALIZE DriverEntry;
EVT_WDF_DRIVER_DEVICE_ADD KmdfHelloWorldEvtDeviceAdd;

NTSTATUS
DriverEntry(
    _In_ PDRIVER_OBJECT     DriverObject,
    _In_ PUNICODE_STRING    RegistryPath
)
{
    // NTSTATUS variable to record success or failure
    NTSTATUS status = STATUS_SUCCESS;

    // Allocate the driver configuration object
    WDF_DRIVER_CONFIG config;

    // Print "Hello World" for DriverEntry
    KdPrintEx((DPFLTR_IHVDRIVER_ID, DPFLTR_INFO_LEVEL, "KmdfHelloWorld: DriverEntry\n"));

    // Initialize the driver configuration object to register the
    // entry point for the EvtDeviceAdd callback, KmdfHelloWorldEvtDeviceAdd
    WDF_DRIVER_CONFIG_INIT(&config,
        KmdfHelloWorldEvtDeviceAdd
    );

    // Finally, create the driver object
    status = WdfDriverCreate(DriverObject,
        RegistryPath,
        WDF_NO_OBJECT_ATTRIBUTES,
        &config,
        WDF_NO_HANDLE
    );
    return status;
}

NTSTATUS
KmdfHelloWorldEvtDeviceAdd(
    _In_    WDFDRIVER       Driver,
    _Inout_ PWDFDEVICE_INIT DeviceInit
)
{
    // We're not using the driver object,
    // so we need to mark it as unreferenced
    UNREFERENCED_PARAMETER(Driver);

    NTSTATUS status;

    // Allocate the device object
    WDFDEVICE hDevice;

    // Print "Hello World"
    KdPrintEx((DPFLTR_IHVDRIVER_ID, DPFLTR_INFO_LEVEL, "KmdfHelloWorld: KmdfHelloWorldEvtDeviceAdd\n"));

    // Create the device object
    status = WdfDeviceCreate(&DeviceInit,
        WDF_NO_OBJECT_ATTRIBUTES,
        &hDevice
    );
    return status;
}
- ソリューションエクスプローラは以下のように構成されています。
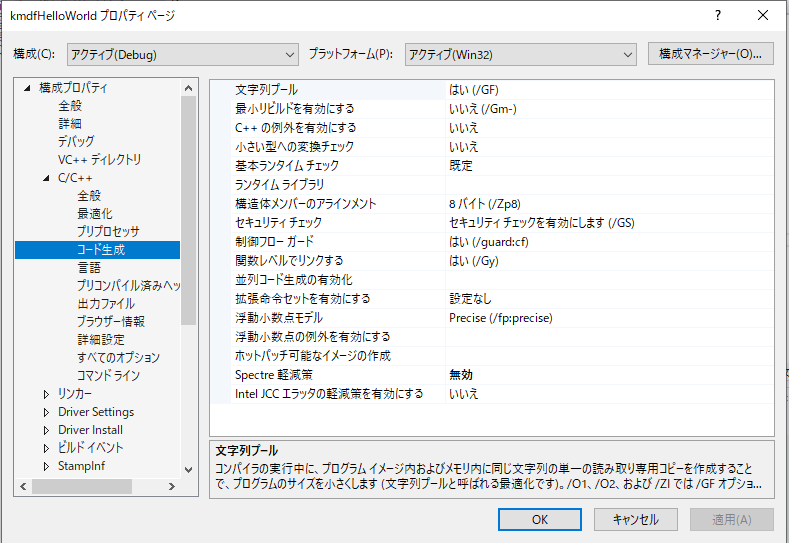
― ビルドの前にプロパティを設定します。ソリューションエクスプローラでkmdfHelloWorldを右クリックし、
― [Wpp Tracing] > [General] > [Run Wpp tracing] を”いいえ”に設定
- [C/C++] > [コード生成] > [Spectre軽減策] を”無効”に設定
- ビルドメニューからソリューションのビルドを選択します。
========== ビルド: 1 正常終了、0 失敗、0 更新不要、0 スキップ ==========
と表示が出ればOKです。Debugフォルダの、kmdfhelloworldフォルダの中に、kmdfhelloworld.cat, kmdfhelloworld.sys, kmdfhelloworld.inf の3つのファイルができています。
- 次のようなエラーが表示されることがあります。
エラー	MSB8040	Spectre 軽減のライブラリは、このプロジェクトに必要です。
使用されているツールセットとアーキテクチャについては、
Visual Studio インストーラー (個々のコンポーネント タブ) からインストールします。
- この場合には、「プロパティ > C/C++ > コード生成 > Spectre軽減策」を無効を再確認します。
デバックの準備
- ドライバーはターゲット側のマシンで動作します。ターゲットマシンへドライバを転送するための準備をします。
- ターゲット側は立ち上げたままとします。
- 転送先を設定します。「プロパティ > Driver Install > Development」
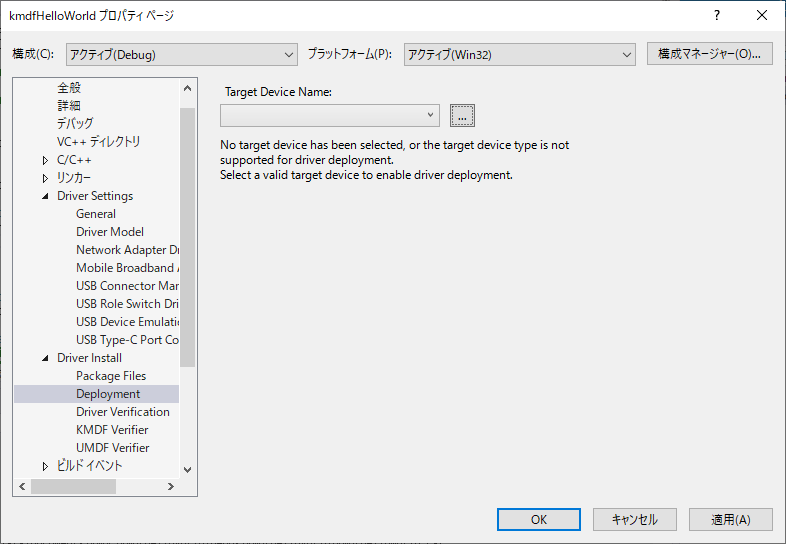
- Target Device Name の右のボタンをクリックします。
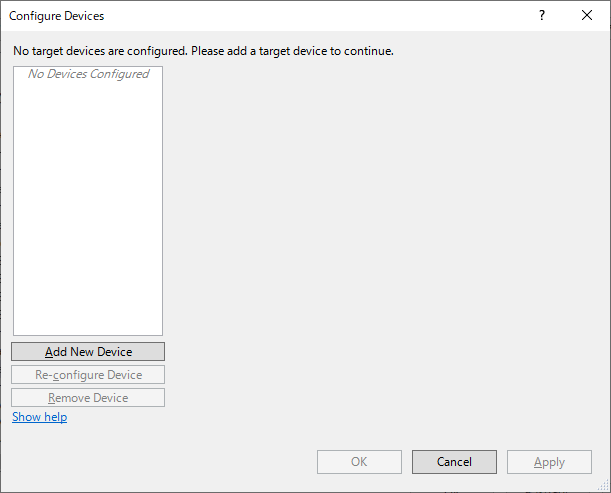
- Add New Device をクリックします。
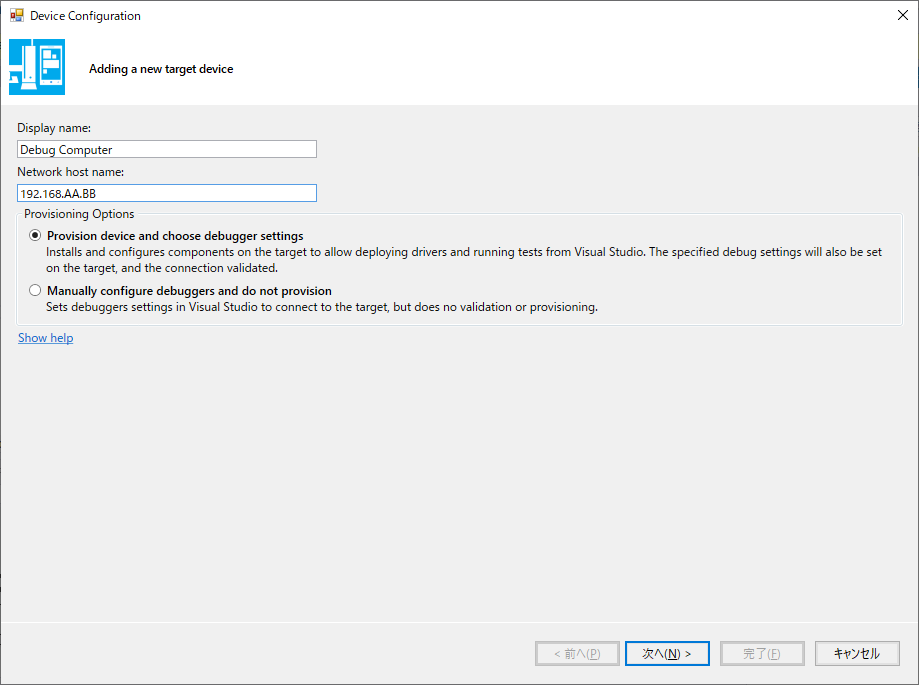
- Add New Device のWindowが開きますので、Display nameとNewwork Host nameを入力します。
- Newwork Host nameには、ターゲットマシンのIPを入れます。
- 「次へ」をクリックします。
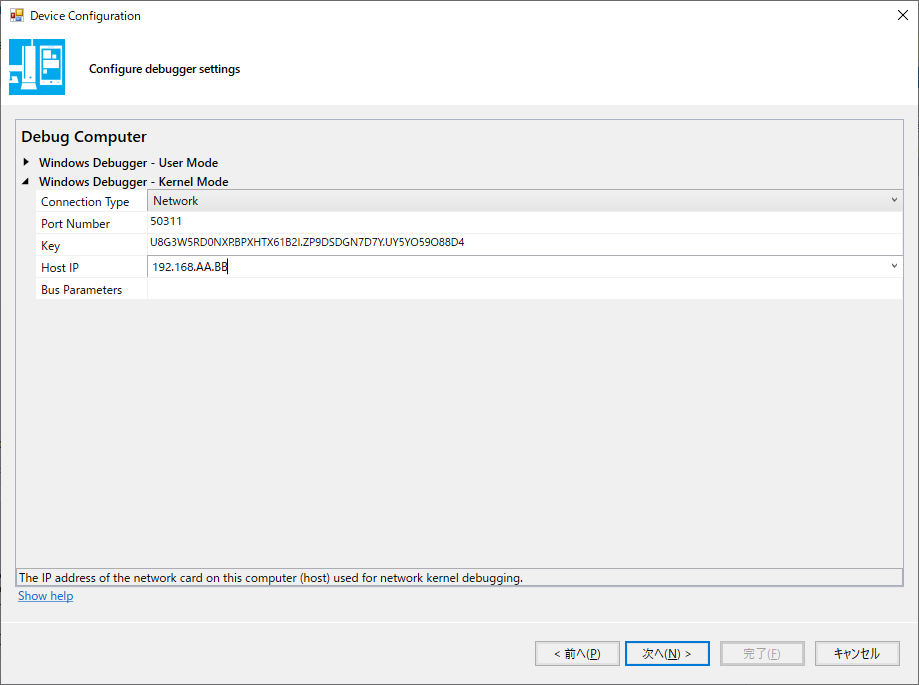
- Host IPには、ターゲットマシンのIPを入れます。
- 「次ぎ」へをクリックします。
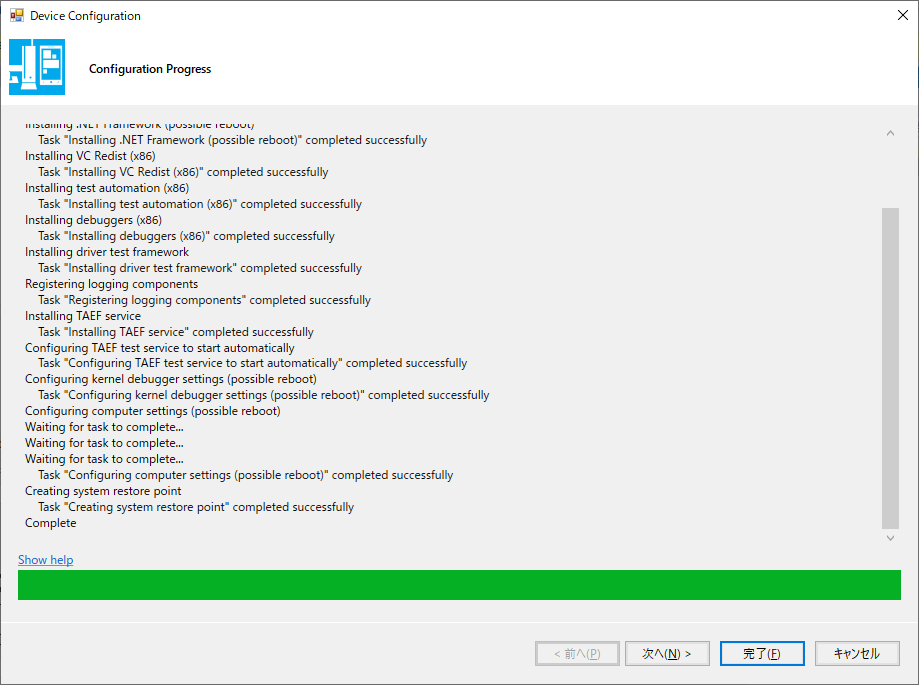
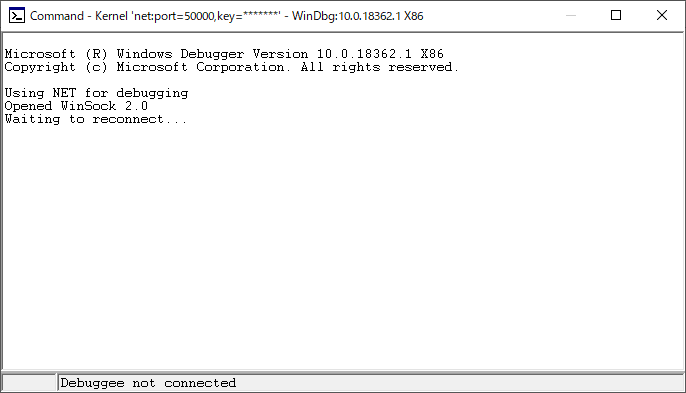
- ターゲットマシンにいろいろ表示が出て、ターゲットマシンが再起動し以下のウィンドウが表示されます。
- 完了表示が出るまでに数分かかります。
- 完了を押します。
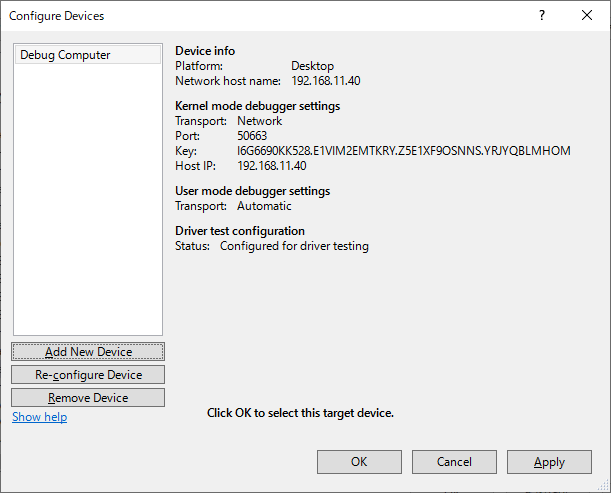
- OK を押します。
- Remove previous driver versions before development にチェックを入れます。
- Hardware ID Driver Uodate にチェックを入れます。
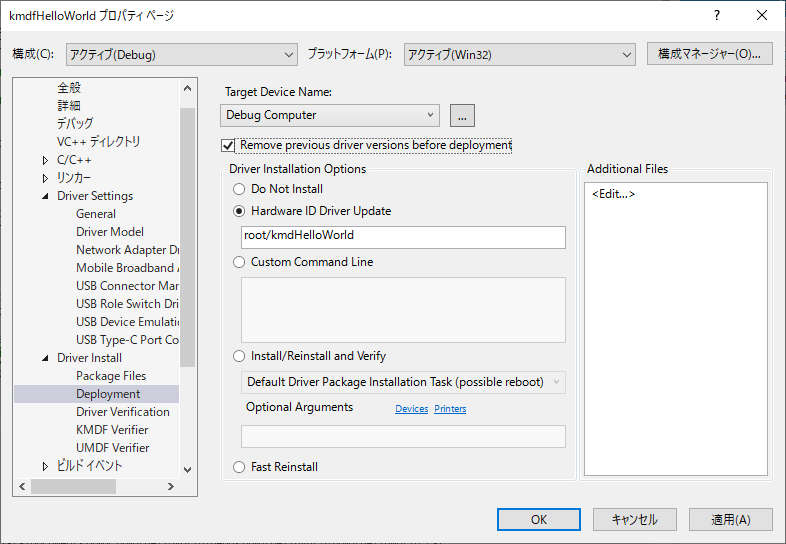
- OK を押します。
- ビルドメニューから「ソリューションの配置」を選びます。
[10:31:14:915]: Result Summary: Total=1, Passed=1, Failed=0, Blocked=0, Warned=0, Skipped=0
[10:31:14:918]: Task "Driver Post Install Actions" completed successfully
Driver Deployment Task Failed: Driver Removal
Driver Deployment Task Failed: Driver Preparation
- と出力に表示されます。Faildが2つ表示されていますが、無視します。
- ターゲットマシンの c:\DriverTest\Drivers の下に kmdfHelloWorld.sys, kmdfHelloWorld.inf, kmdfHelloWorld.sys.cer, kmdfHelloWorld.cat の4つのファイルが転送されています。
デバック
- まず、ターゲット側でコマンドを入力します。
- コマンドプロンプトを「管理者として実行します」
> bcdedit /debug on
この操作を正しく終了しました。
> bcdedit /dbgsettings NET HOSTIP:192.168.XX.YY PORT:50000 KEY:1.2.3.4
key=1.2.3.4
-
HOSTIPはホストマシンのIPアドレスです。PORTとKEYはこのままで良いです。
-
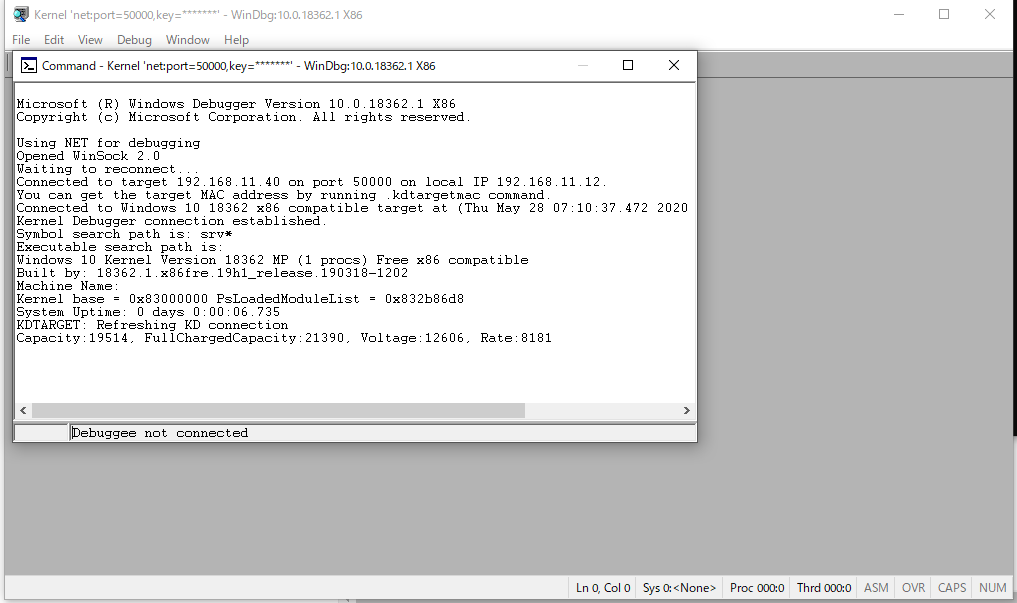
ホスト側で、コマンドプロンプトを開き次のコマンドを入力します。
>windbg -k net:port=50000,key=1.2.3.4
- waiting reconnet と表示され待ち状態になります。
- ターゲットマシンを再起動します。
- デバッガ―に次のように表示されます。
- debugメニューからbreakします。
- ターゲットマシンがブレイクで止まります。(ターゲットマシンは直接には操作できなくなります)
*******************************************************************************
*                                                                             *
*   You are seeing this message because you pressed either                    *
*       CTRL+C (if you run console kernel debugger) or,                       *
*       CTRL+BREAK (if you run GUI kernel debugger),                          *
*   on your debugger machine's keyboard.                                      *
*                                                                             *
*                   THIS IS NOT A BUG OR A SYSTEM CRASH                       *
*                                                                             *
* If you did not intend to break into the debugger, press the "g" key, then   *
* press the "Enter" key now.  This message might immediately reappear.  If it *
* does, press "g" and "Enter" again.                                          *
*                                                                             *
*******************************************************************************
nt!RtlpBreakWithStatusInstruction:
83168fa4 cc              int     3
- 下の kdにコマンドを入力することができます。

- kmdfHelloWorld ドライバからのデバックプリントを表示できるようにマスクの設定をします。
- その後、g コマンドでターゲット側をrun状態に戻します。
kd> ed kd_IHVDRIVER_Mask 0xFFFF
kd > g
- ターゲット側でコマンドプロンプトを「管理者として実行します」。
- ドライバーをインストールします。
- root/ は半角バックスラッシュでなければなりません。
> cd c:\DriverTest\Drivers
> C:\DriverTest\Drivers>devcon install kmdfhelloworld.inf root/kmdHelloWorld
Device node created. Install is complete when drivers are installed...
Updating drivers for root/kmdHelloWorld from C:\DriverTest\Drivers\kmdfhelloworld.inf.
Drivers installed successfully.
- ホスト側のデバッカで、kmdfHelloWorld ドライバからのデバック出力の表示を見ることができます。
KmdfHelloWorld: KmdfHelloWorldEvtDeviceAdd
KmdfHelloWorld: KmdfHelloWorldEvtDeviceAdd
KmdfHelloWorld: KmdfHelloWorldEvtDeviceAdd
- 再びbreak の後、lm コマンド、x コマンドでターゲット側のドライバの状況を見ることができます。
0: kd> lm
start    end        module name
77e40000 77fd9000   ntdll      (pdb symbols)          C:\ProgramData\dbg\sym\ntdll.pdb\428AA04B59155EA5C79465CF1806F3A71\ntdll.pdb
82f95000 83000000   hal        (deferred)
83000000 83755000   nt         (pdb symbols)          C:\ProgramData\dbg\sym\ntkrpamp.pdb\7E8A99EEA98E25629FF1839EA8411A171\ntkrpamp.pdb
86400000 8644a000   kd_02_10ec   (deferred)
8644a000 8648d000   kdcom      (deferred)
...
944d0000 944e0000   bam        (deferred)
944e0000 9451c000   ahcache    (deferred)
94520000 9452d000   CompositeBus   (deferred)
94530000 94536000   kmdfHelloWorld   (private pdb symbols)  C:\ProgramData\dbg\sym\kmdfHelloWorld.pdb\527655F6163C4ED0A6BEE2B09C179BE92\kmdfHelloWorld.pdb
94540000 9454a000   kdnic      (pdb symbols)          C:\ProgramData\dbg\sym\kdnic.pdb\27EBA0B22C6C63C3F86D707CB500ACFD1\kdnic.pdb
94550000 94561000   umbus      (deferred)
94570000 9457f000   CAD        (deferred)
94580000 945ad000   intelppm   (deferred)
945b0000 945c2000   monitor    (deferred```
0: kd> x kmdfHelloWorld!
94533264          kmdfHelloWorld!WdfDriverGlobals = 0x9238cdc0
94533268          kmdfHelloWorld!WdfDriverStubDriverObject = 0x8e6e5058 Driver "\Driver\kmdfHelloWorld"
94533024          kmdfHelloWorld!__security_cookie_complement = 0x6c34a475
9453326c          kmdfHelloWorld!WdfDriverStubDisplacedDriverUnload = 0x86a84498
94533000          kmdfHelloWorld!WdfBindInfo = struct _WDF_BIND_INFO
- ターゲット側のマシンは
/dbgedit /debug off
の後再起動することでテストモードを抜けることができます。