tl;dr
-
Alignを使うと大体いい感じになる -
Alignがなぜか適用されないとき-
ColumnならColumnをIntrinsicWidthで囲む -
RowならRowをIntrinsicHeightで囲む
-
これはなに
flutterで画面を作るときによく使うウィジェット、Column, RowのプロパティにcrossAxisAlignmentというのがありますね
楽にchildrenの位置を指定できるのですが、たまに「子要素一個一個に対して別々に寄せる方向を指定したい」みたいな場合もあります。
これを解消するときの方法とハマりポイントを説明します。
Alignを使おう
このような場合、以下のような感じで書くと実現できます。
...
Row(
          children: [
            Align(
              alignment: Alignment.topCenter,
              child: Container(
                width: 50,
                height: 50,
                color: Colors.amber,
                child: const Text('1'),
              ),
            ),
            Expanded(
              child: Container(
                height: double.infinity,
                color: Colors.blue,
                child: const Center(
                  child: Text('2'),
                ),
              ),
            ),
            Align(
              alignment: Alignment.bottomCenter,
              child: Container(
                width: 50,
                height: 50,
                color: Colors.amber,
                child: const Text('3'),
              ),
            ),
          ],
        )
...
まあ書いてあるのをそのままって感じですが、1と3のContainerをAlignで囲んでalignmentを指定するだけですね。
非常にシンプルです。
おや、Rowの様子が‥
さて、Alignの使い方を覚えたあなたのもとにデザイナーさんがやってきてこう言います
「次こんな感じで作って欲しいんですけど~」
「あ、2番の箱の高さは固定で300でお願いします!」
「了解です!すぐ終わりますよ~」(Rowを画面の上に寄せたいからColumnでRowを囲って、あとはRowの子要素をAlignで囲むだけでしょ そーれ)
...
        Column(
          children: [
            Row(
              children: [
                Align(
                  alignment: Alignment.topCenter,
                  child: Container(
                    width: 50,
                    height: 50,
                    color: Colors.amber,
                    child: const Text('1'),
                  ),
                ),
                Expanded(
                  child: Container(
                    height: 300,
                    color: Colors.blue,
                    child: const Center(
                      child: Text('2'),
                    ),
                  ),
                ),
                Align(
                  alignment: Alignment.bottomCenter,
                  child: Container(
                    width: 50,
                    height: 50,
                    color: Colors.amber,
                    child: const Text('3'),
                  ),
                ),
              ],
            )
          ],
        ),
...
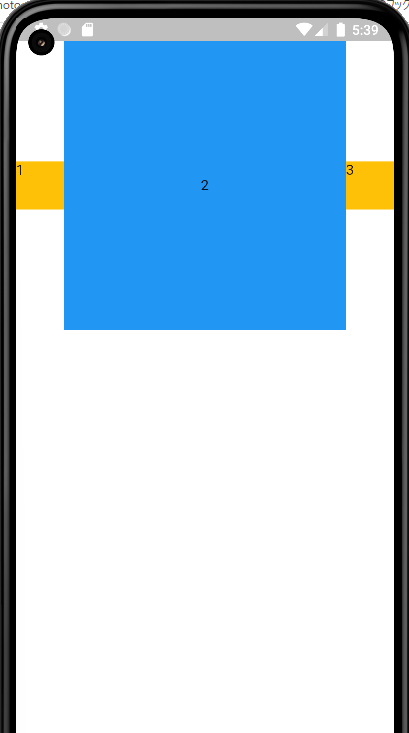
「...あれ、なんでAlign効かないのこれ」
と、こういう場面ではAlignを使ってもいい感じになりません。
Intrinsic〇〇を使おう
Alignがうまくいかないのは、Flutterの描画の仕組み的に仕方ないからです。
Flutterでは画面レイアウトを計算する際、親要素が子要素に、子要素が取れる最大・最小のサイズを渡します。すると、子要素は自身のサイズを計算し、その結果を親に返します。
これを再帰的に繰り返していくことでレイアウトを作成していきます。
このような手法を採用しているお陰で計算量は少なく済むようですが、代わりに制約も大きくなってしまっているらしいです。
上で紹介したようなシチュエーションでAlignがうまくいかないのもこれが原因らしいです。
このようなときに使えるのがIntrinsicHeight、IntrinsicWidthというウィジェットになります。
言語能力がないのでうまく説明できませんが、これを使えばいい感じになります。やったね。
ということで、IntrinsicHeightを使って修正したプログラムが以下になります。
...
        Column(
          children: [
            IntrinsicHeight(
              child: Row(
                children: [
                  Align(
                    alignment: Alignment.topCenter,
                    child: Container(
                      width: 50,
                      height: 50,
                      color: Colors.amber,
                      child: const Text('1'),
                    ),
                  ),
                  Expanded(
                    child: Container(
                      height: 300,
                      color: Colors.blue,
                      child: const Center(
                        child: Text('2'),
                      ),
                    ),
                  ),
                  Align(
                    alignment: Alignment.bottomCenter,
                    child: Container(
                      width: 50,
                      height: 50,
                      color: Colors.amber,
                      child: const Text('3'),
                    ),
                  ),
                ],
              ),
            )
          ],
        ),
...
実際に動かしてみるとこんな感じ、ちゃんとデザイン通りになっていますね

まとめ
Flutterの画面描画の仕組みめんどくさいね


