インフラをデプロイする前に、Terraform のスクリプトをテストしたいという要望があり、Workspaceを検討することになったので、試してみた。
Workspaceとは
Workspaceは、1つのバックエンドをもった1つのコンフィグファイルの複数のインスタンスを管理するためのものである。具体的には、ワークスペースを指定すると、複数のstateファイルを管理できるようになる。
ドキュメントを読むと、典型的な用途は、インフラのスクリプトを本番に適用する前に、実際デプロイしてテストしたいという用途のようだ。今回の目的に適している。
Getting Started
Terraform script
簡単なTerraforma のスクリプトを用意する。今回のスクリプトは Azure 向けに作成しているが、一番簡単ですぐに作成、削除できるリソースを指定するといいだろう。
terraform.tf
provider "azurerm" {
  version = "=1.39.0"
}

resource "azurerm_resource_group" "test" {
  name     = "testResourceGroup1"
  location = "West US"

  tags = {
    environment = "${terraform.workspace} branch"
  }
}
Workspace を追加する
$ terraform workspace new test
こんなオプションがある模様。
$ terraform workspace new --help
Usage: terraform workspace new [OPTIONS] NAME [DIR]

  Create a new Terraform workspace.


Options:

    -lock=true          Lock the state file when locking is supported.

    -lock-timeout=0s    Duration to retry a state lock.

    -state=path    Copy an existing state file into the new workspace.
list コマンドでワークスペースがdefault から切り替わったのがわかる。default は従来のと同じでカレントディレクトリにstateファイルが作られる。
$ terraform workspace list
  default
* test
Apply の実施
terraform apply を実施してみると、terraform.tfstate.d というディレクトリが出来てその中に作成したworkspaceのディレクトリが出来ているのがわかる。
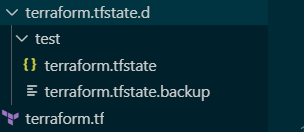
また、${terraform.workspace} が現在のワークスペース名に置き換えられていることも確認できる。
$ terraform apply

An execution plan has been generated and is shown below.
Resource actions are indicated with the following symbols:
  + create

Terraform will perform the following actions:

  # azurerm_resource_group.test will be created
  + resource "azurerm_resource_group" "test" {
      + id       = (known after apply)
      + location = "westus"
      + name     = "testResourceGroup1"
      + tags     = {
          + "environment" = "test branch"
        }
    }
backend を指定した時の振る舞い
Terraform では state を保存するバックエンドを指定できる。バックエンドを指定した時にどのように workspaceはワークするだろうか?
下記の例は Azure のバックエンド (Storage Account) だが、他にも様々なバックエンドが指定できる。Standard Backends
backend を使うように tf ファイルを更新する。
provider "azurerm" {
  version = "=1.39.0"
}
terraform {
    backend "azurerm" {
        resource_group_name = "RemoveTerraform"
        storage_account_name = "tsushistatetf"
        container_name = "tfstate"
        key = "terraform.tfstate"
    }
}
resource "azurerm_resource_group" "test" {
  name     = "testResourceGroup1-${terraform.workspace}"
  location = "West US"

  tags = {
    environment = "${terraform.workspace} branch"
  }
}
このコンフィグの場合、事前にRemoveTerraform という名前のリソースグループの中にtsushistatetf という名前のStorage Account を作成しておく必要がある。また、Storage Accountには、事前にtfstate という名前のコンテナを作成しておく必要がある。
key で指定している内容は、バックエンドに格納されるときのオブジェクト名だ。今回は同じterraform.tfstateにしてみた。
ちなみに、バックエンドを指定すると、terraform init をやり直す必要が生じる。既に、tfstateファイルがある場合は、マイグレーションしてくれるらしいが、今回は無かったのでマイグレーションは発生しなかった。
$ terraform init
Workspace の作成
さて、2つのワークスペースを作成して、apply してみよう。
$ terraform workspace new test
$ terraform apply
$ terraform workspace new pr-branch-one
$ terraform apply
Storage Account 上の stateファイルはどのように格納されているだろうか?
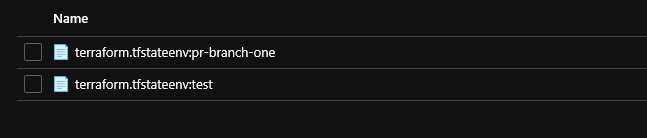
単純に、Workspaceがenv:workspace_name の形式でポストフィックスが追加されている。これは、Azure プロバイダの仕様だと思うが、他のバックエンドconsul や s3、etcd だとおそらく振る舞いが違うのだろう。
次のステップ
多分自分はStateの理解が浅いので、Stateの章を読んでみたい。