今日は一日今まで学んでいた Angular の仕事が振られたので、画面デザイン系で格闘してみたので、いくつかの Tips を整理しておく。
複数の Image Upload の実装
Image をアップロードするというのは、Web でも基本的なシナリオだが、Angular 4 + Material Design でもいくつかの実装方法がある。
最初は
を使おうとして、実は実装までしたのだが、最終的に、どうもデザインがかっこよくないため、結局断念した。他にもいくつかのソリューションが存在する。
は結構かっこいい。プログレスバーも付いている。しかし、ちょい複雑。
これなんか超かっこいい。ドラック&ドロップでインタラクティブで美しい。でも、JQueryの実装になっているのでううむ。となった。他にも、大抵完成度の高いものは、Angular 1.x 用だったりした。大変困ったのだが、結局なんのプラグインも使わず実装することにした。
Image Upload の実装

最終的にカードを使ったシンプルなものにしてみた。しかし、実を言うと、Angular4 + Material Design (Angular Material) は、Input のtype="file" つまりアップロードのインプットに対応していない。普通にやるとだっさださになる。
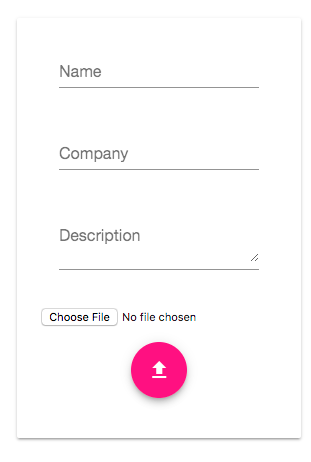
ううむ。これはかっこ悪すぎる。せっかく他はマテリアルデザインに対応しているのに、、、どうしたら上のようになるかと言うと、次のようにする。ラベルをつけて、そっちの方に、マテリアルデザインのスタイルシートのクラスを当ててしまう作戦。input 自体はHidden にしてしまう。
<input hidden="true" id="input-file-id" type="file" accept="image/*" (change)="upload(fl.files)"/>
<label for="input-file-id" class="mat-raised-button mat-basic">Choose image</label>
これは、下記の記事を参考に、Angular Material 用に書き直したもの。考え方は同じ。
画面遷移で苦しむ
他に、低レベルな問題としては、最初、Routing をしているのに、画面が切り替わらない問題があった。マニュアルをみて
app-routing.modules.ts
import { NgModule }     from '@angular/core';
import { RouterModule, Routes } from '@angular/router';

import { DashboardComponent } from './dashboard.component';
import { CarDetailComponent } from './car-detail.component';

const routes: Routes = [
    { path: '', redirectTo: '/dashboard', pathMatch: 'full' },
    { path: 'dashboard', component: DashboardComponent },
    { path: 'detail', component: CarDetailComponent }
];

@NgModule({
    imports: [ RouterModule.forRoot(routes)],
    exports: [ RouterModule]
})
export class AppRoutingModule {}
app.module.ts
import { BrowserModule } from '@angular/platform-browser';
import { NgModule } from '@angular/core';

import { FormsModule } from '@angular/forms';
import { HttpModule } from '@angular/http';
import { MaterialModule } from './material.module';
import { BrowserAnimationsModule } from '@angular/platform-browser/animations';

import { ImageUploadModule } from 'angular2-image-upload';

import { AppComponent } from './app.component';

import { AppRoutingModule } from './app-routing.module';
import { CarDetailComponent } from './car-detail.component';
import { DashboardComponent } from './dashboard.component';

@NgModule({
  declarations: [
    AppComponent,
    CarDetailComponent,
    DashboardComponent
  ],
  imports: [
    BrowserModule,
    FormsModule,
    HttpModule,
    MaterialModule,
    BrowserAnimationsModule,
    AppRoutingModule,
    ImageUploadModule.forRoot(),
  ],
  providers: [],
  bootstrap: [AppComponent]
})
export class AppModule { }
とマニュアルにしたがっているのに、例えば下記のように書いてみると、gotoDetail() イベントが発生すると、ちゃんとURLは切り替わるのだが、画面は切り替わらず、悩んだ。
export class AppComponent {
  title = 'Car Reviews';
  constructor(private router: Router) {}

    gotoDetail(): void {
      this.router.navigate(['/detail']);
    }
}
結論としては、ちゃんとマニュアル読めや!と言う話だった。
<router-outlet></router-outlet> のタグの部分が、画面遷移による切り替え部分になる。当初は
app-routing.module.ts
app.component.html
app.component.ts
app.mdoule.ts
some-detail.component.html
some-detail.component.ts
material.module.ts
2画面アプリなので、app.component と合わせて2セットしか作らなかったが、これではダメだった。app.component には各画面で共通する処理を書いた方が良さげ。 今は、画面定義はヘッダーとフッターのみにして、` タグのみにしている。
app.component.html
<md-toolbar color="primary">
  <md-icon class="example-icon">collections</md-icon>
  <span>{{title}}</span>
  <span class="example-spacer"></span>
  <md-icon class="example-icon">home</md-icon>
</md-toolbar>

<router-outlet></router-outlet>

<md-toolbar color="light" role="aria-labelledby" class="footer">
    <span class="example-spacer"></span>
    <span><font size="3">Serverless!</font></span>
    <md-icon class="example-icon">flash_on</md-icon>
  </md-toolbar>
最終的なファイル構成はこんな感じ。基本的に1画面につき、ワンセットの、.ts と .html が必要
app-routing.module.ts
app.component.html
app.component.ts
app.mdoule.ts
some-detail.component.html
some-detail.component.ts
dashboard.component.html
dashboard.component.ts
material.module.ts
フッターを下部に配置する
これは、単純に CSS にクラスを追加して、先の、フッターのところに、class を追加した。大きさを調整してこんな感じ。文字のサイズは、<font size="3"> とかで調整している。
  .footer {
    position: fixed;
    bottom: 0;
    width: 100%;
    height: 20px;
  }
アイコンをつける
アイコンは簡単。
から、該当するアイコンを探して、次のようにするだけ。md-icon でくくってあげると良い。ちなみに、スペースが名前に含まれているアイコンは、_ で接続すると良い。
<button md-fab color="accent"><md-icon class="example-icon">file_upload</md-icon></button>
Angular Image upload のエラー
最初は、実は、Angular Image upload をつか追おうとして、こんなコードをサンプルを元に書いて
<image-upload
                        url="https://httpbin.org/status/200"
                        buttonCaption="PRESS ME AAAAAAAAAH"
                        dropBoxMessage="DROP ON ME AAAAAAAAAH"
                        clearButtonCaption="CLEAR ME AAAAAAAAAH"
                        [uploadedFiles]="images">
                      </image-upload>
こんなエラーをゲット。いつもながらJS のエラーは一見意味がわからない。
ERROR TypeError: Cannot read property 'length' of undefined
結論としては、最後のものを外せば良い。
<image-upload
                        url="https://httpbin.org/status/200"
                        buttonCaption="PRESS ME AAAAAAAAAH"
                        dropBoxMessage="DROP ON ME AAAAAAAAAH"
                        clearButtonCaption="CLEAR ME AAAAAAAAAH">
                      </image-upload>
出るには出るが、ダサい、、、w

まとめ
今日つまづいたところ、学んだことをメモとして書いておいた。Angular2 そして Material Desgin初めてなので、色々勘違いしているかもしれない。その時は、ぜひご指摘ください。
Resource
- Angular Example
- http://httpbin.org/status/200 <- こんなのあるのね。便利
- Material Deign - introduction をちゃんと読む方がいいのかな。